1800-how's-my-TIGing?

madact

100 W
Joined
Jun 20, 2010
Messages
131
Location
Adelaide, South Australia
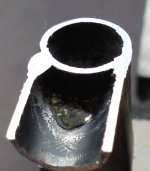
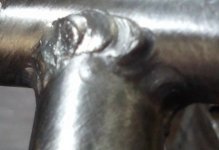
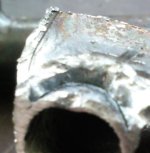
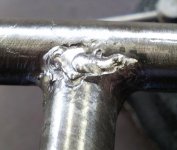
Just did a test tigging of a couple of pieces of tube. Semi-destructive testing shows it to be plenty strong, and penetration was OK, but I did get a bit of burn-through and warping, and it's a bit bodgy looking, I was wondering if anyone had some advice on technique (apart from not rushing, this was somewhat rushed...) - welder settings, procedure etc. etc.

In particular, do I have the polarity the right way around for this work piece & electrode (I've read about arc shape and heat / penetration being affected, but don't have the experience to know exactly how that applies here), and should I be using pulsed DC (if so, what settings should I try)...

Setup:
- T-joint, 12.7mm x 0.8mm tube (1/2" tube, 1/32" wall) galvanisation stripped with hydrochloric
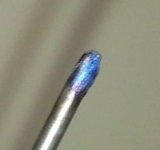
- Electrode: 1.2mm lanthanated tungsten - point could have been finer :?
- Filler wire: 1.6mm ER70S6
- Shielding: Argon, 10 l / min, gas lens (#6 tip)
- Electrode negative / work piece positive
- 35A DC (not pulsed)
- Welded in four sections (edge, edge, side, side)

Photos:
View attachment 2
2.jpeg
3.jpeg
 
No offense, but keep practicing :mrgreen: Not a bad start though.

I should mention, and that is get a better lens I think. Usually the minimum shade is #10. If your eyes are hurting thats a good sign, and if they aren't you might want an eye exam! Electrode positive I think is right for GTAW, and is right for most solid-wire applications. Keep your electrode pointed (taper length I think is about 3-4 times the electrode thickness)...and try to keep it out of the weld puddle. If you get it soiled with molten steel stop and clean it off with the bench grinder. You'll save yourself a lot of frustration by not welding with a nasty glob on the end. It will take time to get the technique down, but the best piece of advice I can offer on that is get your welder settings right first (by doing some test beads on flat material of the right thickness) and find something to rest your arms on while making the weld. The steadier you are the better your bead.

Also I see "undercut" in your welds which is never good: that's where cracks start. I'm talking about the spots where it looks like there wasn't enough "fill" put in.

Good luck with practicing! Hope to see more examples...it's cool to see someone learning TIG
 
dequinox said:
No offense, but keep practicing :mrgreen: Not a bad start though.

Yeah, I know... this was done 'free hand' (i.e. work piece in a vice, me standing up, not resting hands on anything) in 30 min of my lunch break (including setting up the welder and packing it all away), I'll see how I go with a bit more time :mrgreen:. Also, I'll admit I did dip the tungsten early on, let it cool and broke the end off it... not exactly your 'needle-point' there :? I'll definitely fix that up for my next attempt. Don't have a bench grinder, so I'm using a dremel with a diamond wheel to sharpen tungsten.

tungsten.jpeg

dequinox said:
I should mention, and that is get a better lens I think. Usually the minimum shade is #10. If your eyes are hurting thats a good sign, and if they aren't you might want an eye exam!

Ah... the #6 was the tip size on the gas lens, my welding mask is auto-darkening, set to about #10 shade (though the auto-darkening doesn't seem to always trigger perfectly at low welding amperages :( - no after-images or eye pain though)

dequinox said:
Also I see "undercut" in your welds which is never good: that's where cracks start. I'm talking about the spots where it looks like there wasn't enough "fill" put in.

Thanks for the tip... I need to get my welding to the point where I can trust my wheels to not fall off at 100kph (this is an e-velomobile I'm building), so any advice is appreciated.

I think just giving myself more time (and wrist support) will improve the quality a great deal.

Any advice on trying pulsed DC? With the settings I had, takes a while to form a weld pool, then burns through pretty easily, would pulsed help this?
 
Pulse is handy, but you have to time the dipping of your filler material in with it. Do you have a "scratch-n-go" setup or a foot pedal to control the start and stop of the arc?
 
First thing is the tungst. Tip needs to be perfect or you will NEVER get a decent looking weld. Second add more rod on each dip. Third if you accidentally dip the torch, you MUST re grind it properly before continuing. Forget the pulse until you can do it right, that is for experienced welders and wont help you learn properly. Just get used to the torch control and filling and you will get it! TIG isALL about practice and being steady, any shake in your hands will show up in the weld. I have 100's of hours. With the TIG, trust me.
 
Yeah, played with pulse today, results varied somewhat (it only goes to 25Hz, I tried the 1s on / 1s off 'learner' pulse and 25Hz 30% 60A/20A, which did seem to help keep the bead manageable - but not sure if this was just extra practice helping)... think I might take your advice though Whip, and stay with the steady DC for now.

I have HF start and a foot pedal, but I haven't used the foot pedal yet - just getting used to holding & moving the TIG torch at the right arc length, first. I'll give the foot pedal a go tomorrow (weather permitting). I've previously welded 40mm / 3mm angle, which was a breeze, but this thin stuff is trickier - high enough current to get a weld pool going quickly and I blow holes, but little enough not to blow holes and it heats the whole piece before I get a weld pool, I think the pedal will help there...

Also ground up four spare tungstens for tomorrow, to swap quickly - I dipped the tungsten today and really noticed the difference, even without breaking the point off.

One other thing with welding this thin tube, is rotating the torch to get the tip pointed in the right direction... had real trouble maintaining arc length and rotating the torch (also partially due to the stiffness of the hose) - easy to keep the arc length constant when keeping the torch straight, but then I ended up at the end of each weld with the point of the tungsten pretty much tangential to the tube, which can't be a good thing, or welds ~5mm (~1/4 inch) long...
 
Yeah, its all in the wrist LOL! But seriously, the pedal is a NECESSITY, its almost impossible to TIG without it unless you are doing heavy wall items that the heat does not matter as much. With the pedal, just watch the puddle as you are moving along and look for a nice tight bead. The pedal adding or subtracting current will vary the size of the puddle, and with TIG you want a nice tight bead, not a big heavy one like with MIG. I will look around at my pics and see if I can find some of mine in thin wall steel, but you should end up with something that looks like a fillet radius on a machined part. It should be about 1/8" most of the time, if you fit the parts properly. Also, make sure you fit the tubes REALLY well, that is another thing with TIG that you may not know, the tubes HAVE to be fit REALLY nicely, with NO gaps AT ALL around the circumference for a clean and STRONG weld. You can not use the torch to fill gaps and have it look nice. Go to the off road forums like http://www.dezertrangers.com and others to look at how the professionals fit tube and you will see what I mean....
 
Whiplash said:
It should be about 1/8" most of the time, if you fit the parts properly.

Hmmm, the better beads I was laying today would have been in the 1/8" to 3/16" range... I'll see if I do any better with the pedal

Whiplash said:
Also, make sure you fit the tubes REALLY well, that is another thing with TIG that you may not know, the tubes HAVE to be fit REALLY nicely, with NO gaps AT ALL around the circumference for a clean and STRONG weld.

Yeah, I read that online today... after I did some welding. My practice pieces weren't fitted all that well, would have had gaps up in the 1/32 to 3/32 range, which made not melting the edges controllable only by adding filler to cool em off and close em up :? not good. Still, the frames I built back at high-school were all brazed, and I got them joints watertight (as in, I filled the 'stem' tube of a T-joint with water one time, and it didn't come out the gap), so I'm sure I can pick up the knack again - or more to the point, put in the effort :lol:, I'll see how I go tomorrow. For now, I'll apply the other key to good workmanship, a good night's sleep :mrgreen:
 
Don't weld on galvanized, it lets off toxic fumes and contaminates the weld. At least grind it off to 6cm away from the weld. Thats my tip for the day.
 
X2 on that for sure, also be VERY careful not to clen the area with anything but alcohol, if you use brake clean or other "cleaner" sprays, you run the risk of KILLING yourself!!! Some of the "cleaner" sprays contain a chemical that when heated quickly forms LITERALLY, EXTREMELY Poisonous Gas!!

ANYONE WELDING ANYTHING SHOULD READ THIS!!

http://www.brewracingframes.com/id75.htm
 
That's one thing I do know enough to avoid! I'm certainly not using anything like that on it, but alcohol isn't the only safe way to get a clean surface...

I'm removing the galvanisation with hydrochloric acid (1:4 dilution of 300g/L), outdoors in a well ventilated area, rinsing, and drying (I was thinking of using weak caustic to neutralize any remaining acid, but I just read http://www.dow.com/causticsoda/safety/weld.htm, which notes "Caustic soda solution residue must be cleaned from the metal before a suitable weld can be made. If residual caustic soda is not removed, cracks will propagate as the weld is made. Catastrophic failure of the metal may occur during welding if the area is not properly cleaned prior to welding." :shock:, so I won't be risking it...). I'm not using distilled water :lol:, but after that treatment, there won't be much of anything on the surface but steel.

:!: A note to anyone reading this - always wear, at a minimum, apron, protective gloves and chemical-splash rated eye protection when diluting acids or bases, when using them, and when handling the workpiece. Work in a well-ventilated area or a fume cupboard, and avoid breathing any fumes! Always add acid to water, never water to acid! :!:
 
Well, here's my efforts from this arvo:


Looking a lot better, I think, but I still get this feeling you're going to say it's not up to scratch yet :wink:

The pedal and better fit-up helps a lot, no burn-through problems today. I did notice I'm burning the point off the tungsten when the current hits around 40A, I might try grinding them at a fatter angle.

I've also concluded that my work bench, while at a good height for general cutting, hammering, measuring and laying out, it way to low for comfortable TIG welding :(
 
If the tungsten is balling up, I would go the next size up on the tungsten. That is usually an indication its too thin unless you are doing aluminum. You need it to hold the point to get a good clean tight weld. Also I would try to get into more of a rhythm with the dipping of the rod.. Otherwise looking MUCH better!
 
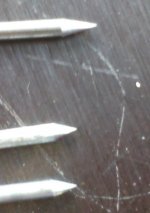
Fair enough, I've ordered some 2.4mm (this was using 1.6mm), I'll probably need some eventually anyway. In the mean time, I'm trying the fatter angle anyway (top is what I was using, bottom is what I'm trying out):
Tungsten.jpeg

... and initial results are promising - much tighter arc / smaller weld pool, and tip is staying quite sharp...
 
Yes, the lower is more of what you should use, that should be good for the tubing you are welding. I think a lot of people think you can TIG as fast as MIG, so I say to you, use a slower feed but less total heat, you should only be able to see the heat "rainbow" if you will, about 1/2" away from the bead, any more than that and you are trying to go too fast with too much heat. that will help you get that "stack of dimes" you are looking for. Rule of thum, if your dip pattern is consistent and you cant see the "dimes" then you are using too much heat to make the weld. Try slowing down and using less pedal. Otherwise it sounds like you are on the right track!
 
My .02 cents, Practice, practice, etc. I tig welded for more than 20 years, mostly s.s. tube for air flow, and vacuum systems, the last cert's I passed made me qualified to weld parts for a nuclear submarine, on tubing I would flow argon through the insides of the tubing so that the weld area's inside were smooth and not discolored. One has to get the current set right for the material thickness, speed of welding, do to the slow down of the dipping of filler rod. The machine I used was a old Lincoln with a foot control, nothing fancy- ac/dc +/-, with hf start. 1970~?

Also used thoreated (sp) tungsten (higher current rateing) on steel, and s. steel, I ground the tungsten point on a belt sander with the point, mostly pointed (10-20deg.~off from vert.) up close to the rotating support wheel, so that the most cross sectional area was close to the point (not like pointing a pencil). When welding hold the tungsten close to the joint, heating a narrow width (it has the "right sound"- foot control, as to not be distracted by trying to do it by eye) adding small amounts of filler rod, (your "coin" stack) without over heating to cause the heated area to get too wide, when it does, allow the area to cool down before moveing on. A fillet wider than 4 times the material thickness was too wide for me, too hot, too wide= undercutting. For the best looking welds, try to rotate the parts to keep them in a mostly level puddle area, for me it took lots of years to make welds in a vertical, and overhead look nearly as good as a horizontal one.

Always have enough argon flow for the size of the tip used, when backing up, and adding filler rod to the puddle, never take the filler rod out of the argon flow. Get a filler rod advancer, (if they still make them) or practice a smooth movement of the filler rod into the puddle area using your fingers with a thin leather glove on.
 
Whiplash said:
that will help you get that "stack of dimes" you are looking for.

Not looking for a stack of dimes so much as I'm looking for a nice strong weld that will save my a$$ if I roll the thing at 110kph... I can do a stack o' dimes at low current, one at a time, and still get insufficient penetration (even on this stuff), the name of the game is getting penetration without distortion (which I reckon is getting there...). Of course, it ends up kind of stack-o-dime-ish anyway, but not with 'sharp' dimes like I see some people promoting...

Jeb: 4x the material thickness is 3.2mm ... that's only twice the width of the tungsten (not to mention the filler wire) ... I see the point of a small fillet, mechanically, but that's just tiny... also, do you mean you grind the tungsten concave or convex? Can't do concave on a flat diamond disk, but I could do them convex if that's what you meant...

These guys seem to be selling a wire feed system, but the data looks useful anyway :| - http://www.weldreality.com/tigData.htm - they recommend a sharper overall angle on the tungsten, but with a flat spot on the end - I might give it a shot, I was noticing some arcing from the 'shoulder' of the cone when using the fatter-angled tungsten (especially welding the inside 90 degree angle of the T), which didn't help arc control...

So, should I be dwelling in one spot longer on low amps, to get a small weld pool? Wouldn't that increase the heat-affected zone?
 
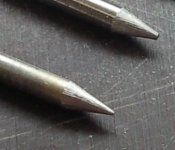
The flat spots seem to work much more nicely than the fat angle - the arc is very controllable, so that's one success.
Tungsten flat tip.jpeg

And I was able to get a 'narrow' fillet (3-4mm) with a slightly convex, somewhat 'stacked' effect easily enough (the spodge on the left was a restart):
Narrow bead.jpeg

Certainly, the heat-affected zone is smaller, but here's the problem:
Poor penetration.jpeg

The 'bend' test (as much as it can be done on this) shows incomplete penetration of the 'stem' of the T joint (that black spot on the left is actually a gap - my phone camera isn't the best at macro photography).

So, any tips on getting both the narrow bead and full penetration?
 
I know how to TIG as well and you are improving nicely. Don't forget that you are doing some very hard stuff (thin-wall pipe welding) and it will take some time to get used to it.

If i were you I would stop welding pipe joints for a bit. Take some of your tubes and just practice running beads down the length of the tube. This will help you to get your timing, speed, and settings figured out before you add the complexity of trying to make an actual join.

Also hit up youtube for tig welding videos and Miller welding has a lot of info too, as well as a very nice, free downloadable book on TIG welding. Here's and article on TIG welding tubing http://www.millerwelds.com/resources/articles/Best-Practices-for-GTA-Welding-of-4130-Chrome-Moly-Tubing/

Keep it up, the difference in your first set of photos and current ones show good progress!
 
Back
Top