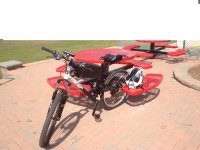
HS3540 BOSS BUILD. Now H4065 Boss Build

Trackman417

10 kW
Joined
May 5, 2011
Messages
844
Location
Schenectady, New York
Hello ALL
I was spending a year contemplating what kind of ebike kit I wanted. I started off with my friends poorly built aotema powered bike kit. It had 36v of sealed lead acid that gave me a max range of 3 miles and a really heavy bike...... Well it was better than using gas. I spent a year "cheating" on my first ebike, for higher power and longer range ebike. I have been eyeballing the phoenix II kits from electric rider for quite some time until I found out those bike kits were just HX series Crystalyte motors...... With a much bigger price tag. So I went with ebikes.ca for my motor, which I am quite pleased with.
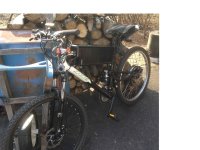
The first thing I knew I would need is a semi high performance bike with Dual suspension and most importantly disk brakes!. I rode my brothers dual motor BMCv2 kit up to 40mph and he had a paratrooper bike. The bumps sucked! It took me a while to finally find a bike that fit my budget but I finally did find one at the local sports authority :D
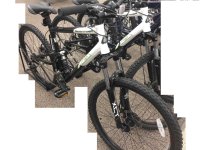
BIKE!.jpg
sorry for the cropped out edges, I needed to make the file as small as I could to upload it =D
Well a day after I found my bike the charger for the batteries came in. Got to say that it could be quite daunting to not only find a charger for lipo batteries but where to find a power supply for the charger. That was one major reason I was hesitant with going lipo. However I found epbuddy.com! And i bought there icharger 208B with there modified Mean Well power supply. Great people who work there. The same day I ordered they shipped and two days later I got my parcel. =D Here is the link for the charger/ power supply combo. http://epbuddy.com/index.php?main_page=product_info&cPath=17_20&products_id=170
Another day later, when I arrived home from school I found a really big box that had, in big letters, crystalyte.
View attachment 12
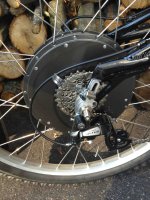
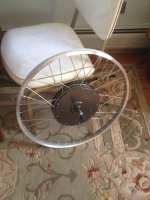
I ripped the box open, to see the present inside and I found a bunch of foam and a huge ass motor! I was used to a motor that was a quarter the size of the rim and this beast takes up half the size of the rim!Motor.jpg
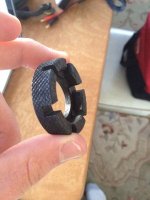
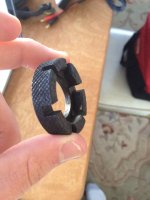
Along with the controller CA and other stuff I found in the box I found this in the same bag and the cassette. I have no idea what that thing is maybe you guys could shed some light on it? I never saw anything like that in my life.Whats that.jpg
A day after that my batteries came in from hobbyking! I got 4 5S 8000maH packs. That I am going to series to give me 74 volts nominal =D Big jump from 36 volts :twisted:
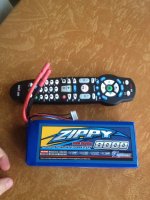
Lipo Battery =D.jpg
I went to go check the voltage on all of them and only one pack had a low cell. They were all quite balanced and I will have the charger work on them to get ready to start breaking these puppy's in!View attachment 8
Now I needed something to put these packs into for safety and such.
It turns out that some people don't like to buy wine with the plastic cases they come in, so I found a bunch of these sitting in the back room! And well they fit the batteries perfectly! My lucky day! I just need to cut them and glue them to make them longer and to see how they will fit on my rear rack.
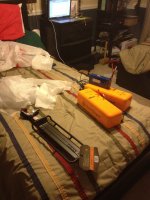
Battery case build.jpg
Cut line.jpg
View attachment 7
View attachment 4
After making the battery box and gluing the pieces together, I need to give it some time to bond strongly. So I used this time to dress my motor rim up with some new treads! Thankfully there is no one riding there bikes in February. It took the guy 15 minutes to get the tire strip and tire in place and I was on my way home!
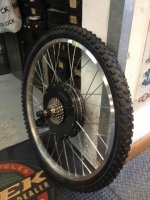
Motor and tire .jpg
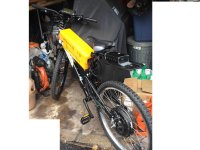
With everything I need in place and only one hour left till work I quite literally zip tied everything on, made sure nothing would get sucked into the spokes and ruin my day and went for a ride. 8)
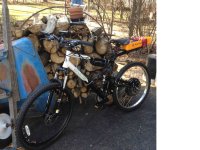
Bike again.jpg
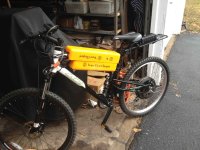
After the piss poor job I did in a rush I went back and made some very necessary improvements and switched the controller and batteries. And did a better job at concealing the wires.
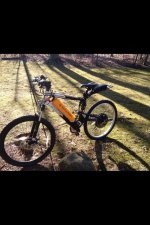
Final bike.jpg
Well now I plan on spray painting the battery box black and I am waiting on the battery harness to arrive from icecube. And I will be done with the bike until I see something that needs improvement! or something that you guys see that needs improvement. I am open to suggestions.
As an suitable update to help fray the cops from thinking my motor is overpowered, I decided to ad a little sticker on my motor. :D

Cool eh? haha let's see them cops get around that! :twisted: The one thing I like about the sticker is that is almost matches the HSR 35/40 sticker that comes with the bike.
 
Very clever battery box! :wink:

Trackman417 said:
... sorry for the cropped out edges, I needed to make the file as small as I could to upload it =D
Here's a little tidier means to get a smaller file:
Try downloading irfanview http://www.irfanview.net/ a freebie photo editor. Download the plugins file also and install both.

  1. Drag/drop your photo onto the irfanview desktop icon
  2. goto 'image'/'resize/resample' and resize your photo down so the largest dimension (width, height) is 800 pixels
  3. goto 'image'/'information' and check current image size on disk
  4. goto 'file'/'SaveAs', set 'Save as type' to 'JPG' and if file is too big for ES from (3) above, then goto the 'JPEG/GIF save options' pop-up and check 'Set file size' then enter 505 for the size - fill in the name and save.
This should scale your image down to a smaller more viewable size and adjust the jpeg encoding to get the best image quality possible for a file small enough to make ES happy. There are other handy tools to let you crop your photo, etc. - the usual stuff.

Lots of apps and ways to accomplish this but the price is right for this one and the image quality is very good.
 
Looks real good.
I like your use of a found product.
Paint & it will make for a real nice battery solution.
I dont drink, but I will check recycling bins in the area for something like that.

Great reuse :mrgreen:


Spoke wrench..jpg

A spoke wrench.
You will find that the "gaps" are different sizes for different sized nipples. :wink:
.
 
Lookin' back @ this thread.

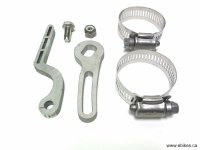
1. No torque arm solution.
Since you are aware of ebikes.ca' greatness.
seeTorqArmRev4 ebikes.ca.jpg

Or DrBass' http://endless-sphere.com/forums/viewtopic.php?f=31&t=29129

If you are running big power/poorly shaped dropouts. :wink:

2. Maybe I missed it, but what voltage, amperage?

3. Careful how that pack is mounted. Let's see some close up pics.

Like it so far. :mrgreen:


*Edit*

Just saw your sig.
#2 answered :wink:
 
Brentis said:
Lookin' back @ this thread.

1. No torque arm solution.
Since you are aware of ebikes.ca' greatness.
see

Or DrBass' http://endless-sphere.com/forums/viewtopic.php?f=31&t=29129

If you are running big power/poorly shaped dropouts. :wink:

2. Maybe I missed it, but what voltage, amperage?

3. Careful how that pack is mounted. Let's see some close up pics.

Like it so far. :mrgreen:


*Edit*

Just saw your sig.
#2 answered :wink:
Yeah I forgot to take a picture of the torque arms and add them in the post :oops: . I got those exact same ones! I will take a picture of them and the battery solution when I have free time.
As a quick note to look at for people who want to buy these torque arms is that they are $45 a PEICE! and I don't really like them that much. From what I read, Doctor Bass' torque arms would be better for my application because my drop outs are perfectly flat. And Doctor Bass' torque arms are $25 for two! Much cheaper and easily twice as strong. Right now I only use the part of the torque arm that keeps the axel from spinning out and the hose clamps. The other cute piece that extends the torque arm, is just wasting space in my bedroom. :evil:
 
maydaverave said:
The mystery item is a spoke wrench.

good eye mate, ive got one of these multi-size spoke wrenches (different make though) and even I didnt recognise it!

nice build mate! very tidy for your first build. The battery packs look great too, how much wh do you have? (ie voltage x amp hours)
 
sn0wchyld said:
maydaverave said:
The mystery item is a spoke wrench.

good eye mate, ive got one of these multi-size spoke wrenches (different make though) and even I didnt recognise it!

nice build mate! very tidy for your first build. The battery packs look great too, how much wh do you have? (ie voltage x amp hours)
I have 592 WH on board with 20S1P.
It's funny because when you asked the question about that, I didn't even know! I don't know I'd I should be embarrassed or what lol.
And with the spoke wrench I thought it was some sort of grinder because of how coarse it was and everybody I asked had no idea what the thing was.
 
A quick update on pictures..
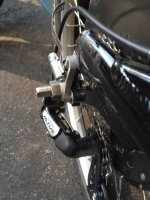
Here are the rear torque arms from ebikes.ca. A little over priced but they will get the job done :DIMG_0783.jpgIMG_0784.jpg
The drop outs are almost perfectly flat! so I am thinking about ordering some Doctor Bess' super torque arms. And they are cheaper then ebike.ca torque arms anyway.
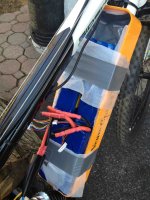
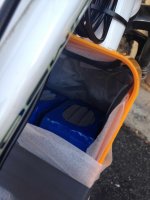
Another update on the battery case.IMG_0785.jpgIMG_0786.jpg
So the battery packs aren't rubbing against the hard plastic I lined the case with some foam that helped protect the battery's in shipping. On top of the foam I put duct tape to stick it to the walls and bottom of the box. It is very important to not just use a piece of foam that is long enough to cover the entire box! If you do that the duct tape will only be sticking on the opposite ends and thats when you find that the simple act of pulling the battery's out and putting them back in will move and possibly rip the foam, you don't want that. I just folded the foam into 4-5 inch sections and I then duct taped them into place. It is much more sturdy that way. And will be less inclined to move with battery's and potentially rip.
 
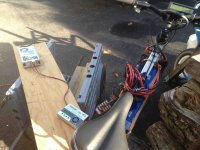
Got sick of the fact that I couldn't make a battery case that could have a slide on and off cover. Soooooo I decided to move everything to the top tube and here is the awesome result!IMG_0799.jpgIMG_0800.jpg
To help the cover stay on during rides I put some vertical pieces of plastic on to the cover. The result is something that isn't easy to slide off.
And there is the intestines of the everything. To the untrained eye it may look unorganized.... But to the trained eye it is perfection! (my eyes) This picture also displays my charging setup. Thanks to IceCube, I can now charge all the battery's at once =D. Which is a big change from charging each battery separately.
I always charge everything outside, and I am never more than twenty feet away from the bike when the battery's are charging. When I go inside its only for the essentials such as going to the bathroom, looking at something that I feel needs a tool from inside to fix, and also getting a quick snack. :lol: I hope thats enough.
IMG_0810.jpg
Now all I gotta do is spray paint the box black and I will be done with the bike. I never thought I would have said this but working on it tirelessly, as I did, was getting old. Every second of free time I had that was during the day and in nice weather, was spent on the bike. But the wait was well worth it. Given the chance to do it all over, I wouldn't.
One quick question I have for you guys is where can I find a 25 pin male and female connector? I want to solder all the cell wires into these connectors instead of connecting all the balance wires together, one at a time, I can do it in one shot.
 
Trackman417 said:
Got sick of the fact that I couldn't make a battery case that could have a slide on and off cover. Soooooo I decided to move everything to the top tube and here is the awesome result!View attachment 2View attachment 1
To help the cover stay on during rides I put some vertical pieces of plastic on to the cover. The result is something that isn't easy to slide off.
And there is the intestines of the everything. To the untrained eye it may look unorganized.... But to the trained eye it is perfection! (my eyes) This picture also displays my charging setup. Thanks to IceCube, I can now charge all the battery's at once =D. Which is a big change from charging each battery separately.
I always charge everything outside, and I am never more than twenty feet away from the bike when the battery's are charging. When I go inside its only for the essentials such as going to the bathroom, looking at something that I feel needs a tool from inside to fix, and also getting a quick snack. :lol: I hope thats enough.

Now all I gotta do is spray paint the box black and I will be done with the bike. I never thought I would have said this but working on it tirelessly, as I did, was getting old. Every second of free time I had that was during the day and in nice weather, was spent on the bike. But the wait was well worth it. Given the chance to do it all over, I wouldn't.
One quick question I have for you guys is where can I find a 25 pin male and female connector? I want to solder all the cell wires into these connectors instead of connecting all the balance wires together, one at a time, I can do it in one shot.

db25 connectors... can be found at your local electronics stores. cheap and easy to solder to.

i'm using a db37 at the moment mounted into the top of my case (37pins) for my 24s pack, so either bulk charging or balancing doesn't require me to even take the cover off my bat case!
 
Really nice build, Those torque arms look like they mean business. Great battery box solution.
Can you show us how you mounted the battery box? Or how it is bolted to the bike frame?
Thanks. Racer X
 
Racer_X said:
Really nice build, Those torque arms look like they mean business. Great battery box solution.
Can you show us how you mounted the battery box? Or how it is bolted to the bike frame?
Thanks. Racer X
I mounted the battery box using to U-Bolts with a really long piece of metal to help distribute the weight between the holes.
View attachment 2
I don't know about you guys but I do not like when plastic is being supported by two bolts. So I got a really long washer to help distribute the weight a little better. It is the same on the other end as well.
View attachment 1
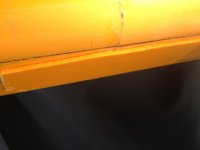
Along with hanging the UBolts to the frame, I also used the same plastic welder to put a giant rectangle to help keep the two pieces of plastic together. I may not need it but it is extra assurance :D Who DOESN'T love extra assurance?
UBOLT3.jpg
 
Nice job Trackman417, I am also trying to use U-Bolts for my battery box build
BUT what makes it work so good for you as I can see is that you used the extra long U-Bolts And a new technique which I did not think about WoW Thanks for sharing.
Racer X
 
Racer_X said:
Nice job Trackman417, I am also trying to use U-Bolts for my battery box build
BUT what makes it work so good for you as I can see is that you used the extra long U-Bolts And a new technique which I did not think about WoW Thanks for sharing.
Racer X
Thanks! What are the dilemmas you are facing? Another question with the DB connectors how did you solder the leads together? I'm looking at them online and there isn't any wire to solder. Is that right?
 
Trackman417 said:
Racer_X said:
Nice job Trackman417, I am also trying to use U-Bolts for my battery box build
BUT what makes it work so good for you as I can see is that you used the extra long U-Bolts And a new technique which I did not think about WoW Thanks for sharing.
Racer X
Thanks! What are the dilemmas you are facing? Another question with the DB connectors how did you solder the leads together? I'm looking at them online and there isn't any wire to solder. Is that right?

you want to get ones like these... 'solder db25' most electronics store's will have them.
http://rocky.digikey.com/weblib/Norcomp/Web Photos/172-037-202R011.jpg
so you can basically solder in your own wires. each pin can take about 4-5A, so for balancing thats heaps.
 
sn0wchyld said:
Trackman417 said:
Racer_X said:
Nice job Trackman417, I am also trying to use U-Bolts for my battery box build
BUT what makes it work so good for you as I can see is that you used the extra long U-Bolts And a new technique which I did not think about WoW Thanks for sharing.
Racer X
Thanks! What are the dilemmas you are facing? Another question with the DB connectors how did you solder the leads together? I'm looking at them online and there isn't any wire to solder. Is that right?

you want to get ones like these... 'solder db25' most electronics store's will have them.
http://rocky.digikey.com/weblib/Norcomp/Web Photos/172-037-202R011.jpg
so you can basically solder in your own wires. each pin can take about 4-5A, so for balancing thats heaps.
Alrighty. Thanks a lot. If there is anything that I find to be a turn off for balance leads is connecting them together. You meed finger mails for those things..... Only problem is, I don't have nails! But I only have four to worry about. So I guess I shouldn't be complaining because some other people here are pushing more voltage than I ever could without my motor heating up and essentially becoming a giant furnace.
 
Trackman417 said:
...............................................

you want to get ones like these... 'solder db25' most electronics store's will have them.
http://rocky.digikey.com/weblib/Norcomp/Web Photos/172-037-202R011.jpg
so you can basically solder in your own wires. each pin can take about 4-5A, so for balancing thats heaps.
Alrighty. Thanks a lot. If there is anything that I find to be a turn off for balance leads is connecting them together. You meed finger mails for those things..... Only problem is, I don't have nails! But I only have four to worry about. So I guess I shouldn't be complaining because some other people here are pushing more voltage than I ever could without my motor heating up and essentially becoming a giant furnace.[/quote]

its not too bad, having done half a dozen db37 plugs for my 24s pack I can say the easiest way is to fill in all the pins on the db connector, tin all your wires and then solder it all together. makes the job fairly quick and easy. its better too to use thicker guage stranded wire if you can, they dont tend to frazzle as much as the thinner stuff like the turnigy wire.
 
Alright thanks for everything. How ever with my current set up it wouldn't make sense for me to solder the balance leads to the connecter because of all the wires. I have to look at the bright side that it is only four balance leads to connect not 10 :D lol. Thanks for the idea. Maybe on the next build.
 
Soooooooooooooo gues who decided to series the discharge plugs while the individual cells were still paralelled.........
I DID! :D
Luckily all the damage was done to the series block and the block that connects all of the bullets to the andersons. To make sure the balance leads where still usable I connected them into my charger one by one to check if any cell voltages did not pop up where they should be. I got lucky.. this time. By damage I mean just three of the andersons on each side need replacing. I know I got lucky this time. Gave icecube the description of what needed to be replaced. From what I could tell icecube has customer service that is second to none. :D
 
best check all the cells too, though chances are they're fine. I've done it once too, except I accidentally shorted a 15s pack... needless to say the 4mm bullets worked great as a fuse! certainly gets the adrenalin going too huh?
 
sn0wchyld said:
best check all the cells too, though chances are they're fine. I've done it once too, except I accidentally shorted a 15s pack... needless to say the 4mm bullets worked great as a fuse! certainly gets the adrenalin going too huh?
Yeah I checkEd all the cells with my charger and everything was good.... Thank the good lord. When I made the series connection I saw a puff of white smoke come out of the part where the balance leads were. Afte realizing what I did I ripped the parallel balance lead off. The balance wires just go warm. Before checking the cells I didn't know what happened to them so I was pondering about selling them as damaged packs on here for half price lol. But they aren't sO I can sleep at night. About the adrenaline. LOVE IT! My adrenaline wasn't that hi, since I took this thing out for its first run.
The Anderson's are currently working for now, until icecube makes and sends me the peices I need.
 
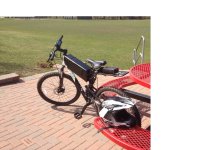
Alrighty. So the weather finally got good enough to spray paint the battery box. The only problem with this bike now is it looks too damn good! 8)
IMG_0862.jpgIMG_0865.jpgIMG_0866.jpg
 
Turned out great! Painting it black took the focus off the battery boxes, making it more stealth.
That controller could also fit either under the battery box or on the down tube. Have you considered that? Either way it looks good.
 
Racer_X said:
Turned out great! Painting it black took the focus off the battery boxes, making it more stealth.
That controller could also fit either under the battery box or on the down tube. Have you considered that? Either way it looks good.
I have thought about mounting te controller below the Frame. And I might just do that. However I don't like the fact that dirt ad mud can get hurled at the controller. I already blew my budget and jump started the economy on the bike and I don't feel like blowing my budget even further. I already paid icecube for half of my battery harness XP. Right now it works For me because all the wires are coming out of the controller are going one way. it makes it neater.
 
Back
Top