X5304-20inchRwd Disc Steel Frame Azonic

Joined
Nov 26, 2007
Messages
304
Location
Lantana Texas
Update March August 2016


Been riding this bike for about 7 years. Loving it!!!
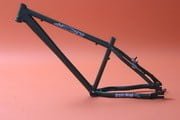
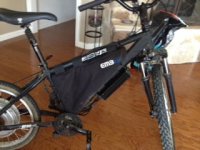
What is unique about my build is that is the choice of using a steel frame. I started out with a Forge Sawback 5xx and after realizing how flemsy aluminum is changed all the parts over to a steel frame.

Bike .........Forge Sawback 5xx 17 inchframe WITH REAR DISC BRAKE
All the parts from this bike were moved to a STEEL FRAME to hold the X5
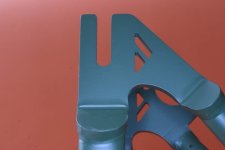
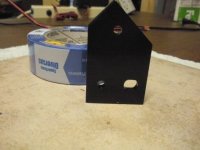
Frame.......Azonic Steelhead This is a steel chromoly frame with 1/4 inch flat dropouts
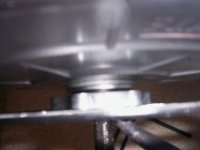
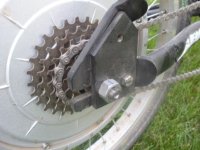
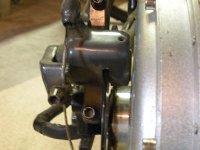
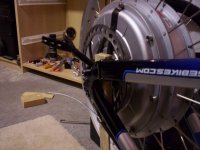
Motor .......Crystalyte X5304 on a 20inch rear wheel
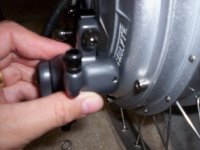
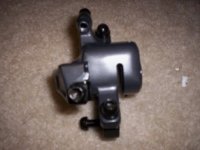
Controller..36-72 Volt 48Amp 4110IFRB Mosfets
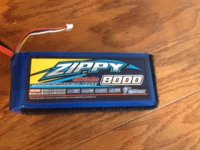
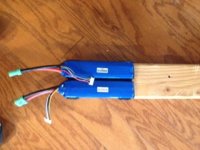
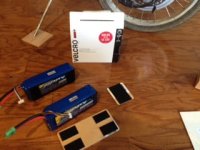
Batteries....A123 24s2p = 80volts New Aug 2016 Four80005sZippy to make 1p20S
Charger.....Mastech 5020
 
The major obsticals for this build were:

#1 Finding the right disc spacer (1/2 inch works) to make the rear brake caliber clear the motor.
Do not try searching for low profile caliber to fit a 3/8 spacer you will not find one

#2 Finding a machine shop to make a torque plate (Only $50 all done) well worth it better than twisted wires

#3 Making a spacer to spread the dropouts (only need 13mm) so that the DISC clears the frame. (This took the most time, the solution is simple but getting there was a journey) This spacer goes on the axle inbetween the disc and the inside dropout

#4 Making the battery pack. Not to hard for me but want to show all how it fits together and works. Took more thought and measuring and connecting and soldering than it looks.

#5 Switching from an aluminum frame to a steel frame Need specail bike tools will show which ones and provide links to where to get them cheap.

#6 Reinforcing the beam rack (the pole that holds the luggage bag and attaches to the seat post)

PROBLEM #1

The disc Caliber is does not fit using the 3/8 adapter
Not enough room between the hub and disc even with the addition of two spacing washers
1/8 More should do the trick See picture number 3.
So have new 1/2 inch adapter on order
 

Attachments

  • EbikeBrakprobblogpic.JPG
    EbikeBrakprobblogpic.JPG
    21.9 KB · Views: 5,346
  • EbikeHayesMX2blogpic.JPG
    EbikeHayesMX2blogpic.JPG
    20.5 KB · Views: 5,338
  • EbikeBrakeFixblogpic.jpg
    EbikeBrakeFixblogpic.jpg
    14.6 KB · Views: 5,330
Problem #2 Torque Arm

Next challenge is making a torque arm.

Anyone know where to get one for a rear X5?

I remember seeing somthing here about someone on Ebay offering to make them.
Also remember GetaDirtBike would make some. But would rather deal with someone in North America

Steve used training wheels but this will take too many bends and compromise the strenght.

I really want to get this right.

Please Help
 
Hey

I remember when i tried this .. the only way you could fit with some modding would be to flip the motor so when your going forward the motor arrow is going in reverse.. you could only fit a single speed gear thou..


solution ..


go with resistive braking .. save you alot of headaches. but you need good torque arms .. They are the most important thing to keep your wheel intact and not damage any wires..

-steveo
 
Steveo

Thanks for the info. Your bike was actually one of my major inspirations for me making my Ebike.

I am about 90% confident that I will be able to get the rear disc to fit.

I just need to expand the droppouts about a bolt width to make it all work.

Will post some pics of this next week. Currently fabricating the spacer to make this all happen.


Anyways, For all others out there let us know how well that resitive braking works.
 
Does your caliper bolt directly to the frame or do you hav an adapter from the frame to the caliper ?

My Chaos has an adapter and it allows me to shift the whole thing a hair more and make things fit.. i have had both 4 and 5 series motors on my frame with 8" disks to work...

Looking good tho.. keep at it and dont' ever quit !
 
Hey

resistive braking works really well i think! ...

check this thread where i tried it Its very simple look at fechers schematic .. i will be using this once my pack is done which is my priority atm.

http://endless-sphere.com/forums/viewtopic.php?f=2&t=583&st=0&sk=t&sd=a&start=45

-steveo
 
It is my opinion that aluminum Frames are too weak for these X5 motors so
At least the one that came with the Forge Sawback5xx

So I switched the frames!!!
I will post what bike specific tools I used to switch the parts to the new frame.

The original Sawback frame was aluminum. My new steel frame is an Azonic Steelhead.
http://cgi.ebay.com/NEW-2007-Azonic-Steelhead-Pro-Frame-Steel-Head-Green_W0QQitemZ160244893295QQihZ006QQcategoryZ98083QQssPageNameZWDVWQQrdZ1QQcmdZViewItem


The Steel head is a Great frame. Aluninum frames are flemisy even with a torque arm!!!!

Still gonna keep the ForgeBikes Sawback as parts are less expensive using this bike for parts
rather than buying individually.
Love those flat steel 1/4 inch drop outs!!!!!

Problem half solved still need a torque arm.
 

Attachments

  • BikeBlogAzonicFrame1.jpg
    BikeBlogAzonicFrame1.jpg
    3.9 KB · Views: 4,436
  • BikeBlogAzonicFrame2.jpg
    BikeBlogAzonicFrame2.jpg
    18.7 KB · Views: 4,431
Problem #2 Torque Arm Problem Solved

Went to a local machine shop with my prototype and they made me a torque plate out of 1/4 inch tool grade steel for $50.
The hard part about this hole deal was finding the right machince shop willing to do the job.
The magic question to ask is if they are a JOB SHOP or production shop. Job shops will be happy to get the work and help you while production shops don't want the work unless you are doing 1000S of pieces.

They made a very nice press fit on Double D hole for axle and put two 1/4 inch holes in to attach it to that lovely Azonic flat cromemoly dropout.
 

Attachments

  • BikeBlogTorquePlate2.JPG
    BikeBlogTorquePlate2.JPG
    22.9 KB · Views: 4,591
  • BikeBlogFinTorqArm.JPG
    BikeBlogFinTorqArm.JPG
    28.3 KB · Views: 4,217
Problem #1 Solved

The 1/2 inch disc brake adapter from ebikes.ca gave enough clearance for a Hayes MX2 caliper.

1st picture look like it hits but does not

Just all the silver layers in picture.

2nd picture shows the gap about 1mm-1.5mm gap inbetween side cover and caliper

Have been riding bike hard for 2 months and no rubbing or shifting/bending issues.
 

Attachments

  • BikeBlogHalfinch5.JPG
    BikeBlogHalfinch5.JPG
    63 KB · Views: 4,186
Next problem #3

Problem #3 is that the round disc hits the frame.

Solution is to spread the dropouts enough to make clearance for the disc to clear the frame rail
This required the need to make a spacer.

Here are some pics of the problem with the old Sawback frame.

The solution to the problem is a spacer. To find out how wide/big to make the spacer had to first spread the dropouts for every thing to fit.

Used good old fashion wood shims and then took measurment of how much of a spacer I needed to make.

The spacer worked in both frames and did not need to be changed.
 

Attachments

  • BikeBlogSpreadDropouts.JPG
    BikeBlogSpreadDropouts.JPG
    101.3 KB · Views: 3,065
  • BikeBlogWedgDropouts1.JPG
    BikeBlogWedgDropouts1.JPG
    100.5 KB · Views: 3,050
Problem # 3 Solved via 10mm Collar from Fastenal

Here is the final spacer. Goes right where you see the wood wedge.
Found a "collar" that was the correct width and also the correct size hole.
Collar + washer = the right width/space for everthing to line up and give room for the disc to clear.

This solution was the result of lots of custom hack saw and drill work with a different spacer. So this part will save someone countless hours of making/cutting a custom spacer from a larger coupler.Will post later how I got here to make it more clear.

This was quite the find. Flipped through many catalog pages and lots of trips back and forth to Fastenal.
 

Attachments

  • BikeBlogFastnalSpacer.JPG
    BikeBlogFastnalSpacer.JPG
    67.8 KB · Views: 3,042
  • bikeblogSpacerCloseup.JPG
    bikeblogSpacerCloseup.JPG
    45.6 KB · Views: 3,797
Video off road

http://www.youtube.com/watch?v=JYuV2H4EZzc


Where can I find instructions on how to put the video pic on the screen rather than the link?
 
August 2016
Took off battery rack on back
Moved batteries to Center of frame Using EM3EV Bag and 5sZippy8000mah
 

Attachments

  • EmcFrambag.JPG
    EmcFrambag.JPG
    21.4 KB · Views: 1,789
  • EmcZippy8000.JPG
    EmcZippy8000.JPG
    22 KB · Views: 1,789
  • emcFrambag2Zippys.JPG
    emcFrambag2Zippys.JPG
    19.3 KB · Views: 1,789
  • EmcFramBagPlyAndVelcro.JPG
    EmcFramBagPlyAndVelcro.JPG
    20.4 KB · Views: 1,789
  • EMCframeBagPlywood.JPG
    EMCframeBagPlywood.JPG
    15.2 KB · Views: 1,789
  • EmcFrambagWithZippys.JPG
    EmcFrambagWithZippys.JPG
    24.5 KB · Views: 1,789
Back
Top