teslanv
1 MW
It's been a long time since I did an in-depth build post, but I've been so enamored with this latest build, I wanted to share the details of it with the Sphere.
Lately, I've been focused on building great commuter bikes. Main considerations include moderate power (1500W-2000W), high efficiency, comfort and clean, thoughtful design details.
My favorite place to find donor bikes is at www.bikesdirect.com
I've done many builds based on the Gravity and Motobecane frames they sell. And for the lower end of the spectrum, the bikes they offer are a great value. Some of my favorites include the Gravity Bullseye Monster COMP, Motobecane 400HT and 429HT, Motobecane Fantom 29er, and now this new one, using the Motobecane Jubilee FS.
http://www.bikesdirect.com/products/motobecane/full-suspension-comfort-bikes/full-suspension-comfort-jubilee-fs.htm
After some initial CAD estimation, I determined that the 19" frame size MIGHT have enough space to fit the Hailong XL battery. I took a bit of a gamble, and ordered the 19". It arrived within a week to my doorstep, and I got to work designing the custom 1/4" stainless steel torque arms that would grace it's drop-outs.
Much to my pleasure, the bike's drop-outs had nice indentations into which I could "nest" my torque arms. AFter making and test fitting several paper templates, I had a set 3D printed for the final test.
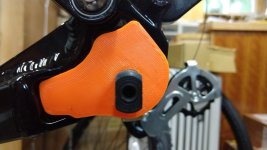
I ended up tuning the design a bit more, and in the end, came up with a very clean looking torque arm.
View attachment 5
To allow the derailleur to fit on the opposite side I designed a cut-out.
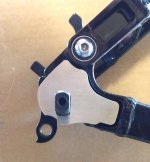
The Hailong XL battery is from a new vendor I'm testing. I had this one made with Samsung 30Q cells, and a 40A BMS.
For a while now, I have been mounting the Hailong XL packs with three bolts. The first bolt goes in the Cast Aluminum plate, which requires disassembling the mounting bracket (3 screws). I locate the battery where I want on the down tube, and mark the location of the screw hole at one of the bike's Water bottle bosses. Drill the plate and bolt it on the down tube.
I also like to hide the battery connector in this space, as it keeps the install nice and tidy.
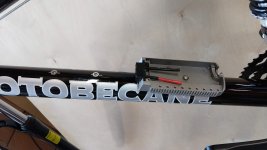
I drill 9/32" holes and install Aluminum RivNuts for the other two bolts.
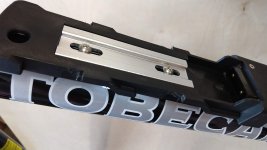
The battery had JUST enough room in the triangle, but DID present some challenges getting it mounted, due to the need to drop and slide it onto the bracket. I actually had to remove the top bolt of the rear shock and push it out of the way to get the battery to slide onto the mounting bracket. I also had to cut away a bit of the dovetail slides, as the battery couldn't slide quite far enough forward to get it to drop. Still plenty to plastic there to hold the battery on tight, though. When it's installed, it is quite inconvenient to remove the battery from the bike, which a marketing guy would call "theft prevention". :wink:
View attachment 7
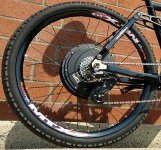
The motor is my 35mm DD Hub motor, in a 6T winding, which cranks out around 8.5 RPM per volt. Laced in the 26" Sunringle MTX39 rim it puts out a nice amount of torque, when paired with my 12x3077 Sine Wave controller. I did de-tune the controller to max out at 40A in consideration of the battery's BMS limit. It still cranks out a solid 2000W of peak power, which is plenty for the busy northwest bike lanes. At 48V, the top speed is right at 28 MPH without any field weakening.
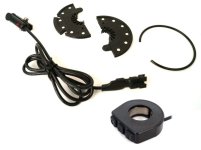
I've been recently using the Grin Tech 12-pole PAS sensor and Digital 2-button AUX device for running the Pedal assist feature. I absolutely LOVE this option, and the Digital 2-button control. With the new 3.1 firmware on the CA3, you can set up to 20 levels of assist. I generally set mine up for 1000W of max pedal assist power, with 11 levels of assist, including 0% on Level one. This allows me to easily select the PAS power level on 100W increments (0%, 100W, 200W, 300W, etc. up to 1000W) to me, this PAS set-up is much easier to install and implement vs. a torque sensing bottom bracket, and results in a very acceptable and tunable PAS system that feels very similar at a fraction of the cost and effort as the torque sensing BB.
The Motobecane Jubilee does have a few shortcomings, however. It has a quill stem, so not many great fork options to upgrade with. And the rear shock is pretty cheap and basic. On my shake-down ride across the I-90 bridge in Seattle, the pavement gets a bit bumpy, and a dampening shock would work much better that the stock spring shock, which is stiff and bouncy.
Overall, though this has to be one of my favorite bike to commute with. It really is quite a bit more comfortable riding more upright, vs being hunched over on a standard MTB.
View attachment 1
Lately, I've been focused on building great commuter bikes. Main considerations include moderate power (1500W-2000W), high efficiency, comfort and clean, thoughtful design details.
My favorite place to find donor bikes is at www.bikesdirect.com
I've done many builds based on the Gravity and Motobecane frames they sell. And for the lower end of the spectrum, the bikes they offer are a great value. Some of my favorites include the Gravity Bullseye Monster COMP, Motobecane 400HT and 429HT, Motobecane Fantom 29er, and now this new one, using the Motobecane Jubilee FS.
http://www.bikesdirect.com/products/motobecane/full-suspension-comfort-bikes/full-suspension-comfort-jubilee-fs.htm
After some initial CAD estimation, I determined that the 19" frame size MIGHT have enough space to fit the Hailong XL battery. I took a bit of a gamble, and ordered the 19". It arrived within a week to my doorstep, and I got to work designing the custom 1/4" stainless steel torque arms that would grace it's drop-outs.
Much to my pleasure, the bike's drop-outs had nice indentations into which I could "nest" my torque arms. AFter making and test fitting several paper templates, I had a set 3D printed for the final test.

I ended up tuning the design a bit more, and in the end, came up with a very clean looking torque arm.
View attachment 5
To allow the derailleur to fit on the opposite side I designed a cut-out.

The Hailong XL battery is from a new vendor I'm testing. I had this one made with Samsung 30Q cells, and a 40A BMS.
For a while now, I have been mounting the Hailong XL packs with three bolts. The first bolt goes in the Cast Aluminum plate, which requires disassembling the mounting bracket (3 screws). I locate the battery where I want on the down tube, and mark the location of the screw hole at one of the bike's Water bottle bosses. Drill the plate and bolt it on the down tube.
I also like to hide the battery connector in this space, as it keeps the install nice and tidy.

I drill 9/32" holes and install Aluminum RivNuts for the other two bolts.

The battery had JUST enough room in the triangle, but DID present some challenges getting it mounted, due to the need to drop and slide it onto the bracket. I actually had to remove the top bolt of the rear shock and push it out of the way to get the battery to slide onto the mounting bracket. I also had to cut away a bit of the dovetail slides, as the battery couldn't slide quite far enough forward to get it to drop. Still plenty to plastic there to hold the battery on tight, though. When it's installed, it is quite inconvenient to remove the battery from the bike, which a marketing guy would call "theft prevention". :wink:
View attachment 7
The motor is my 35mm DD Hub motor, in a 6T winding, which cranks out around 8.5 RPM per volt. Laced in the 26" Sunringle MTX39 rim it puts out a nice amount of torque, when paired with my 12x3077 Sine Wave controller. I did de-tune the controller to max out at 40A in consideration of the battery's BMS limit. It still cranks out a solid 2000W of peak power, which is plenty for the busy northwest bike lanes. At 48V, the top speed is right at 28 MPH without any field weakening.

I've been recently using the Grin Tech 12-pole PAS sensor and Digital 2-button AUX device for running the Pedal assist feature. I absolutely LOVE this option, and the Digital 2-button control. With the new 3.1 firmware on the CA3, you can set up to 20 levels of assist. I generally set mine up for 1000W of max pedal assist power, with 11 levels of assist, including 0% on Level one. This allows me to easily select the PAS power level on 100W increments (0%, 100W, 200W, 300W, etc. up to 1000W) to me, this PAS set-up is much easier to install and implement vs. a torque sensing bottom bracket, and results in a very acceptable and tunable PAS system that feels very similar at a fraction of the cost and effort as the torque sensing BB.

The Motobecane Jubilee does have a few shortcomings, however. It has a quill stem, so not many great fork options to upgrade with. And the rear shock is pretty cheap and basic. On my shake-down ride across the I-90 bridge in Seattle, the pavement gets a bit bumpy, and a dampening shock would work much better that the stock spring shock, which is stiff and bouncy.
Overall, though this has to be one of my favorite bike to commute with. It really is quite a bit more comfortable riding more upright, vs being hunched over on a standard MTB.
View attachment 1

