Weight Sensing Longboard with Inline Wheel Motors

kfong said:
Is there software we have to download to use the CA as a skateboard controller. Justin, will you be making that available.

Yup. Right now it's a bit of a quick hack job which did to the CA3 code in order to work with the strain gauge inputs, but once I tidy up the setup menu and display screens a bit more then I'll certainly post the firmware here as a "CA3 Skateboard Build" in case any other people want to play it. Basically the functionality is all there as a regular V3 Cycle Analyst, but the Aux input is used as the front weight sensor, and the Trq input is used for the rear weight sensor. Each one can have its own calibration in mV/lb. Next up will then be to revisit the old self balancing emanual project, with all wheels under the deck
http://www.ebikes.ca/emanual
And have an additional set of options, where one input would be a gyro and the other would be a distance sensor.

Arlo1 said:
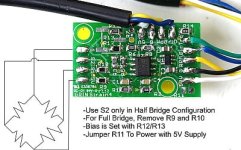
Justin IM working on a variable regen lever I am going to use strain gauges and need an amplifier would you be interested in selling the stain gauges and amplifier board?

Just finished creating this for you, and for rowbiker:
http://www.ebikes.ca/shop/ebike-parts/stokemonkey-parts/strainamp.html
StrainAmp Store Item.jpg

I'll have more pictures and details of the strain gauges themselves posted up later, but the shear gauge has two 1K strain elements on it both at 45 degrees from the edges and is used in an area subject to shear stresses, while the regular gauges are the same type that I showed glued on the trucks here, and are for simple compression/tension stresses.
 
Awesome thanks Justin.
 
"Hands free is such a ticket to do rad stuff while riding the board."

yep:

http://instagram.com/p/oLyB-2S3dW/

hahaha.
 
Very cool design, and approach to putting motors in wheels. And on another note, if you create the next design around the roja hybrids, without machining the trucks...you should make two sets and send the second set to me for testing :D
Will even pay you money to let me test! And only 4 hours away from yea.

And an idea that may not have been mentioned, since it is weight sensing have the board come to a complete stop if it is unweighted for more than a second. Would make a good 'leash' feature. Wonder how I could get these motors in my electric fly wheels!? mwahaha
 
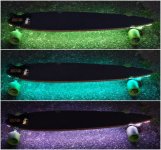
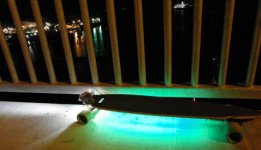
Hey guys, time for a long overdue summary update of these weight sensing board projects. After the Vancouver Maker Faire last year the next fun event we took them out on was the 2014 Vancouver bike rave. For that of course I had to spice it up a bit and added a full RGB light strip to the underside of the deck.
UnderGlow.jpg
It was a pretty wild event with thousands and thousands of people with lit up bikes clogging up the entire seawall in Vancouver from Science World to Stanley Park, and this was right at home. I didn't get any photos or videos but you can imagine the scene a glowing hoverboard zipping through crowds of costumed people several km long partying, dancing, and biking in varying states of mind.

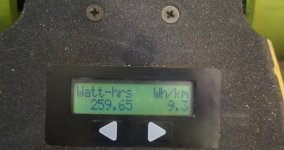
The electrical usage is consistently 8 to 10 wh/km with average speed riding, and 12-15 wh/km when you try to burn rubber.
CAStats.jpg

And in all cases the amount of regen seems to over right around 10%. This is the case both on flat ground city riding due to stop and go, or when you are on hilly up and down terrain.
RegenStats.jpg

Unfortunately though we didn't put a ton of km on it last year since one of the strain sensor signals on the front truck started acting up. But when it was working it was a popular thing for people visiting to demo ride. Here is Voicecoils from ES on it with a giant e-board grin and a solid thumbs up.
AbrahamThumbsUp.jpg
 
We also noticed that something was acting up with the batteries in first inline motor powerboard that we made for the 2013 SF Maker Faire, and last weekend decided to finally give this old project a good overhaul.

View attachment 8

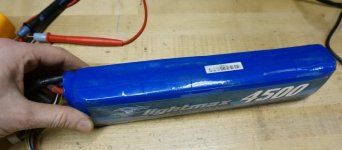
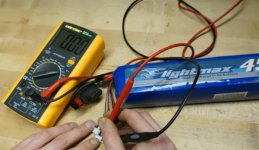
This board we made with two 10s hobbyking LiPo batteries running in parallel and protected by a sheet metal battery bay. At the time, RC grade LiPo seemed like the best way to get the required high power and energy density, but for whatever reason I always have terrible luck using them in any actual projects. One of the two packs was puffing up pretty bad:

PuffingLiPo.jpg

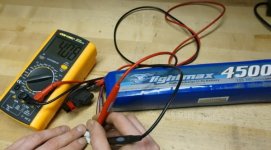
The pack as a whole was at 38V, but when we checked the individual cells most were around 4.1V, with a single cell reading 0V. I'm not sure at what point that cell shorted, but it'd be a far from ideal situation to charge the pack up to the normal 42V since individually the cells would be at 4.6V each, huge danger territory. With a balancing charger as most people hopefully use with unprotected LiPo packs this would have been caught right away, but I'm more of a bulk charge type and am lucky that this didn't turn into a fireball. All the cells were poofing which means almost for sure they had been well overcharged at some point.

OKCell.jpg
ShortedCell.jpg

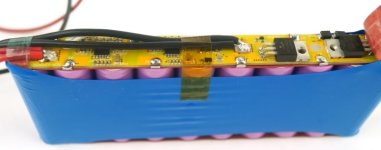
The good news is that since then the state of high power density 18650's has advanced dramatically. So last year we had a small batch of 10S x 1P packs made up with the Samsung 25R high power cells, and a thin inline BMS board that is connected via metal tabs rather than wire leads:
BMSBoard.jpg

That's a 90 watt-hour battery that weighs 490 grams is good for 20A max discharge rates. No need for LiPo ever again!
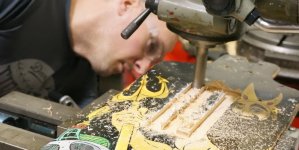
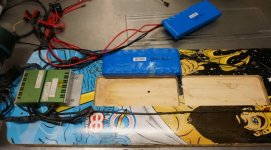
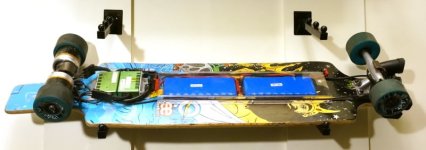
We scrapped the aluminum battery enclosure and decided to mill a pockets in the deck in order to have the batteries half inset into the wood. I was tempted to make 4 pockets in a grid and have a 360 watt-hour capacity, but the curvature on the deck meant that it wouldn't sit quite as nice so we settled with just 2 packs end to end. The deck is ~15mm thick, and the pockets were milled just under 10mm deep.

MillingBatteryPocket.jpg

To cover the batteries, we just used a strip of 1/8" Lexan Sheet and bent it on a metal brake to have a "Z" shape on either side. That was surprisingly quick and easy, and you can't bet better than polycarbonate for impact protection if something was ever to smash the belly of the board.
BatteryCutouts.jpg

We also cleaned up the wiring harness a bit. The first build with the large metal enclosure box meant we could stuff a bunch of extra cables and connectors and have it be out of sight, but the clear plastic and trim look meant there was no room for a rats nest and all the wiring had to be reconsidered.
AngledView.jpg

Side view, when compared to the first build with the LiPo packs it is night and day. But it's also not as much capacity, only 5Ah versus ~8Ah we had before.
SideView.jpg
 
That is GORGEOUS. 25R is an awesome power cell. You're really making me want to build an eboard, next bike comes first though!

That is so slim, truly top-notch! I'm certain you could sell boards like that for a pretty reasonable profit if you wanted, though it might not be worth it to you to scale up production like that.
 
That looks amazing. So stealthy, but you can still show off the guts like the engine window on a Lamborghini.

...and this is the part where I make everyone jealous by mentioning I live around the corner from Justin's lab and he's gonna let me ride it in just 24 hours. Can't wait.
 
agraham said:
That looks amazing. So stealthy, but you can still show off the guts like the engine window on a Lamborghini.

...and this is the part where I make everyone jealous by mentioning I live around the corner from Justin's lab and he's gonna let me ride it in just 24 hours. Can't wait.

video please !
 
this thread was really inspirational for me.


What happened to the more recent skateboard motors you made that were part of a collaboration and were more recessed into the wheel?
I'm surprised these two are still going being exposed to curbs and flying rocks.

NOW, months later, seeing how the hub motor is all the rage and it's construction seems less complex, this method of mounting seems an overly complicated way to get pretty much the same thing done but with greater vulnerability.


Ive changed to feel the more exposed the parts the better it looks. If the controllers were just exposed boards under plastic as well and the shrink wrap on the batteries was just clear there would be no secrets.
 
Hummina Shadeeba said:
inspirational.
What happened to the more recent skateboard motors you made that were part of a collaboration and were more recessed into the wheel?

I was gonna get to that next. We did an overhaul on both boards and I was really curious to see how the more fully recessed motor was holding up. I was a little concerned that the thin-section motor ball bearings might not be fairing too well. The whole principle of this design approach should be that the shock and impact loads are taken by the skateboard wheel ball bearings, and that the motor ball bearings would be just there to centralize the motor without taking the rider's weight. But since the large wide wheel overlaps the motor a fair amount, any rocks or impact on the insides of the wheels would still transfer to the motor ball bearings.

Anyways this is what it looked like coming apart. There was a lot of powdery black gunk, and it turns out that was the black paint finish from the RC motor shell which had been ground and worn off by the motor slipping inside the wheel. Remember on this build there was no positive indexing between the wheel and the motor, we just slightly undersized the cavity in the wheel so that it was a snug fit on the motor shell, and it doesn't surprise me that in use there would be a little bit of slippage.
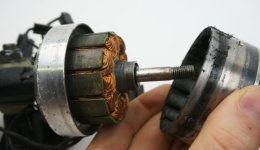
MotorInspection.jpg

Also some little bits of ferrous material that got picked up from the road and what not. I few blasts with an air compressor cleaned it up pretty well. And the good news is that the thin section ball bearings weren't much worse for wear.
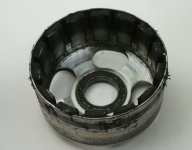
MotorShell.jpg

I'm surprised these two are still going being exposed to curbs and flying rocks.

They are a little dinged up, but still going strong for sure. So we'll keep riding them as is until/if anything actually goes.

NOW, months later, seeing how the hub motor is all the rage and it's construction seems less complex, this method of mounting seems an overly complicated way to get pretty much the same thing done, but with more vulnerabilliy.

The downside of having the motor 100% enclosed in the wheel is that you then need a specially molded wheel sleeve that slides over the hub, you can't easily use off-the-shelf interchangeable skate wheels. But with the motor beside the wheel and only partially enclosed by it, then you can replace your wheels and wheel bearings much easier as they wear down. The challenge is then making the motors as thin and pancake like as possible to reduce their exposure.

torqueboards said:
Nice display. What display did you use for that?

Not of the electric bike ilk eh? :wink: That is an old school small screen Cycle Analyst, but with a modern CA V3 circuiboard that has many more has inputs for torque sensors etc. which were repurposed to read the front and back strain gauge signals instead. It's pretty handy having it flush mounted on the deck like that, but I found that the membrane overlay label tended to get peeled up from people's feet so while it was apart last week I worked the recess a bit deeper into the deck so that it would sit below the grip tape.
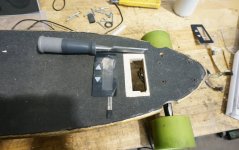
CycleAnalystCutout.jpg

With the deck all stripped down again, it was also a great opportunity to recess all of the other electronics and wiring into the woodwork. So I used a regular router to make channels down the sides for the LED light strips, and then a milling machine to make a pocket under the battery for the driver circuitry, and also channels at the front for half a dozen front facing white LED lights as an integrated headlight
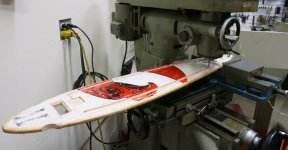
MachiningChannels.jpg

I wanted the lighting system integrated into the deck and 100% rugged, so after milling the channels and wiring everything up it was back-filled with epoxy resin. Later on I plan to rough up the epoxy finish a bit and then continue on the paint job on the deck, masking off just a small dot over each LED emitter. That way the lights will just come out of nowhere.
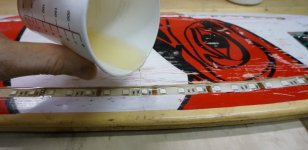
PouringEpoxy.jpg


Great work as usual Justin, have you integrated your FOC into this board yet?

These are still the stock FOC controllers from ASI, we don't actually need the power upgraded ones because we're phase limiting the current into each motor to just like 30 amps anyways. The controllers even with stock 10mOhm fets stay pretty cool to the touch, while the motors are decidedly hot after a long trip. But we still have occasional problems due to vibrations with these controllers, especially since it's two PCBs that are connected together via a header/socket arrangement. Next build will definitely be a fully potted controller too in order to make it immune to the rattle.
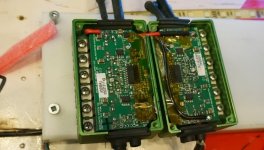
ControllersOpen.jpg

Pediglide said:
Hooray for hands-free! :mrgreen:

I hear you buddy. Sky's the limit for what you then decide to occupy your hands with!
http://www.youtube.com/watch?v=ISKkPyu1Zo4&t=12m25s
 
How about a route-data logger that the controller can remember and connected to a phone app?

In that way, when you have the data saved, all you need to do is stand on the board and keep your balance.

Just so you can do this, haha. j/k
 

Attachments

  • Beer Runner.jpg
    Beer Runner.jpg
    44.1 KB · Views: 6,105
Well I got to try these weight sensing boards just now.
I have to say I was skeptical. I just couldn't believe I would be as comfortable with no controller.
But now I'm a believer. It's so intuitive. The instant I got on it just worked perfectly I was carving along at full speed* - and not the world's best longboarder to begin with. It's not like mindreading at first, because you do have to push three quarters of your weight through your front foot to go fast and almost stand on your back foot to get full braking power, but within a minute or two you are already starting to do it unconsciously.
I really feel like this is the future. Even if remote controls never go away, I wouldn't be surprised if half of all powered board work this way in the future.

As requested here is a video. It's blurry and blown out because my phone sucks but it's Justin and Robbie on my Boosted and their weight sensing board in a drag race.

[youtube]vIeToQsqtOs[/youtube]

Spoiler: the Boosted wins for the first few seconds until it hits its speed limiter and then its left in the dust. Justin's board just keeps on accelerating as long as you like.
Also I think Justin's board is current limited IIRC to keep the motors from overheating so it would be interesting to see how this drag race would turn out if it was unbridled.

* the very first time I got on the board was just to feel how flexy it was, but it had just had it's software upgraded and all the settings cleared so it didn't have the usual limiters set up including the "don't be powered until the user kicks you up to 2km/h" setting so it instantly bucked me off - but once the user-friendly settings were keyed in it worked like a dream
 
justin_le said:
I hear you buddy. Sky's the limit for what you then decide to occupy your hands with!
http://www.youtube.com/watch?v=ISKkPyu1Zo4&t=12m25s

Aside from having your hands free to do whatever, here's another possibility that can happen with remote controllers. Watch @2:28

[youtube]DXceOMIJaKY[/youtube]
 
justin_le said:
torqueboards said:
Nice display. What display did you use for that?

Not of the electric bike ilk eh? :wink: That is an old school small screen Cycle Analyst, but with a modern CA V3 circuiboard that has many more has inputs for torque sensors etc. which were repurposed to read the front and back strain gauge signals instead. It's pretty handy having it flush mounted on the deck like that, but I found that the membrane overlay label tended to get peeled up from people's feet so while it was apart last week I worked the recess a bit deeper into the deck so that it would sit below the grip tape.

I noticed it - but wasn't sure. It's a lot smaller but I guess that explains the old school :)
 
agraham said:
Well I got to try these weight sensing boards just now.
I have to say I was skeptical. I just couldn't believe I would be as comfortable with no controller.
But now I'm a believer. It's so intuitive. The instant I got on it just worked perfectly I was carving along at full speed* - and not the world's best longboarder to begin with. It's not like mindreading at first, because you do have to push three quarters of your weight through your front foot to go fast and almost stand on your back foot to get full braking power, but within a minute or two you are already starting to do it unconsciously.
I really feel like this is the future. Even if remote controls never go away, I wouldn't be surprised if half of all powered board work this way in the future.

As requested here is a video. It's blurry and blown out because my phone sucks but it's Justin and Robbie on my Boosted and their weight sensing board in a drag race.

[youtube]vIeToQsqtOs[/youtube]

Spoiler: the Boosted wins for the first few seconds until it hits its speed limiter and then its left in the dust. Justin's board just keeps on accelerating as long as you like.
Also I think Justin's board is current limited IIRC to keep the motors from overheating so it would be interesting to see how this drag race would turn out if it was unbridled.

* the very first time I got on the board was just to feel how flexy it was, but it had just had it's software upgraded and all the settings cleared so it didn't have the usual limiters set up including the "don't be powered until the user kicks you up to 2km/h" setting so it instantly bucked me off - but once the user-friendly settings were keyed in it worked like a dream

Oh well now that's just not fair :) The Boosted one is both current-limited and speed-limited.
 
torqueboards said:
skdoo said:
Oh well now that's just not fair :) The Boosted one is both current-limited and speed-limited.

The double whammy! lol! Tell all your friends.. Jk :mrgreen:

That's what happens when you have to have a warranty :)
 
agraham said:
As requested here is a video. It's blurry and blown out because my phone sucks but it's Justin and Robbie on my Boosted and their weight sensing board in a drag race.

Hey agraham, which Boosted Board do you own? There are three versions of the Boosted Boards (http://shop.boostedboards.com/collections/boosted-boards) running 1000W, 1500W, and 2000W.

agraham said:
I have to say I was skeptical. I just couldn't believe I would be as comfortable with no controller.
But now I'm a believer. It's so intuitive. The instant I got on it just worked perfectly I was carving along at full speed* - and not the world's best longboarder to begin with.

I worked with Justin last summer in 2014 and I often got to ride his V2 electric longboard and I had the same conclusion. It just... works. No controller. You can easily chat with people walking around you because you're only consciously balancing your body to one side or the other. Granted, I have never tried any other e-longboard so I can't comment if it is the same with a controller.

It's even more amazing when you consider how humans react to certain situations. Hypothetically, if you are going at a rather brisk pace on the e-longboard and about to enter an intersection with a car in the middle, your main instincts and reflexes would be to lean backwards out of the situation (causing breaking) rather than consciously trying to use a controller to brake.
 
torqueboards said:
I noticed it - but wasn't sure. It's a lot smaller but I guess that explains the old school :)

Yeah, but I think this gives me reason to maybe bring back a small screen option. We continued making them for a couple OEM ebike customers for a few years after they were nominally discontinued, but skateboards could breath in a new life!

Anyways today was quite an eventful day for 2 reasons. First is that I took both weight sensing boards down to the Landyachtz headquarters for a little visit and tour. They are only like a 10 minute ride from our shop and it's silly that I hadn't make the trip ages ago. They have an awesome facility and I'll have a more to say on that in a future post.

The other thing is that I finally had the confidence to try using one of these powerboards for my ~15km commute home from Grin to North Vancouver. That's been one of my dreams from the getgo to have a decent commuter board, but so far we've just been testing these on shorter neighborhood trips, where if something goes wrong it's not that far to bring things back to the shop for repair. So when work wrapped up at midnight, donning my favorite ES t-shirt, I grabbed the board rather than my ebike and set sail.

View attachment 1

Riding at 1am the roads were clear of any traffic which was nice. I decided to go east over the 2nd Narrows bridge, since they just this year reworked it with a brand new cycling sidewalk, while the more scenic lions gate bridge through Stanley Park has a super long causeway where you are riding on a sidewalk with the annoying grooves between each pad of concrete: badump badump badump badump....

Anyways the bridge was awesome. I was a bit worried that the gap under the railing was large enough that if I bailed off the board it could shoot through the crack and plunge into the river below, but when I stopped to check the fit right at the summit I was relieved find that the board is about 5mm taller.
2nd Narrows Bridge Gap.jpg

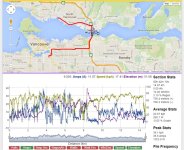
The consumption stats surprised me a bit, I used 12.5 wh/km when I was expecting more like 9-10 for the relaxed non-aggressive riding that I was doing. A small part of this is from the fact that the LED light strips draw about 20 watts from the battery, but it's still more than expected. I had an analogger connected to the CA in order to log all the trip stats and you can see them here:
http://www.ebikes.ca/tools/trip-analyzer.html?trip=3GHcYP

ToNorthVan Stats.jpg

There was no traffic I barely had to stop at all, so without the stop and go the overall regen stat was lower than normal, just over 3%. But if you look just at the section of the 2nd narrows bridge, it hit 60% regen. Mind you, the bridge starts at a higher elevation than where it lands.

Weather permitting I'll ride it again back to work in the morning, this time taking the spirit trail to the lions gate bridge and then riding through stanley park and along the waterfront bike path back to the shop. Should be a thrilling way to start the day.

Return Trip.jpg
 
Back
Top