E-S Stealth Electric Bike Owners

That sucks about the theft QMS!
What did the police have to say about it ?
I will keep my eye out for it on the off chance it winds up in my neck of the woods. It's certainly not subtle so unless it ends up on a large private property it's going to get noticed.
Maybe fitting a GPS tracker your demo bikes might be a good move in future ? It's sad we have to even talk about it but unfortunately you're not the first person who's had a bike pinched during or after a test ride.

CD, that's good in a way they sent you a 14mm axle, atleast it's a straight drop in for your torque plates. And yes, the bombers X5 motor uses 14mm axle.

And before anyone goes circling the drop-out anomaly above, be aware, we added a small amount of metal (via welder)
Ah, too late :p 
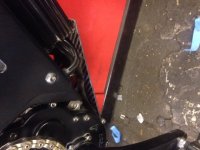
Just to clarify, did you only weld one side ? The photo isnt totally clear, I've circled what looks to be the welded side and drawn an arrow to what looks like the unwelded side. Is that right ?

CD-drop.jpg
 
:lol: :lol: :lol: Jay, predictable as always.

Yeah, only one side really needed the fix up, and you've correctly figured out which. I couldn't slide the motor right into the drop-out in that shot because of it so need to grind it back till I can.

I'm guessing you can see something wrong? What now? :roll:

Cheers
 
Ummm.
 
DunkenKBliths said:
QMS said:
URGENT URGENT URGENT DEMO BIKE JUST STOLEN#

Just posted on Twitter...with picture...I have a few thousand followers...so hopefully it might get picked up !

This is obviously too late, as hyena mentioned there are some pretty cheap GPS loggers these days, easy to mount with all the other gizmos, most wouldn't know it's there, just rock around to their place with the cops or the local footy team.

People mount them to their drones Incase they fly off.
 
Would be keen on a recommendation for these. I know some use a very coarse location and some are quite accurate but need an active sim card.
 
Cowardlyduck said:
:lol: :lol: :lol: Jay, predictable as always.

I'm guessing you can see something wrong? What now? :roll:

Cheers

No trying to be a smart a$$, but you went from a motor with a 40+mm wide stator to a motor with a 35mm wide stator, this will translate into about 10% less thrust acceleration, but you will probably gain 1-2 Km/H top speed. I think you are going to be disappointed performance wise. I know I would. That said, the bigger axle and your swingarm repair is definitely a step in the right direction and those issues will probably be resolved.
 
Rix said:
No trying to be a smart a$$, but you went from a motor with a 40+mm wide stator to a motor with a 35mm wide stator, this will translate into about 10% less thrust acceleration, but you will probably gain 1-2 Km/H top speed.
How do you figure that? I think I know why you are thinking that, but curious as to why you claim it?

The Leaf motor is 10% more efficient than the HS40...so yeah, it might have 10% less torque, but will make 10% less heat at the same power level. Also keep in mind, I didn't buy this motor to break any thrust/acceleration records. As mentioned previously, I originally bought this motor to make a reliable slightly lighter and cheaper alternative to the HS4080 with similar performance.
So the Leaf motor at 7.2Kg, $260, and a 14mm axle VS the HS40xx at 8.4KG, $900, and 1/2" axle...so far I think I've succeeded. :mrgreen:

So I can see your not trying to be a smart a$$...your just completely missing the point.

Cheers
 
Cowardlyduck said:
Rix said:
No trying to be a smart a$$, but you went from a motor with a 40+mm wide stator to a motor with a 35mm wide stator, this will translate into about 10% less thrust acceleration, but you will probably gain 1-2 Km/H top speed.
How do you figure that? I think I know why you are thinking that, but curious as to why you claim it?

The Leaf motor is 10% more efficient than the HS40...so yeah, it might have 10% less torque, but will make 10% less heat at the same power level. Also keep in mind, I didn't buy this motor to break any thrust/acceleration records. As mentioned previously, I originally bought this motor to make a reliable slightly lighter and cheaper alternative to the HS4080 with similar performance.
So the Leaf motor at 7.2Kg, $260, and a 14mm axle VS the HS40xx at 8.4KG, $900, and 1/2" axle...so far I think I've succeeded. :mrgreen:

So I can see your not trying to be a smart a$$...your just completely missing the point.

Cheers

Yah,I missed your point completely :shock: and didn't see it from your perspective of being more efficient, and economically cheaper. What I queued in on was "3540 performance" with the better axle. Okay, so now that I am tracking with you CD, this is the motor you will be running with the Mini, are you going to be sticking with 12S lipo? Still want to know what you get for top speed with OVS on 7. Got an ETA for when this will be up and running?
 
Rix said:
Yah,I missed your point completely :shock: and didn't see it from your perspective of being more efficient, and economically cheaper. What I queued in on was "3540 performance" with the better axle. Okay, so now that I am tracking with you CD, this is the motor you will be running with the Mini, are you going to be sticking with 12S lipo? Still want to know what you get for top speed with OVS on 7. Got an ETA for when this will be up and running?
Cool. :)
Well, everything is a bit up in the air atm.
Since it looks like my HS4080 will now live again with it's new axle and improved torque blocks, I'm think about using it on the Fighter mainly and potentially using the Leaf on another bike. That being said, I will be lacing the Leaf into the 24" rim from my old busted HS4065, so I will be able to swap it over to the Fighter if I want to. And I think I will do that for when I want to do longer rides as the increased efficiency and reduced weight could get me and extra 10km+ range. :)

As for my Adaptto...I got it back from warranty repairs from Russia the other week. I just got around to testing it last night and it's got the same original issue where it doesn't read or display power readings. :x
Adaptto told me they tested it twice before sending back, but I suspect their tests didn't include closely examining the display to see that it read/displayed power readings properly. It still runs motor's, but has no way of limiting itself, or showing how much power is used which is how it blew last time.
This time hopefully they can look at it before it blows so they will know how to fix it for good. :roll:
But considering I've already spend 1/4 of the total cost of the thing in posting it back (insured) to Russia for repairs, I'm not keen to repeat that without some sort of compensation from Adaptto which I will be seeking. We'll see how it goes. :|

So for now the ETA is some time in the next few weeks...with my old 18Fet Infineon as the controller and the original 16S LiFeP04 stock battery with over 500 cycles as my pack. At least it will be running. :)

Cheers
 
Bummer about the mini E. Good new about the bigger axle for the 4080 though. Who is machining the new axle for you?
 
Rix said:
Bummer about the mini E. Good new about the bigger axle for the 4080 though. Who is machining the new axle for you?
Sorry, I should have clarified.
By 'new' axle, I really meant the axle we salvaged from my old busted HS4065...what we've been discussing the last few pages. So it's all the same specs...just without the stripped threads my HS4080 had previously.
So it would have the same rotation issues as before, however we beefed it up with some welds on the axle and on the dropouts, and made the changes to the torque blocks as posted previously, so I'm hopeful this axle will last even though it's 1/2" cheese metal.

I ground back the weld on the dropouts, and wire brushed them to clean them up a bit. A nice new coat of paint and they look pretty good IMO. :)

DSC_2348.jpg

DSC_2350.jpg

DSC_2352.jpg

DSC_2354.jpg


Cheers
 
Just a little home made carbon shit guard,makes it easyer to clean especially when u get dog shit flick up onto the wires etc :shock:
 

Attachments

  • image.jpg
    image.jpg
    44.8 KB · Views: 2,441
Jimboyr6 said:
Don't those welds have to be perfectly flat on inside of swing arm ?
It is pretty flat already...pic doesn't really show it.

Jimboyr6 said:
Just a little home made carbon shit guard,makes it easyer to clean especially when u get dog shit flick up onto the wires etc :shock:
I like it. :)
I need to do something similar as the mess I get on the wires around here sucks. :)

Cheers
 
Cd you've dropped 15% from your stator width and torque will be a similar drop.
Torque is proportional to stator width, assuming they are using the same parameters for copper fill and neodymium grade.
You can can feed it a bit more juice to compensate. You'll have to.
Net nett you'll be about the same kwh per km, just a less responsive motor.

Did it end up being $260? I thought that was the USD price, but thought postage was extra?
 
Theodore Voltaire said:
Thanks efMX. That's what I do, except I always install the caliper last. Seems easier that way.
I'm not sure what you mean. Note that you don't have to remove the front brake caliper to remove and reinstall the front wheel. Loctite the caliper bolts in place when the caliper is aligned with the rotor. Then don't disturb it. Even when changing the pads, leave the caliper mount bolts alone.

With USD-8 fork:

- Get the upper fork caps level in the triples. Don't worry about the fully extended length of each fork being different. That's because the top-out stopper is in the left leg. All fine.
- When installing the front wheel, push the axle through from the brake side first, then lift the right side lug a little so the axle pops through into position. The tighten the end cap bolts lightly, then the pinch bolts. No need to go real tight on anything. The axle or caps will never come loose. It's very important that the axle is lightly lubed before installation, so it sits square/true in the fork lugs.
- Release the air pressure out of the right (damper) leg if not riding for a week or more. That greatly reduces the chance of air leaking past the piston seal into the the damper oil. I used a dremel grinder to make more clearance around the schrader valve for easy air filling.
- check that the bushing caps are tight on the bottom of each gold alum upper tube. DNM didn't do mine up very tight at the factory.
 
Samd said:
Cd you've dropped 15% from your stator width and torque will be a similar drop.
Torque is proportional to stator width, assuming they are using the same parameters for copper fill and neodymium grade.
You can can feed it a bit more juice to compensate. You'll have to.
Net nett you'll be about the same kwh per km, just a less responsive motor.

Did it end up being $260? I thought that was the USD price, but thought postage was extra?
I get that.
As mentioned, I was never after better performance than the HS40, and don't mind a slight torque drop.
Sure, I'll have to feed it more power when and IF I want the same torque, but the point is I won't be doing that most of the time and therefore it WILL be more efficient overall. So no, it won't be the same kwh per km...it will be better, especially on long lower power rides.

It ended up being $260 including postage, but yeah that was US, so $352 AUS by today's rates (which are a fair bit worse than when I bought it). And yeah I'm aware that's about the same as a MXUS, however I got the custom axle shoulder width included in that price, so not a bad deal IMO.

Just because my circumstances and needs don't match the majority of others here doesn't mean I've made the wrong motor choice.

Cheers
 
Emmett said:
Theodore Voltaire said:
Thanks efMX. That's what I do, except I always install the caliper last. Seems easier that way.
I'm not sure what you mean. Note that you don't have to remove the front brake caliper to remove and reinstall the front wheel. Loctite the caliper bolts in place when the caliper is aligned with the rotor. Then don't disturb it. Even when changing the pads, leave the caliper mount bolts alone.

With USD-8 fork:

- Get the upper fork caps level in the triples. Don't worry about the fully extended length of each fork being different. That's because the top-out stopper is in the left leg. All fine.
- When installing the front wheel, push the axle through from the brake side first, then lift the right side lug a little so the axle pops through into position. The tighten the end cap bolts lightly, then the pinch bolts. No need to go real tight on anything. The axle or caps will never come loose. It's very important that the axle is lightly lubed before installation, so it sits square/true in the fork lugs.
- Release the air pressure out of the right (damper) leg if not riding for a week or more. That greatly reduces the chance of air leaking past the piston seal into the the damper oil. I used a dremel grinder to make more clearance around the schrader valve for easy air filling.
- check that the bushing caps are tight on the bottom of each gold alum upper tube. DNM didn't do mine up very tight at the factory.
 
Theodore Voltaire said:
Emmett said:
Theodore Voltaire said:
Thanks efMX. That's what I do, except I always install the caliper last. Seems easier that way.
I'm not sure what you mean. Note that you don't have to remove the front brake caliper to remove and reinstall the front wheel. Loctite the caliper bolts in place when the caliper is aligned with the rotor. Then don't disturb it. Even when changing the pads, leave the caliper mount bolts alone.

With USD-8 fork:

- Get the upper fork caps level in the triples. Don't worry about the fully extended length of each fork being different. That's because the top-out stopper is in the left leg. All fine.
- When installing the front wheel, push the axle through from the brake side first, then lift the right side lug a little so the axle pops through into position. The tighten the end cap bolts lightly, then the pinch bolts. No need to go real tight on anything. The axle or caps will never come loose. It's very important that the axle is lightly lubed before installation, so it sits square/true in the fork lugs.
- Release the air pressure out of the right (damper) leg if not riding for a week or more. That greatly reduces the chance of air leaking past the piston seal into the the damper oil. I used a dremel grinder to make more clearance around the schrader valve for easy air filling.
- check that the bushing caps are tight on the bottom of each gold alum upper tube. DNM didn't do mine up very tight at the factory.

Thanks Emmett, much appreciated.
 
I got to tell you guys about something that's bugging me now about my bike. It's not really my bikes fault, it's this other bike I bought. A cheap electric fat bike. It's not compatible to a Stealth in any way except one, but in that one tiny way it beats the crap out of my Stealth. Now every time I look at my Stealth, I'm thinking, how can I get this for my bike, except in 24" ?

In this case the rim is 26" x 3" inside width. The tire is a 26 x 2.5 Hook Worm. the actual tire width mounted is 3.3" I'd like the same thing except with a 24" rim, and tire.

It looks like a tire such as this would fit in the swing arm, but the forks would be a problem. Maybe the newer forks are wider then 3.3" ?

 
Hi

I Belive one of my Hall sensors is toasted. How do you measure if and witch Hall Sensor is broken ? On a Stealth Bomber. Any one have any experience with this. Thanks.
 
stritzky said:
Hi

I Belive one of my Hall sensors is toasted. How do you measure if and witch Hall Sensor is broken ? On a Stealth Bomber. Any one have any experience with this. Thanks.

A Hall sensor tester is the easiest way, not exactly sure where I got mine...it was a while ago.


Without one of these, you'll need a multimeter and do it like this:

https://www.ebikes.ca/documents/HallSensorTestingFinal.pdf
 
Back
Top