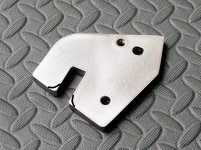
Long story short: I needed torque plates for an aluminum frame build. I wanted open plates instead of the kind with axle through-hole. I've made dropout plates before and although it's not difficult, with just hand tools for sawing and filing it's fussy time consuming work. With another build planned with similar requirements, it seemed worth the effort to make a tool to simplify torque plate fabrication.
The Idea
The angle grinder is a mainstay of metal fabrication but it's a 'big arm muscle' tool that limits fine control when moving the grinder into the work. The idea is to jig up a mount and table so small hand muscles can instead move the work into the fixed grinder so closer tolerances and finer finish are possible.
The Result
This torque plate is cut from 1/4 inch 304 stainless and was made with the tool described below -- without hand sawing or filing (well - save for light filing to remove grinding flash from the lower edges).
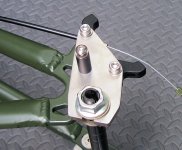
The Tool
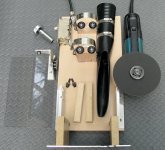
The tool consists of a mount to firmly hold a 4 1/2 inch angle grinder (Makita with Paddle switch) and a table to position the work. The table can be adjusted so the center line of the work is on a radius of the cutting/grinding wheel to give a square bottom to the kerf. It can also be dropped so work up to 3/8" can be ground without running into the grinder disk retaining nut. The thing cuts and grinds really fast and gives a nicely finished perpendicular edge. A shop vac pickup keeps the air more or less free of smoke and cutting waste.
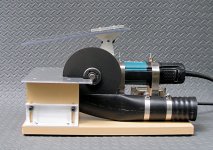
View attachment 6
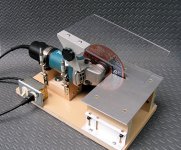
View attachment 8
View attachment 7
Making a Torque Plate
Because a small error or variation in the slot can throw off the holes and edges quite a bit, the idea it to cut the slot first, then lay out the rest of the part to accommodate however the slot comes out. This allows fairly imprecise slot alignment during fabrication but with a nicely aligned final product.
My first plate is shown above. Here's some shots of making the second plate for the drive side of the frame.
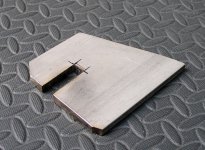
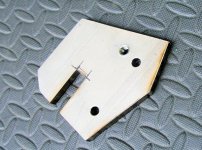
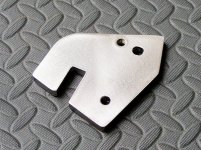
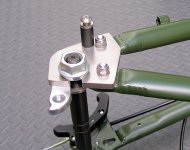
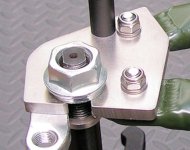
Anyhow - these first torque plates came out pretty spiffy and I'm pleased not to rely on generic TAs or iterations with Big Blue Saw. The slotting, cuts, and shaping went quickly and it was nice to skip the sawing and filing stuff...
The Idea
The angle grinder is a mainstay of metal fabrication but it's a 'big arm muscle' tool that limits fine control when moving the grinder into the work. The idea is to jig up a mount and table so small hand muscles can instead move the work into the fixed grinder so closer tolerances and finer finish are possible.
The Result
This torque plate is cut from 1/4 inch 304 stainless and was made with the tool described below -- without hand sawing or filing (well - save for light filing to remove grinding flash from the lower edges).

The Tool
The tool consists of a mount to firmly hold a 4 1/2 inch angle grinder (Makita with Paddle switch) and a table to position the work. The table can be adjusted so the center line of the work is on a radius of the cutting/grinding wheel to give a square bottom to the kerf. It can also be dropped so work up to 3/8" can be ground without running into the grinder disk retaining nut. The thing cuts and grinds really fast and gives a nicely finished perpendicular edge. A shop vac pickup keeps the air more or less free of smoke and cutting waste.

View attachment 6

View attachment 8
View attachment 7

- The fore and aft grinder mounts are scrap wood with a pair of rubber feet (Home Depot) screwed down. The circular body of the grinder rests on/between the feet so no fancy shaping of the mount is required - all simple square cuts. These two ends are joined by a base piece to form a pedestal that can be mounted to anything. There are two 3/8" holes in the pedestal base piece which is held down to the base with 1/4" bolts and fender washers so the pedestal can be slid around a bit to get it square with the table. The base is chopped from a scrap particle board shelf from the dump. All components are bolted to the base using M5 sheet metal rivnuts set into through holes or using EZ-Lok 1/4-20 threaded inserts. This allows easy and repeated assembly/disassembly in spite of the particle board.
- Two stainless 4 1/2" spring loaded turbo intercooler T-bolt clamps (search: eBay) were cut into two sections, drilled, and screwed down to form the retaining straps. The spring-loading feature is nice, but not strictly necessary. The provided clamping nuts were nice and tall but had a tight friction fit. As an alternative to replacing them for ease of use, a tap was run through to get standard clearance. Adjustment is easy with a deep socket and ratcheting Harbor Freight finger-grip handle .
- The table is cut from a bit of 1/8" 5051 aluminum leftover and screwed to some particle board legs. The sliding mounts were made by slotting some aluminum channel. In the low position the table allows clearance for 3/8" material to pass under the grinder retaining nut and can be raised to whatever height is appropriate for the thickness of the work to get a square-bottom kerf. A couple of particle board spacers were run off to make it easy to set the raised height for 1/4 inch plate. An alternative to an adjustable table would be to simply knock up a couple of separate wooden tables or legs and use whichever was appropriate.
As it turns out the aluminum gets dug up by the grinding flash on the lower edge of the work so it's necessary to stop from time to time to strip the flash off the bottom corner with a few file strokes. A few quick rubs with a sanding block smooths the aluminum plate when the job is done. That said, a wooden table top with a scrap of duct work sheet metal tacked on the deck might avoid some of this.
- The vacuum pickup was not planned, but a lucky find of a discarded curved shop vac extension at the dump supplied the part. A little reshaping with a hot air gun squeezed it a bit. Two hose clamps drilled and screwed to the base hold it in place. Without this, a bit of aluminum flashing (Home Depot) was going to be tacked to the base to deflect the molten grinding particles.
- The 3/16" polycarbonate shield (search: eBay) is simply screwed into the handle mount of the grinder. The mount was made from bits of aluminum angle but there are many mounting alternatives (I was going to use the gooseneck from an old desk lamp before the present mount idea popped up). In spite of the fixed shield, a full face shield is recommended...
- I already have a 6 inch disk table sander (part of a belt sander), but lacking that, this jig could do sanding as well. It's hard to find rigid sanding disks for these angle grinders so I would probably just use a common 6" stick-on sanding disk stuck to a thick 6" cutoff wheel (cut out the arbor hole in the sanding disk). This would give a pretty stiff fiberglass reinforced disk that should give a good finish for long straight work edges.
Making a Torque Plate
Because a small error or variation in the slot can throw off the holes and edges quite a bit, the idea it to cut the slot first, then lay out the rest of the part to accommodate however the slot comes out. This allows fairly imprecise slot alignment during fabrication but with a nicely aligned final product.
My first plate is shown above. Here's some shots of making the second plate for the drive side of the frame.


- Layout was done from paper cutout to get rough location and orientation of slot. The work was cut oversize to allow adjustment for angle errors, etc. The table assembly imposes limits because of limited 'throat' - the space between cutting wheel and gear head. Because of this, cutting the work piece from the stock plate and certain rough cuts were done freehand with the unmounted grinder. These rough cuts are discarded later anyway, so precision and skill are not an issue. Smaller rough cuts were done last using the table to trim the work just enough so that it could lie flat on the bike dropout for fitting/marking.
- The slot was cut by drilling a roughly 8mm hole then making two parallel cuts to free the center chunk from the slot. A 'no-drill' alternative would be to make the two side cuts then two diagonal cuts leaving a pointy bottom to the slot to be ground flat. The slot was made about 2mm too narrow and not quite deep enough; a fresh grinding wheel with nice square edge was used to bring the width to spec and grind to depth. Unlike the thin 0.045" cutoff disk, the grinding wheel is 0.25" thick and the wheel edge easily makes a smooth square bottom to the slot. A spare axle was used to continually check the fit ($12 MAC replacement axle from EM3EV - a handy 'tool' for dropout and TA work). So - no hand filing at all to make the slot.
- With the slot cut, the part was mounted up and clocked fully in the direction of wheel rotation. The holes were then marked and drilled. Since motor torque tries to spin the shaft counter to wheel rotation, this ensures the torque plates - not the frame - will carry the rotational load. This was for a geared hub with uni-directional torque - centering the slot with the test axle would be recommended for a DD with regen.
Due to a drilling whoops I needed to file one of the holes slightly so the loaded position of the plate properly shared torque with the other plate. A chainsaw file is a good choice - long and round with a constant diameter the entire length.
- After the part was clocked to the proper position and the holes drilled, the exact orientation on the frame became finalized, so the excess material was marked then cut and ground away to get a nice visual appearance. Cutting goes so quickly that there is no real penalty to this double 'initial rough cut/final finish cut' strategy. After grinding, the edges were sanded using a table disk sander to get a finer finish - but this wasn't strictly necessary. The faces were hand sanded a bit with 60 grit then 100 grit emery cloth - again not really necessary.
Anyhow - these first torque plates came out pretty spiffy and I'm pleased not to rely on generic TAs or iterations with Big Blue Saw. The slotting, cuts, and shaping went quickly and it was nice to skip the sawing and filing stuff...
- FWIW: I was going to make these first plates out of common mild steel bar stock (Home Depot, eBay, etc) but went with the 304 stainless on a lark. There was no real downside to cutting and grinding the stainless, but tapping was very difficult and time-consuming (not much fun to drill either). I would really recommend mild steel if tapping is part of the design.


