JP spot welder

Lurkin said:
Welcome to the forum!

At what point are you using these connectors? to connect parallel packs? I'm not sure if I'm following how you are planning to use them. I haven't seen anyone use them.


He is using these to connect normal wires to the ends of battery pack by running a nickel strip off the side and then crimping this connector to it and crimping the wire to the other side of this piece.
 
my welding 84v35Ah 280pcs Samsung 25R cell


I'm very happy with my purchase

packages are sealed easily and connections are very strong
 
arek_arecki said:
my welding 84v35Ah 280pcs Samsung 25R cell


I'm very happy with my purchase

packages are sealed easily and connections are very strong

Are all those welds necessary? It seems like each tab has over 10 or 12 welds per cell? I see most other people use 6 welds per cell.

How do you determine how many welds per cell you will need?
 
Try to avoid welding in the middle of the negative side.
4 dots is all you need if the weld are strong, but sometimes on a few, you need to take 6.
 
Unfortunately, today, JP Spot damaged, do not know why. Probably one of the transistors burned out. I use always juas 110Ah 900A and nickel 0,15-0,2mm. The time I set on 8-12ms. I'll have to send JPSpot to riba2233 for repair
 
Guys, I updated my 3D printed spot welding fixtures on Thingiverse.

They work really well. I have already made small battery packs using 18650 and AAAs with no issues.

Try them out and give me some feedback!

http://www.thingiverse.com/thing:1205466


ec44744ab36e8094482d9fd6d0f703b8_preview_featured.jpeg
 
Who has bought one of these spot welders in the San Francisco/San Jose , California Area ?

I would like to build some packs ( a couple of small 4s 1p and 4 s 2 p, as well as a 48/or 52 volt 5 p pack for my bicycle.
I do not know enough about also soldering/welding a BMS , where to get the BMS ect.
So
I would like to hire someone to make me a couple of packs .


Thanks
 
riba2233,

Where did these nickel / copper strips come from:

Clipboard01.jpg

Did you make them or did you find them already made somewhere?
 
Viewed videos of your spot welder in operation and am very much interested in purchasing the DIY kit.
Please advise of cost for DIY kit and least expensive shipping to USA, Florida, 33319-3625 along with safest
payment options. Thanks very much.
 
bones007 said:
riba2233,

Where did these nickel / copper strips come from:


Did you make them or did you find them already made somewhere?

Here is the thread which has the links to lots of these materials.

https://endless-sphere.com/forums/viewtopic.php?f=14&t=68005
 
dssguy1 said:
I made one to 3D print. I will print it tonight and of my dimensions were right, I will upload it for others to print.
This ever happen? Also I found a file for printing a 18650 holder and there were a and aaa holders too. Can anyone point me I can't find it again.

Also any versions that don't use so much material? Printer tells me, 4 hours.
 
Curious, has anyone considered 3d printing custom 18650 holders per order? I talking about replacing the little individual click togethers for either end of the cell prior to spot welding. Theres pre made packs on aliexpress which I intend to buy and butcher (less space between the cells than the individual click togethers) but it would be so much nicer to just custom print the correct pack with no butchery/waste?
 
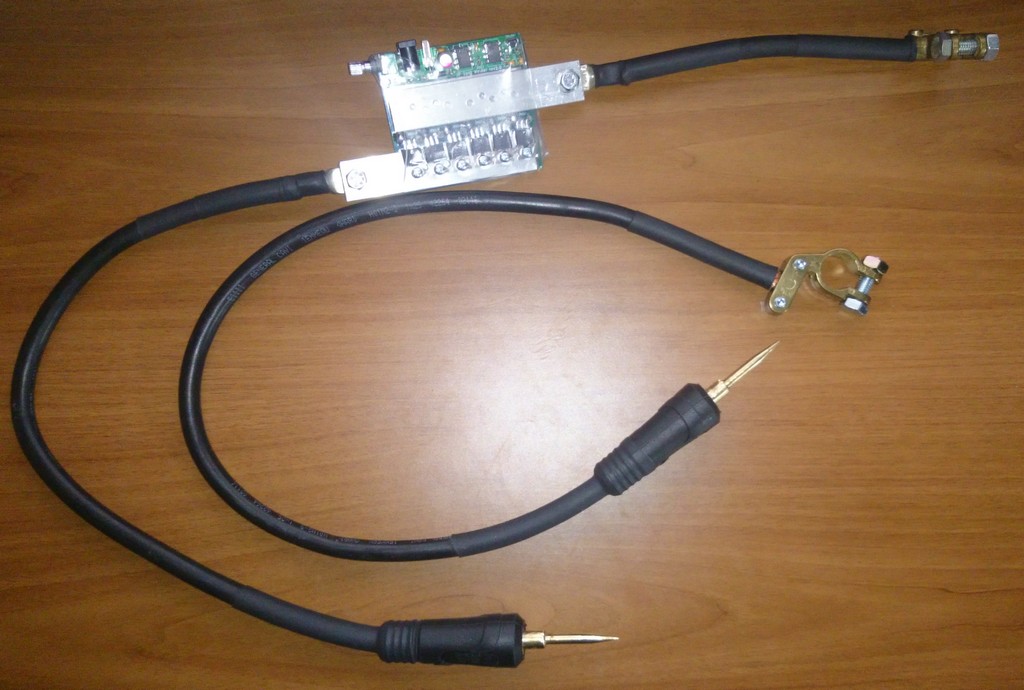
Finally I got my JP Spot Walder + Electrodes to work (already had footswitch and 12V DC adapter).
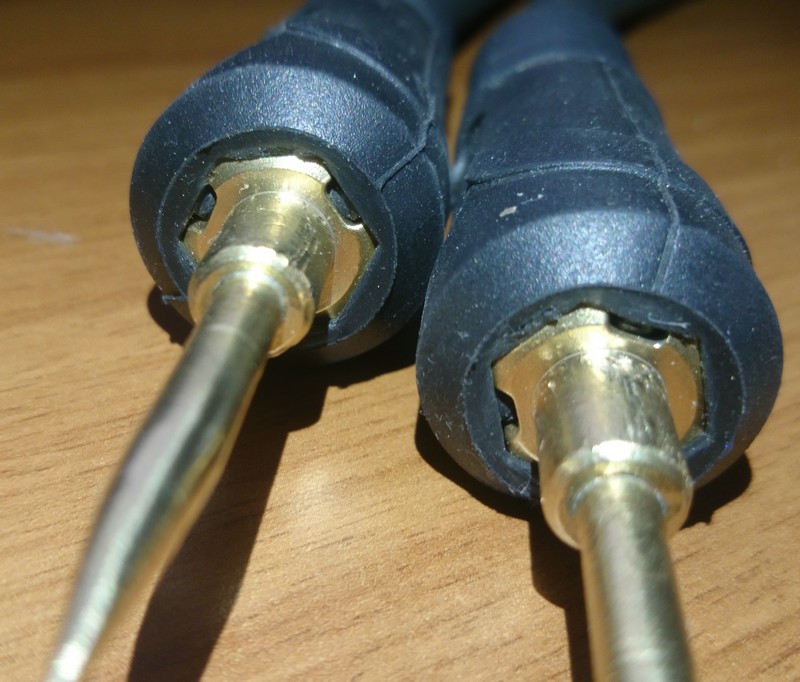
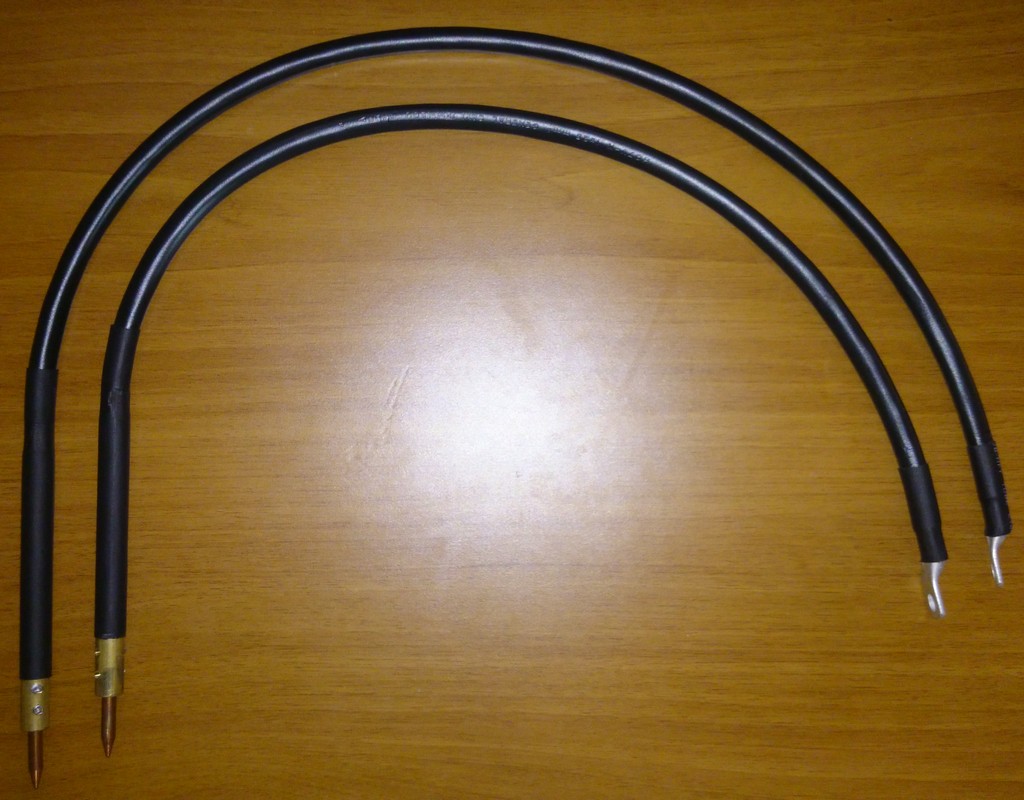
At first I bought only the welder, and I've managed to build electrodes on my own, using 2 DINSE connectors with brass tips industrially soldered and 10-25mm welding cable. It wasn't a bad rig, look at the photos

Jg6VN4q.jpg


MYmUzZn.jpg


BUT (to put it simply) IT DIDN'T WORK.

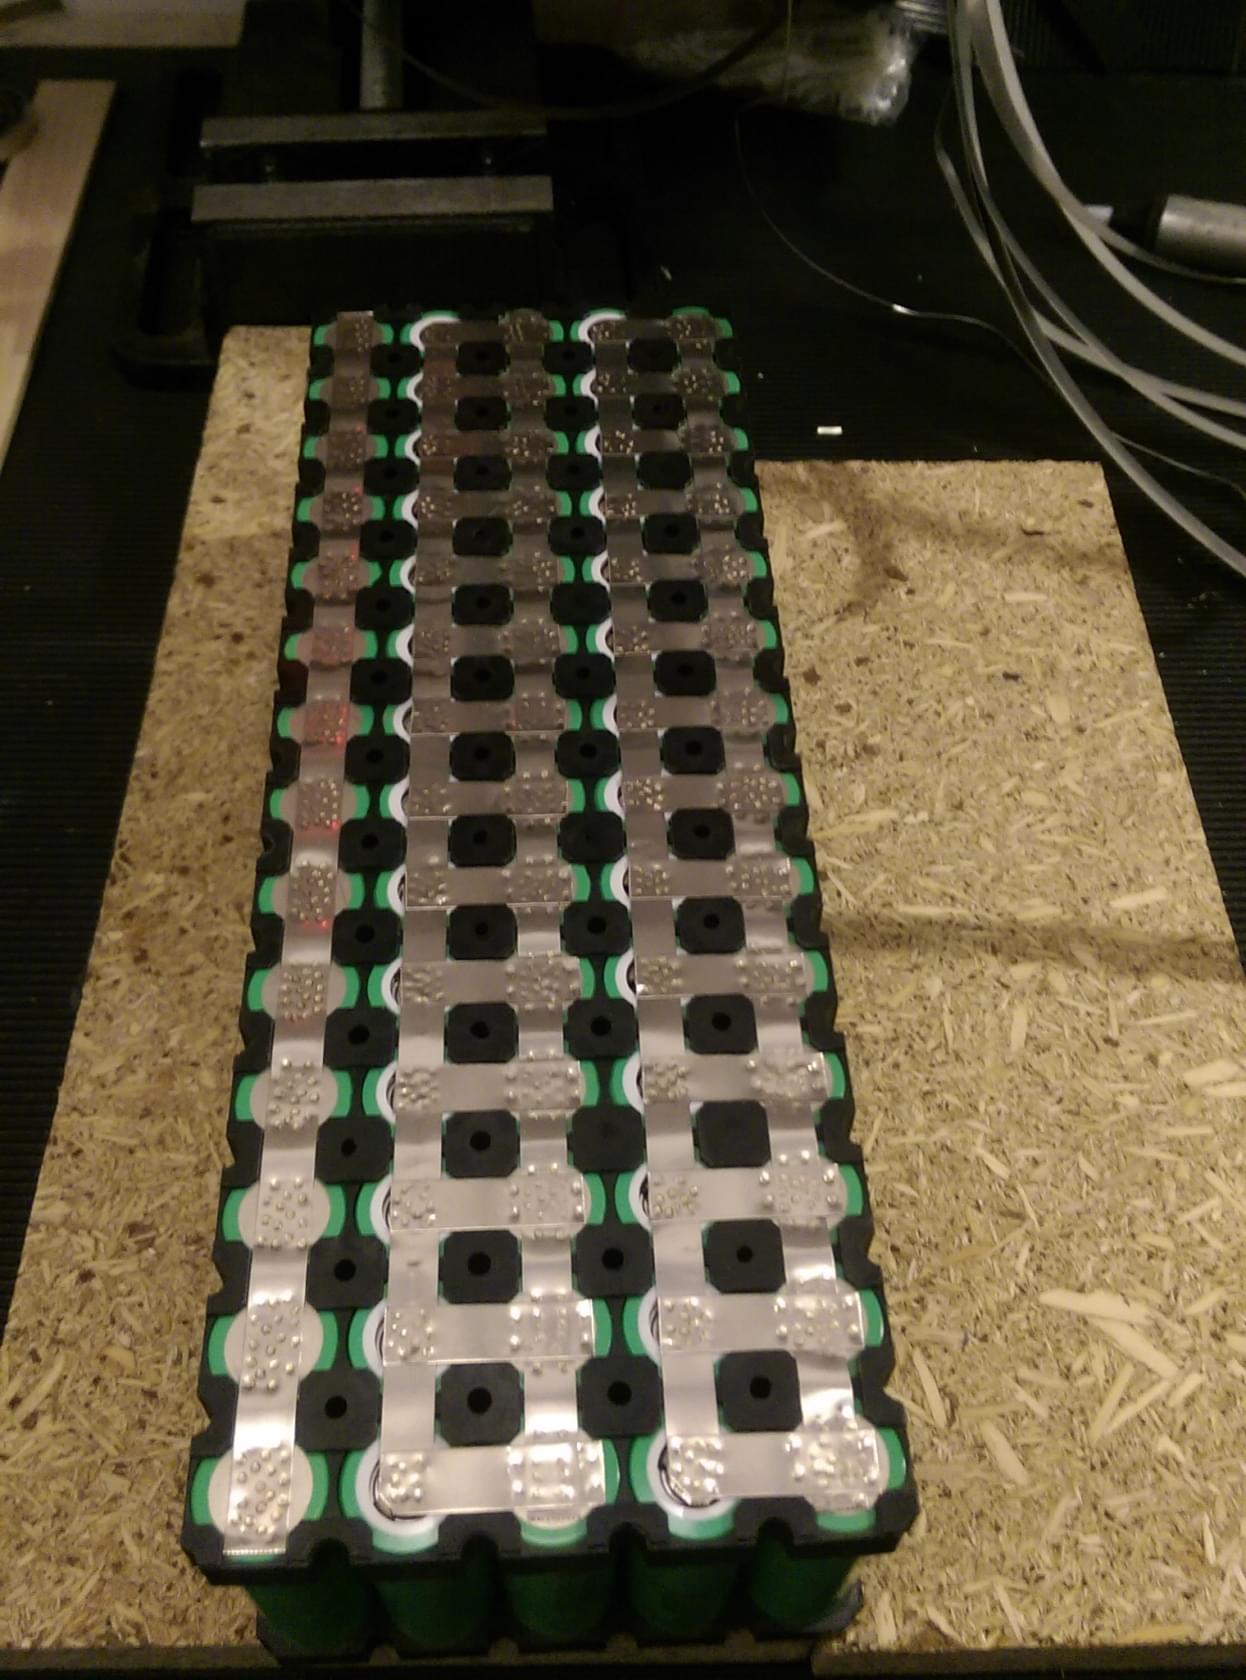
The brass tips ALWAYS stick to the nickel strip (0,15*8 mm pure nickel) and the nickel strip won't stick at all to the 18650`s metal surface (tried both negative and positive sides, just to be sure).

This are the ”original” JP's electrodes, very solid and accurate construction

HcbX6K2.jpg


that works perfectly. Tried today (with the same 0,15*8 mm pure nickel strip) using a six months old VARTA C14 56AH 480A fully charged yesterday, and some dead 18650 batteries from a dismissed 18V Makita pack.
Originally, the Makita battery was assembled using thick nickel strip (at least 0,3mm) and I encountered some difficulties desoldering the batteries without destroying/ruining everything inside the plastic case.
Using JP's spot welder and 10ms time, the soldering points between nickel strip and 18650 battery have 90 % strength of original Makita industrial soldering process (maybe they rely on the same JP spot solder, who knows :) ) and I suspect the 0,3mm thickness plays a determinant role in obtaining a such effective result. I don't see the reason (with such weak 56Ah battery) to cut down welding time to 6-7ms, 2-3 ms more wouldn't destroy your new 18650 batteries, and using less time than necessary leaves you with less than reliable welding spots between nickel strip and batteries.
I plan to buy 0,2*8 mm strip, I'll post my result with it (have to wait 3-4 weeks, China is not so close to Europe :) ).
 
@bones007: Those are this ones:

http://www.aliexpress.com/item/Lm386n-op-amp-audio-amplifier-0-25w-dip-8/1781712921.html

And copper wire with silver plating is this one, but you can find it many other places, even ebay:


http://www.banzaimusic.com/Silver-Wire-1-0mm.html


@mcicare: you'll get PM :)

@lurkin: I've done that for one pack, it's a good idea if you have time, printer, and know how to get fine enough print, I've made it only in third try.

@rio: thank you for the report! :)
 
Lurkin said:
Curious, has anyone considered 3d printing custom 18650 holders per order? I talking about replacing the little individual click togethers for either end of the cell prior to spot welding. Theres pre made packs on aliexpress which I intend to buy and butcher (less space between the cells than the individual click togethers) but it would be so much nicer to just custom print the correct pack with no butchery/waste?


Look up a few posts. I created some 3D printed holders to help build packs. You can make them in any configuration. Worked first print for me.
 
Finally completed my DIY welder today and started to experiment. Some odd issues here.

Using an 875 cranking amp (700 CCA) battery, 1 year old, fully charged and hardly used.

I started to test weld using a big C disposable battery. What I found is that .13 nickel welded fairly easy but still took 5-10ms, and probably closer to 10ms for consistent welds.

Using .15mm x 7mm took around 15-20ms. Something really didn't seem right here because Riba was quoting much lower ms. I also wasn't getting any sparks. Even at 15-20ms with .15, I wasn't getting strong welds all the time. .15mm was much harder to weld than .13mm.

The other issue was the positive electrode wasn't welding as strong as the negative.

I wasn't too happy to be honest and thought something may be wrong with the welder. I stopped, read a bunch again about timings and decided to go out again to try and do more tests to figure out what is wrong. I thought maybe it was because I was welding to a large C disposable battery which is too large to weld to and decided to try some AA smaller batteries.

While experimenting I discovered that how much force or pressure you use with the electrodes determines how strong the weld is. The harder you push, the less sparks you get and the weld is much weaker!
I never read anything about this and have read a lot, including this entire thread.

Riba mentioned in his video to push firmly, specifically when he was going to weld thicker strips, so I was pushing down as hard as I could! but that was causing no sparks, and weak welds.


The final test was I finally tried .2mm nickel. I pushed as hard as I could at 20ms, and my welder could not weld the .2mm nickel, it pulled right off easily. SO at my highest pulse time, and pushing as hard as I could, the weld pulled off with almost no force with my fingers.

I then did another test at same 20ms pulse time and I used just a little downwards force and guess what, I needed pliers to remove the .2mm nickel and they also had two nice holes in it. How much downwards force makes a huge difference on how the welds come.

So I am confused here? Why is pushing hard with the electrodes making the welds weak and causing no spark? How much force do I need to use?

Has anyone else noticed this? This may explain why the positive electrode is also weak because I was using my right hand, and that may have made me push harder with it.

What was happening here is as my welds seemed weak I was pushing even harder thinking pushing harder would make it weld better, but what was happening was the complete opposite.
 
this is resistance welding, you have to be in the right spot of contact resistance to obtain enough heat to weld.
keep in mind simplified rule what you discovered yourself:
at same current
pushing hard equal less resistance, less heat, weaker weld
pushing gently equal more resistance, more heat( so more energy on the weld), stronger weld
 
vehiculeselectriques said:
this is resistance welding, you have to be in the right spot of contact resistance to obtain enough heat to weld.
keep in mind simplified rule what you discovered yourself:
at same current
pushing hard equal less resistance, less heat, weaker weld
pushing gently equal more resistance, more heat( so more energy on the weld), stronger weld

Thanks, makes senses.

I wonder why has this hasn't been discussed more often. Downwards pressure makes a huge difference that I would think it would have been brought up more often.

It could also be that the new designed JP electrodes are so skinny and well built that you can now hold them more straight and use a lot more force without worry.

Maybe it is just common sense to everyone except me :D .
 
Back
Top