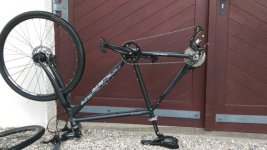
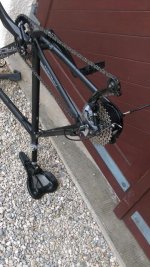
Lightweight build Q100 cst 201 at 14s

I was reading around on the forum and some were saying that it didn't fit with a 9 speed so I checked and it fits :)
I am really happy how the cassette hides the motor. :D
motorwithcassetteside.jpg
motorwithcassette.jpg

I still don't know how I am going to tidy the controller cable I am wondering if I will cut the cable I don't need.
I am really impatient to get my shipment it's going to be hard to wait
 
First thanks for sharing your build. Really helps me as a newbie to all this to get started!!

Just checked out the controller you got.
http://em3ev.com/store/index.php?route=product/product&path=41_38&product_id=77

It says it has 3 programmable speed settings. Once you program those settings, how do you switch between them? Is there a physical switch on the controller?
I want to have such a switch and wonder how to do that? Switzerland probably has a 25kph limit as well so it would be great to switch to that if necessary...


I want to build pretty much the same thing you are building (stealth!!) and I'm thinking about either putting the battery in a pannier bag or inside a proper water bottle. Check this guy out. https://www.electricbike.com/mini-hub-motors/ How cool would it be to be able to take the battery out of the holder once you lock the bike... and have mutliple bottles to extend your range!

Will you also have some kind of pedelec sensor or just the thumb throttle? Any other parts your putting in you didn't mention yet?

Good luck :D
 
The battery in the bottle seemed a bit hard to do because it is not easy to put 18650 cells in that format. that's why I am going with a tiny pack in the seat bag. I will most likely use this seat bag to put the battery in http://www.chainreactioncycles.com/ch/fr/sac-de-selle-topeak-sidekick/rp-prod57999 in medium size it's pretty small and I can take it off easily. Pannier bag would work well but I didn't want on because of the look :D I am only going with thumb throttle so I don't need a screen. I do like the clean look. The only thing that's going to be hard to hid is the controller but we will see what I can do about it.

thanks for following and don't hesitate to ask any questions :wink:
 
Thanks! I'm currently reading tons of stuff about batteries and will see what's the best (water bottled?) solution. Will keep you updated. What range and top speed do you expect your bike to have?
Hope your stuff arrives soon, you must be pretty excited :)
 
leo99 said:
Those anybody know how the phase wire and hall wire match between a infineon 6fet 3077 and a q100cst 201 match ? :lol:


No guarantee but try green-to-green for Hall/Phase wires and blue-to-yellow, yellow-to-blue for Hall/Phase wires.

If that doesn’t work, give this a try - https://endless-sphere.com/w/index.php/Determining_the_Wiring_for_a_Brushless_Motor
 
Have a Q100c CST and it seems the clutch is not disengaging. Have tried to take it a part but cannot seem to un screw the cover. Did try a make shift tool with studs that fit into the three screw holes but could not un screw it. Appreciate any insight. Thanks Espen
 
esp said:
Have a Q100c CST and it seems the clutch is not disengaging. Have tried to take it a part but cannot seem to un screw the cover. Did try a make shift tool with studs that fit into the three screw holes but could not un screw it. Appreciate any insight. Thanks Espen
The rear is a little harder to get apart than the frt. The force of the cassette when pedaling tightens the motor cover.
Go to the hardware store and buy several hex-head 5mm (?) bolts that are a little longer than the panhead bolts that secure the cover.
With those three bolts removed, screw one of the longer ones in so the head protudes a bit over the cover.
Now, using a big screwdriver, a metal rod, or some other kind of "drift", drive the cover off with the drift and a hammer.
You may bend the bolt, but it doesn't matter, just keep hitting it.
If it doesn't come loose, apply heat in the form of a propane torch around the perrimeter of the motor cover, gently heating it uniformaly.
It unscrews in the normal direction, counter-clockwise.
 
Thanks will give that a try. Thought I might need to make a tool that fit the three holes but thinking about I guess the three screws are attached to the clutch so will rotate.
 
Hi guys,
quick update:
It's alive :D
the last few weeks I haven't time to continue my build but this week every evening I have been slowly building:
I laced the wheel. Fist time for me and it went pretty smoothly expect that I had to restart a few times. I am quite happy of the result :)
I then plug everything up and after a few hours. (I forgot that the on-off wires of the controller were not connected ). It now works .
I did a very quick ride and it is everything I hoped for. I still have to solder the wires together, clean the build and buy a bag for the battery

leo

PS: the combo that work for me with the infenion controller from em3ev with the q100c was for phase: Blue/yellow green/blue yellow/green and sensor green/yellow yellow/blue blue/green
 
leo99,

What controller did you get from Em3ev ? ( link )
This one ? http://em3ev.com/store/index.php?route=product/product&path=41_38&product_id=77

If that is the one, it says it has a 25 amp max draw, which from what I have been reading , over 17 amps is too many amps for the little Q100 motors .
How did you limit the amps on the controller ? by using a Display like the Cycle Analyst 2 or Cycle Analyst V3 ?
or
programming the controller by computer ?
Or did you program it to limit the amps to 17 ?

Did you get 13s or 14 s battery pack ?

I would love to see a close up picture , or two, of the connection of Phase Wires and Sensor Wires to see exactly the different color combinations for connection.


leo99 said:
Hi guys,
quick update:
It's alive :D
the last few weeks I haven't time to continue my build but this week every evening I have been slowly building:
I laced the wheel. Fist time for me and it went pretty smoothly expect that I had to restart a few times. I am quite happy of the result :)
I then plug everything up and after a few hours. (I forgot that the on-off wires of the controller were not connected ). It now works .
I did a very quick ride and it is everything I hoped for. I still have to solder the wires together, clean the build and buy a bag for the battery

leo

PS: the combo that work for me with the infenion controller from em3ev with the q100c was for phase: Blue/yellow green/blue yellow/green and sensor green/yellow yellow/blue blue/green
 
Hi scooterman,
That's the controller I took.
I asked them to reprogram it at 15 amps so not to overheat and I am running it with a 14s battery. I'll upload a picture when I can this week of the connectors :wink:
I ended up with a quite a crazy combo because I wasn't sure what a good combo looked and sounded like :D

Leo
 
I am glad you did end up with a combo, since BMS Battery does not want to sell us a controller other than the little 36 volt one for the Q100 motors.
There is another small 48 volt controller that was on AliExpress a year ago, that would , perhaps , work but some of the connectors are different .
and I do not know if it is even still available .


Now that I have had an Infineon Controller , and Cycle Analyst 2.3 , to work with a Mac hub motor, I am quite happy with the Infineon Controllers and Cycle Analyst Display.
I can adjust, at any time,
the amount of amps that I can run through the controller and motor, buy just a few button pushes on the C.A. 2.3, in other words, I can adjust for what kind of riding I do that day,
or even adjust down the amps if I am going for longer distances, slower speeds during a ride , when stopped of course .

The only thing I do not like about both of those. is the size of the Infineon Controllers, they are bigger than the really cheep small ones,
and
The size of the Cycle Analyst. it is like a brick, and the mount is terrible, however I am extremely Happy with it, and its functions, and just lately I found a better way to mount it .
here : http://em3ev.com/store/index.php?route=product/product&path=41_59&product_id=157

I look forward to pictures of how stock you made the bike look, and especially the close up of the connectors,
When you say Blue/Yellow, does that mean
Blue from the Motor - to - Yellow of the controller ?
or
Blue from the Controller - to - Yellow of the motor ?


leo99 said:
Hi scooterman,
That's the controller I took.
I asked them to reprogram it at 15 amps so not to overheat and I am running it with a 14s battery. I'll upload a picture when I can this week of the connectors :wink:
I ended up with a quite a crazy combo because I wasn't sure what a good combo looked and sounded like :D

Leo
 
The first color is motor side and second side is controller side.
I haven't finished the build at all I just connected the the wires with a quick electric connector to see what the combo was. I am going to solder the cables since the connectors weren't the same and it takes more space. I ll cut all extra cable and shrink wrap all the cables. I still haven't bought a bag for the battery. I'll be finished in a few weeks. I am in the middle of exams so not a lot of time to spend on the bike.
The 6fet controller is quite small I find

Leo
 
Perhaps leave just enough wire to do a cut and splice/solder , in the future .
In case you need to remove something and replace it.

A battery bag is easy, on my bike frame it would not work, so I am spending way too much time modifying the existing batter case , and it still will not look clean enough.

You could later make your own battery case out of Plexiglas ( Lexan ) , to have a clean look, you can cut all the pieces and glue them together with Acrylic Cement, or
SCI Grip, Weld-On clear medium bodied solvent cement , for Acrylics.
That would give you a much stealthy look like what you want , compared to a bag.
Design it with a little room for some thin padding on the inside.

leo99 said:
The first color is motor side and second side is controller side.
I haven't finished the build at all I just connected the the wires with a quick electric connector to see what the combo was. I am going to solder the cables since the connectors weren't the same and it takes more space. I ll cut all extra cable and shrink wrap all the cables. I still haven't bought a bag for the battery. I'll be finished in a few weeks. I am in the middle of exams so not a lot of time to spend on the bike.
The 6fet controller is quite small I find

Leo
 
The thing is I am trying to be a stealthy as possible that's why I got a custom 50v 6ah battery. The battery is small enough to fit in some saddle bags. I am trying to find the smallest bag that could work so that it doesn't look like a battery pack :D
I will leave some extra wire but anyways I can solder directly on the controller if necessary.

Leo
 
Leo,
A small 6 amp battery is light weight enough to carry on a rear rack,
You can get a quick release for the rear bag , and quick disconnect connectors , like the Anderson 45 amp connectors, or 90 or 60 connectors sold by Hobby King.
Here is a rack and bag.

http://www.trekbicyclesuperstore.com/product/bontrager-seatpost-rack-179419-1.htm?gclid=CPLz6unOps0CFUlufgodSoUFwQ

and the Bag that clips into and quick releases from the rack

http://www.trekbicyclesuperstore.com/product/bontrager-interchange-rear-trunk-bag-179325-1.htm?gclid=CJu77JzPps0CFVFgfgodgXAOPg

Topeak also sells the same type of system

http://www.topeak.com/products/Racks/RXBeamRack_w_side_frameE-Type

http://www.topeak.com/products/TrunkBags%20RX

Then you just disconnect the battery connectors, and release the bag off the rack, and take them with you.
Also very stealthy


leo99 said:
The thing is I am trying to be a stealthy as possible that's why I got a custom 50v 6ah battery. The battery is small enough to fit in some saddle bags. I am trying to find the smallest bag that could work so that it doesn't look like a battery pack :D
I will leave some extra wire but anyways I can solder directly on the controller if necessary.

Leo
 
Leo,

I am now starting to install my little Q100c cst motor,
However
I also have a different controller than the 36 volt one that BMS sells,
I have a 48 volt one,
not Infineon, a Small one, KT something.

I noticed , that just like an infineon controller there are 5 wires coming out of the controller for the Motor Hall sensors, the typical Red/Black/Blue/Green/Yellow,
However
Coming out of the Q100c motor, is six wires, a White wire in addition. What did you do with that wire ?

Is your bike running without it connected to a controller ?

Thanks
 
Back
Top