Cycle Analyst V3 preview and first beta release

Glad you got your CA power issue sorted. That was certainly an annoying little bump in the road...
I'd like to say I've never accidentally smoked electronic gear, but that would be a really really big lie... :D

irq said:
Question about the Digi Aux Feature:

Presets can be changed directly through the 2 Buttons on the CA, which is nice but far away from my fingers in Case of Emergency.
Is it possible to configure a 2 Button Digiaux Setup to do the same?
Sure - just select 'Presets' for the AuxD function and set up the CA for two presets.
Done.

Button #1 = Preset #1 (This is actually 'decrement level', but since there's only 2 levels - it always goes to 1)
Button #2 = Preset #2 (This is actually 'increment level', but since there's only 2 levels - it always goes to 2)

EDIT - Oops, I misunderstood.
You want it to be a little more difficult... (which confuses me with regard to the 'emergency' remark...)
Anyhow, no can do, but - you can extend the CA button wiring and have remote CA buttons separate from any DigiAux functionality. This should work fine using those nifty buttons you found for DigiAux use.
 
emergency in term of rised attention by law enforcement
 
talking about it...

Clip the connection of the left CA button to the board.
Then add 2 wires to the CA board at the button left and button right pads, leading out together with a GND wire each to an external momentary switch (in german: taster), one affixed to either side of the handlebar.

Also consider a power main switch in easy reach as well.

And don't forget:
  • 1 - always start on preset #1 ('safe' mode)
    2 - make the statistic windows showing max values of w and sp invisible, both static and mobile
    3 - practice the emergency

Requires some reading of the manual, but it's all there...
 
irq said:
emergency in term of rised attention by law enforcement
Gotcha.
Unfortunately, the whole DigiAux strategy is set up to use the minimum amount of electronic bits and the supporting firmware is pretty basic. The chosen strategy makes it impossible to discern a 2-button push from a single UP-button push, so the more obvious 2-button initiator for more complicated behavior is not possible.

Another issue is that the digital input works by overriding the analog voltage, so the digital signaling must be transient to allow the analog control to continue working - it's not possible to simply lock down a button using a hidden switch unless you are willing to freeze the analog input at the existing setting.

So - two strategies come to mind: hide the digital preset push button or use a analog preset switch to allow a latching override by some other hidden switch.

  • If you only want two presets and point is to have a more or less 'legal' power level and a 'WooHoo!' mode, then operating the switch easily isn't such a big deal. You might configure the digital preset to start in preset #1 (legal mode) and use a single UP pushbutton hidden inside the bar end that can be pressed by pushing in on the end of the rubber grip. To get into legal mode on a pull-over, just turn off the bike for your 'conversation' and when it's powered up it will be legal with no obvious means to alter that condition.

  • Another possibility is to use the digital input to adjust UP/DOWN in levels in place of the analog pot, then use a SPST switch to provide an analog preset input. In this case, since the preset switch is on the analog input, you can add an external magnetic switch or similar to either close or open the preset switch contacts, thus forcing the bike to the 'legal' preset. This then becomes the same old plain-Aux 'hidden switch' conversation that has appeared in the thread before.
Anyhow - a couple of thoughts that might work out for you - albeit with some fabrication of sorts.

EDIT - Oops - looks like a race to post with EW:

electricwheels.de said:
And don't forget:
  • 1 - always start on preset #1 ('safe' mode)
    2 - make the statistic windows showing max values of w and sp invisible, both static and mobile
+1
 
DigiAux -- multi-level digital PAS Limit + 3-position Amps Limit

P9100335b_700.png
eBay: surplus mag-reed tactile pbuttons, booted switch, water bottle mount, aluminum spacer, scrap 1/8" aluminum plate
 
Hi,

just connected my new CA3 to the PC...

I did not connect anything but power and Serial cable. CA utility works fine.

Now I like to change the initial Preset. So I set "Power on Preset" to 1.

Write down settings to CA and restart.. Preset is 3 again....

Can anyone help please? I dont want to be a beta-tester, so this should work...

Thanks,
Joe
 
What firmware version is your CA (see splash screen)?

Sequence should be:
  1. Upload settings CA -> Setup Utility
    -OR-
    open a previously saved settings file of the proper version
  2. Make changes
  3. Download settings Setup Utility -> CA
  4. Optionally save setting file
If making a new setup from scratch in the Setup utility you must be certain to create a new settings file of the same version as your CA.
 
Hi,

I am sorry, just found the solution... AUX_POT was activated without poti connected.
This resulted in a pullup (or pulldown) to always the same mode.

Connected poti and fine. Disable aux-pot and I can switch between modes by keys :)

Nevertheless, thanks :)
 
electricwheels.de said:
talking about it...

Clip the connection of the left CA button to the board.
Then add 2 wires to the CA board at the button left and button right pads, leading out together with a GND wire each to an external momentary switch (in german: taster), one affixed to either side of the handlebar.

that was my first thought when i started thinking about this (small Village, things like Fluxkompensator looking Bikes rise Attention here...), but i dropped this direction pretty quick because it wont resist a closer look if one got some knowledge about Ebike Kits work. My current Idea is something which uses a RFID Keytag (absolutly inconspicuous, even got already on on my Keyring to get Access to my Workplace and Datacenter), but all RFID Tags i had my Hands on until now need to be really close to the Reader (1cm might be already to far away).

If the Distance could be increased this whould be a neat solution, as soon as one gets down of the bike - magic - Mosfet Switch or Relais does the Trick. Of course, this wont resist a complete disassamble, too...

Also consider a power main switch in easy reach as well.

that whould be something which could be easily done with the same relay module than for the RFID thing, just needs a 2 Way Module. But Yes, thats something i really need to add asap.

And don't forget:
  • 1 - always start on preset #1 ('safe' mode)


  • [x] check :) already done

    2 - make the statistic windows showing max values of w and sp invisible, both static and mobile

    [x] check :) the Display only shows really unproblematic Values, and thats nothing i am really sad about. With the Default Display Settings i got overwhelmed with Information, and had my Eyes more on the Display than on the Street where they should be

    even for other reasons i whould recommend to reduce it to a minimum

    3 - practice the emergency
Requires some reading of the manual, but it's all there...


i hope my posts dont look like i dont dig through ES Forums/Wiki and Docs, i do a lot and they are very very helpful but there are lots of very complex topics and settings which often got influence on other things which one does not expect in the first. So, i really appreciate the helpful Answers like yours, Teletiks and everyone elses. And even more i should mention that its really awesome that ppl here stay polite and helpful (german forums are a whole different story in this).

Cheers :)
 
teklektik said:
irq said:
emergency in term of rised attention by law enforcement
Gotcha.
Unfortunately, the whole DigiAux strategy is set up to use the minimum amount of electronic bits and the supporting firmware is pretty basic. The chosen strategy makes it impossible to discern a 2-button push from a single UP-button push, so the more obvious 2-button initiator for more complicated behavior is not possible.

ok, it was worth a question. i just go through all possible options

Another issue is that the digital input works by overriding the analog voltage, so the digital signaling must be transient to allow the analog control to continue working - it's not possible to simply lock down a button using a hidden switch unless you are willing to freeze the analog input at the existing setting.

So - two strategies come to mind: hide the digital preset push button or use a analog preset switch to allow a latching override by some other hidden switch.

  • If you only want two presets and point is to have a more or less 'legal' power level and a 'WooHoo!' mode, then operating the switch easily isn't such a big deal. You might configure the digital preset to start in preset #1 (legal mode) and use a single UP pushbutton hidden inside the bar end that can be pressed by pushing in on the end of the rubber grip. To get into legal mode on a pull-over, just turn off the bike for your 'conversation' and when it's powered up it will be legal with no obvious means to alter that condition.


  • rfid or something similar is currently what i am invastigating, the only problem i currently see is that the rfid tag needs to be as close as possible to the reader. whouldnt be that funny to get it flapping while riding.

    [*]Another possibility is to use the digital input to adjust UP/DOWN in levels in place of the analog pot, then use a SPST switch to provide an analog preset input. In this case, since the preset switch is on the analog input, you can add an external magnetic switch or similar to either close or open the preset switch contacts, thus forcing the bike to the 'legal' preset. This then becomes the same old plain-Aux 'hidden switch' conversation that has appeared in the thread before.
Anyhow - a couple of thoughts that might work out for you - albeit with some fabrication of sorts.

the magnetic switch is also pretty interesting, sounds like a pretty good plan b for rfid

EDIT - Oops - looks like a race to post with EW:

electricwheels.de said:
And don't forget:
  • 1 - always start on preset #1 ('safe' mode)
    2 - make the statistic windows showing max values of w and sp invisible, both static and mobile
+1
[/quote]

mission accomplished :)
 
teklektik said:
irq said:
...THAT sounds really interesting. is there any tech doc already floating around somewhere?
Well, sort of - which goes to the remark about Case Studies. The puzzle pieces are scattered about, but the picture probably isn't obvious until you gather them together.

So, to make this work you need these bits:

  • A plain vanilla PAS wheel installed according to the Guide section "5.7 Pedal Assist" or buy one of the plug and play versions from Grin >>here<< or >>>here<<<
  • A three position CA switch - either DIY as described in the Guide or an off-the shelf version from Grin >>>here<<<
  • Flash 3.1b6 or later firmware with DigiAux support
  • A DIY DigiAux circuit with pushbutton or switch assembly as described in this thread >>>here<<<, >>>here<<<, >>>here<<<, etc.
    The DigiAux documentation with circuits can be downloaded >>>here<<<
  • Configure AuxA for 'Amp Lim', throttle mode for Current Throttle, and set PLim->MaxCurrent = maximum controller current
  • Configure the CA 3-position switch for different power levels as in the Guide section "G.1 Grin Tech 3-Position Switch (Fixed Resistors)"
  • Configure AuxD for 'PAS Assist' with the desired number of Assist levels
  • Configure the PAS according to the Guide section "6.5 AutoTorqPAS – AutoPAS with RPM-Proportional Assist" to get RPM scaling or just use plain vanilla AutoPAS mode w/o scaling - or use a real torque sensing rig like TDCM or Thun.

Flip the switch to change max throttle current and push the UP/DOWN buttons to select the PAS Assist level.
Enjoy your handiwork...


running this setup since today, and all i can say is: awesome, i couldnt imagine that a supersimple pas magnet sensoring can archive such a neat result

who the fu... needs torque sensor, its awesome. so far, its exactly the way of cycling i wanted to archive :)
 
Guys, I am new to CA3 and cannot understand how to deal with a few things:
I have phaserunner controller with a TDCM torque sensor along with a normal throttle.

First is the annoying throttle delay. I have the default passthru setting on the CA. When throttle goes through CA nothing happens for about 0,5-1sec(feels like it anyway) when I twist it. When I connect throttle to phaserunner everything is fine I have a direkt response.
I read about that you can change:
ThrO upRamp
ThrO fastRamp
But I dont even find those settings in my CA

Second is when I activate PAS and torque sensor, the throttle ramp is changed when using throttle - accelerations is very sluggish compared to when I disable pas/torq sensor) Can I have a crisp acceleration with throttle while PAS/torq is enabled?
Thx
 
Allex said:
First is the annoying throttle delay. I have the default passthru setting on the CA. When throttle goes through CA nothing happens for about 0,5-1sec(feels like it anyway) when I twist it. When I connect throttle to phaserunner everything is fine I have a direkt response.
I read about that you can change:
ThrO upRamp
ThrO fastRamp
But I dont even find those settings in my CA
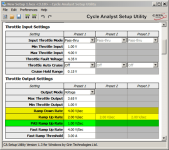
Have you set up the CA according to the [strike]Un[/strike]official Guide? This will get your throttle dead zones squared away and help you set the ramping. I'm unsure why you cannot find the ThrO parameters - they should be prominently displayed in the 'Throt OUT' setup category of both the CA console setup and the Setup Utility. The ebikes.ca CA V3 page explains the parameter locations, etc. That page should fill in all the basics and get you the firmware and programming tools, etc. The following image shows these parameters (from 3.1b8 release, but same place in 3.01). Post back if this does not help in locating the ramping parameters.

CA3_ThrOParms.png
You can inspect any delays introduced by the CA by examining the IN and OUT voltages on the Diagnostics screen. With a high UpRate, OUT should track IN instantaneously in PassThru mode. Those particular display fields ignore the Display Averaging parameter and works off the immediate raw voltages so there is no need to jiggle Pref->Averaging to eliminate artifacts of CA display smoothing.

As you can see in the image, the default UpRate is 2V/sec so if you are using the defaults and your throttle has the usual 3V range, you can get a maximum of (3V) / (2V/sec) = 1.5sec throttle delay if you slam it WOT on getaway.

Allex said:
Second is when I activate PAS and torque sensor, the throttle ramp is changed when using throttle - accelerations is very sluggish compared to when I disable pas/torq sensor) Can I have a crisp acceleration with throttle while PAS/torq is enabled?
It's a little difficult diagnose what is going on since the basic PassThru throttle tuning (ramping at least) is not fully configured and is operating improperly. You really need to get the basics squared away before you move on to these more advanced features - bad foundation and all that...

In any case, this should not be happening - torque PAS processing has nothing to do with throttle processing and throttle application always suppresses PAS processing. The only way I can see this happening is if you are switching presets to activate PAS which would bring a different UpRate and power limiting settings into play (see image above) -- but you didn't indicate you were using presets and haven't changed the UpRates, so this behavior is confusing...

I recommend that you flash 3.1b8 and start again with the Guide install procedure to get your throttle set up, then move on again to the TDCM. The re-flash will get you a few useful things:
  • default settings which will eliminate a lot of interaction quesitions when following the Guide
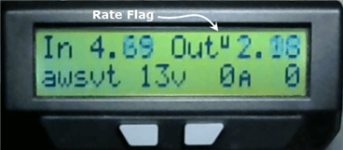
  • rate flag indicators on the Diagnostic Screen so you can see when those settings are affecting your throttle
    3-1b7_RateFlag.png
  • new PASRate parameter to allow separation of throttle (UpRate) and PAS (PASRate) ramping so you can tune each operating mode separately
    (see this new parameter in the above image)
If you have no cable to re-flash or reload default parameters, then proceed with the install procedure, etc using the factory-installed 3.01 firmware (verify on splash screen).

If issues remain unresolved, post up your settings file and firmware version so we can look at the particulars of your configuration. Settings can interact, so it's not always easy to diagnose an issue with just a high level description of what has been set up...
 
is there any, at least "somewhere around" eta for the final 3.1 release? more goodies probably included like the suddenly popped up pas ramp feature?
 
Hmmm... 'ETA' -- the bane of Engineers everywhere...

This Fall.
There will probably be two more beta releases before the preliminary production release 3.1p1.
Expect 3.1b9 very shortly... :D
 
:) since you ignored my question about more new features one could think that there will be such ;)
 
i've a new question regarding temperture throttle rollback: which GAIN parameters take control of it?
the problem i see now: i ride w/o power limiting for now. so power/amp limits are set to 9999W and 99A and 199km/h. so changing Wgain and Pgain etc doesn't really change a lot.
my temp sensor is probably in the wrong place and is very sensitive to temperature changes. so the temperature shown raises by several degrees within seconds if ridden hard. this causes temperature throttle to happen very quickly, as it takes very little time to go from 100C to 120C, and so the throttle is PUMPING really hard. i'd like to have rollback cause gently.
what do i need to adjust, and how?
 
izeman said:
i've a new question regarding temperture throttle rollback: which GAIN parameters take control of it?
This is a good question.

Temperature scaling works without benefit of a separate PID controller and directly scales PLim->MaxCurrent according to the percentage of over-temperature in the temperature range bracketed by Temp->ThrshTemp and Temp->MaxTemp. The scaled max current value is then processed normally by the Current and Power PID controllers.

  • % = ( ActualTemp-ThrshTemp)/(MaxTemp-ThrshTemp) * 100
This means that at least one of these PID controllers must be tuned for smooth temperature rollback - that is, you might leave the power controller effectively deactivated with an unattainably high MaxPower setting and rely on the Current Controller by using a realistic MaxCurrent and tuning AGain appropriately.

izeman said:
i ride w/o power limiting for now. so power/amp limits are set to 9999W and 99A and 199km/h. so changing Wgain and Pgain etc doesn't really change a lot.
Yep - a this is a reasonable means to deactivate current and power limiting for the no-temp-limiting case.

izeman said:
my temp sensor is probably in the wrong place and is very sensitive to temperature changes. so the temperature shown raises by several degrees within seconds if ridden hard. this causes temperature throttle to happen very quickly, as it takes very little time to go from 100C to 120C, and so the throttle is PUMPING really hard. i'd like to have rollback cause gently.
what do i need to adjust, and how?
A couple of things:

  • 120C is pretty low - remember this is the temperature at which the CA will reduce the current to zero, so your setting are really saying "go from full power to no power over a 20C temperature swing.

    I would recommend expanding the range so the effect of rising temperature is more gradual. This will give the CA a greater opportunity to feather back the throttle instead of such an abrupt shutdown. Try raising MaxTemp to maybe 140C-150C so that the power will be reduced by 50% at your target temperature of 120C which should significantly reduce the thermal load without stopping the bike in its tracks.
    • (120C-100C) / (140C-100C) * 100 = 50%
    As a second step, you can also try lowering ThrshTemp to 90C so that the onset of rollback is a little softer - this is obviously a matter of taste and situation, but having the bike throttle back a bit early on may help slow the rapid temperature rise to cutoff that you are presently experiencing.

  • Next, you will need to tune either the Current or Power PID. For instance, reduce MaxCurrent to a meaningful maximum. This will reduce the dead-zone across which the PID controller must adjust to start getting results. The wider the dead zone, the longer this takes, and the greater error accumulates which makes the CA more prone to over-correcting. (This is not a huge effect, but since you're having an issue, getting it somewhat closer is not a bad idea.) You can then move on to tuning up AGain. You might do this by setting MaxCurrent to 50% of your desired max to simulate an overheating event, then go WOT and reduce AGain until the surging goes away. With MaxCurrent restored to a proper value, the temp limiting should behave smoothly.
 
v3.1 Beta 9 Released

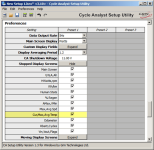
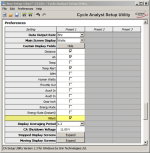
3.1b9 is ready with a minor fix or two and some cool new features. The EEPROM map is generally compatible with 3.1b8 so you don't need to build a fresh config from scratch, but you should revisit the AuxA and AuxD Function parameters as well as the 'Still' and 'Moving' screen flags in Preferences to freshen up the settings since there are now additional options and the previously selected menu item indices may be incorrect.

As always, there are more details in the Release notes, but here's a few highlights:

  • The behavior of PAS->MxThrotSpd has been changed to use the Speed PID controller instead of simply cutting power when the configured speed is exceeded. This gives a nicer limiting action but does require that the Speed PID controller be tuned to give a smooth action. For most modestly powered bikes it will work fine with the default settings. There are tuning instructions in the Guide if things need a little tweaking. This is mostly for the folks saddled with EU or EU-like pedelec restrictions where throttle use is limited to a certain speeds.

  • A new 'ThrO' limiting option has been added to AuxA and AuxD. If selected, the Aux input directly scales the final Throttle OUT voltage. This is provided as a sort of brute force speed limiting option for walking the bike or as a WOT limiter for a poor man's autocruise, etc. It works as a simple limiter and has no PID to tune, etc. so setup and behavior are pretty straightforward. This is similar to 'MaxThrottle' in the V2 but works through the Aux scaling instead to address some common issues in a way that's easy to understand and use.

    View attachment 4
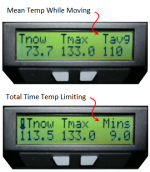
  • A new 'Temp Statistics' screen has been added to the Status Screens and like the other status screens can be selected for display when still or moving in Preferences. The rightmost field alternates to show two different values as illustrated below. Importantly, the temperature stats are **NOT** saved to EEPROM and will disappear on a power cycle - they are considered transient trip-specific data that will be derived anew on the new trip.

    CA3_TempStatus.png
    CA3_TempScreen.png

  • RBatt is now available as a display option in the Main Screen 'Custom Views' field.

    CA3_RBattSnap.png

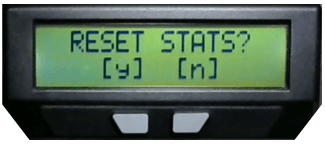
  • The 'Peak Reset' button press option has been retired in favor of new per-screen statistics resets. Parameters on a particular screen that accumulate value over time can be cleared with a long right press. The values on other screens are unaffected. This means you might clear the Amin/Amax values before a test run on your favorite hill and repeat the test with different settings, resetting those statistics between trials.

    These and the original Trip Reset pop-up screens now require a verifying Y/N response before statistics are erased to avoid accidentally trashing data.

    CA3_ResetStatsPopup.png


Here's a summary version of the included Release Notes

Release 3.1b7 said:
Note: V3.1b9 Setup files are **incompatible** with firmware or Setup files of **ALL** prior releases. However, CA configurations or setup files of version 3.1b8 are compatible with V3.1b9, but the AuxA and AuxD Function settings as well as Still and Moving Screen selections should be revisited in Setup to verify and/or correct any error deriving from added option choices.

IMPORTANT: Please install this package according to README_install.txt. Failure to do so may result in improper operation of the Setup Utility.


IMPORTANT: After installing this zip package on a PC, the Setup utility will no longer be able to properly utilize 3.1 Setup files prepared for prior 3.1 versions. 3.1 settings files prior to 3.1b7 will not display or edit properly and will download to the CA incorrectly resulting in improper CA operation. Similarly, setup files prepared with this release cannot be used with earlier CA 3.1 firmware versions. 3.0 Setup files are unaffected.


>> Any incompatible existing CA setup must be recorded and manually reconfigured over a fresh 'CA3-1b9_firmware.hex' installation.
>> All existing CA Setups prior to 3.1b8 must either be:
  1. exported manually from the CA console (at least the statistics)
  2. OR read by the Setup Utility and preserved in screen snapshots PRIOR to installing this package. Saving to a 3.1 Setup file and reading the file after installing the zip package will not work.

IMPORTANT: Because a CA3-1b9_firmware.hex flash will load default settings, throttle voltage configuration may be incorrect. Treat this as an initial CA installation and place the bike on a stand or otherwise elevate the drive wheel to prevent a runaway when the flash completes and before a proper configuration can be restored.


(1) 1730 - PAS->MxThrotSpd uses a hard power cutoff, use Speed Limiting instead
(2) 2432 - (new) Add 'ThrOut Lim' to AuxPot Functions
(3) 2470 - (new) Add RBatt to the Custom Views options
(4) 2560 - Stated Display Averaging time is one half actual period
(5) 2430 - (new) Add Temperature Statistics Status Screen
(6) 2610 - (new) Add per-screen statistics reset capability

So, give it a try and post up any issues. :D

Download!
View attachment CA3-1b9.zip
(Previously implemented 3.1b8 beta features (part of this build) described here and in the Release Notes.)
(Newer 3.1b10 beta release available here!)
 
Is it just my senility, or is the Windows "3.1" version CA3 setup utility on the Grin page (http://www.ebikes.ca/product-info/cycle-analyst-3.html#software-setup-utility) really the "3.0" version? I've downloaded the self-extracting "CASetupUtility_v1.31_Windows.exe" file twice now, and the executable when extracted and run says 3.0 up in the title bar. This extracted executable file has a 3/26/2015 datestamp, and has a size 11,333 KB.

If there is a different download link for the 3.1 setup utility, might someone kindly point me to it. Honestly, I've looked...
 
It's probably just speed-reading dyslexia with all the 1's and 3's arranged differently for the different versions of this or that... :D

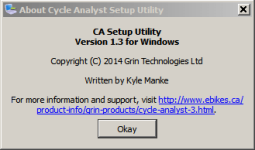
The Utility is 1.31 - although 'About' on the menu bar erroneously reports 1.3:

CA_SetupUtilAbout_1-31.png

The version of CA firmware that the utility supports is controlled by some files under the installation directory with extensions of '.hex' and .cas'. These allow the same utility (1.31) to handle different CA versions by just adding some definition files as needed (3.00, 3.01, 3.10, ...).

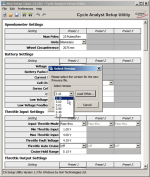
Out of the box the Setup utility comes with files for version 3.00 of the firmware (V300.cas and V300.hex). When you unzip the 3.01 patch package or one of the new 3.1 beta packages into the Setup utility installation directory, you typically get some new files to define or redefine setups (e.g. V310.cas, V310.hex) - this is why it's important to follow the installation instructions for the beta packages.

The Setup utility lists your CA firmware choices (as defined by these extra files) when you select "File/New Setup File" or if it gets confused and can't identify the firmware when pulling config from a CA:

SetupSnap.png
 
As per usual, teklektik, you provide a perfectly phrased, and logically plausible explanation of where and how I went off the rails. Maybe even the why. A deeply humbled, but somewhat enlightened, ES'ser will now proceed to RTFM. I remain deeply indebted to you.
 
Back
Top