Battery in a tube ... concept

LewTwo

1 MW
Joined
Apr 8, 2014
Messages
2,119
Location
Houston, Texas
OK ... I have been thinking about this since I first became interested in Ebikes. One of the things that I find problematic is that many battery packs are built from 18650 cells and those usually require soldering or welding tabs on the individual cells. This results in a battery pack that is difficult at best to service. I keep thinking there has to be another method. My interest was rekindled a couple of nights ago with I ran across a couple of you tube videos that inspired some ideas to resolve two problems. I have put together a PDF file with the concept, reference information and my rambling logic. If anyone is interested I welcome any thoughts or criticisms anyone could offer .

Thank you

PDF Revised 1 Jan 2016
View attachment Battery in A tube.pdf
 
Have you seen Bobc's tube battery? Seems to be coming along well so far.
https://endless-sphere.com/forums/viewtopic.php?f=14&t=82777

There are a few others, too, some of which are listed from a link in the second post.
 
amberwolf said:
Have you seen Bobc's tube battery? Seems to be coming along well so far.
https://endless-sphere.com/forums/viewtopic.php?f=14&t=82777

There are a few others, too, some of which are listed from a link in the second post.
No I had not seen that. Interesting ... but somewhat more massive than my little CF road bike needs 8)
 
Think of smaller ID tubes,..
A 60mm id will give you 7 cells in a "layer" (14 - 24 Ah ?)
Or you can reconfigure cells to give lower capacity ( fewer parallel cells) but in a half length tube.
Then again the tube does not have to be round !......
Search,..its all been done before.
 
Hillhater said:
Think of smaller ID tubes,..
I think that you missed what I was proposing. Each 19mm diameter tube holds a single string of 18650 cells. Two tubes of seven cells connected in series to provide 50-52 volts nominal from the string. The reason I am splitting it into two tubes is the length would be inconvenient. Also I do not need to run a long lead from the bottom of the battery.
 
Got some Samsung INR18650-25 cells and penny tubes. The cells have a measured diameter of 18.25mm. I did a trial fit with a 60mm wide piece of paper (0.21mm thick) . The cell slides nicely into the tube and the paper tube fits snugly in the penny tube. Waiting on other bits to arrive via a slow boat from China :)Battery in a tube - trial fit(799).JPG
 
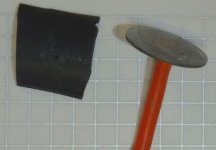
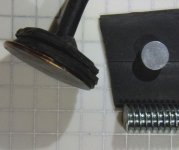
Prototype Terminals. I made these by soldering a short piece of 14 ga copper wire in a 1/8 inch hole drilled true a 3/4 inch diameter piece of copper. The top surfaces were ground/filed flat. Then I put some pieces of old inner tube (I seem to have a surplus of that material) on the back of the copper disks. A short slit was snipped in the bits of Inner tube so that they could be slid over the wire. Then scissors were used to trim off the excess rubber around the disk. I put 4 pieces on the bottom terminal and one on the top. These are used to provide a cushion/spring so tht the cells can be preloaded in compression.Battery in a tube - prototype 10 (799).JPGBattery in a tube - prototype 12 (799).JPGThe bottom picture also shows one of the 6mm dia x 1mm thk magnets on a piece of inner tube. The metal bit at the bottom is 1/4-20 threaded stub (for size perspective).
 
One problem is that the magnets tend to slide around as shown on the right cell below. I needed something to keep them centered. I chose to use 0.5mm thick "3M 9448A Double Coated Tissue Tape". I used leather 5/8 inch diameter leather punch to cut circular pieces and 1/4 punch to put a hole in the center. These are place on the positive end of the cell (see center cell below). Then the magnet can be placed in the middle effectively turning the cell into a 'button' top cell with a magnetic end. The silicon rubber also provide addition insulation to reduce the risk of a short between two cells.

Other materials could be used for the same purpose: vinyl electrical tape, paper, etc. If one has access to a 3D printer then one might be able to create flat rings to center the magnets ... however this works and requires no special tools (could be cut with a utility knife).
 
I have the first prototype finished. :D

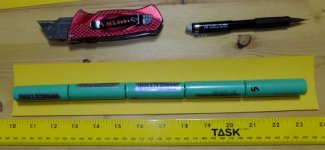
I began by using a utility knife and a steel straightedge to cut a piece of paper exactly 60mm wide and about 14 inches long.Battery in a tube - prototype 01(799).JPG
Next the paper was rolled around a string of batteries and the long 'edges' joined using masking tape. The paper tube was then trimmed to a length of 12.5 inches.
A 'Penny Tube' was cut in half. The terminals were slipped into the ends of the penny tube halves.
The pieces were then slipped over the ends of the paper tube (filled with cells) and secured in place with masking tape.Battery in a tube - prototype 02(799).JPG
Two more layers of paper were added to fill in the gap between the pieces of the penny tube. These were simply glued to underlying layer using carpenter's wood glue.
The wood glue had the undesired effect of softening the paper. I applied two coats of two-part polyester resin to the outside diameter of the tube.
My perception was the tube finished in this manner was still a bit on the weak side. The tube is easily bent. This can create a crease in the tube making the cells difficult to slide in and out. Battery in a tube - prototype 03(799).JPG
I decided to add an addition layer to strengthen the tube. My first thought was to use Braided Woven Carbon Fiber Sleeving but that stuff is relatively expensive.
As an alternative I decide to try 3/4" PET Expandable Braided Sleeving: https://www.amazon.com/gp/product/B00V3PTEXU
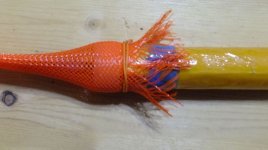
I tied the the sleeving to the capped end of the tube with wire.Battery in a tube - prototype 04(799).JPG
A coating of ployester resin was applied to the outside of the tube and the sleeving then pulled over the tube.
Two more coats of resin were applied to the outside of the sleeving. After the resin cured the rough end was trimmed and sanded.Battery in a tube - prototype 05(799).JPG
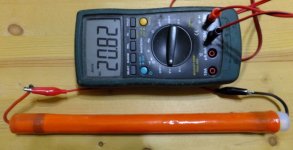
Battery Configuration: 5S x 1P
Nominal Voltage: 18 Volts
Finished weight: 293 grams (capped tube with terminals and wires = 66 grams)
Finished Length: 340 mm
Largest Finished Outside Diameter: 27 mm
Smallest Finished Outside Diameter: 23 mm

Lessons Learned:
1) The concept is valid and this method should be able to be used to produce a battery of any desired configuration.
2) My skills with two part resin are nothing short of abominable. Hopefully those will improve with some more experience.
3) The material selection needs to be refined.
..a) The paper I used was too soft. I am thinking either 100% rag vellum or perhaps even common 20 pound bond would be better.
..b) The Penny tubes work but are a bit fragile. Purpose 3D printed end cap might be ideal.
..c) The magnets and silicon gaskets worked as expected. It might be just as effective to use the paper ring gaskets available for 18650 welded packs.
..d) The PET Braided Sleeving was inexpensive and provided sufficient reinforcement.
4) Both ends of the tube should have removable caps to aid in removing the cell string.
5) Using a string of cells for the 'form' works but a precisely sized rod would be a valuable asset in construction of the tube.
6) Folding the Braided Sleeving over the wire resulted in a large bulge at the top of the tube. It would be better to cover the threads with something like wax paper and extend the sleeving beyond the end of tube. The excess sleeving could then be trimmed from the tube with a sharp utility knife after the resin had set.

Additions Thoughts:
1) Using 6mm copper binding posts for the terminals would eliminated the need of soldering and provide flexibility to arrange the tubes in various configurations.
2) A seperate thin paper tube that slides in and out with the cells might be desirable.
 
So I recently had a similar idea after seeing this ebay auction:
http://www.ebay.com/itm/Battery-Module-for-Scooter-Electric-Bicycles-Lithium-E-Bike-/112267271916?hash=item1a23a69eec:g:9ckAAOSwopRYeGEz

Which I think has some of your ideas as well such as the terminal ends. My idea however was using a plastic tube/bracket that can be screw adjusted for tension.
 
This not a new idea..
Kicking an old dead horse.
Former member SAFE tried a battery in a tube concept many years ago.
Multiple parallel pvc tubes with copper penny contacts, and BIG springs to supply tension to the individual batteries in the tube.
Worked fine until he would hit a bump in the road. Open circuit , Open circuit and on and on. He never got it to work .
 
tiny_n_terrible said:
This not a new idea..
Kicking an old dead horse.
Former member SAFE tried a battery in a tube concept many years ago.
Multiple parallel pvc tubes with copper penny contacts, and BIG springs to supply tension to the individual batteries in the tube.
Worked fine until he would hit a bump in the road. Open circuit , Open circuit and on and on. He never got it to work .
So that would be an excellent reason to revisit it. Perhaps those BIG springs were the problem. I am now waiting on delivery of some different materials.
 
LewTwo said:
I am now waiting on delivery of some different materials.
What are you doing differently on V2?
Love this concept, particularly for traveling with ebike batteries that meet airline regulations.
Though V1 does look a bit like a stick of dynamite, which might complicate things with TSA.

Suspect you've already seen this but if not:
http://www.westsystem.com/ss/assets/Uploads/Buildingcompositetubes.pdf
I came across it last year when I was building that bamboo frame.
 
footloose said:
LewTwo said:
I am now waiting on delivery of some different materials.
What are you doing differently on V2?
I ordered a 3/4 inch (19.05mm) OD x 1/8 inch wall aluminum tube to use as a form. I will polish it to a mirror finish before I try to use it. I am going to try useing a single layer of common wax paper as mold release. I plan to experiment a bit with that to come up with a "cheap" DIY version of the tube. I have been thinking of trying 3M cast tape. That is the stuff medical folks use to make fiberglass casts for broken bones. I also want to try bond paper and 100% rag vellum. It is a learning experience.

I also ordered two 500mm lengths of carbon fiber tube 19mm ID x 20mm OD. I think that these may barely slip inside the Penny Tubes

Binding post and caps at both ends of the tube. I also hope to improve on my workmanship with the resin :)

footloose said:
Suspect you've already seen this but if not:
http://www.westsystem.com/ss/assets/Uploads/Buildingcompositetubes.pdf
I came across it last year when I was building that bamboo frame.
I have a length of that stuff but it was exspensive and I did not want to waste it on the first prototype.
 
Back
Top