New recumbent QUAD build (OEM project)......

OK, update;

-My 50lbs of lipo is on its way. I just got word form Hobby-King that the back-order was released.
-The fat tire kids bikes I am using the wheels and tires from are due in today.
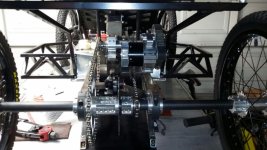
-I ordered a new 5 turn 6 wire motor for Delta/Wye switching today.

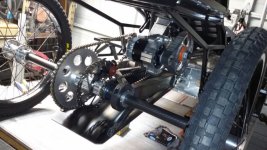
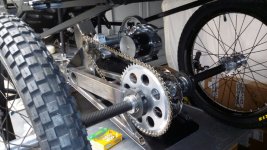
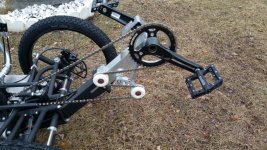
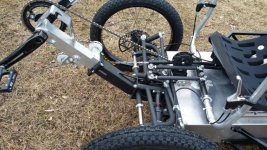
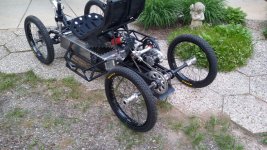
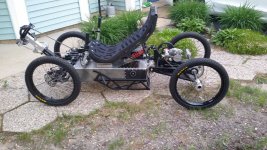
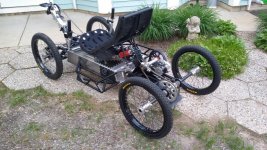
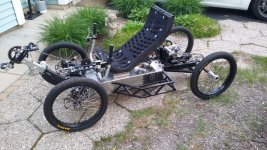
Also, I am building the fat tire wheels, and the wheels shown in the first picture for comparison.

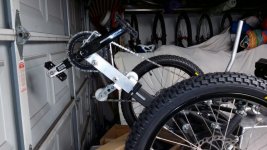
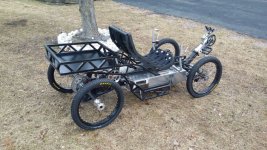
I will be building widened suspension as well as testing the stock suspension. Outrider wants to be able to test this quad against one of their stock trikes with the same wheels, tires, and overall width (and ground clearance). So, I will have many iterations to show you guys on this build.

I have some really cool ideas for the widened front suspension.

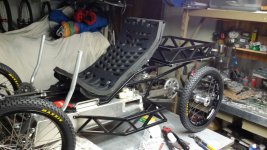
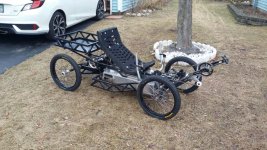
Oh, also, I am making nerf bars for the sides on the chassis to protect the rear wheels. They should look really cool!

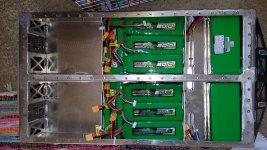
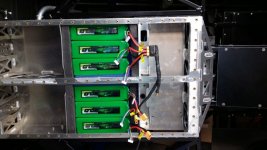
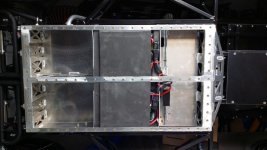
Lastly, Tom from Outrider and I have been discussing component layout. For a reverse trike (Tadpole) layout, you want the CG to be very forward biased for stability (Keeping the weight between the front wheels). However, for a quad, the CG should be near the center. So, I will be mounting my packs rearward in the box and moving the seat to the rear most adjustment location for a more centralized CG. This should improve handling quite a bit.

I am hoping to continue an on-going relationship with Outrider to develop this vehicle to its limit within the basic layout of the chassis. I really enjoy this kind of work, and they could use the help without hiring and paying another full time engineer. This seems to be a good relationship, all things considered.

Matt
 
As we've seen in your other build threads you have a habit of delivering the goods every time. Looking forward to see this Quad come to life.
 
Some new lipo! What you are looking at is 12s-100ah of Multistar Lipo. 55 pounds of goodness! This pack should be good for 100 miles of range. As you can see, there is room in the chassis box to accommodate double that. I would never use 200 miles of range, though. But, it is a cool prospect.

So, at 100ah, does that makes this quad a P100? With twin motors it would, then, be a P100D. :mrgreen:

Matt
 

Attachments

  • IMG_20170412_074959.jpg
    IMG_20170412_074959.jpg
    123.5 KB · Views: 2,227
Wow, that's a lot of Lipo. Let's hope it never goes off. An all metal battery enclosure is really good feature for fire safety. You should have no shortage of power for the motors and a nice low C rate.
 
fechter said:
Wow, that's a lot of Lipo. Let's hope it never goes off. An all metal battery enclosure is really good feature for fire safety. You should have no shortage of power for the motors and a nice low C rate.

Yup, I figured the same. I am using Multistar Lipo in my Raptor in an 80ah guise. The low C rate sure does help things. I have found that true in every high kwh build I have setup.

One thing I do for safety is set my charger to top out at 49 volts. The LV cutoff in my controllers is set at 40 volts. This keeps me well within the safety margin at least from a voltage standpoint. Anything can happen, though. Then again, I do not store any gas cans in my garage. I have seen numerous garage fires from gas cans or solvent rags in buckets. Care should be taken in everything we do. I real feel for those who have suffered loss in fires.

Matt
 
Sorry for the delay updating this thread. I was waiting on rear end (quad) parts from the machineshop. But, at this point, I am building it up as a trike first, then converting the rear end to the custom quad axle. That should give me a great comparison between the two.

I have almost everything I need for the build at this point. I will begin assembling the chassis and lacing the wheels very soon.

Matt
 
Progress! I bet you guys were wondering what was going on. :D

The machined parts for the rear end are finished. You can see the clamping style of the various parts. They clamp around the axle with a fifth bolt passing through the axle as a locating pin. The axle is a thick wall carbon fiber tube turned down to the proper diameter. The complete assembly shown weighs in at 2 pounds, 5.8 ounces with fasteners! I cannot believe how light it is. I can stand in the middle of the axle with no deflection. If I bounce on it, I can get a small amount of flex. Perfect!

I have enough parts for 5 complete axle assemblies.

The cool part of this modular system is flexibility. I can make a longer axle or a shorter one. I can make hubs for ATV wheels/tires or for anything else I want to mount to the rear. Heck, with these parts, I could make a single sided swing-arm with any width tire for a normal upright bicycle, possibly an extremely wide rear wheel setup to use an ATV tire on the world's fattest fat bike! This system is very flexible...... :mrgreen:

Matt
 

Attachments

  • hubs2.jpg
    hubs2.jpg
    65.7 KB · Views: 3,227
Sorry for the crazy long time since posting any progress reports. Part of the delay is a huge OEM development project I am building and part of the delay was related to communication with the buyer of this quad (yes, it is sold :mrgreen:).

Anyway, here are some pictures.

The chain tensioner is all billet with ball bearing pivots. The drive unit is one of my DaVinci Drive units (the last brand new one I have in stock). The rear rack is aluminum box tube attached to a steel box tube sub frame. The whole assembly is easily removed. The nerf bars are box steel. They are powder coated black. The floor of the rear rack is 3mm thick g10.

I think the mechanical work is finished. I am down to the wiring at this point.

Matt
 

Attachments

  • IMG_20180207_22656.jpg
    IMG_20180207_22656.jpg
    77.1 KB · Views: 2,706
  • IMG_20180207_58393.jpg
    IMG_20180207_58393.jpg
    111.1 KB · Views: 2,707
  • IMG_20180207_30257.jpg
    IMG_20180207_30257.jpg
    105.1 KB · Views: 2,706
  • IMG_20180207_22174.jpg
    IMG_20180207_22174.jpg
    95.9 KB · Views: 2,707
  • IMG_20180207_7258.jpg
    IMG_20180207_7258.jpg
    105.2 KB · Views: 2,704
  • IMG_20180207_50677.jpg
    IMG_20180207_50677.jpg
    101.6 KB · Views: 2,705
  • IMG_20180207_41246.jpg
    IMG_20180207_41246.jpg
    93.5 KB · Views: 2,704
  • IMG_20180207_9332.jpg
    IMG_20180207_9332.jpg
    104.6 KB · Views: 2,704
  • IMG_20180207_59425.jpg
    IMG_20180207_59425.jpg
    107.1 KB · Views: 2,704
More progress,

The swingarm is back from the powder-coater. So, it was back to work!

Today I reinstalled the swingarm, drilled the axle for hub mounting, unstalled the brakes, and did quite a bit of shimming and adjustments. I pedaled the quad for the first time. I rides great under pedal power. I cannot wait to get the electric system running.

Oh, the perspective client I have for the quad is having financial issues and may not be able to purchase it. So, this quad may be up for sale soon.

Matt
 

Attachments

  • IMG_20180221_56335.jpg
    IMG_20180221_56335.jpg
    163.4 KB · Views: 2,624
  • IMG_20180221_8663.jpg
    IMG_20180221_8663.jpg
    157.2 KB · Views: 2,622
  • IMG_20180221_2287.jpg
    IMG_20180221_2287.jpg
    178 KB · Views: 2,622
  • IMG_20180221_37929.jpg
    IMG_20180221_37929.jpg
    152.9 KB · Views: 2,623
  • IMG_20180221_50261.jpg
    IMG_20180221_50261.jpg
    159.7 KB · Views: 2,623
  • IMG_20180221_57380.jpg
    IMG_20180221_57380.jpg
    155.1 KB · Views: 2,623
  • IMG_20180221_11652.jpg
    IMG_20180221_11652.jpg
    163.8 KB · Views: 2,623
Slowly but surely making progress.......

I made the battery harness and installed the battery packs. The packs are nestled in foam (high density neoprene) on all sides for safety. All wiring and connectors are multi layered in adhesive lined heat shrink and all sharp edges inside the box have been radiused and padded with multiple layers of Gorilla Tape for added safety. The lower panel is held on with 80 screws. You can see the battery box leading edge is protected with a chromoly bash-guard. You can also see the smooth undercarriage that continues to the swingarm skid plate. It looks like it will be difficult to snag the undercarriage on anything.

I am down to just some final wiring, fabricating the throttle interface, and mounting the controller. Then it is ready to run.

Matt
 

Attachments

  • IMG_20180401_12148.jpg
    IMG_20180401_12148.jpg
    87.6 KB · Views: 2,436
  • IMG_20180401_22814.jpg
    IMG_20180401_22814.jpg
    77.1 KB · Views: 2,436
  • IMG_20180401_39489.jpg
    IMG_20180401_39489.jpg
    91.8 KB · Views: 2,436
I am jealous of all that battery juice you've got in there Matt. That thing is gonna rip even without one of your dual motor setups. Hats off, it's fantastic build and great concept for a vehicle.

-dave
 
There is room inside that box for 2.5 times that much lipo. This pack size was chosen for a number of reason; weight, cost, complexity, range and power requirement, etc.

I may add more cells if I deem it necessary. :mrgreen:

Matt
 
I finally got it running! I have to tighten the spokes and do some other odds and ends. One front shock will not hold air. So, I have to fix that.

I have it geared low for off road use (about 25mph top speed) right now. It sounds the tires in grass and dirt. On the pavement it pulls really hard. It draws 10,000 watts accelerating. 25 mph feels great on this thing. It has tons of power and runs great off road.

Oh, it is extremely stable. I have been trying to tip it on two wheels while riding and it really does not want to tip no matter how hard I try.

Matt
 
Here are a few pics.

It runs awesome. I have it geared for off road use (a touch over 20mph). This gives tons of power. I really don't feel it needs any more speed. But, with 12,000 watts available, more speed is easy to obtain.

Matt
 

Attachments

  • IMG_20180530_48920.jpg
    IMG_20180530_48920.jpg
    108.2 KB · Views: 2,094
  • IMG_20180530_40740.jpg
    IMG_20180530_40740.jpg
    106.5 KB · Views: 2,095
  • IMG_20180530_31585.jpg
    IMG_20180530_31585.jpg
    104.5 KB · Views: 2,095
  • IMG_20180530_21275.jpg
    IMG_20180530_21275.jpg
    95.1 KB · Views: 2,094
  • IMG_20180530_12297.jpg
    IMG_20180530_12297.jpg
    100.2 KB · Views: 2,093
  • IMG_20180530_1346.jpg
    IMG_20180530_1346.jpg
    103.8 KB · Views: 2,093
  • IMG_20180530_59320.jpg
    IMG_20180530_59320.jpg
    101.6 KB · Views: 2,092
  • IMG_20180530_38378.jpg
    IMG_20180530_38378.jpg
    101.1 KB · Views: 2,092
I've been driving the quad quite a bit. Here is some info;

It is currently geared for 25mph top speed. I chose this gearing because of the area I drive it. It sees primarily of road use. 25 is about perfect. It gives me enough speed to be fun with all the grunt I could ever use. It has so much torque, It turns the tires on pavement! Also, it is super stable. I can power slide it (not quite a drift) on pavement. Off road, it will drift and donut without any problem at all. Oh, it is super cool seeing two rooster-tails in the dirt! :mrgreen: It also jumps very well. I get about 10 inches of air under all 4 wheels and it handles that wonderfully. The motor runs well without too much heat build up and the controller handles the load well without overheating.

I will get some gopro action video for you guys soon so you can check it out.

Matt
 
That looks like a blast. Can't wait to see the video.

Are quads legal on the street there?
 
Wow, that thing really rips. If the grass was wet it would probably drift even better. Looks like you could mow the lawn with it
 
Back
Top