Kepler Bottom Bracket Friction Drive For Sale (Finally)

sotaro said:
Kepler said:
Sure, no problems. You would need a minimum of 10 though setup 2S5P. That would give you 24V and 20A

oops, I don't understand. Based on voltage and amp hours I would think that I would need 6s 3p. As the packs are already 3s, then I would need 6 packs to yield 22.2V 12.75Ah. As you are the learned one and I am the beginner, is the reason for the 5p instead of 3p to supply the needed current?

Neil's batteries are max discharge of 4 amperes (0.9C). Multistar constant discharge is 10C (2200 watts) with 10 second max of 20C (4400w).

The advantage of Neil's batteries is by my calculation 1/3 price 1.5x weight or by yours, half price, 2.3x weight. The energy density is close (within 6%).

Thank you for reexamining my question. How do I order and when might the bits arrive?

Those packs are 3S so 11.1V nominal. I just rounded it out to 12V for the sake of round numbers. You need a minimum of 2 of these packs in series to give you 22.2V however you still only have the ability to draw 4 amps from the 2 packs in series. Keeping in mind 4 amps is a max draw for these packs, place 5 of the 2S (2 series) in parallel will give you a max draw of 20 amps. Depending on how you set up your current limits, 20A will be pretty common to hit under acceleration. These packs have built in protection so if you go over the max amps, it will trip the pack out. This would then have a cascading effect with current draw capacity dropping off as each pack goes above its 4 amp peak.

You might be able to get away with 2S4P (8 packs) but I doubt it. Good thing is you can try 2S4P first see how it goes, and add extra packs in parallel until you get a reliable setup. I would recommend you purchase 12 packs so you can do some experimentation.

In regards to purchasing a drive bracket, I will send you a PM with the details.
 
I'm awaiting delivery of one of the brackets here in the UK. Following this thread, I feel pretty confident about putting all the components together and the mechanics of attaching the device to the BB etc.

The one thing I'm unsure about is the batteries. I'm tempted by the various HK LiPo options linked to in previous posts but I'm worried by their safety aspects - I shall probably not use the bike much during the UK's wet winter months and storing a LiPo unused through several months (in my apartment) then charging it up again doesn't seem ideal to me.

Kelper, I really like your saddlebag Li-ion pack (featured in the build thread) and I wonder if you know of an 'off the shelf' Li-ion pack which more-or-less matches to this (in terms output and size)? Or, if I can get instructions to closely follow in building a similar sized pack (of course, requiring me to invest in a desktop spot welder). I do struggle with the various specifications required to calculate a suitable battery size, but I'd be pretty good at following a layout for building one someone has already passed as being fit for purpose.

I remember on the previous thread someone using two x 12v (or 18v) power tool packs to power his device - and I'm thinking this might be a good and easy 'off the shelf' solution for me?
 
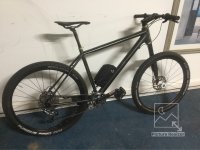
Here's the photo as requested.
Years ago I stealthed my bike as I don't like flashy decals. I rode this bike through Asia and didn't want people thinking it was expensive. Now it's mainly a commuter. I have many different wheel/tire combos for it. I've had the bike as low as 7kg although at moment have heavier tires and beefy pedals on it. Wouldn't be hard to get 9kg with motor and battery.

The bike is not finished. I'm yet to decide where my cables will be. My first setup was too restrictive and prevented the actuation of motor onto tire, its fine now but the wires will need more protection. The bag contains a 5800mAh 6s LiPo and also vesc inside the aluminium heat sink box as recommended earlier in thread. I had all sorts of trouble with the heat sink box as my vesc didn't quite fit the dimensions and I damaged some wires and caps. I had to modify it by making the holes larger and also removing some thickness. I have ordered a couple of Vesc-x as well and plan to use that instead.
I had the bag lying around and fixed it to the bottle cage nuts on the frame. It seems to be a very easy way to hide everything. Only took about 30min. I use the button throttle option as I have twist grip gears RHS so I set the buttons to use with my left hand. I may convert to a switch though depending how it feels.
I'll take it out for a long ride today and see what mileage and speeds I get on the 6s battery. I had a few of these lying around but I will probably change my battery set-up when I'm happy with the motor.
I set up mine with the turnigy sk3 6354 motor and also have the lighter sk3 5055 to try out. it will be hidden a lot more and lighter so hopefully will be a great option too. The noise levels are not an issue. Much quieter than my gng mid drive and there is no way I could lift my gng bike with 1 finger!!!!
Hope this helps someone.
Ryan
 

Attachments

  • IMG_0555.JPG
    IMG_0555.JPG
    179.3 KB · Views: 4,091
Bike still looks very minimalistic. The Vesc on my road bike is not using a heatsink case but it does get warm if I ride the bike with full assist constantly. That is with the battery amps set at 25A and the motor amps set at 30A. The layout of the vesc from various suppliers can vary a bit especially the capacitor layout. This is where the Vesc X I think is worth the extra money as you have good heat sinking built in a rated 50A for those who want to use higher assist for a longer period of time

I do like the bag on the bottle cage mount. Keeps the cabling nice and short too. I am tipping you will will use a lot of assist with your testing today so it will be interesting to see what sort of range you get out the pack.
 
Slopes said:
I'm awaiting delivery of one of the brackets here in the UK. Following this thread, I feel pretty confident about putting all the components together and the mechanics of attaching the device to the BB etc.

The one thing I'm unsure about is the batteries. I'm tempted by the various HK LiPo options linked to in previous posts but I'm worried by their safety aspects - I shall probably not use the bike much during the UK's wet winter months and storing a LiPo unused through several months (in my apartment) then charging it up again doesn't seem ideal to me.

Kelper, I really like your saddlebag Li-ion pack (featured in the build thread) and I wonder if you know of an 'off the shelf' Li-ion pack which more-or-less matches to this (in terms output and size)? Or, if I can get instructions to closely follow in building a similar sized pack (of course, requiring me to invest in a desktop spot welder). I do struggle with the various specifications required to calculate a suitable battery size, but I'd be pretty good at following a layout for building one someone has already passed as being fit for purpose.

I remember on the previous thread someone using two x 12v (or 18v) power tool packs to power his device - and I'm thinking this might be a good and easy 'off the shelf' solution for me?

I wouldn't get too hung up on using a LiPo pack with this drive. Remember, it is just one pack, not multiple strings of packs that people need to use on traditional ebikes. There are millions of RC enthusiasts using a single LiPo for their models and they are managing not to burn their house down. Just use them sensibly. This means:

1> If charging indoors, keep the battery in LiPo bag and on a hard tiled surface.
2> Never leave the charging battery unattended
3> Balance charge often
4> Set your cutout voltage in your controller conservatively. Rule of thumb: 3.5V per cell minimum. On a 6S pack, this means a final cutout of 21V
5> If the pack puffs up, decommission the pack, get rid of it and cut your losses.
6> Get a charger that has a storage voltage mode for your winter period.

The Vesc has two battery cutoff settings. This allow you to go a little deeper on the battery discharge if you want. Still be conservative though. I set the first threshold to 3.5V per cell. The Vesc starts backing off the current draw at this voltage. I then set the hard cutoff to 3.4V per cell. The good thing about this is that you can feel the drop in power so you can then save your battery by pedaling more and using it just to get you home. Setting the the first threshold even higher, say 3.65V per cell gives you a larger reserve and is well worth considering especially since most of these installations will be minimalistic with no onboard display.

Building your own 18650 packs is subject on its own. Takes a bit to setup but it certainly is another good option. Just a bit hard to do on kitchen table if you are living in an apartment :)
 
thank you very much for your private message and this explanation. I am surprised at the current draw. so the Neil's batteries would work well if I wanted that much range, but would be a lot of weight for shorter rides. Thanks!
 
No worries. With regard to current draw, remember, we are dealing with low voltages so we need to get the current up the get the desired Watts. 20A and 22V is only 440W and keep in mind, this is a peak. Most of the time you would use less then than this.
 
ryan74 said:
Here's the photo as requested.


Hope this helps someone.
Ryan
Very nice, thank you!
 
Kepler said:
I wouldn't get too hung up on using a LiPo pack with this drive. Remember, it is just one pack, not multiple strings of packs that people need to use on traditional ebikes. There are millions of RC enthusiasts using a single LiPo for their models and they are managing not to burn their house down. Just use them sensibly...

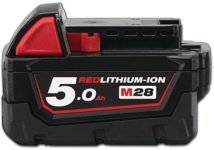
Thanks for the tips. One option I'm looking at is getting one of these Milwaukee 28v/5Ah powerpacks to use with the bracket. It's not the greatest capacity, but city commutes is my main priority. I'm also planning a Bafang BBS01 build and it'd be useful to have a battery (or two linked together) I can use for both bikes.
 

Attachments

  • s-l1600.jpg
    s-l1600.jpg
    30.7 KB · Views: 4,059
Hi everyone,
Had a few issues with my test run yesterday with motor cutting out every now and then. Similar to an issue which I thought I had fixed by adjusting the holes in the heatsink box I bought. I finally found aqnother issue after checking over everything again. When you tighten down the vesc in the box it places a lot of pressure on the positive battery lead which can get pushed into one of the pins on the underside of the board causing some sort of malfunction which resets the controller. There was a warning on vedders site that this could happen which I found out about after the fact. They recommend grinding down the pins a little and further insulation or moving the positive lead away from this area. With the heat sink case I would grind down the pins and insulate more as it really is a tight fit. Luckily it didnt damage my vesc, only caused intermittent power issues which would come up as a DRV error which made me think I had damaged the DRV chip.
Will have to wait a few days to test again.
Ryan
 
Slopes said:
Kepler said:
I wouldn't get too hung up on using a LiPo pack with this drive. Remember, it is just one pack, not multiple strings of packs that people need to use on traditional ebikes. There are millions of RC enthusiasts using a single LiPo for their models and they are managing not to burn their house down. Just use them sensibly...

Thanks for the tips. One option I'm looking at is getting one of these Milwaukee 28v/5Ah powerpacks to use with the bracket. It's not the greatest capacity, but city commutes is my main priority. I'm also planning a Bafang BBS01 build and it'd be useful to have a battery (or two linked together) I can use for both bikes.

That battery would work fine. There is a sample of using this type of battery over on the development thread. https://endless-sphere.com/forums/viewtopic.php?f=28&t=84905&start=250
 
With quite a few people going down the Vesc controller path, I thought I would put together an short video on how to program the Vesc to accept an eBike throttle or my button throttle. Pretty straight forward to do but there are a few little tricks that are best demonstrated to make the process a little more straightforward.

[youtube]KpeA6QRTZg8[/youtube]
 
Hi John,

Just thought I would let you know about a small problem I was having with the gravity spring. I'm assuming the gravity spring spacer should allow the spring to move freely. I was having troubles with the engagement and it felt like the spring was binding and basically only allowing 1/2 the spring to work. I thought of adding a little more spacer in there but in the end it was where the spring bends at 90 degrees to go through the hole where the problem was. It just made it stick out more. I bevelled the inside of the spring tensioning plate to accommodate the curve and now it is perfect.
Anyway, rode my normal route to work today and usual average speed for the 10km ride is 23kmh. Today was just over 30kmh. Top speed increased from 45 to 56kmh(slight downhill with pedalling). Going home will be the test, more uphill than down. Had no issues with the motor and it was quiet to me. Absolutely love it. Will plug into computer tonight and see how much juice I used.
Am still amazed at the hookup on my MTB tires. Doesn't feel like slipping at all. Ill be hitting the trails this weekend to see how it behaves on the dirt. I'm guessing the bumps etc will make it slip and also fine dirt.
Also my 5 year old boy thinks it not fair so we will be building up his spare bike this weekend. I'll tone the settings down on the vesc for him though.

Ryan
 
Thanks for your feedback Ryan and I am glad you are enjoying the experience.

With regards to the gravity spring, this is hand made so not an exact science. I have found that if it does bind a little, just make sure the "L" bend at the end of the spring is 90 degree to rest of the spring. After bending 50 of them by hand in my little jig, i got very accurate at doing them. Yours might have been one of the early ones. Either way is a bey simple fix. If anyone finds the same issue and doesn't want to do their own fix, let me know and I will post out a new spring to them.

I am really keep to see how the drive goes off road. I have a full suspension MTB crying out for this drive. Will use the same back tire as you to hopefully have reasonable dry off road grip and good commuting performance.
 
I took mine off road today and unfortunately the bracket slipped on my BB. I probably didn't tighten as much as I could/should have as I was a little nervous seeing I adapted my BB30 to screw bearings. Will tighten tomorrow and have another blast. The best thing with this kit though is that if something does go wrong then it doesn't really matter as you can ride home without power as it is so light. I also have a GNG mid drive and I occasionally break a belt(yet to get upgrade to Lightning rods) and I can still ride home but it is obviously much harder work. I was 30km away today when the BB slipped but easily got home.
I like your design for clamping the BB housing that you did on your PF BB road bike. I might try get something similar eventually so that I can adjust on the go as carrying a BB tool is not much fun.
The other issue I am having is my thumb is getting way too sore using the push button(lasts for hours after the ride). I went stealth and used the smallest button I could find at jaycar electronics and I'm paying for it. I have dodgy thumbs already from work. Think I will try the larger button or use a toggle switch instead.
 
ryan74 said:
Hi John,
<snip>
Am still amazed at the hookup on my MTB tires. Doesn't feel like slipping at all. Ill be hitting the trails this weekend to see how it behaves on the dirt. I'm guessing the bumps etc will make it slip and also fine dirt.

What tyre are you using?

I'm doing a MTB setup too and went trawling through heaps of tyres looking at their tread desgn. Have ordered a Continental Speed King, which is pretty much a race tyre, so wear may not be too good. Other tyres I had on the possibles list were Mitas Zefyros, Schwalbe Hurricane HS 352, Maxxis Tread Lite and Continental Double Fighter.

BTW, as well as possibly using friction tape for grip on the tyre, I came across an interesting post where a guy had cut a tyre and glued that onto his motor. So it was tyre to tyre/ rubber to rubber for the grip aspect. It may give best of both worlds - grip and wear!

HTH
db
 
You need to pick a MTB tire that doesn't have any gaps for the motor / roller to fall into. It will still work Ok, but it will be noisey. Out of those tires that you mentioned, I think the Mitas Zefyros will be the noisiest and the Schwalbe Hurricane HS 352 will be the quietest. Will be interesting to see how the Continental Speed Kings go. They might be a little on the noisey side but certainly should work Ok. I like the look of the Continental Double Fighters and the Maxxis TREAD LITEs too. Out of all of those, I am leaning towards the Continental Double Fighters as they have the most aggressive tread pattern that I think the roller would work smoothly on. All untested of course but I think I will give those a go.

With regards to friction tape, I have done a heap of testing on this. The most effective grip is using belt sander material. the lower the grit, the more grip but even 120 grit works well in the wet. You just need to live with the accelerated tire wear. Properly setup so that you dont get any slip, probably expect 1000km out of the tire. Poorly setup, maybe 200km. If you need to go down the path of grip tape for wet weather use, choose a hard compound tire if you can. Glueing rubber to the motor is useless. It rips apart quickly under dry conditions and slips badly in wet weather. Rubber to rubber in the wet does not equal grip. In the dry, steel to rubber works perfectly.
 
I was recently helping a friend with some building work and had the idea that the rubber grip-gloves I was wearing might provide a workable solution for using this setup in wet conditions. The gloves have a thin rubber area with a fine nobbled pattern to its surface. Perhaps a 20mm wide (x can circumference) strip of this material cut from the glove and securely glued (if possible) to the motor would provide a strong non-slip connection to the tire but without the wear/scuffing associated with grit papers?
 

Attachments

  • 63401790_l.jpg
    63401790_l.jpg
    29.4 KB · Views: 3,888
Keplers bits arrived, VESC X is still 10 days or more away...
Turns out the bike that was planned is a no go, so I'm hunting for a new ride. What the heck one more bike...
 
Slopes said:
I was recently helping a friend with some building work and had the idea that the rubber grip-gloves I was wearing might provide a workable solution for using this setup in wet conditions. The gloves have a thin rubber area with a fine nobbled pattern to its surface. Perhaps a 20mm wide (x can circumference) strip of this material cut from the glove and securely glued (if possible) to the motor would provide a strong non-slip connection to the tire but without the wear/scuffing associated with grit papers?

I think that rubber from that glove would rip up very quickly. Worth giving a go though. You really need a a very robust grip material which is why belt sander material works well. I was thinking of perhaps a wrap of 10 thou shim steel that has been dimpled with a centre punch all over and then glued to the motor.
 
tomjasz said:
Keplers bits arrived, VESC X is still 10 days or more away...
Turns out the bike that was planned is a no go, so I'm hunting for a new ride. What the heck one more bike...

Are you sure it wont fit? Can you send me a link to the bike or some pictures of the bottom bracket. The drive can mount to the non drive side of the bottom bracket if the chainring is getting in the way. You just need to re assemble the drive as the mirror image of the way the drive has been sent.
 
Hi db,

The tire I am using is a Schwalbe Furious Fred EVO tubeless ready 26 x 2.25. It will wear quickly i think but that doesn't bother me. The tread down the centre is minimal and knobs on the side don't engage motor at all. I have no issue with hookup at all and speed is great and I feel very safe riding trails fast. I have also lightweight 2.0 versions of above tire but they wouldn't last at all I think.
I tightened my BB yesterday and took the bike offroad today and have had no slippage. Very impressed.
Unfortunately I completely destroyed my battery today. I somehow reset the motor parameters on the Vesc while trying out my smaller motor(I don't recommend drinking Whiskey while programming Vesc!!). I didn't realise i had set the cutoff for the batteries to default which is 8v or something. My battery died during the ride and is all puffed now measuring 2.5v/cell. Usually I ride with a monitor which alarms me but I thought the Vesc would prevent this sort of thing so I haven't be using it. Unfortunately I am not the best with computers so somehow I reset the values. Lucky I have a few spare batteries at home. Another 30km ride home with no assist.
Let's see what tomorrow will bring. Am enjoying the learning from mistakes though!!!
 
Keeping the drive bracket secure with it mounted to just one side of the bottom bracket does have some challenges. Adding the anti slip material to where the drive mates with the BB face has made a big difference but it still means the bottom bracket bearing cup needs to be very tight to keep the drive secure.

The drive will move on the bottom bracket more easily using a larger and heavier motor. I had very few issues with the 50mm motors but the extra weight of the 63mm motor caused more slippage issues. What I have found is that on shut down, the motor gets driven into the end stop bolt with quite a force. Against the end stop metal bolt, this creates a sharp "jack hammering" action. This makes a bit of an unpleasant knocking sound each time the drive disengages and is constantly trying to rotate the drive on the bottom bracket.

I have come up with a very simple fix for this which i have been testing for about a week now. Here it is:


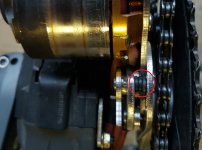
I simply added 3 #7 o rings to the lower end stop bolt so that the swing arm now has a padded landing point when disengaging.

Firstly this modification has made disengagement silent rather then hearing a metallic clunk every time the drive disengaged. This is a nice improvement in itself. However I think the big advantage will be a lot less tenancy for the drive to move on the bottom bracket due to the reduced jack hammering action on disengagement.

The modification is super simple. Just unscrew the bottom end stop and install the 3 small o rings over the end stop screw. Once done, re set your end stop position to allow for the extra diameter of the o rings and you are ready to go.

All new drives will be shipped with this modification and i will send out o rings to all those that have perchased drives so far.

If you cant wait for my delivey, the o ring only cost a few cents and can be bought through most industrial suppliers.

The part is as follows: Neoprene #7 o ring. 5/32 ID x 9/32 OD x 1/16 Width.

This doesn't mean you cant use the drive as shipped as it works perfectly well. This is just an enhancement to the design.
 

Attachments

  • Endstop dampener.jpg
    Endstop dampener.jpg
    85.3 KB · Views: 3,812
How's everyone going on the waterproofing side of things , I've been thinking of power velocitys 6fet controller and a sensored motor if the vesc isn't water proofable.

Also no issues on suspensioned bikes the spring keeps contact ?

Also thoughts on roughing up the motor surface for wet and dry use ?
 
Back
Top