Animalector's Ebike Builds

Thats rad! Just received a shipment of BBSHD drives and am about to finish a handful of Norco Alines, it will be interesting to see how the HD drive compares to the BBS02.

Love the battery box. I would love to put a link to this build on ES facebook. https://www.facebook.com/groups/endless.sphere/
Mind if I do?
 
So Today I had my first real ground clearance issue...
Happy (Custom).jpg
Not so happy (Custom).jpg

I am going to have to adjust my riding style, and land rear first, then front...

Anyways, this rotated the motor, and put a nice dent in the controller case, at first I thought everything was ok, then it started to whine. Then nothing. moving the bike backwards was very difficult, and I feared mechanical damage.

I pulled off the controller, disconnected the phase wires, and the motor was once again smooth to spin backwards (still firm, but no more than usual I think)

Conclusion - Blown controller ... more to come
 
Tada, Also from about 3 or 4 mins into the video, I test the Bafang motor with the lebowski controller...

Works well, I "might" consider hooking that up temporarily to ride around.

Also I need to locate a facing tool for the bottom bracket shell.

Andy

[youtube]FVeoqoZloHo[/youtube]
 
i Will be buiding this in the new year so I dno't have issues with bottoming out again. 3mm aluminium plate bolted and strapped to the frame, should be strong enough. joins will be welded

:pancake: :D :) :eek: :shock: :? 8) :mrgreen:

Bashplate.png
 
Sweet design, if executed well it will probably look factory! 8)

I was thinking along the same lines, but wanted to include dampening somewhere so when it takes a hit, rather than cracking or deforming the energy is dissipated in a controlled manner...
 
Thats a nice idea lurkin! Would be interesting to run solid side plates like iscg bash guards to provide the structure.


Sent from my iPhone using Tapatalk
 
should be getting a mate to build up the bash plate soon, CAD work finished..

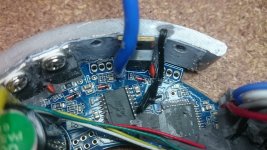
I might have mentioned above that I replaced the FETS on the BBS02 controller without success I thought I would post here.. the symptom was that it ran on throttle for around 5 seconds, then when I closed the throttle, the motor kept spinning. I pedalled backwards or something to get it to stop, and once it stopped it was dead, wouldn't spin again. this time when I pulled out the FETs I decided to measure them all, and discovered that it was only the high side that was cactus.

So this is the photo of the controller...

DSC_0003.JPG

Going from memory (it's been a week or so since I looked at it) there is a single FET on the 'high' side ( the one on the left), and parallel FETs on the low side. It's the high side FET that keeps blowing, which is on the left.

I thought perhaps there was a get resistor missing, and it was a floating gate, from the looks there are no components missing except the pads on the far right of the pic. . Can any guru's suggest why perhaps a high side FET might keep blowing? I should probably measure gate resistances. etc etc. maybe there's an issue with the driver and it's feeding 48V to the gate.. don't know..

Thanks
Andy
 
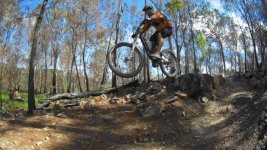
After a couple of weeks bombing down the kuranda range with no motor loving the ground clearance ive finally put the motor back on..m along with the bash plate..
2017-04-16 19.51.18.jpg


Also.. Atherton tracks..

[youtube]EYlXpNjJvo4[/youtube]
 
I used 0.2mm Nickel plate, with settings of 1ms, 1ms, 20ms and an old truck battery. Everything worked well. the only "blow outs" were where i missed the button on the +ve of the cell, or if I wasn't holding the probes flat against the nickel with Sufficient pressure. Otherwise it went very well.

Slotting was more effort than it was worth. The sheet welded just fine without the slots.

I was hitting 3 welds per cell, with a 4th weld at 90degrees just for good measure.

Kapton tape across all edges before applying the balance wires, then balance wires soldered into the space on the nickel plate between the groups of cells, then Kapton tape everywhere after.

Andy
 
don't really know about the BMS.. it was whatever came with the pack originally.. It's for a mate's bike (the blue norco shore I posted photos of a little while back.) https://endless-sphere.com/forums/viewtopic.php?f=6&t=38846&start=300#p1202414

I think the BMS is something relatively basic, but we know the Low voltage cutoff was working very well.. The original pack had some welds come loose resulting in only around half capacity before BMS shutdown. Should be all good now, but I guess we will see how it performs on Thursday when we take it out for it's first ride.

Andy
 
The bike is for sale. I love it. But want to try something a little different (factory mid drive) .

Since my last update I bought a cyclone drive and installed it on the Norco. I've instantly gained about 30mm of additional ground clearance.

A mate of mine is going to plasma cut me a bracket that will move the cyclone further forward and up. A bonus of this is that a Sine wave Infineon will fit behind the motor within the bracket for a stealth look and overall about 60mm more ground clearance than the BBS02
file.php


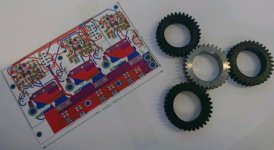
Another thing I thought I would try is 3d printed cyclone gears. I'm not expecting much. But I'm not pushing the motor hard either. Currently running it at 60% of the default cyclone setting.
DSC_0184_crop_757x415.JPG.
I'll try running the plastic gears at 20% controller current setting and wind up the controller slowly while riding it around the back yard to around 50% before I try taking it to a track

Also shown is my new Nano-Lebowski controller. Overall PCB size is 100mm X 62mm pretty small.

Lastly even though I'm trying to sell the bike, I really want to buy a tsdz2 tongsheng motor. Torque sensored control. 48v 500W plus. Plus when I overlay the drawing into my bike. I can expect 26mm better ground clearance than the bafang.

I might give it a go I can always put the motor on my road bike
 
Nice nano lebowski, will look forward to seeing that all built up.
 
That's the power stage. My cpu board fits on top in the same format as my micro Lebowski. I also have a new CPU board, but the same format as the old one.

On the new CPU board I have added a temp sensor connector, and temp sensor under the power supplies, and I'm using pre made 75-15 DC/DC 15w supply that is PCB mountable, similarly a 15-5 DC/DC 5w. Otherwise the CPU board is the same

Now I just need time and money to make it happen.
 
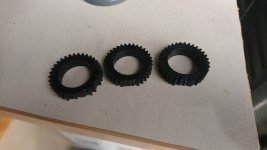
" Can you 3D Print (ABS) plastic cyclone gears ?? "

absolutely yes.... Do they work... hmm not so much

  • I removed the motor,
    opened the gearbox,
    installed the gears,
    ran the motor on the bench

Hmm, sounds good

  • reinstalled the motor,
    test run with the wheel off the ground
    hop on
    start riding very gently,
    so far so good, 1/2 way around the yard
    apply some more throttle
    gently
    **CRUNCH** bzzzzzz

I didn't even make a full lap
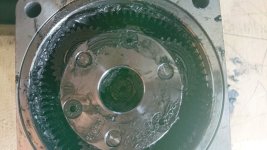
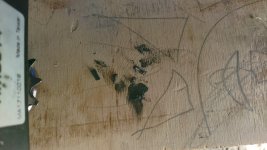
DSC_0189 (Custom).JPGDSC_0187 (Custom).JPGDSC_0188 (Custom).JPG

unless PEEK or Glass filled nylon is magic, I don't know if plastic gears will work at all with this motor. I just think they are too narrow.. It was a good experience opening the gearbox though.
 
Back
Top