A 1982 Raleigh 10 speed with TSDZ2 mid-drive

If you ever decide to redo the front rack, I'd recommend making something that is actually a projection of the *frame* rather than the fork, so that it doesnt' move iwth teh steering. There's a few bikes already built this way for that reason.

I could probably carry a couple of the largest (25-30lbs) dog food bags over the front on a bike if it was on the frame, but I couldn't safely do half, possibly not even a quarter, of that if it's on the fork, based on past experiences, because of the way it affects the steering itself. I've always meant to build such an extended frame rack out over CrazyBike2's front wheel, and SB Cruiser's as well. Wanted to do it for DayGlo Avenger back in the day, but it's aluminum and I wanted to weld it on.

If you don't wanna (or can't) weld to the frame, you can bolt them on, using U-bolts over the tubes (with rubber strips or blocks if you won't want to damage the frame paint or need spacers for cabling, etc).

There may be disadvantages I haven't thought of to doing it this way, but it's worth trying. :)
 
amberwolf said:
If you ever decide to redo the front rack, I'd recommend making something that is actually a projection of the *frame* rather than the fork, so that it doesnt' move iwth teh steering. There's a few bikes already built this way for that reason.

I could probably carry a couple of the largest (25-30lbs) dog food bags over the front on a bike if it was on the frame, but I couldn't safely do half, possibly not even a quarter, of that if it's on the fork, based on past experiences, because of the way it affects the steering itself.

I actually thought about these issues before deciding to put any rack on the front at all. In particular, most people aren't alert enough to recognise that the substantial caster in the front of most bikes, including mine, which is intended to help the bike want to go straight ahead and not oscillate under various conditions actually means that anything projected forward that's mounted to the fork will proscribe an arc, in both the horizontal and, of course, around the axis of rotation of the fork, the high point of which is when the fork is dead-ahead relative to the frame. On either side of that, it will drop considerably, the rate of which depends on the amount of castor in that frame. This means that any weight that's on the front will have to be LIFTED when turning toward center!

So, I'm not all that delighted to carry stuff in the front, I just want it as a way to balance out the weight of the whole bike. A gallon of milk in the front instead of the back will go a long way to keeping the bike from wanting to do wheelies when fully loaded! And that's my real motive.

I've already been contemplating a specialized trailer that could carry substantial loads. I've got design ideas for the hitch that lets the bike lean into corners while the trailer remains horizontal on two parallel wheels. And, design ideas for the trailer that permits its width and length to be changed very quickly to accommodate various loads, in particular moving the relative position of the wheels to the carriage so that various centers of gravity can be accommodated easily to keep a "tongue weight" at a reasonable level. And I have design ideas to add two wheels to become a four wheeler with only a few moments worth of clicking parts into place! 8)

Will I build any of that? Doubtful, but... maybe :D
 
As I reported in my first outing with my bike reborn as a butterfly, the electrical system cut out three times, I think, in the first 22 miles - not often enough to be serious trouble but definetly a concern and a potential safety risk if it cut out at the wrong moment. As I reported earlier, when I returned, I put it on the charger and it behaved normally.

I had further cut out issues on the next substantial ride, a ride of some 16 miles or so. On the outbound half of the journey, it didn't cut out at all that I can recall. But about two or three miles into the return leg (about 11 or 12 miles in all) it started to cut out more and more frequently. It would restart OK, but at some point it refused to restart at all. During these restarts - after the first few - I tried disconnecting and reconnecting the bullet electrical connectors that link the battery to the rest of the system, but it didn't help. At some point it would turn off as soon as it turned on and later it wouldn't turn on at all. :cry: :shock: :(

I didn't want to report on it until I had more information - I was unsure if it was the pack or the TSDZ2.

I contacted the battery seller who is also the maker, and they gave both authorization and directions on taking the pack apart and analyzing what's going on.

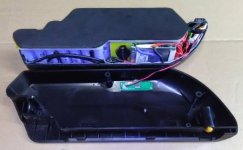
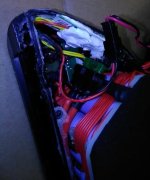
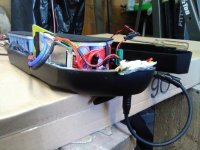
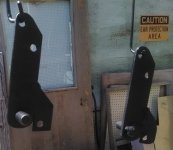
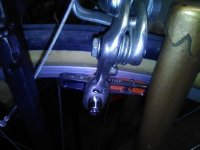
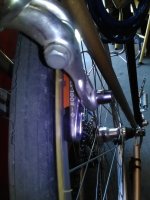
In the images below, you can see taking it apart. I contacted a friend of mine who's an electrical engineer who has worked extensively with automotive EVs, and he got his volt meter and joined me in the work.

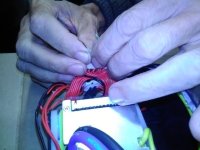
We did the work in two phases, first a less invasive, just trying to reconnect things and look for anything obviously wrong, then putting it back together to see if there was any change, and when that didn't work, we then took it apart again and collected cell voltage readings and wrote them all down.

We collected more data than anyone would probably want or could make use of because there are several different sets of data: one from before we took the battery casing apart, another with it apart the first time, another set after it went back together from that first time, then a set of data from the second time we took it apart, and then, finally, some more data after we had it back together. However, the readings didn't change much except that at a few points the battery assembly seemed to be OK and other times it was clearly not OK.

The bottom line of all this is that it has an intermittent discharge problem. We got it to work for a few minutes, and then it quit working, just as it had done for me from the very first ride, though the length of time it works has reduced considerably. When working, it seems to do just fine. Again, at first, it - the TSDZ2 - just turned itself off, but would turn on again immediately and work, and get serious power out of it. Later, on the second ride, it turned off more and more frequently, then finally wouldn't go on at all. This same pattern continues to today.

Evidence collected from when it was apart the second time points to a bad BMS - Battery Management System - and not a pack wire or the pack itself since we were getting 53.6v from the fuse input to pack ground but at that same moment only variously 25 to 29v coming out of the output pins where the battery casing attaches to the battery mounting bracket. Yet, at other times, we got full pack voltage on those same pins.

Here's the voltage data from the FOURTEEN (I expected 13!) pairs of wires at the "BMS balance plug":

1 - 4.14
2 - 4.14
3 - 4.13
4 - 4.13
5 - 4.13
6 - 4.13
7 - 4.12
8 - 4.12
9 - 4.13
10 - 4.13
11 - 4.13
12 - 4.13
13 - 4.13
14 - 4.13

The vendor says the 14th pair are "just grounds" but if true, it should no provide a voltage, so this is an unresolved mystery.

We didn't have a means to discharge and do the other testing discussed in the document the vendor shared. But again, my perception is that the cells themselves have nothing to do with this. Otherwise, it wouldn't cut out during a ride, then, a few minutes later, after having done nothing but turn it back on, deliver stunningly good performance as I rode up some very steep hills. At least, that's my perception; if there were bad cells, they'd stay bad until some action was taken.

The vendor agrees with my basic analysis and are shipping a new BMS - it's not hazardous cargo, it's small, light, should be able to get here quickly - and I'll install it and see where we are.

Meanwhile, a "backup battery" would be a great thing. I assume there are other battery sizes that are built into cases that would fit this same mounting system... Now I'd like to find them but I haven't found time to look - the casing has the name "Reention". I presume I'll find something when I do a search, but if any of you reading this thread already know, I'd appreciate any pointers.
 

Attachments

  • EM3ev_13S4P.17.05.10-3_just_opened_2_2.jpg
    EM3ev_13S4P.17.05.10-3_just_opened_2_2.jpg
    36.1 KB · Views: 2,514
  • EM3ev_13S4P.17.05.10-3_just_opened_1_2.jpg
    EM3ev_13S4P.17.05.10-3_just_opened_1_2.jpg
    73.8 KB · Views: 2,514
  • EM3ev_13S4P.17.05.10-3_BMS_in_place_1_2.jpg
    EM3ev_13S4P.17.05.10-3_BMS_in_place_1_2.jpg
    41.3 KB · Views: 2,514
  • EM3ev_13S4P.17.05.10-3_measuring_4_parallel_cells_1_2.jpg
    EM3ev_13S4P.17.05.10-3_measuring_4_parallel_cells_1_2.jpg
    47 KB · Views: 2,514
  • EM3ev_13S4P.17.05.10-3_just_opened_nose_packing_2_2.jpg
    EM3ev_13S4P.17.05.10-3_just_opened_nose_packing_2_2.jpg
    61.4 KB · Views: 2,514
  • EM3ev_13S4P.17.05.10-3_apart_being_charged_1_2.jpg
    EM3ev_13S4P.17.05.10-3_apart_being_charged_1_2.jpg
    57.1 KB · Views: 2,514
Despite it working on hills *after* having cutouts, based on the pattern of cutouts, it sounds like a cell group has some kind of an issue with delivering current once it drops below a certain point--voltage sag under load becomes too great, and the BMS shuts the pack down to protect it.

It could be a cell that's disconnected (broken welds) from the rest of those in the same group, or it could even be a pack built incorrectly so it doesn't have the same number of paralleled cells in each group.

Unless you test the cell voltages while the pack is *under load*, preferably a load at least as great as that during the cutouts, you probably won't see that type of problem.

If it's an intermittent connection due to bad welds, you may not see the problem all the time, so it'd be important to test it at the time you do see the problem. (difficult to do when on a ride).

It could be a bad BMS--but the ones I typically see reported are just plain intermittent, or don't work at all, or have a single cell group it drains down thru a stuck-on balance channel, etc. I don't recall one that creates something that gets worse as the pack gets lower in voltage (during a ride).

It's also possible that it's one of the pins in the female connector going to the BMS balance port--if the contact surfaces are spread just a little, they will make enough contact to work most of teh time, but sometimes not. Colder temperatures often make this worse, but depending on how it's failing to connect, heat could actually be more of a problem, causing the contact to expan outward away from the pin in the middle. Sometimes humidity changes will also affect operation. Vibration also affects it.


Regarding the differing voltages between the casing pins and the fuse input: Is the fuse input on the charger end? If so, it's normal for a BMS to read full voltage on it's charger input while reading a "floating" voltage on it's discharge output, if the BMS has shutdown output to protect the pack due to what it sees as a low cell.

If the fuse input is also on the discharge end, then I don't know--normally fuses that are on the discharge end of a pack are post-BMS, so you'd see the same voltage everywhere in the wiring icnluding the fuse, and only see a different voltage on the BMS board itself, prior to the discharge FET(s).

If it's a 13s pack (48v) then there are often 14 wires. If it's a 14s pack (52v) then it's 15 wires. That gives you ground plus a positive wire for each cell group. Some packs use the main battery ground instead of a separate wire, so then you only have the group positives in the balance leads.


Otherwise, it wouldn't cut out during a ride, then, a few minutes later, after having done nothing but turn it back on, deliver stunningly good performance as I rode up some very steep hills. At least, that's my perception; if there were bad cells, they'd stay bad until some action was taken.

Generally that's true, but a bad connection between cells in a group (bad welds at one end, for instance) could cause what you see, if there's bumpiness or vibration in the right way, and could cause it to work then not work as it connects/reconnects.

And it isnt' even quite as simple as that, as the disconnect wouldnt' even instantly cause a cutout--the group would have to again drain enough (minus the cell(s) that are disconnected) to trigger the cell-level LVC in teh BMS and cause shutdown.


A BMS could do it, too, if the right failure were happening inside it.


the casing has the name "Reention". I presume I'll find something when I do a search, but if any of you reading this thread already know, I'd appreciate any pointers.
That brand name seems to just be a casing brand, from what I've read in various threads here on ES. They make a number of case sizes.

I'm not sure if anyone (other than individuals, like the various pack builders on ES) makes packs that fit them that don't already come in the cases.
 
amberwolf said:
Despite it working on hills *after* having cutouts, based on the pattern of cutouts, it sounds like a cell group has some kind of an issue with delivering current once it drops below a certain point--voltage sag under load becomes too great, and the BMS shuts the pack down to protect it.

First of all, thank you for your long, detailed reply; I'm learning a lot, thank you.

...I have my doubts about a set of cells dropping out because they're on whole not that bad (I posted data upthread) and because the pack wasn't run long enough to have much of a discharge when the problem first occurred. Even the entire 22 mile trip only took a little over a quarter and not a third of the pack's theoretical power, so it wasn't run down very much.

amberwolf said:
It could be a cell that's disconnected (broken welds) from the rest of those in the same group, or it could even be a pack built incorrectly so it doesn't have the same number of paralleled cells in each group.

I think we can safely rule out the latter but the former is a real possibility, I agree.

amberwolf said:
Unless you test the cell voltages while the pack is *under load*, preferably a load at least as great as that during the cutouts, you probably won't see that type of problem.

Got any great ways to fabricate a load? I was thinking I could hook up a dis-used electric frying pan or something like that, but the resistance is key. Too much resistance and it does nothing much and not enough and it draws too much current.

... BTW, the load where it was cutting out was often very low. Keep in mind this is with the TSDZ2, so when you're not pedaling, there's no load...

amberwolf said:
If it's an intermittent connection due to bad welds, you may not see the problem all the time, so it'd be important to test it at the time you do see the problem. (difficult to do when on a ride).

Yes, of course.

amberwolf said:
It could be a bad BMS--but the ones I typically see reported are just plain intermittent, or don't work at all, or have a single cell group it drains down thru a stuck-on balance channel, etc. I don't recall one that creates something that gets worse as the pack gets lower in voltage (during a ride).

Just a guess, but it's my perception it has nothing at all to do with load. It's never failed when at high load that I can recall. The system just turns off. Poof! Then, comes back fine, if it comes back at all.

amberwolf said:
It's also possible that it's one of the pins in the female connector going to the BMS balance port--if the contact surfaces are spread just a little, they will make enough contact to work most of teh time, but sometimes not. Colder temperatures often make this worse, but depending on how it's failing to connect, heat could actually be more of a problem, causing the contact to expan outward away from the pin in the middle. Sometimes humidity changes will also affect operation. Vibration also affects it.

This is "Bomb-Crater-Roads Oakland," so of course there are LOTS of vibrations going on! ... This list of yours here just leaves me saying; that's why I BOUGHT a pack; I'm sending it back! Trouble is, the time delay since it's China.

amberwolf said:
Regarding the differing voltages between the casing pins and the fuse input: Is the fuse input on the charger end? If so, it's normal for a BMS to read full voltage on it's charger input while reading a "floating" voltage on it's discharge output, if the BMS has shutdown output to protect the pack due to what it sees as a low cell.

If the fuse input is also on the discharge end, then I don't know--normally fuses that are on the discharge end of a pack are post-BMS, so you'd see the same voltage everywhere in the wiring icnluding the fuse, and only see a different voltage on the BMS board itself, prior to the discharge FET(s).

Unfortunately, I don't recall at the moment just where the fuse is in the system. I think it's on the output of the whole pack. Hmmm...

I think I need a "backup" pack as soon as I can afford one.
 
RTIII said:
Got any great ways to fabricate a load? I was thinking I could hook up a dis-used electric frying pan or something like that, but the resistance is key. Too much resistance and it does nothing much and not enough and it draws too much current.

... BTW, the load where it was cutting out was often very low. Keep in mind this is with the TSDZ2, so when you're not pedaling, there's no load...

Not that it matters if you're sending it back, but if you need to test one in the future:

Lots of battery-level loads for 48V+ packs: toasters, toaster ovens, heaters, stove elements (might have to parallel a few if they're meant for 240VAC; or just unplug your whole stove from the wall and plug the battery across two of the "line" inputs to the stove, and turn everything on high for full load)

Set the bike up with rear wheel off ground, and either make a roller-load (like a dyno would use; could be as simple as a car spare tire mounted on something it can spin on but not easily; driven by friction from the bike tire), or just engage the wheel's brakes enough to simulate various loads. (hard on the pads if you do it a lot under high power)

Then just hand-crank the pedals during each of the cell measurements.


Just a guess, but it's my perception it has nothing at all to do with load. It's never failed when at high load that I can recall. The system just turns off. Poof! Then, comes back fine, if it comes back at all.
THen that sounds a lot more like a connection issue, either a wire that's broken inside it's insulation (often right next to the soldered points or contact crimps), or a contact with spread pins, or a contact that is partly backed out of it's connector shell (which may not show the problem unless it's plugged in, where it's hard to see).

Or a bad/broken weld, that disconnects cells from a group so that even a little load is enough to bring that group to LVC long enough to shut the BMS down.


This list of yours here just leaves me saying; that's why I BOUGHT a pack; I'm sending it back! Trouble is, the time delay since it's China.

Yeah; and shipping cost cuz they often make you pay shipping back...and there's a further problem: AFAICR you can't ship a defective pack around easily (probably have to lie about what it is / it's status); you'll have to check with your shipper about that. People have also had problems at various shippers with getting them to even accept any battery at all from someone that isn't UN-hazmat certified; some take them just fine, some don't.
 
RTIII said:
amberwolf said:
...Got any great ways to fabricate a load? ....
Bike trainer, especially one with an adjustable resistance. $30 - Craigslist.
Great for winter time exercise too !

It's great how you're detailing your trouble shooting and the warranty work with the seller.
It's too bad that even the 'Name Brand' stuff can go bad. It's not like you're pushing this pack to the limit..


Good Luck,
 
amberwolf said:
Lots of battery-level loads for 48V+ packs: toasters, toaster ovens, heaters, stove elements (might have to parallel a few if they're meant for 240VAC; or just unplug your whole stove from the wall and plug the battery across two of the "line" inputs to the stove, and turn everything on high for full load)

...You're suggesting hooking up the 48V pack to general appliances that have resistive loads and ... just hoping for the best that the load drawn isn't too high or too low? Hmmm... I don't have an electric stove - I cook with natural gas - and have only a few items around with resistive loads like that - like the disused frying pan I cited. . . I guess the BMS will protect the pack (if it's working!) from drawing too many amps and if it draws too little it just won't do anything much.

amberwolf said:
Set the bike up with rear wheel off ground, and either make a roller-load (like a dyno would use; could be as simple as a car spare tire mounted on something it can spin on but not easily [...snip...] Then just hand-crank the pedals during each of the cell measurements.

You lost me here: I'm guessing your suggestion about hand-cranking the pedals is about getting the TSDZ2 to do some work, however, that doesn't do it; it only adds in power proportionally to how much is input, even at the most aggressive setting. This just isn't going to be able to add much power at all since what I can do by hand is pitiful as compared with a riding scenario. And, even more puzzling: How am I going to measure a battery pack, all disassembled on a bench so I can do the measurements, while under load if it's got to be powering the mid-drive? Hmmm...


amberwolf said:
Just a guess, but it's my perception it has nothing at all to do with load. It's never failed when at high load that I can recall. The system just turns off. Poof! Then, comes back fine, if it comes back at all.
THen that sounds a lot more like a connection issue, either a wire that's broken inside it's insulation (often right next to the soldered points or contact crimps), or a contact with spread pins, or a contact that is partly backed out of it's connector shell (which may not show the problem unless it's plugged in, where it's hard to see).

Agreed.

amberwolf said:
Yeah; and shipping cost cuz they often make you pay shipping back...

In one of their comments, I interpreted it as them saying they'll pay for shipping, both ways. ATM, however, they're sending another BMS card I'm supposed to try.

amberwolf said:
there's a further problem: AFAICR you can't ship a defective pack around easily (probably have to lie about what it is / it's status); you'll have to check with your shipper about that. People have also had problems at various shippers with getting them to even accept any battery at all from someone that isn't UN-hazmat certified; some take them just fine, some don't.

Yes, I hope I don't have that problem.
 
Norton said:
RTIII said:
...Got any great ways to fabricate a load? ....
Bike trainer, especially one with an adjustable resistance. $30 - Craigslist.
Great for winter time exercise too !

...I meant a load for the BATTERY, of course, not me!... (Most "bike trainers" use friction, I'm pretty sure - I've never seen one that used any form of electricity that wasn't intended to do something like power a small TV while you get your workout! Besides, too much ground footprint and we don't have winter-time issues here, except, maybe, rain; you can bike year round. That's why realestate prices are so high here.)

Norton said:
It's great how you're detailing your trouble shooting and the warranty work with the seller.
It's too bad that even the 'Name Brand' stuff can go bad. It's not like you're pushing this pack to the limit..
Good Luck,

Thanks Norton. I'll be posting updates.
 
The kickstand arrived last week (also ahead of schedule).

It's heavier than I'd like, but it should work OK. The big challenge was mounting it. It was designed for a 26" wheel, and for a much wider frame (axle length). Further, it had inward folded tangs designed to prevent - or limit - rotation that could never work on my bike, even if it were the only accessory mounted to the rear axle area.

So, it's a good thing I have a metal-working workshop!

There are photos below, but here I describe what you see in the photos:

The first thing I did, since I knew they weren't going to work for me was to grind off the inward folded tangs mentioned above. Later, when mocking things up, I also ground a bit more clearance from the forward end of the right bracket so it could never come too close to the rear derailleur. To solve the width problem, I decided to mount adapter brackets that would mount on the outboard surfaces of the luggage rack's down-tubes. This spaced the mounting at least 25mm wider and, as it turned out, just about exactly the amount needed for a perfect fit.

Next, I made two brackets, one per side, out of flat (but thick) bar stock that bolt in to my bike's four rear M6 accessory mounting locations, two per side on the axle mounting flanges. The angle downward had to be right. That was relatively easy. Bolted in to two M6 bolts per side would prevent any rotation issues and be strong as heck because the forces are primarily in shear.

Rear axles are standardized at the M10 size today (10mm nominal diameter), so I needed to accommodate that. To both keep weight down and keep as large clearances around the rear wheel as possible, I chose to not use a bolt and nut, but rather thread the bar stock, then cut a short length of "all thread" and weld it into the flat bar. So, it's sort of like a bolt, but the flat bar itself is the "head" of the bolt! This also means that only a matching nut is required to attach the kickstand making working on it easier.

Then I had to make an anti-rotation feature for the mounting of the kickstand to the adapters. Again, to keep weight down and keep it simple, I chose to use a small bit of flat bar stock, welded to the first bit, find the right spot and put an M6 hole where only mounted is a cheese head screw - the head of which between 8 and 9mm, mostly but not completely filling the oval slot in the kickstand.

It almost worked out perfectly, but I hadn't fully factored in the "slop" in the parts, so with a load, it thrusts the back of the adapter brackets upward against their mounting bolts and the clearance is taken up between the cheese head screws and the kickstand slots making for a wrong angle that encourages the bike to move forward off the stand - it holds, but I'm not happy with it.
 

Attachments

  • Legran_kickstand_mounting_bracket_installed_1_2.jpg
    Legran_kickstand_mounting_bracket_installed_1_2.jpg
    76.4 KB · Views: 2,429
  • Legran_on_kickstand_closeup_1_2.jpg
    Legran_on_kickstand_closeup_1_2.jpg
    67.6 KB · Views: 2,428
  • Legran_w_kickstand_up_1_2.jpg
    Legran_w_kickstand_up_1_2.jpg
    61.8 KB · Views: 2,428
RTIII said:
...I meant a load for the BATTERY, of course, not me!... (Most "bike trainers" use friction, ...
My trainer has a 'magnetic resistance' drive. It's variable and uses the Lenz Effect where it spins an aluminum disc between two magnet plates that move slightly in relation to each other. The aluminum and magnets get hot.]
Magnets have an effect non ferrous metals. It is relatively small and folds up when not in use. I should use it more in the winter... :oops:

But of course you'd need a partner with this variable load to pedal the bike. Or get the dang throttle figured out.. :lol:
And you'd need an extension cable with an inline Power/kWh meter. (Kind of like what I posted in the other TSDZ2 thread.)
You'd want this meter even if you use a fixed resistive load like a toaster or fry pan.
Just reading resistance on the cold resistive load will not tell you the power it consumes at high temp and with a variable 48V DC source.

I'm learning a lot about BMS and troubleshooting on this thread !
 
...I had a little time on Saturday, so I dismounted the kickstand and fixed the two brackets to get the rotation right. To do this I first put them into the milling machine (one at a time) and elongated the hole for the cheese-head screws to make it an oval instead of a circle, then welded up the former part of the circle where I didn't want the hole. I then used the mill again to clean up the hole so it looked like it was made that way int the first place! This was precision work! 8) I moved the holes over by a mere 3mm, but, after the paint dried, I tried it and it was a successful effort! :D
 

Attachments

  • Legran_kickstand_mounting_bracket_painted_2_2.jpg
    Legran_kickstand_mounting_bracket_painted_2_2.jpg
    48.8 KB · Views: 2,386
Yesterday my Kool Stop brake pads came. The packaging proclaims, "light-weight V-Type 2 holders with all-weather, high-performance replaceable brake pads" and "now with thicker brake material for longer pad life!"

I'd considered making anti-rotation adapters but when I looked at them I thought geez, these'll work fine as is! 8)

At least, I sure hope so because I didn't make any such adapters! If the shoes screw up in rotation I'm gonna be :shock: then :evil:

The directions advised to clean the rims first, so I used acetone since it leaves no film afterward, and it did a fine job, though I was careful not to get any on the tire, just in case! And, there WAS a lot of the old pad material left stuck to the rims. I then mounted the shoe assemblies and the rears, I think, went right on with no adjustment needed, but the fronts were a tiny bit tight and rubbed a little, so I just opened up the cable's connector to let the springs do their thing, then tightened and then it was a tiny bit too lose ... a few moments later, PERFECT! :D

Directions said that the braking performance would improve with use, and if so, it will be beyond phenomenal because it's incredible now! :lol:
 

Attachments

  • KoolStop_left_front_1_2.jpg
    KoolStop_left_front_1_2.jpg
    51.2 KB · Views: 2,355
  • KoolStop_left_rear_1_2.jpg
    KoolStop_left_rear_1_2.jpg
    90.2 KB · Views: 2,355
Good pads will flex your brake calipers more, so be sure you have the pads adjusted slightly toe-down so that the pads don't contact the tires under hard braking.
 
Chalo said:
Good pads will flex your brake calipers more, so be sure you have the pads adjusted slightly toe-down so that the pads don't contact the tires under hard braking.

Thanks, Chalo, I went and checked them at your suggestion and only felt inclined to adjusted one of the four, and it was probably OK, but it's a "just to be sure" situation, as you suggest. Thank you for your comments and, dare I say it, friendship. :)
 
chas58 said:
I'm glad to see you upgrading your brakes. :lol:

They're UNBELIEVABLY good now! 8) :D :lol:

Chris, the salesman at local bike store Cycle Sports of Oakland, refused to sell me these or any other modern brake pads because, he said, these can't be fitted to old bikes like mine. :shock: I asked why not. He said they'd rotate around and cause problems and he didn't want the liability. But I've never seen any anti-rotation features on any moderns that have them, so I have this perception he was blowing smoke up my ass. Any comment to that?
 
RTIII said:
He said they'd rotate around and cause problems and he didn't want the liability. But I've never seen any anti-rotation features on any moderns that have them, so I have this perception he was blowing smoke up my ass. Any comment to that?

1) He doesn't understand, and doesn't want to understand, old bikes; or

2) he really really wants to sell you a new bike.
 
Chalo said:
RTIII said:
He said they'd rotate around and cause problems and he didn't want the liability. But I've never seen any anti-rotation features on any moderns that have them, so I have this perception he was blowing smoke up my ass. Any comment to that?

1) He doesn't understand, and doesn't want to understand, old bikes; or

2) he really really wants to sell you a new bike.

Yeah, or option 3) he doesn't like me.

I definitely got that impression, especially at three particular points. I'm "super technical", he's not at all. I asked a number of questions (about the moderns) he couldn't readily answer or his answers were complete bullshit anyone with any engineering skills whatsoever would know was wrong - such as things pertaining to mechanical advantage of various braking system alternatives. -shrug- I expected an answer like "cost" or "simplicity", "ease of adjustment", or maybe "works better in these conditions but not those conditions." IDK why some people have a problem with saying, "I don't know", or "I'm not sure," etc, and would rather lie. Somehow they stupidly think that if you're asking you don't know, so any answer to shut you up will do and the asker won't know any difference! Wrong!

The sad part is I was only there because a guy on the phone had given me excellent advice for free and I wanted to spend money in his store to help thank him for his time (don't they make a lot of money on the markup of accessories?!) and this Chris guy has basically chased me away.
 
http://www.instructables.com/id/KITTY-litter-pannier/ since you have a cat. Water tight. Weight is low whe you have something in them. Light weight
 
chas58 said:
I'm glad to see you upgrading your brakes. :lol:
Yeah, me too.

But what is the 'Ready to Ride' weight of this bike now?

Those old school road rims and tires are for a Road Bike, you know? The kind where a rider stands over bumps, or hops the bike over bad ones, to lessen the impact the bike has to take.
These tires and rims have a hard knock life.
But there are Tandem Rated rims and tires in this size. Then it might be safer as a Cargo Bike.

Sorry if this sounds critical.... I can't help myself.....
:cry:
 
Norton said:
chas58 said:
I'm glad to see you upgrading your brakes. :lol:
Yeah, me too.

But what is the 'Ready to Ride' weight of this bike now?

Those old school road rims and tires are for a Road Bike, you know? The kind where a rider stands over bumps, or hops the bike over bad ones, to lessen the impact the bike has to take.
These tires and rims have a hard knock life.
But there are Tandem Rated rims and tires in this size. Then it might be safer as a Cargo Bike.

Sorry if this sounds critical.... I can't help myself.....
:cry:

Apparently you have overlooked / not read / forgotten the several instances where I point out that I'm running brand new aluminum rims, including a rear one I laced myself with a new 130mm 7 gear Shimano freehub. -shrug-

In any event, more helpful would be pointers to specific instances of these "rims and tires in this size" that are worth looking at.....
 
RTIII said:
....Apparently you have overlooked ..... that I'm running brand new aluminum rims, including a rear one I laced myself with a new 130mm 7 gear Shimano freehub. -shrug-

... more helpful would be pointers to specific instances of these "rims and tires in this size" that are worth looking at.....
Yes, I saw where you hydraulically spread your really old, low dollar in the day, stamped steel, rear horizontal dropouts to allow for the use of a modern 130mm hub.
Did you make those dropouts parallel or do you just crank down the quick release and hope for the best ?

Tandem Rated Wheelsets. Google.

But don't throw any more money at this old bike. Just avoid potholes and bumps. And Ride On !!! At least you're enjoying your ebike! :) I'm still waiting and watching..... :cry:
 
Norton said:
Yes, I saw where you hydraulically spread your really old, low dollar in the day, stamped steel, rear horizontal dropouts to allow for the use of a modern 130mm hub.

That's an assholeish remark.

Norton said:
Did you make those dropouts parallel or do you just crank down the quick release and hope for the best ?

That's another assholeish remark.

Norton said:
But don't throw any more money at this old bike.

And another rude remark - three, all in one posting, and no, using a couple of emoticons doesn't make up for the fact that you can't seem to find it in yourself to not be rude - an asshole even. Why this latest pair of exchanges was prompted from you making yet another caustic remark for which I gave a measured, polite reply, trying yet again in vain to guide you to appropriate behavior.

I don't really care what your problem is; I've asked you repeatedly to not be rude to me in the past and you just aren't capable of it. PLEASE DON'T EVER POST IN REPLY TO ME AGAIN. I've had enough of your rude shit.
 
There are some valuable points to what he's saying. Some is irrelevant-- like the fact the frame was cheap and has stamped steel dropouts. Both of those things make it a much better choice for conversion than most of the "nice" bikes of the period. Thick tubing is stiffer than thin, and stamped dropouts (if they're reasonably thick) can take a lot of damage without breaking.

It really is all in the details. A 1982 Huffy, with paper-thin dropouts and internally brazed frame, would not be nearly as suitable as your Raleigh. And an expensive 1982 Colnago with thin Columbus SL tubing would probably fail sooner too.

He's right that you should verify the dropouts are aligned, because if they're not parallel, it puts a great deal of stress on the axle. A bike shop has special tools for gauging and straightening dropouts.

The wheels might or might not work for you in the long run. There are very few 27" wheels that are equal, structurally, to what comes with a cheap no-frills 700c bike today-- let alone something built for heavy duty. It looks like your wheels have zinc plated spokes, which tend to become stuck in the nipples over time. That complicates later truing. But if your wheels do what you ask of them, then it's no big deal that you could have better ones.

The very limited selection of tires in 27 inch curtails your ability to let fatter tires protect your wheels. Here's one fatter tire you can get: http://www.swifttire.com/product/sand-canyon-27-x-1-38-folding-tan/

The excellent Michelin World Tour tire I have recommended in the past seems to have been discontinued, unfortunately.
 
Back
Top