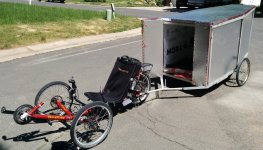
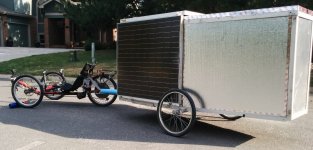
New Transportation Etrike
Introduction to Tadpole Recumbent / Purchase Strategy
Always wanted to have the most energy efficient ride, so in June of 2011 I started searching for a used tadpole recumbent trike. These are low to the ground which reduces air drag or air friction, but there are three wheels so the rolling resistance and axle resistance is increased. After riding some two wheel recumbents I decided on a three wheel version for ease of riding. Yes, they are wider and very-yes it is more difficult to transport (Saris can support main cross axle, or Yakima/Thule roof mount rails for two front wheels, saddle for back wheel). A user group named Bentrider helped me with my understanding of these low riding wheeled vehicles.
Towards the end of the summer of 2011 I was looking at ebay and craigslist web crawlers to search on the words “tadpole” and “trike” along with specific company brand names. Terratrike seemed to have evolved the tadpole design and were at an OK price if purchased used, but still a big chunk of change. I am tall so I needed a long trike, which I eventually found down in Colorado Springs. Tried it out, and haggled because I had cash, summer was ending so it was a little easier to get a good price. The recumbent tadpole trike purchased is a red Terratrike Tour with an extended boom for my longer legs. I could still use another spacer to lengthen the boom more but would also need to lengthen the chain, and the chain is plenty long as it is traveling back and forth the length of the bike. Weight limit for the trike is 300 lbs. One important point, these need clips and bike shoes. Your legs don't want to run under that red frame if they fall to the pavement! Crank Bros clips shown in etrike picture below.
Stuffed the trike into my Prius hatchback and drove it back up to the Denver area. For the next year I rode that around the hilly paved bike trails. It was nice because I didn't get stressed out shoulders and wrists like when using an upright bike. But it was much much harder pedaling uphill than a normal two wheeled bike. And downhill was slower because it just didn't feel as safe. Once I did get tossed out because I was stopping and turning at the same time. Good to get a road rash to determine just how far to take it over the line. The trike is extremely fun, like a carpet ride around the mountains, especially with an electric motor. You lean into the turns so as not to fall out ~smiley~.
View attachment 3
The etrike today with pannier on left side, muddy worn tires.
Electric Motor
October of 2012 was the start of exploring the ebike side of the equation. Obsession accurately descibes the next two months' investigating electric hub motors for bikes/trikes. Bikes have a backup power system, the rider, so that is nice. I didn't want something that would take away from that fail safe availability so I went with a hub motor. The hub motor has permanent magnets and energized magnets.
There is a tax on energy if the motor isn’t running because of those permanent magnets, much harder to pedal than if a normal cassette/freewheel was on the trike. The etrike design called for one wheel to be driven, the rear wheel. And I wanted that wheel to also have a regenerative braking system; more for the brake then the extra energy (which is minimal) put back into the battery.
Endlessshpere.com was instrumental in figuring out many of the details of motor, battery, motor controller and such. But there were many details that had to be worked out on my own. I purchased a used hub motor on a rim that had loose spokes.
View attachment 2
Photo showing inside of hub motor where three power wires (blue, yellow, green) going to coils around iron, 1,2,3; 1,2,3.... Permanent magnets are the thin shiny metal pieces just outside the copper windings.
After extensive searching bought many of the items from one China vendor (Greentime) including: motor control, a motor wiring testing box (cycle analyst so I could figure out the right wires on the motor), two metal brackets to keep my bike frame from breaking due to the increased power at the rear axle called torque arms, a thumb throttle (top of right handle bar), and a small voltmeter which I put in a black box on the etrike under the seat. And I bought a Bicycle Pedal Assistant Sensor/Ebike PAS system (which has never been installed mostly because it needs a wire all the way to the front crank). It did help to buy lots of this ebike stuff from one vendor so I saved on shipping and only had to track one order.
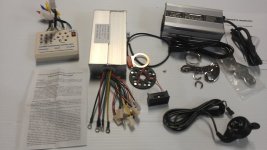
Ebike stuff from China.
The back wheel needed appropriate inner tube and a serious tire that wasn’t going to go flat; didn’t ever want to take that wheel off with all the wires and torque arms. Using a 20” diameter 1.95” wide Maxxis Hookworm tire and a slime inner tube. These were purchased from a USA bike supply vendor. The tube air valve is different from the two front wheels, so I need to make sure I have a pump for both schrader and presta valves. Bit of a hassle.
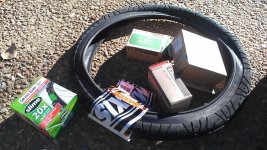
Tire and tubes.
Functions on the motor controller are amazing for the low cost. It has regenerative braking, cruise control, some voltage and current protection. The controller spits out energy exactly at the right time / power levels to the iron pieces in the hub motor, turning them into magnets that force the permanent magnets to move. The whole hub motor assembly is stationary; the axle stays put. It is the outside rim of the hub motor that moves. This particular motor can crank out a respectable amount of horsepower. The spokes then move the wheel. I had to learn the hard way that the spokes need to be rugged and the wheel true. Normal hub motors are about 0.25 horsepower, but mine is more like 0.75 HP in driving force; much more power is dissipated in brake mode. Think of a real horse pounding those tiny spokes back and forth. There is a lot of energy being transferred by those spokes so they should be strong. After a year of struggles I purchases stainless steel spokes and had REI true the wheel. You have to make sure that everything about the spokes are the right size, and that the rim has the right size hole for your inner tube air valve type. Lots of little details on this journey.
Again, the motor controller is an amazing piece of gear, for something costing less than $40 (there are better versions made in USA for twice that amount). Three power wires and three phase wires go into the motor. Other wires go to switches, battery, throttle, cruise and brake button. On/off switch is on the right side of the seat, brake button and cruise are mounted at the top of the left handle bar. All wiring is held to the frame using cable ties.
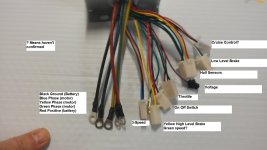
Wiring out of motor controller.
I bought a circuit breaker, and a LiPo 12s2c 20C battery from a vendor I won’t mention. LiPo batteries require lots of supplemental equipment to charge, balance and more. The LiPo pack needs constant attention to operate safely, but there is a chance even if you do everything right it can still flame out. http://endless-sphere.com/forums/viewtopic.php?f=3&t=47407
LiPo was the wrong technology for me, which I learned after a fire, a fire that you can not put out! Now I have a 48V 20AH LiFePO4 battery and am much happier with the results. The battery is heavy, has a built-in battery management system and is expensive.
The hub motor itself took lots of consideration on which type to purchase, but after I read the story of the Pikes Peak Hill Climb race almost won by a guy with a slightly modified hub motor, I got my general answer to what hub motor to purchase. The guy who almost won that race averaged 28 MPH up hill to 14,110 feet above sea level http://www.electricbike.com/hub-motor-pikes-peak/. I purchased a used Crystalyte HS3540 from a reputable contributor to Endlessshpere.com. It needed a freewheel spacer and a freewheel itself. Increasing the voltage to stock hub motors dramatically increases the power.
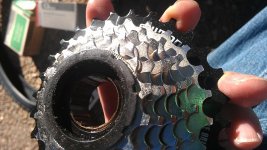
Freewheel screws right onto hub motor (not a cassette).
You can see the freewheel, the torque arm, the hub motor and the new tire on the right side of the finished trike.
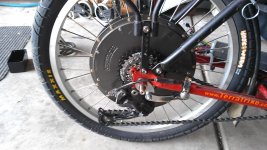
Right side of finished trike.
Left side of finished trike shows the voltmeter (46.2 V showing), the motor controller mounted vertically behind the trike seat, the battery bag above that, and the various wires going to the hub motor and the torque arm (one on each side). Placement of all this stuff is going to be different for any bike or trike depending upon where room is available.
Left side of finished etrike.
Summary
Zipping around town on this etrike might look strange, but it is a gassss. Probably average 18 miles per hour. I often pedal, so my actual electricity usage is reduced. I can get to the store quicker than jumping into a car. Where I live is similar to Red Rocks; flying around these hills on this etrike is exhilarating, like a magic carpet ride. Sometimes it is hard to tell if I am having that out of body dream where you are flying around familiar areas. Row row row your boat, gently down the stream, merrily merrily merrily, life is but a dream.
I have modified a kid bike trailer to hold my kayak, and I take it down to the local lakes with the etrike. Makes for a long rig, that can go under gates at reservoirs where others in cars wait to pay their tolls (bikes/trikes are free). Five wheels, one motor which still hauls everything uphills.
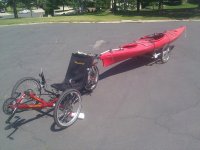
Etrike with 14.5 foot kayak, trailer is modified kid carrier with Yakima kayak saddles.
And I have played with energy efficiency using a rear fairing. My normal watt-hours per mile is around 33 watt-hours/mile (a measurement of energy over distance, not power). And I measure this at the wall where electricity is put into the battery charge controller. The rear fairing reduces that 10 to 12%. Details on the fairing are in another blog entry: http://renewableenergyspace.blogspot.com/2012/11/inexpensive-lightweight-recumbent.html.
View attachment 4
Less than $10 fairing reduces energy 10 to 12%; on Blog.
My next goal is to utilize some of the PV modules I have lying around to charge the battery. Would take just a small amount of surface to completely charge the battery for commuting purposes, 10 to 20 miles each way. So, the ultimate goal is a carbon free transportation solution that can get my butt where it needs to be in a relatively fast amount of time. Hope this helps. Thanks so so much to Bentrider and Endlessshpere communities.
Also at this blog link:
http://renewableenergyspace.blogspot.com/2014/10/new-transportation-etrike-by-joseph.html
Introduction to Tadpole Recumbent / Purchase Strategy
Always wanted to have the most energy efficient ride, so in June of 2011 I started searching for a used tadpole recumbent trike. These are low to the ground which reduces air drag or air friction, but there are three wheels so the rolling resistance and axle resistance is increased. After riding some two wheel recumbents I decided on a three wheel version for ease of riding. Yes, they are wider and very-yes it is more difficult to transport (Saris can support main cross axle, or Yakima/Thule roof mount rails for two front wheels, saddle for back wheel). A user group named Bentrider helped me with my understanding of these low riding wheeled vehicles.
Towards the end of the summer of 2011 I was looking at ebay and craigslist web crawlers to search on the words “tadpole” and “trike” along with specific company brand names. Terratrike seemed to have evolved the tadpole design and were at an OK price if purchased used, but still a big chunk of change. I am tall so I needed a long trike, which I eventually found down in Colorado Springs. Tried it out, and haggled because I had cash, summer was ending so it was a little easier to get a good price. The recumbent tadpole trike purchased is a red Terratrike Tour with an extended boom for my longer legs. I could still use another spacer to lengthen the boom more but would also need to lengthen the chain, and the chain is plenty long as it is traveling back and forth the length of the bike. Weight limit for the trike is 300 lbs. One important point, these need clips and bike shoes. Your legs don't want to run under that red frame if they fall to the pavement! Crank Bros clips shown in etrike picture below.
Stuffed the trike into my Prius hatchback and drove it back up to the Denver area. For the next year I rode that around the hilly paved bike trails. It was nice because I didn't get stressed out shoulders and wrists like when using an upright bike. But it was much much harder pedaling uphill than a normal two wheeled bike. And downhill was slower because it just didn't feel as safe. Once I did get tossed out because I was stopping and turning at the same time. Good to get a road rash to determine just how far to take it over the line. The trike is extremely fun, like a carpet ride around the mountains, especially with an electric motor. You lean into the turns so as not to fall out ~smiley~.
View attachment 3
The etrike today with pannier on left side, muddy worn tires.
Electric Motor
October of 2012 was the start of exploring the ebike side of the equation. Obsession accurately descibes the next two months' investigating electric hub motors for bikes/trikes. Bikes have a backup power system, the rider, so that is nice. I didn't want something that would take away from that fail safe availability so I went with a hub motor. The hub motor has permanent magnets and energized magnets.
There is a tax on energy if the motor isn’t running because of those permanent magnets, much harder to pedal than if a normal cassette/freewheel was on the trike. The etrike design called for one wheel to be driven, the rear wheel. And I wanted that wheel to also have a regenerative braking system; more for the brake then the extra energy (which is minimal) put back into the battery.
Endlessshpere.com was instrumental in figuring out many of the details of motor, battery, motor controller and such. But there were many details that had to be worked out on my own. I purchased a used hub motor on a rim that had loose spokes.
View attachment 2
Photo showing inside of hub motor where three power wires (blue, yellow, green) going to coils around iron, 1,2,3; 1,2,3.... Permanent magnets are the thin shiny metal pieces just outside the copper windings.
After extensive searching bought many of the items from one China vendor (Greentime) including: motor control, a motor wiring testing box (cycle analyst so I could figure out the right wires on the motor), two metal brackets to keep my bike frame from breaking due to the increased power at the rear axle called torque arms, a thumb throttle (top of right handle bar), and a small voltmeter which I put in a black box on the etrike under the seat. And I bought a Bicycle Pedal Assistant Sensor/Ebike PAS system (which has never been installed mostly because it needs a wire all the way to the front crank). It did help to buy lots of this ebike stuff from one vendor so I saved on shipping and only had to track one order.

Ebike stuff from China.
The back wheel needed appropriate inner tube and a serious tire that wasn’t going to go flat; didn’t ever want to take that wheel off with all the wires and torque arms. Using a 20” diameter 1.95” wide Maxxis Hookworm tire and a slime inner tube. These were purchased from a USA bike supply vendor. The tube air valve is different from the two front wheels, so I need to make sure I have a pump for both schrader and presta valves. Bit of a hassle.

Tire and tubes.
Functions on the motor controller are amazing for the low cost. It has regenerative braking, cruise control, some voltage and current protection. The controller spits out energy exactly at the right time / power levels to the iron pieces in the hub motor, turning them into magnets that force the permanent magnets to move. The whole hub motor assembly is stationary; the axle stays put. It is the outside rim of the hub motor that moves. This particular motor can crank out a respectable amount of horsepower. The spokes then move the wheel. I had to learn the hard way that the spokes need to be rugged and the wheel true. Normal hub motors are about 0.25 horsepower, but mine is more like 0.75 HP in driving force; much more power is dissipated in brake mode. Think of a real horse pounding those tiny spokes back and forth. There is a lot of energy being transferred by those spokes so they should be strong. After a year of struggles I purchases stainless steel spokes and had REI true the wheel. You have to make sure that everything about the spokes are the right size, and that the rim has the right size hole for your inner tube air valve type. Lots of little details on this journey.
Again, the motor controller is an amazing piece of gear, for something costing less than $40 (there are better versions made in USA for twice that amount). Three power wires and three phase wires go into the motor. Other wires go to switches, battery, throttle, cruise and brake button. On/off switch is on the right side of the seat, brake button and cruise are mounted at the top of the left handle bar. All wiring is held to the frame using cable ties.

Wiring out of motor controller.
I bought a circuit breaker, and a LiPo 12s2c 20C battery from a vendor I won’t mention. LiPo batteries require lots of supplemental equipment to charge, balance and more. The LiPo pack needs constant attention to operate safely, but there is a chance even if you do everything right it can still flame out. http://endless-sphere.com/forums/viewtopic.php?f=3&t=47407
LiPo was the wrong technology for me, which I learned after a fire, a fire that you can not put out! Now I have a 48V 20AH LiFePO4 battery and am much happier with the results. The battery is heavy, has a built-in battery management system and is expensive.
The hub motor itself took lots of consideration on which type to purchase, but after I read the story of the Pikes Peak Hill Climb race almost won by a guy with a slightly modified hub motor, I got my general answer to what hub motor to purchase. The guy who almost won that race averaged 28 MPH up hill to 14,110 feet above sea level http://www.electricbike.com/hub-motor-pikes-peak/. I purchased a used Crystalyte HS3540 from a reputable contributor to Endlessshpere.com. It needed a freewheel spacer and a freewheel itself. Increasing the voltage to stock hub motors dramatically increases the power.

Freewheel screws right onto hub motor (not a cassette).
You can see the freewheel, the torque arm, the hub motor and the new tire on the right side of the finished trike.

Right side of finished trike.
Left side of finished trike shows the voltmeter (46.2 V showing), the motor controller mounted vertically behind the trike seat, the battery bag above that, and the various wires going to the hub motor and the torque arm (one on each side). Placement of all this stuff is going to be different for any bike or trike depending upon where room is available.
Left side of finished etrike.
Summary
Zipping around town on this etrike might look strange, but it is a gassss. Probably average 18 miles per hour. I often pedal, so my actual electricity usage is reduced. I can get to the store quicker than jumping into a car. Where I live is similar to Red Rocks; flying around these hills on this etrike is exhilarating, like a magic carpet ride. Sometimes it is hard to tell if I am having that out of body dream where you are flying around familiar areas. Row row row your boat, gently down the stream, merrily merrily merrily, life is but a dream.
I have modified a kid bike trailer to hold my kayak, and I take it down to the local lakes with the etrike. Makes for a long rig, that can go under gates at reservoirs where others in cars wait to pay their tolls (bikes/trikes are free). Five wheels, one motor which still hauls everything uphills.

Etrike with 14.5 foot kayak, trailer is modified kid carrier with Yakima kayak saddles.
And I have played with energy efficiency using a rear fairing. My normal watt-hours per mile is around 33 watt-hours/mile (a measurement of energy over distance, not power). And I measure this at the wall where electricity is put into the battery charge controller. The rear fairing reduces that 10 to 12%. Details on the fairing are in another blog entry: http://renewableenergyspace.blogspot.com/2012/11/inexpensive-lightweight-recumbent.html.
View attachment 4
Less than $10 fairing reduces energy 10 to 12%; on Blog.
My next goal is to utilize some of the PV modules I have lying around to charge the battery. Would take just a small amount of surface to completely charge the battery for commuting purposes, 10 to 20 miles each way. So, the ultimate goal is a carbon free transportation solution that can get my butt where it needs to be in a relatively fast amount of time. Hope this helps. Thanks so so much to Bentrider and Endlessshpere communities.
Also at this blog link:
http://renewableenergyspace.blogspot.com/2014/10/new-transportation-etrike-by-joseph.html


