
You are using an out of date browser. It may not display this or other websites correctly.
You should upgrade or use an alternative browser.
You should upgrade or use an alternative browser.
Show Us Your Homemade Battery Housing
- Thread starter jimw1960
- Start date

@teslanv
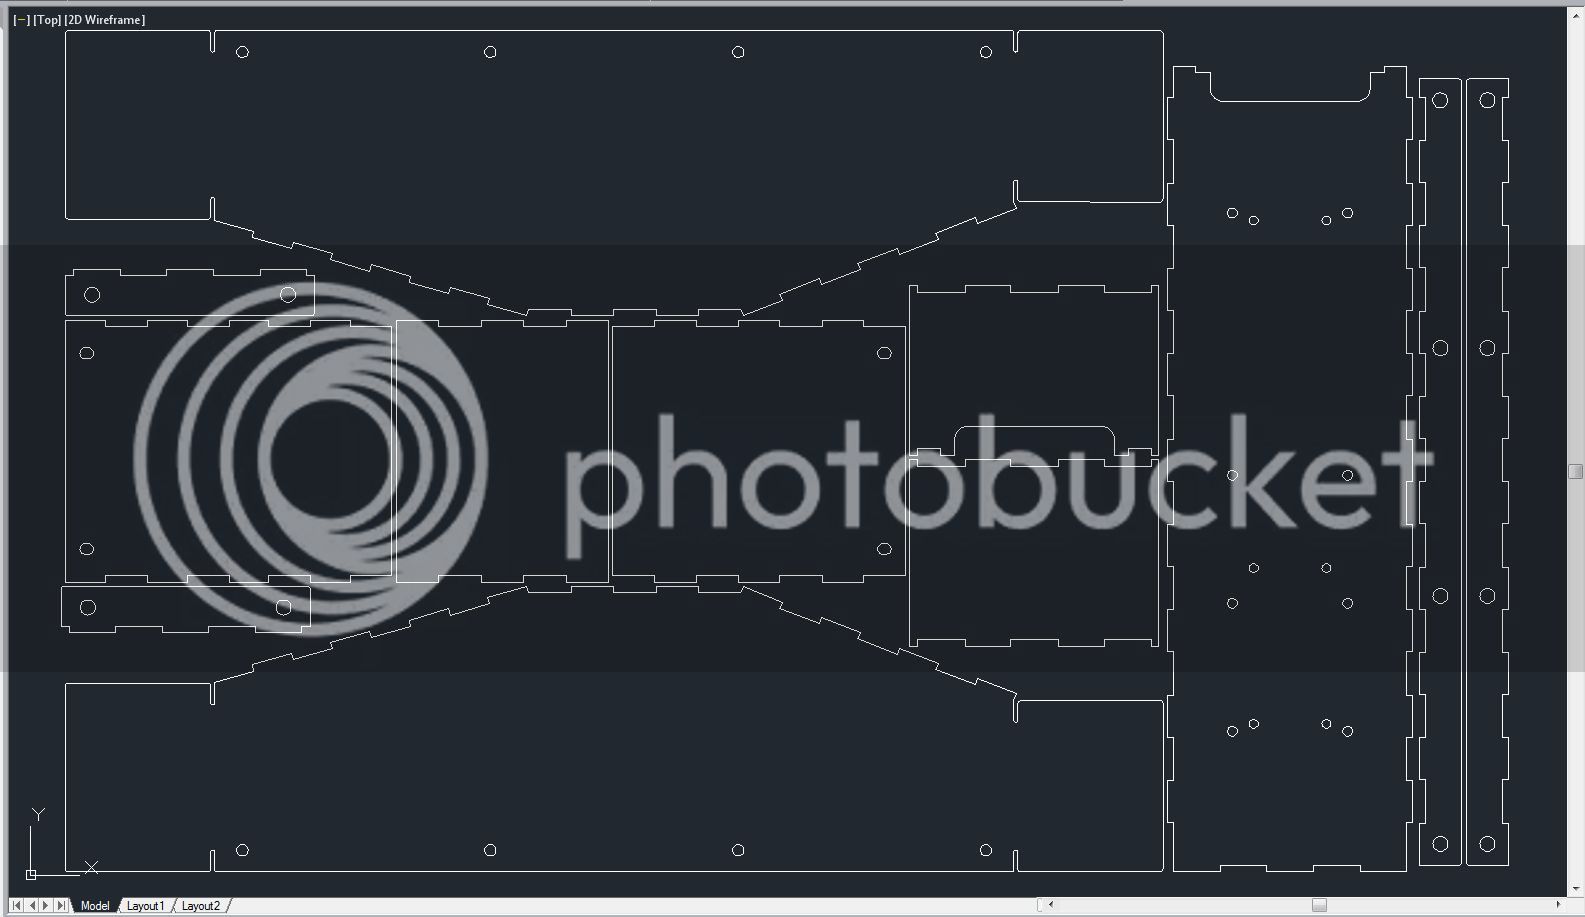
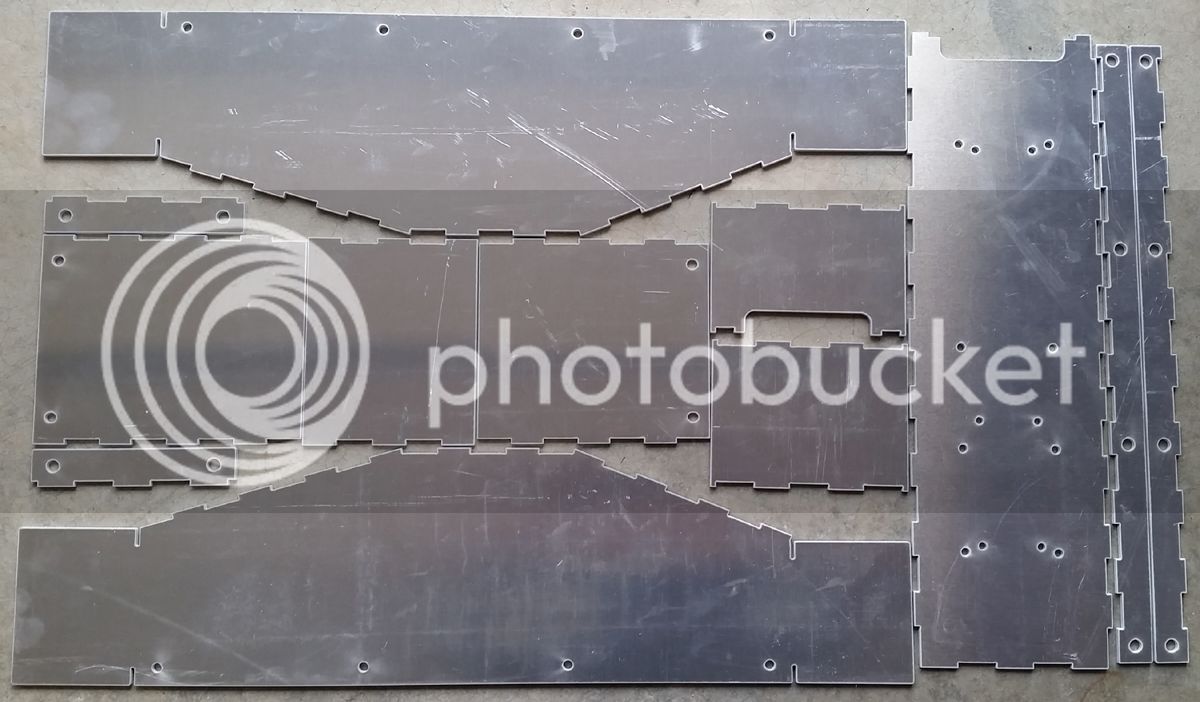
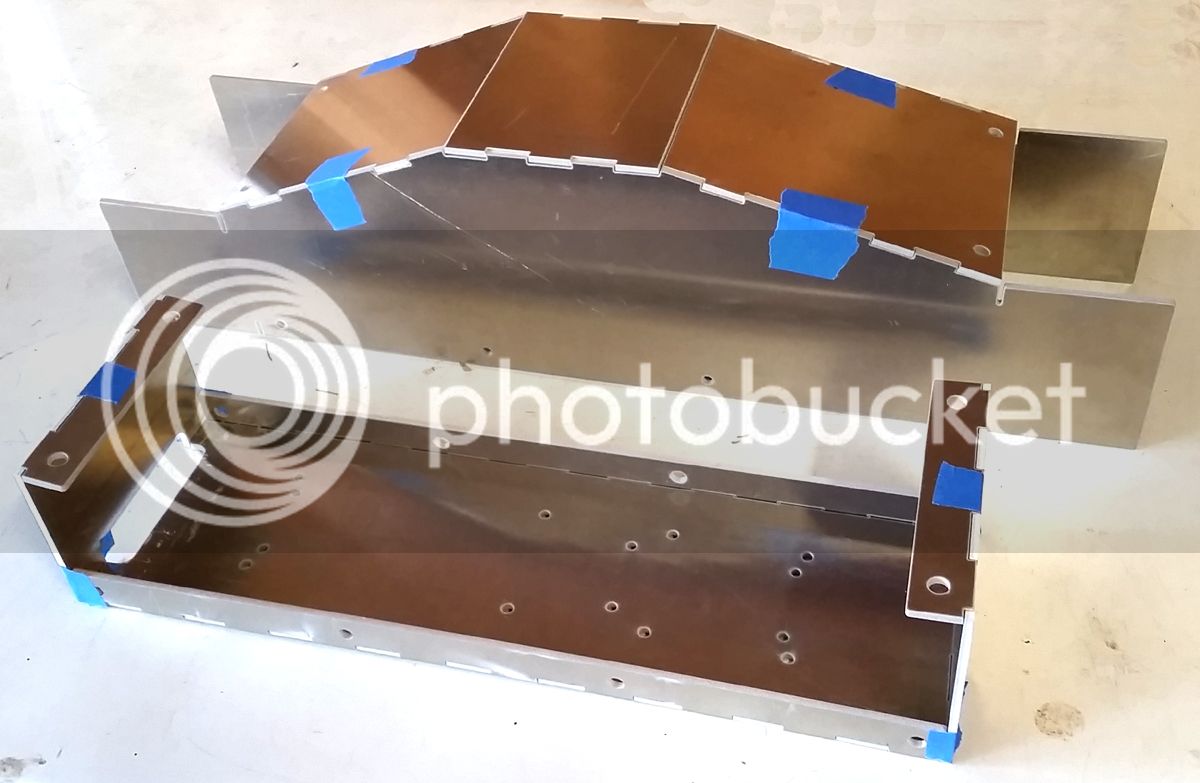
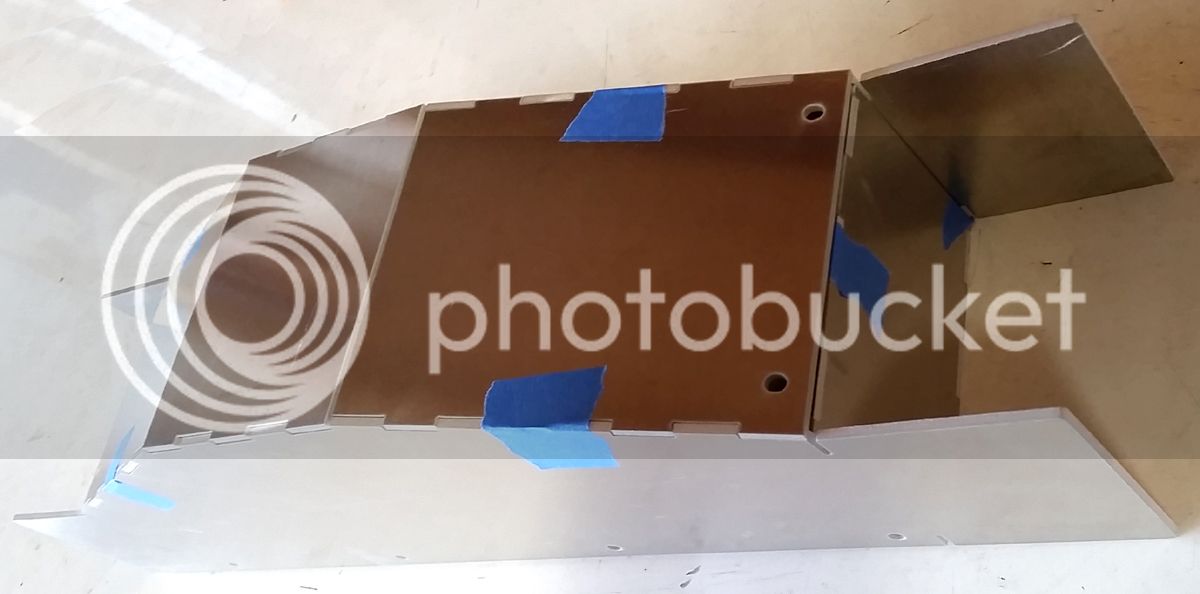
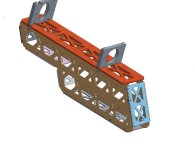
Hey, looks kinda like mine https://endless-sphere.com/forums/viewtopic.php?f=1&t=85489 without the screws. Are you going to cut a section out of the frame and weld it in? Did you cut the panels with a water jet? Nice.
Hey, looks kinda like mine https://endless-sphere.com/forums/viewtopic.php?f=1&t=85489 without the screws. Are you going to cut a section out of the frame and weld it in? Did you cut the panels with a water jet? Nice.
Attachments
teslanv
1 MW
mauimart said:@teslanv
Hey, looks kinda like mine without the screws. Are you going to cut a section out of the frame and weld it in? Did you cut the panels with a water jet? Nice.
Yes, it will be a cut & fill job.
And yes, panels are waterjet.
Looks like you are taking it to a whole nother level, MM.
RonnieBrowen2106
100 W
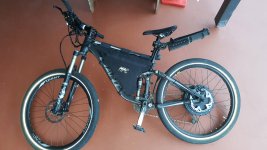
I want to make some custom bolt on side panels to house the battery on my electric bike. I was wondering about which material should I use. I want to use fiberglass, but I heard it is kinda heavy. I heard that stock aluminum would be better for what I am trying to do. What are your thoughts?
Attachments
craneplaneguy
10 kW
.083 aluminum
RonnieBrowen2106
100 W
Thanks. I already have everything measured and a 1:1 stencil of the side panel created. All I need now is to figure out the material to use.craneplaneguy said:.083 aluminum

Boodyhole
1 mW

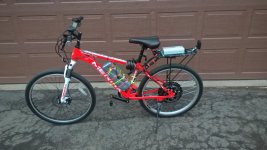
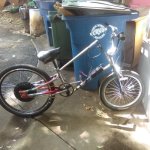
Just got this piece of shit together last weekend.
<$600 for the entire build.
Takemehome
1 kW
Boodyhole said:
Just got this piece of shit together last weekend.
<$600 for the entire build.
Wow perfect color match between helmet and wheel. :lol:
Please attach the image directly to the post; your link cannot be visited by my browsers.
EDIT: I see you've now attached a teeny tiny thumbnail to your post, but it is not large enough to see antyhing other than that there is a bicycle of some type in the image.
There is an entire thread Adding Pictures at the top of every forum's sticky list if you need help.
EDIT: I see you've now attached a teeny tiny thumbnail to your post, but it is not large enough to see antyhing other than that there is a bicycle of some type in the image.
There is an entire thread Adding Pictures at the top of every forum's sticky list if you need help.
alsmith
100 kW
bikehedz said:more of the same
I like your solution to protecting/waterproofing the connectors coming from the controller!
Your image is so small I can't clearly see anything in it, but it looks like your toptube is broken off of or cut away from the headtube and bent way up over the handlebars. If this is the case, you should know that now all of the weight of you (which can be multiplied many times when you hit bumps and potholes) and anything else on the bike will slam into the single weld point at the bottom bracket (pedals area), and weaken it so that it bends and breaks.
Can take a while for it to show or fail, but the frame needs that top tube for it's design.
If it's a steel frame it may happen slowly, but if it's aluminum it will happen suddenly, probably when you hit a bump, and that will break the frame in half at the pedal area. Exactly what happens during the crash after that depends on how fast you're going and the terrain you're on, and other conditions, but I don't imagine it'd be much fun.
I strongly recommend re-triangulating the frame to directly transfer the pushing forces between the top of the seattube to the top of the headtube.
Ok, I can see it now if I zoom in on it.
The problem is you have a parallelogram and not a triangle, so there is no strength to resist the problem I described above. It can still just collapse due to that kind of breakage.
A triangle is rigid because it can't fold, but a parallelogram (or diamond or square or rectangle, etc) *can* fold.
It might never have a problem. But if it does, you probably won't like what happens.
If you make a complete battery box whose side panels are fully attached on all the sides of the parallelogram it'll strengthen it considerably, but if it's left open like that it is pretty weak compared to a triangle. (that's why they use triangular segmentation in frames).
The frames that are built without them are generally made of thicker/larger tubing with greater strength than the smaller stuff, larger contact area at the welds for load transfers, etc., but they also generally weigh significantly more.
You can also use gussets at the corners of the parallelogram, but it can still break just past the end of the gussets.
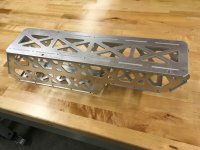
Custom battery box for old but low mileage Scott Voltage MX5:
16S12P of Samsung 35E (~40AH)
Box made of 2mm EN AW-5754 aluminum, MIG welded together. Painted using 2-component car-paint/lacquer.
Battery with mounts designed to fit the bike without any modification to the frame (no extra holes or welds).
Mounts 3D printed from PETG.


Parallel connections welded with 12x0,2mm nickel strips, series connections soldered with 1x10mm copper (2 of them parallel). Copper strips had holes drilled in place of solder-joints for easier soldering and sort-of quality control for these joints.
Battery was cast inside the box using 2-component silicone with 37 Shore-A hardness (that's about soft pencil eraser). About 1,5kg of it was used.
BMS on the left side, mounted using thermal tape straight to aluminum for better cooling. Below under aluminum separator on the left is 100A current sensor (Allegro ACS758 based) and on the right fuse socket. DS18B20+ 1-wire temperature sensor is stuck between cells.
While designing I was intending to fit controller (without it's shell) inside that place under separator. It was overly optimistic of me - on computer screen everything seems easier

Still left to do: dashboard that would display voltage, temp, current and so on. New CNC-milled endcaps for controller for better connector and wiring handling along with proper fixings to battery mounts.
16S12P of Samsung 35E (~40AH)
Box made of 2mm EN AW-5754 aluminum, MIG welded together. Painted using 2-component car-paint/lacquer.
Battery with mounts designed to fit the bike without any modification to the frame (no extra holes or welds).
Mounts 3D printed from PETG.
Parallel connections welded with 12x0,2mm nickel strips, series connections soldered with 1x10mm copper (2 of them parallel). Copper strips had holes drilled in place of solder-joints for easier soldering and sort-of quality control for these joints.
Battery was cast inside the box using 2-component silicone with 37 Shore-A hardness (that's about soft pencil eraser). About 1,5kg of it was used.
BMS on the left side, mounted using thermal tape straight to aluminum for better cooling. Below under aluminum separator on the left is 100A current sensor (Allegro ACS758 based) and on the right fuse socket. DS18B20+ 1-wire temperature sensor is stuck between cells.
While designing I was intending to fit controller (without it's shell) inside that place under separator. It was overly optimistic of me - on computer screen everything seems easier
Still left to do: dashboard that would display voltage, temp, current and so on. New CNC-milled endcaps for controller for better connector and wiring handling along with proper fixings to battery mounts.
augidog said:
Hybrid. Awesome !!
Pedals/gas/and electric!!
craneplaneguy
10 kW
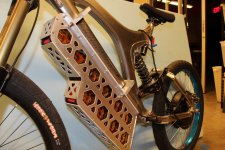
I like the way you fit that in the frame, that's thinking outside the box. Sorry.
whereswally606
100 kW
A really neat build, smart too. I wonder what the range is? The motorcycle fairing on the bars seems a bit daft though. Well done.
Sent from my ALE-L02 using Tapatalk
Sent from my ALE-L02 using Tapatalk
Similar threads
- Replies
- 36
- Views
- 9,404