How Can I Improve My Spot Welds When Building Battery

mcristiani

10 W
Joined
Jul 19, 2017
Messages
84
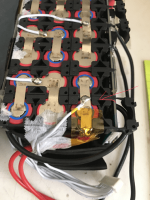
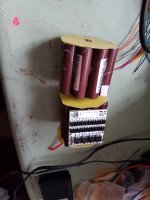
I am using a sunkco 709A welder from ebay.

For multiple layers of nickel strip, do I weld them all in one go i.e. two or three layers. Or weld on each layer one after the other?

My series tabs are weak. Am I heating the parallel weld up when I spot-weld to the layer of nickel that is the parallel group?

Does welding too hot, actually overstress the metals and make them weak, brittle or even unweldable?

Can you make any comments in regards to safety or efficiency with the below operating procedure:

Layout cells according to schematic diagram
Weld all parallel connections on one side
Weld all parallel connections on the other side
Test voltages
Weld all series connections on one side
Weld all series connections on the other side
Test Voltages
Solder sensing/balance wires
Connect B-
Connect Balancing harness
Connect B+
 
Follow up question that very well may be bordering on dumb.

For the first series were I also am connecting the battery positive cables, would it cause a problem for the sense wire to be in-between the cells and not out off the end where the positive is connected?
 

Attachments

  • balance_harness.png
    balance_harness.png
    69.7 KB · Views: 1,611
Wherever you fit and run the sense wires, just make sure that they're completely insulated from any nickel strip that would be at a different voltage. I normally use that thin GRP sheet.

About the welding: Normally the first layer welds OK, but when you weld the second layer, the current runs between the electrodes through the top layer of the nickel instead of going down through into the layer below. To solve that, cut slots in the nickel strip. I use a Dremmel with a cutting disc for that. I tie the strip to a long piece of wood, then plunge the Dremmel's cutting disc in every 18 - 20 mm, then cut off whatever length I need. Alternatively, you could cut the strip along its length with a pair of scissors and weld the two pieces with one electrode on each. Whichever of those two methods you use, it forces the current down into the next layer so the two layers become welded. Doing it like that, you can weld with a much lower current and do less damage to the cells.
 
Awesome! That is a great tip that I can use. Thanks.

In the picture, can you comment on the sense wires being "completely insulated". I think I see an example were the sense wire crosses another series before being soldered. Here is where I should have the fishpaper?
 
They look OK because they don't run over any connections that are at a different voltage. Never run then over uninsulated connections that are at a different voltage because if they chafe through, you'll have a fire. That means that you have to cover the cell-connections with something like sticky-backed cardboard or find a different route for the sense wires.

Here's one I made just before I cut the notches in the GRP insulation for the sense wires:
 

Attachments

  • cell-pack.jpg
    cell-pack.jpg
    184.5 KB · Views: 1,548
Thanks for the picture d8veh.

I'm sorry, but I can't visualize the below. What would be a connection to a different voltage? I thought you may have meant running a sensing wire across a different series/group.

"They look OK because they don't run over any connections that are at a different voltage."
 
What voltage should I have batteries at when building pack? Is there a concern if they are 3.95v or higher?
 
The voltage of the cells when building doesn't matter as long as they're all the same.

mcristiani said:
Thanks for the picture d8veh.

I'm sorry, but I can't visualize the below. What would be a connection to a different voltage? I thought you may have meant running a sensing wire across a different series/group.

"They look OK because they don't run over any connections that are at a different voltage."

If you look at your last photo, the twi shorter white wires run from their solder point to the left, which is OK. If they went to the right, they'd cross the right-side cell group, which is at a different voltage, so if the insulation wore through, there'd be a fire. In that case, you'd need more positive insulation like card or GRP.
 
An update from me. Now with three batteries built.

Using the Sunko spot welder, I absolutely find better results with all nickel strip being notched where there is a connection to a cell. I am using a scissor mainly, but this means I cannot get this gap in the middle cell of a 3p connection.

I did decide to try the dremel where I needed to get an endpoint (B+) tab and it worked perfect.

I will build up a little jig for the next battery run and use the dremel for sure.

Great input.
 
I found that the slots in the strips made a massive difference to the quality of the welds. I tried it after I noticed that the strips in OEM batteries often have them.
 
Here's a pic to show the type of slot that is being suggested:

Cells21700_11.png
 
That picture looks really nice.

The series and parallel are all one piece? That looks custom done, no?

Also, do you put the insulative 'o-ring' pad on the top side of the cell? What is the purpose of that?
 
Yes, the rings go only on the top. It's because the edge of the cell at the top is at a different voltage to the middle where you weld. In service, the metal strip can wear through the thin plastic insulation or the insulation can get damaged when you assemble the battery. Both those situations can cause a fire.
 
Back
Top