It's actually just Bosch's 18v 6.3ah battery packs (a relatively new product, that works with most bosch 18v tools, except is apparently too large to fit some of them.) Here's the battery on bosch's site: https://www.boschtools.com/us/en/boschtools-ocs/batteries-gba18v63-178152-p/ and here's a link to one on amazon https://www.amazon.com/Bosch-GBA18V63-CORE18V-Lithium-Battery/dp/B01N6VIHUR
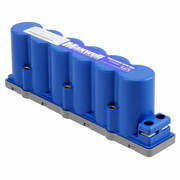
What's great is, while amazon apparently is selling each battery for close to $90... I've been getting them consistently off ebay for around $105 for 2 shipped. Originally I was buying them in a pack of two with a charger for about $120 (got so many chargers I've been selling them for $20... which seems to make people pretty happy, and brings my cost to $50 a battery pack). Originally had to do that, since all the sellers selling just the 2 batteries at a good price were in California, where I'd have to pay tax, and would bring the price to almsot the same as the 2 batteries plus charger. Each pack contains 10 x Sanyo 20700A cells (30A continuous per a cell, 3100mAh) in a 5s2p configuration, the plastic holder their in is Bosch's "CoolPack 2.0" designed to keep them from overheating (and holds them very securely)... plus the copper I heard is laser welded on. And as I just found out, what I originally thought was hardly a BMS (didn't see balancing wires), is apparently a full featured BMS, with a flexible circuit (similar to a laptop display's cable) that is attached to each parallel group through the side of the cell, underneath the circuit board. I'm making use of the batteries (as configured), copper, battery holder, and even the top/bottom caps (they have a nice formed rubber insulation that even accounts for the slightly different heights of the positive vs negative sides of the parallel groups, which not only protects with a bit of shock absorbance, but keeps even pressure across the batteries, forcing the copper to make solid contact across the entire surface).
I need to buy a good digital micrometer, BUT, my digital calipers (which are relatively cheap bt appear to work) measures the copper at .10mm , which seems right (but the first battery of both the positive and negative sides has 2 layers, and the negative side is attached to some pretty thick braided copper, and the positive side has a much thicker copper tab attached that is about 0.85mm thick. Both the braided copper and the thicker copper tab are attached to the thin copper by some form of much higher power welding (no solder or extra material, but they have a seriously strong/solid connection... as well as the same kind of connection to the BMS... I couldn't even pry the positive side off of the BMS with any of my tools, had to cut the end off in order to remove the BMS).
These are by far the best built battery packs I have seen, and I'm currently constructing a 20s2p pack by connecting 4 in series (planning to beef up the copper by pressing thicker chunks of copper across each section)... goal is to have a 3000w battery pack for my Cyclone, for my usual short trips I plan to use it on, that is as light as possible while still capable of easily producing the 3k watts. Ironically, ended up not even needing a spot welder for this build.. but will for my next one.
Here's a some photos of the batteries as I removed the last pieces I won't be using, showing all the parts I mentioned (the 4th one shows the BMS directly, while the 2 following it show the balancing 'cable', that also contains the 4 LEDs + button to show current batttery charge:
https://drive.google.com/file/d/11iWsbfSD7VzBFAGRc8k44hWyxuP2OjMe-Q/view?usp=sharing
https://drive.google.com/file/d/1f-hJ2iIJS08hNCc-Ec0ewoV0IOIGeBfhAA/view?usp=sharing
https://drive.google.com/file/d/120tmFINTZg2zKHo85gwvx17UwysixVMDMQ/view?usp=sharing
https://drive.google.com/file/d/1UcbNHzGUyR_Q948ldkNffpWxjOoQxmSSCg/view?usp=sharing
https://drive.google.com/file/d/1pZ1oGKBPvCfnZT1jgKFVgVkFTFxgkpQStw/view?usp=sharing
https://drive.google.com/file/d/16PGL8gq6pwFBsMSlwjmm6Wyk-GSdKmNY8A/view?usp=sharing
https://drive.google.com/file/d/1wOumrJI-3D5j0-ngQs6599iq2GbCduDSnQ/view?usp=sharing
My apologies for such a long post, wanted to explain all the details of the battery clearly. BTW, I read a blog's teardown report of these, which is where I heard the copper was laser welded... not very sure about whether or not it's true (I know they have very consistent welds that are clearly done by an automated system)... but I'm trying to see if Bosch will let me know in better detail what their process is to weld the copper (if they are will to say).... could provide some useful information. Obviously the slotting is rather important.
BTW, these cells are POWERFUL... I shorted across a single parallel group, and it took a chunk off of my VERY solid Wiha screwdriver (after 5 years of use/abuse, the only sign of damage on this driver)... and that's just 1 single group of 2 cells at about 4V.
")