Snickers
10 mW
- Joined
- Nov 22, 2007
- Messages
- 21
A very interesting, great open topic also quite interesting for updating my “old” S06S.
I like this controller but I’m not using it so much du to some programming features.
- motor efficiency with the direct drive motor (not so good at low power)
- no e-brake function though the normal break contact.
- Time reaction with too long ramp-up (PID?)
- Regeneration (e-braking) with too long ramp up and only available at the throttle. (PID?)
It is a not reversible flashing.
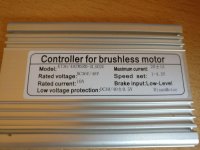
So, do you think I can be face to magic smoke with my S06S boosted to (60V 55A) ~3KW* used with a standard direct drive motor?
*I describe shortly modification I made 4 years ago…
https://endless-sphere.com/forums/viewtopic.php?f=6&t=59225&p=928932#p928932
I like this controller but I’m not using it so much du to some programming features.
- motor efficiency with the direct drive motor (not so good at low power)
- no e-brake function though the normal break contact.
- Time reaction with too long ramp-up (PID?)
- Regeneration (e-braking) with too long ramp up and only available at the throttle. (PID?)
It is a not reversible flashing.
So, do you think I can be face to magic smoke with my S06S boosted to (60V 55A) ~3KW* used with a standard direct drive motor?
*I describe shortly modification I made 4 years ago…
https://endless-sphere.com/forums/viewtopic.php?f=6&t=59225&p=928932#p928932