MAKING A CHEAP BATTERY PACK WITH CHINESE CLONES? IMR AKA LMO BATTERIES 18650

mightbaal

100 mW
Joined
Jun 15, 2018
Messages
39
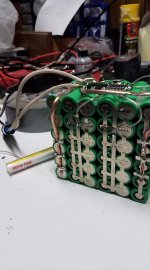
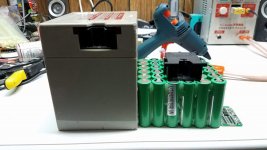
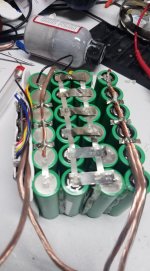
Ok well I know there are a lot of bad things about chinese 18650 cells but I want to make a pack for my E-bike. I want to make it with IMR or LMO batteries as they can discharge alot of amps if needed. I was thinking about making a 15s8p pack. I have ordered 100 of these cells before and I am no expert but they all tested same voltage (within .05v) from the factory and they were sitting in my basement for a year before I decided to test them in other items besides ecigs. I built a 4s6p pack for my kids power wheels with a 80 AMP continuous BMS (peak burst says 160A). The batteries never even got warm and my Imax B6 put over 12000 mah (12 ah right?) worth of charge into them when they were not even close to being dead. I currently have a ebike battery from china that I have had for like 3 years on my bike with a leaf motor 1500w but the controller pulls what it says about 1980w off the line till it tops out around 30-35 mph (flat road). This battery however is made from soft cells and is 48v20ah with a 2c rating. I feel like I am pushing the limits of this pack I had one problem where the solder actually melted on this batteries BMS going up a hill. I Soldered it way better than the chinese did after that. I have a spot welder for these batteries and pure nickel strips. Am I playing with fire (maybe literally) doing this? I can make these so cheap with a high amp draw if needed I always use a BMS for any pack I build. Here are the batteries I want to buy I will select the VTC6 3120 mah ones with 35a continuous discharge rating however I think these are all the same cells just wrapped different. I will attach some of my beta power wheels batteries that have been working good so far from my last batch of batteries. The 6s6p pack I bought a 15a BMS not knowing power wheels actually draws alot of amps and it smoked the crap out of it lol.

https://www.dhgate.com/product/100-top- ... 3344844083

P.S. About the power wheels battery YES YES I know this is 14 gauge speaker wire I used lol. I have High temp silicone wires that range from like 8 gauge to 12 gauge. Just was for testing dont have picks of the 2nd battery the 4s6p (80A BMS) but im waiting on a BMS for that pack (6s6p) still that is rated for that amp draw.

The pic I was just testing the dumb charger making sure it worked I didnt have any XLMR (?) female adapters at the time
 

Attachments

  • FB_IMG_1529131395996.jpg
    FB_IMG_1529131395996.jpg
    92 KB · Views: 1,643
  • FB_IMG_1529131404776.jpg
    FB_IMG_1529131404776.jpg
    85.2 KB · Views: 1,643
You are welding the packs wrong. FIRST you make the series connection (that carries the power) and you put the parralel on top of those.
 
flippy said:
You arw welding the packs wrong. fIRST you make the series connection (that carries the power) and you put the parralel on top of those.

I did not know that. I thought this way I would for sure have a good contact in P then the series would work better. What are the downsides to the way I have that pack setup?
 
Now all the power/current needs to pass tru the p strip before it can go into the series connection.
Its basically putting butter on top of the condiment.

Remember that the P strip in theory does not pass any current if the pack was perfect. It only needs to balance out the group. The power is carried by the series connection so those need to be on the bottom with 3 welds. Yoy can put a parralel strip on top of that with 2 welds but the series welds is were the magic happens. Now you are using double welds wich is just redudant, adds resisitance, heat and is just poor pack building in general. You are letting the P strips and welds do double duty.

If the series is good you hardly need any P strips. Usually one is enough to keep the cells balanced in that group and have a common tap point for the balance wires.


Why do you have the third strip in the middle? What does it do that the other 2 arnt already doing?

Side question: what current do you expect to run tru those strips?
 
The middle strip I put in so I could solder the BMS wire keeping heat away from the batteries as much as possible. I want to run 50 amps tops through it at 24v. That pack is for a power wheels. Each battery is said rated for 35 amps continuous. I know on my ecig mod I pull 100 watts with 1 battery.
 
what heat are you expecting on those balance strips?
the series strips will get hot, melt the insultation off the top of the cell and make contact with the negative side and short out the entire pack.

also: those batteries might be rated for 35 amps but those strips are certainly not. you need 8mm x 0.2mm or bigger in order to handle those current safely.
 
flippy said:
what heat are you expecting on those balance strips?
the series strips will get hot, melt the insultation off the top of the cell and make contact with the negative side and short out the entire pack.

also: those batteries might be rated for 35 amps but those strips are certainly not. you need 8mm x 0.2mm or bigger in order to handle those current safely.

Wow don't know that been using the 4s6p pack for awhile never noticed any heat from it. Not sure if I can weld with the .2mm tabs at least not with the handle welder it's a cheap tab welded from china think I paid 270 for it shipped.
 
What if I took the current pack and added in some x pattern strips in the series would that help current flow preventing over heating? They are 100% nickel if that matters....
 
Also how good would this work?

https://www.amazon.com/Alloet-0-1523mm-Nickel-Battery-Welding/dp/B074SDF4XG/ref=mp_s_a_1_14?ie=UTF8&qid=1529188060&sr=8-14&pi=AC_SX236_SY340_FMwebp_QL65&keywords=nickel+strip+18650
 
mightbaal said:
Also how good would this work?

https://www.amazon.com/Alloet-0-1523mm-Nickel-Battery-Welding/dp/B074SDF4XG/ref=mp_s_a_1_14?ie=UTF8&qid=1529188060&sr=8-14&pi=AC_SX236_SY340_FMwebp_QL65&keywords=nickel+strip+18650

just buy the good stuff:
https://www.aliexpress.com/item/1kg-Quality-low-resistance-99-96-pure-nickel-Strip-Sheets-for-battery-spot-welding-machine-Thickness/32864774543.html

mightbaal said:
Wow don't know that been using the 4s6p pack for awhile never noticed any heat from it. Not sure if I can weld with the .2mm tabs at least not with the handle welder it's a cheap tab welded from china think I paid 270 for it shipped.
1: 270 is not cheap. i burned out 3 of those.
if you want a much better welding experience i recoomend getting something like this: https://malectrics.eu/product/diy-arduino-battery-spot-welder-prebuilt-kit-v3/

2: the cells dont get hot, those can deliver 35A each. what does get hot is those series strips. and it will not happen immiediatly (usually). it takes some time. if the current spikes are short enough it might never happen but who run the risk of possibly getting a dead short in the pack you cant stop? it will melt out the strips, cause lots of burning and usually sets the insualation you wrapped around the pack on fire.


if you want to do it right you remove all the strips, start with having high current paths for the series connections (2 of those small strips side by side if needed if you dont want to wait for the strip i llinked above, try to prevent stacking welds for series connections) and do a simple parralel strip on each end and have 1 stick out on the side so you can solder on the balance wire on the side.

here is a good example i build last year for a customer:
PlgW55Cl.jpg


here is a bigger picture of the other side during construction: https://i.imgur.com/BNKSoRx.jpg
you see that the strips on the sides are filling the entire with and stacked because the front bit needs to carrly all that current from the back cells as well. you also see that welds are overlapping on every cell they touch. this balances out the load over the strips as equally as possible.

this is a 18P setup and have 3 more of these blocks to make 16S18P. capable of running 180A continous at 60V and peaks well over 400A.

light sidenote: considering how guled the cells together i recommend just getting proper cell holders. this way of glueing the outsides wont hold on a bike. it will shake loose.
 
flippy said:
mightbaal said:
Also how good would this work?

https://www.amazon.com/Alloet-0-1523mm-Nickel-Battery-Welding/dp/B074SDF4XG/ref=mp_s_a_1_14?ie=UTF8&qid=1529188060&sr=8-14&pi=AC_SX236_SY340_FMwebp_QL65&keywords=nickel+strip+18650
just buy the good stuff:
https://www.aliexpress.com/item/1kg-Quality-low-resistance-99-96-pure-nickel-Strip-Sheets-for-battery-spot-welding-machine-Thickness/32864774543.html

mightbaal said:
Wow don't know that been using the 4s6p pack for awhile never noticed any heat from it. Not sure if I can weld with the .2mm tabs at least not with the handle welder it's a cheap tab welded from china think I paid 270 for it shipped.
1: 270 is not cheap. i burned out 3 of those.
if you want a much better welding experience i recoomend getting something like this: https://malectrics.eu/product/diy-arduino-battery-spot-welder-prebuilt-kit-v3/

2: the cells dont get hot, those can deliver 35A each. what does get hot is those series strips. and it will not happen immiediatly (usually). it takes some time. if the current spikes are short enough it might never happen but who run the risk of possibly getting a dead short in the pack you cant stop? it will melt out the strips, cause lots of burning and usually sets the insualation you wrapped around the pack on fire.


if you want to do it right you remove all the strips, start with having high current paths for the series connections (2 of those small strips side by side if needed if you dont want to wait for the strip i llinked above, try to prevent stacking welds for series connections) and do a simple parralel strip on each end and have 1 stick out on the side so you can solder on the balance wire on the side.

here is a good example i build last year for a customer:
PlgW55Cl.jpg


here is a bigger picture of the other side during construction: https://i.imgur.com/BNKSoRx.jpg
you see that the strips on the sides are filling the entire with and stacked because the front bit needs to carrly all that current from the back cells as well. you also see that welds are overlapping on every cell they touch. this balances out the load over the strips as equally as possible.

this is a 18P setup and have 3 more of these blocks to make 16S18P. capable of running 180A continous at 60V and peaks well over 400A.

light sidenote: considering how guled the cells together i recommend just getting proper cell holders. this way of glueing the outsides wont hold on a bike. it will shake loose.


Man I cannot say how much you were right I was disassembling the 6s pack and accidently touched the 2 close batteries and sparks and smoke came about I finally got the 2 series out that were arced out and put them in a bag and set them outside away from my house. The 4s pack I made for the power wheels came apart on me and was like wow. Nothing bad happened with those but they had thick .2mm tabs that my welder couldn't get them to stick to the battery well. The 6s pack has small burn marks on the tops of the batteries might bot try to salvage that pack and toss em. I ordered 18650 battery spacers and will look into better thicker nickel. The 2 ones that arced I cannot try to disable from the 2s6p because I'm scared it's going to blow up they are fully charged how do I get rid of these?
 
thats is too bad you had to experience that. but on the other hand it is a good moment to learn.

use small side snips:

11952-01.jpg


lift a bit of the nickel strip and then use needle nose pliers and rotate the strip off the cells. use the snips to cut off exess material and a dremel for the weld nippels that remain so you keep a flat surface when you weld on new strips.
 
flippy said:
thats is too bad you had to experience that. but on the other hand it is a good moment to learn.

use small side snips:

11952-01.jpg


lift a bit of the nickel strip and then use needle nose pliers and rotate the strip off the cells. use the snips to cut off exess material and a dremel for the weld nippels that remain so you keep a flat surface when you weld on new strips.

I'm scared to even mess with these right now I tossed the 2p2s out as I don't even want to risk it blowing up guess I don't understand the structure of the lithium 18650 is the wrap the only protection from negative to positive or something?
 
The batteries are so tight with the strips that if I try to cut the series connection they spark sometimes I'm guessing from the protection wrap getting scraped off? Doesn't make sense to me...
 
The batteries are so tight with the strips that if I try to cut the series connection they spark sometimes I'm guessing from the protection wrap getting scraped off? Doesn't make sense to me...


P.S. this is the 4s that came apart on me I used thicker stuff for this but had problems with it sticking to the battery even with the welder at 8 and 2p 4p and 8p enabled.
 

Attachments

  • received_10156477821648844.jpeg
    received_10156477821648844.jpeg
    155 KB · Views: 1,504
dont worry about the bottom, you cant mess anything up there.

the top you need to watch.

0bee84573ddd3eb0a6541aea36fccdad.jpg


the edge that is coverd in wrapping is also the negative! break the wrapping at the top edge and you have a direct contact with the negative pole 1mm away from the positive. this is why you need to seriously think about how good the current capabillity is of your strips. any heating will melt the wrapping and the strip will make direct contact to the negative pole.

a lot of people use extra insualtion to prevent this from happening:
https://www.aliexpress.com/item/100pcs-18650-lithium-battery-anode-insulating-gasket-insulating-ring-18650-series-of-anode-hollow-pad-of/32850027572.html

its cheap and helps durabillty in high current applications.

sorry to be rude, but that picture hurts my eyes. you have 3mm thin strips and put 8mm on top of those and not even well.
see pics a few posts up on how it should look. also note that the P strips stick out on one side so the balance wires can be solderd on and you can glue and tape on a flat piece of plastic to protect the battery.
you see the top and center wide strip? notice it goes under the insulation. see the above picture and tell me what it is REALLY close to....

and what was your plan with the positive terminal there? you got nice wires but you solderd those on dinky little 3mm strips that still need to pass all that current.
fun fact: most speaker wire is CCA, not real copper. you can tell if its silvery when cut in half. that means its aluminium, not copper and the resistance is 3+ times higher. it is nice and cheap but you need 3 times as much to get the same current rating.

take needle nose pliers and just roll the strips off. just make sure you dont touch the other batteries when rolling the strip off.
 
flippy said:
dont worry about the bottom, you cant mess anything up there.

the top you need to watch.

0bee84573ddd3eb0a6541aea36fccdad.jpg


the edge that is coverd in wrapping is also the negative! break the wrapping at the top edge and you have a direct contact with the negative pole 1mm away from the positive. this is why you need to seriously think about how good the current capabillity is of your strips. any heating will melt the wrapping and the strip will make direct contact to the negative pole.

a lot of people use extra insualtion to prevent this from happening:
https://www.aliexpress.com/item/100pcs-18650-lithium-battery-anode-insulating-gasket-insulating-ring-18650-series-of-anode-hollow-pad-of/32850027572.html

its cheap and helps durabillty in high current applications.

sorry to be rude, but that picture hurts my eyes. you have 3mm thin strips and put 8mm on top of those and not even well.
see pics a few posts up on how it should look. also note that the P strips stick out on one side so the balance wires can be solderd on and you can glue and tape on a flat piece of plastic to protect the battery.
you see the top and center wide strip? notice it goes under the insulation. see the above picture and tell me what it is REALLY close to....

and what was your plan with the positive terminal there? you got nice wires but you solderd those on dinky little 3mm strips that still need to pass all that current.
fun fact: most speaker wire is CCA, not real copper. you can tell if its silvery when cut in half. that means its aluminium, not copper and the resistance is 3+ times higher. it is nice and cheap but you need 3 times as much to get the same current rating.

take needle nose pliers and just roll the strips off. just make sure you dont touch the other batteries when rolling the strip off.

Thank you for all the information sorry I am kind of a noob when it comes to this I knew 18650s are dangerous but not how bad. All I knew is if they are overcharged or undercharged they can go boom and that if it's pierced same thing. To be honest these cells were sitting in the basement for over a year and I had a tab welder for other business stuff with watch batteries. Those strips came with the welder so I have no idea about them. I have a bunch of 8-12 gauge silicone high temp wire (It's silver) but it's kind of a pain with the BMS due to the small contact areas. I will be redoing my packs I have another 300 18650 cells coming and like 400 cell spacers coming thicker nickel strips etc. I plan on making 1 60v (16s8p) 45 amp draw ebike battery and another 6p6s battery for my kids power wheels (It really turns it into a monster lol).
 
To be honest also I only checked the voltage on the cells and put them together they all read 3.85-3.88v they are cheap China clones.
 
voltage is also a good check.

just strip the cells down and use a dremel to get rid of the welding spots that remain after pulling the strips off.
in the meantime you can do some capacity testing of you have a imax B6 or something (if not: get one, original please, not fake ebay).
try and match the capacities as much as possible and group them together.
when you get the parts you need you can build the packs proper.
 
flippy said:
voltage is also a good check.

just strip the cells down and use a dremel to get rid of the welding spots that remain after pulling the strips off.
in the meantime you can do some capacity testing of you have a imax B6 or something (if not: get one, original please, not fake ebay).
try and match the capacities as much as possible and group them together.
when you get the parts you need you can build the packs proper.


I am not sure if my Imax B6 is authentic or not I think it Is? When I had my kid take it out the first time it wasn't close to shutoff voltage I think the 4s6p had 14.98-15.02v at the terminals. I put it on a Imax B6 put 5 ah into it 2x and the 3rd time it put 2230 mah so it has to be a minimum of 12.2 ah (I would assume right).

The battery pack I think fell apart on his 3rd run when I was still in test phase with his power wheels and he was going all over crazy running into bushes with his friend case he thought it was fun etc. I didn't have much padding at the time. I may wrap it once with some high temp electrical tape stuff I have on hand.
 
the fake B6's are usually 10 to 20mV off. more if you use crappy wires.

check here: https://www.skyrc.com/antifake/indexen.php

also: you dont need more padding: you need cell holders.
when you put the cell holders on the cells and have a block complete you can put a dab of glue between each cell were the holder is. that fixates the holders even more. and prevents the holders from pushing against the strips (otherwise the strips are the only thing keeping the holders in place).

dont get those small dinky holders, get the 5X6 or something. the smaller they are the more you need and the weaker the whole thing is.
 
flippy said:
the fake B6's are usually 10 to 20mV off. more if you use crappy wires.

check here: https://www.skyrc.com/antifake/indexen.php

also: you dont need more padding: you need cell holders.
when you put the cell holders on the cells and have a block complete you can put a dab of glue between each cell were the holder is. that fixates the holders even more. and prevents the holders from pushing against the strips (otherwise the strips are the only thing keeping the holders in place).

dont get those small dinky holders, get the 5X6 or something. the smaller they are the more you need and the weaker the whole thing is.


Crap I already bought these sigh

https://www.amazon.com/gp/aw/d/B0791C6697
 
lay them in a brick formation. you need to cut the exess off but they are so cheap it does not matter.
 
flippy said:
lay them in a brick formation. you need to cut the exess off but they are so cheap it does not matter.

Thanks I want to also buy a 3d printer and make a case for the batteries too I won't be discharging them near what they can do so it shouldn't heat up much (I hope).
 
Back
Top