I mentioned getting this 80 amp BMS back a few pages. Last night I got around to upgrading it. Like it's smaller siblings it too has the same issues with poorly soldered down mosfets and copper. In pulling off the P- mosfets and copper from everywhere, I found lots of voids under things or flat out no solder contact.
You will want to get thermal gap filler as what is there already is insufficient and you may have damaged it getting the BMS apart. The tops of the mosfets aren't going to be all the same height and gaps can be 1mm to 1.5mm between the tops of the mosfets and the heat sink. Thermal gap filler is the best option since it squishes into the gaps. If you don't know what this is, there's a soft rubbery strip on top of the mosfets that contacts the heat sink. That's thermal gap filler. It's not overly expensive and this much gap filler will do quite a few BMS upgrades.
https://www.ebay.com/itm/GPU-CPU-Heatsink-Cooling-Thermal-Conductive-Silicone-Pad-100x100x1-5mm-JB/282985144694?ssPageName=STRK%3AMEBIDX%3AIT&_trksid=p2057872.m2749.l2649
I upgraded this BMS last night. It was several hours of work. The mosfets (HY3712) are really poor...450 mOhms and 30 amps. I replaced them with IRF4110 which are 3.7 mOhms and 180 amps. Not all the P- mosfet positions are populated from the factory. I'm no longer limited by crappy mosfets and now all positions in P- hold a mosfet. The manufacturer sold the BMS as 80 amps and now it's more like 300 amps thanks to more and better mosfets, shunts and copper. Since I used 100 volt mosfets and the BMS can do 30S, I'll never be able to use it above 24S, but that's fine. It will go in an EV that runs on 20S or 82 volts that currently has 2 dumb BMS in it.
As you can see the P- copper does not cover the entire P- buss and doesn't overlap those 3 holes at the right edge of the board where you connect to P-. You can't see it under the solder, but the 2 B- power busses on either side of the shunts don't have full copper coverage either. The copper on them is exactly the same length as is the P- copper. It's better than no copper, but fails to do the job the added copper is there for.
I took a few photos of the final product, but neglected to uplaod them. I'll add them later.
The first thing I did was pull up all the existing copper because it was like the below picture in places...and that's BAD. The whole point of the added copper is to reinforce the solder traces so they handle current better. Being lifted off the traces completely fails that goal. Not being soldered down at all fails that goal. Being too short to cover the entire buss fails that goal. NOT overlapping the P- and B- solder pads fails that goal. Once all the copper was pulled up, I tinned every surface of the copper so they would solder down correctly later. BTW..all that copper really pulls away heat. I had my Hakko at max heat just to put out enough heat to pull up that copper. I'm thinking I need a higher power solder station. Until now, I've rarely needed MAX power. A lot of the copper was nearly bare on the back side (no solder on it). FAT LOT of good that does for carrying current!

Once I had all the copper pulled, I heated all the P- mosfet legs and pulled them away from their solder pads. With no copper to soak up heat, the mosfets come up much easier, but they still take a lot of heat to melt the solder under the tab. I would add solder to each tab to get maximum heat transfer to the mosfet tab from the soldering iron. You don't have to pry or anything. In fact that's bad as it lifts off the solder pads from the board. Once the solder melts, the mosfet will slide off with very little effort. IF you can't get this to happen, your soldering iron is too weak.
After all the P- mosfets were removed, I unsolderd all the existing shunts. There were 20 .004 ohm, .5 watt shunts. I had .005 ohm, 2 watt shunts so I had to add another 5 to maintain the same total resistance. If I had put in 20 .005 ohm shunts, the current measurement would have been off by 20%. There was plenty of space on the BMS for another 5 shunts. In the below picture, you can see they are NOT very closely packed together and they are on both sides of the BMS. There was lots of room for 25 2 watt shunts.

I kept running into problems with the solder the manufacturer used. It was garbage solder and took far too much heat to get it to melt. It also was very brittle and doesn't flow well. I melted off as much of the original solder as I could get off the BMS. I use only real lead/tin 60:40 solder. Nearly all of the Chinese lead free stuff is garbage like what this BMS was made with. Real solder flows sooo much better, melts right, cools without crystallization and voids and other issues. In this thread towards the top half of page 2, I did a whole set of posts on soldering and good vs bad solder. If you don't have it, get real lead/tin solder from weller or kester. Don't ever buy chinese solder...every brand I've ever tried has been garbage. If you think lead is bad (that's not me and I'm not going to eat it), then get high silver content solder from a well known company like kester or weller. AVOID CHINESE SOLDER!!!
https://endless-sphere.com/forums/viewtopic.php?f=35&t=94527&p=1395677#p1395677
Anyway, once the BMS was depopulated of mosfets, copper, shunts and crap solder, I then put flux on all the places where things would get soldered down and thoroughly tinned them with good solder. One of the things I've run into multiple times with these BMS is the mosfets are not soldered down. I've found the copper is commonly floating and has minimal or no solder on its underside. We want maximum unhindered current flow. That's the whole point of the added copper. That's the job of the mosfets. Getting every traced properly tinned, makes soldering things in place pretty much guaranteed. Getting rid of as much of the garbage solder as possible was also very helpful in this regard.
Finally I was in a place where I could start soldering down parts. I started with the B- and shunt copper reinforcing. It takes loads of heat since you have to transfer the heat from the iron, through the copper and to the trace under it. Having everything coated in solder already makes this much easier. Still, I add more good solder so that no gaps and voids can exist between the trace and the copper. Then I heat a section of the copper, push it down and make it sit tight to the trace under it. It takes working down the copper strip several times, pushing it flat until there are no gaps under it. Since none of the lengths of copper were long enough, I used the copper I pulled up from C- to fill in the missing lengths needed on B- and P-. I won't be using C- for more than 30 amps so I don't care about copper on those traces and more likely I won't use C- at all ever...so I really don't care if C- is reinforced or not.
Next came the 2 watt shunts. They are 4X larger than the .5 watt shunt so they sit on top of the copper instead of in between them. I'm adding more and more mass...lots of copper, solder and parts. I was soldering at MAX power on my Hakko. I would place a single shunt, solder down one side, get it straight and then add the next shunt. Conveniently there was room for 15 shunts on the top of the board. The other 10 went on the bottom of the BMS. Good solder flows well, but with overcoming this much copper mass, it would barely heat up enough to flow well with my largest flat tip and MAX power. I'm seriously considering buying a higher power solder station.
You can buy mosfets with the tabs cut off and the legs already bent for surface mount use, but I do motor controller modding and use mosfets for other things too. It doesn't make sense to buy mosfets for surface mount only. I buy them like I'd use in a controller and then bend the legs like a surface mount mosfet would have. It's easy to do and takes a few seconds per mosfet. The center leg (drain) is not used so I snip it off. Once all the mosfet legs are bent and trimmed, I tin all the legs and tin the back of the mosfet. I want good solder flow everywhere. Anything that isn't already coated in solder won't flow solder particularly well.
NOTE: It is possible to get a defective mosfet straight from a manufacturer. I test all the mosfets on a component tester to make sure they work before they get soldered down.
I start with placing a single mosfet on the BMS and getting it straight. I don't need MAX soldering iron power for this. Since everything is pre-tinned, all I need to do is heat up the solder already on the pad and melt the leg solder into it to get the legs properly soldered down. The mosfets won't sit flat yet since the area under it's back is somewhat lumpy and the solder on the back of the mosfet is too. This will get fixed in a minute when the tab gets soldered down.
Now it's time to crank up the power again. It takes a lot of heat to melt the solder under the back of each mosfet. I apply solder to the hole in the tab and fill it full. The tip of the iron stays in that puddle of solder in the hole until I'm satisfied the mosfet is properly soldered down. I'm also pressing down on the mosfet to get it to lay flat. Soon the solder on the pad and on the back of the mosfet start melting and the mosfet lays flat. It all flows together since it's all pre-tinned. IF the hole in the tab is less than full of solder, I add a bit more. Now I tin the top of the mosfet tab since it's already nice and hot. Copper will be soldered here for reinforcing P-. Repeat for all 20 mosfets that went into P-on both sides of the board. The more parts get laid down, the longer it takes to get everything hot enough to flow the solder. The first mosfet was quick...5-10 seconds and it was fully soldered down. The back side of the board took more like a minute each since I was heating the top side of the board too before the mosfet tabs were hot enough on the back side to melt the solder properly.
Finally it was time for the P- copper. This was sloooooow going! It sits on top of the mosfet tabs and overlaps the P- solder pad. With everything pre-tinned, it's mostly a matter of heat and getting solder to flow, but there is so much mass to heat up that the soldering iron was really working at it's maximum limits 100% of the time. I had to heat up the copper and the mosfet tabs under them and then get the solder to flow. This BMS was the first time I really challenged my Hakko. There was sooo much mass to heat up, that it could not do the job by itself. I would play my butane mini torch over the copper to pre-heat it and then put the soldering iron on the hot spot and get the solder flowed together. The torch is far too hot for electronics, so I couldn't do this for long without causing damage.
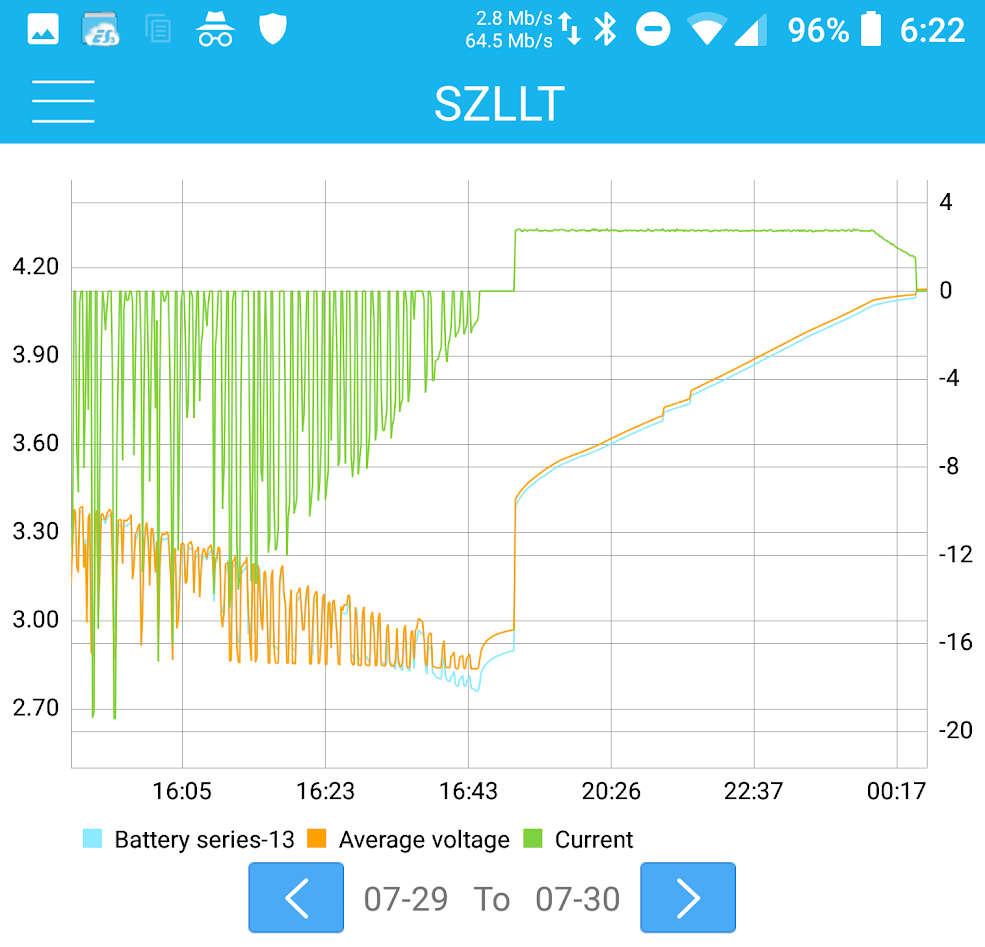
This BMS is pretty big and beefing it up took lots of patience and heat. Now that it's done, I'm betting 300 amps is possible. The last thing I did last night was plug it into a 20S pack and make sure it still worked. 100% success!
Pictures of the upgraded BMS to come later.

")