Appel Electric Cruiser

Thanks so much amberwolf, Ajsomfan, and Warren. Don't know how I missed that type-o, should be, "boring you to tears".

OK, you asked for it, now I'm going to go nuts...more posts to come!

Warren, I absolutely love those recumbents, especially the low three wheelers. They are perfect for E conversions, and
make total sense in design and function. I even designed a few. But after riding some of them, (many years ago), I couldn't
shake an uneasy feeling in traffic. If we could take cars out of the picture, I'd have a fleet of them. Your recumbent makes
more sense to me, being up a little higher, and that seat looks comfy as hell. I like the way you have the batteries down low.

These are exciting times, the folks here on the Sphere are turning the lathe's of heaven.
The future owes itself to your advancements.

Keep on keep'n on! :eek:
 
amberwolf, you are doing exactly what you need to do. Getting your hands dirty. The effort you put into your projects
And your knowledge on this stuff is is second to none. I'm very impressed by your bikes! Is that a piano on your cart? OMG!
You've been helping others with their projects forever, and my hat goes off to you!
 
APL said:
Let me know if I'm boring too to tears...

Not even close. If anything, I wouldn't mind seeing more detail for some of the assemblies and processes.
 
APL said:
Is that a piano on your cart? OMG!
Yes, yes it is. :lol: The trailer worked fine for it, but the old-pallet-wood deck didn't survive it.

There's also some posts/pics around this time last year, about pulling almost 600lbs of dog food, but the piano was definitely heavier than that. ;)

Both the dogs together are still under 300lbs, so not much of a challenge for the trike. :lol:


You've been helping others with their projects forever, and my hat goes off to you!
Others helped me with mine, so it's only fair to pass it on. :)


Mostly I know how to troubleshoot things...step by step elimination, and I know enough about electronics to get myself in trouble. ;) But my knowledge is pretty basic; I don't really know how these things (motors/controllers) work, regarding the math for their operating principles, etc. I couldn't design most of these things from scratch. :lol:
 
Your style is phenomenal. That suspended seat situation is so righteous man!
Ive managed to break my Thudbuster, and am now riding on a Kinekt, but neither one of them have the right feel, whatever you did there with your comfort seat and however you figured that out, thats just fantastic. Thanks for sharing.
 
Thanks for your encouragement wturber, and Ebuilt, I defiantly appreciate it. More detail to come.. I'll start with a close up of
the motor drive cog, just a single, just to clarify that a bit. and maybe a battery box build? Could also do a mini brazing course?
Anything else?

Ebuilt, I try to think global when designing these things, and keep the people, or masses in mind. Whenever I come up to a stop
sign, I notice that family's on bicycles always have their feet all tippy toed, like they don't want to get off the bike, and I realized
that this is what people really want. But that puts all the weight on the seat, so it's got to be comfortable, which bike seats aren't.

Lets face it, some people have a double wide rear section, :oops: and the fact is, if you want to be 'really' comfortable. you need a big
cushy butt holder. If you go on Ebay and check out, 'motorcycle solo seat' you'll see a massive collection of saddles,.. from
skinny winnie, to extra super double wide. True, they're a bit heavy, but comfort wins out. And if anything should catch on, the
industry will remedy that. I can see something like that all in carbon fiber!!! :D
 
APL said:
Could also do a mini brazing course?

Maybe. My main question with brazing is what is easier/more approachable for novice builder not necessarily looking to become a frame-building craftsman and not necessarily having a large amount of work or storage space? What's the simplest reasonable setup do to brazing in your garage? Ditto electric welding. Bike frames and related structures being the target use.
 
wturber, Probably going to be a Mig welder and heavy wall steel tubing. People help me out here! Everybody's got a way.

MIG welders are those wire feed welders, and can do a pretty good job, but may not be too pretty. I myself have never been
to good at it. But some people do everything with a Mig. About $2-300. new,.. used, pretty dang cheap. A lot of them will run
off 120v wall current. Throw sparks everywhere, and should have a gas set up with them, but don't have to.

TIG welders are the hot set up, but they start at $400. (Harbor F), usually much more, and have to have a tank, plus a good
learning curve. TIG welding is a lot like brazing. Depends on how deep the pockets are I suppose.

Welding might be a little expensive for an occasional build. Unless you can find a buddy that will let you frack around with his
set up, that would be best.

Otherwise, another possibility is to find a MATC, or school that offers a short course on welding, in which case you have it made
because they have a sweet shop, and all the goodies for building a bike! Takes a time+schedule though, that you might not have.

OK, that brings us to fiberglass, or composites. Defiantly the safest, least space using, and perfect for the occasional.
Fiberglass can get pretty heavy, and the construction techniques are a bit different than tubes, usually panels, and box like
sections, but not always. Totally within your reach though. There should be a lot of carbon fiber stuff here on the Sphere.

A good source for all materials is Aircraft Spruce in California. They have a warehouse in Georgia, so shipping is only a few days,
and they have 4130 tubing, aluminum, fiberglass, carbon fiber, kevlar, and just about everything. Plus they have all kinds of
airplane goodies that you would never see anywhere else. My number one place. It's on the web. aircraft spruce,com?

So that brings us back to brazing. Brazing takes a bit of a learning curve, can burn your shop down, and usually
takes a set of tanks and gauges. Not cheap, but you can rent. There is a small setup out there that uses the small 12" tanks like
you would use for a camp light, or trash burner. Comes with a cheap torch as well. $50.? Might be a little too cheap, but should
do some brazing of bike like connections. Never used it myself, but if it might be the ticket just to find out if it's the method
you might want to use.

There are slightly larger sized set ups for more money as well, look up 'small brazing kits' on 'Images', and go from there.
Sorry to get so long in the tooth here, hope I've touched on what you were actually asking.
 
APL said:
wturber, Probably going to be a Mig welder and heavy wall steel tubing. People help me out here! Everybody's got a way.
I use a (crappy) Harbor Freight wirefeed welder; it's capable of MIG/TIG but I only use flux-core wire with it. IIRC it was about $300 or so on sale at HF several years back. It requires 220VAC; I made a long extension for my dryer plug to run outside where I can use it (haven't had the option of adding an outlet outside yet).

Previous to that I used the flux-core-only version that they sometimes have on sale for $70-90. It runs off 120VAC which is handy, but it doesn't do nearly as good a job, even though the parts inside look about the same as the stuff in the bigger one. I had a lot of trouble with recycling old bikes into new ones using that (burn thrus, stuttering causing birdshit welds, etc); but can do it ok with the big one.

I'm no expert welder, but rarely do welds made with it break (can't say the same for the materials I use themselves). So far the only serious such failure was the heavy tack welds I'd made to position the BB on the trike, and then forgot to go back and weld. Even that lasted for more than a year, maybe two; can't remember when I switched to this BB.

Neither of the welders I've used can do really thin stuff; just medium wall steel stuff--but the big one can do 1/4" or thicker stuff depending on the kind of join needed. :)


So that brings us back to brazing. Brazing takes a bit of a learning curve, can burn your shop down, and usually
takes a set of tanks and gauges. Not cheap, but you can rent. There is a small setup out there that uses the small 12" tanks like
you would use for a camp light, or trash burner. Comes with a cheap torch as well. $50.? Might be a little too cheap, but should
do some brazing of bike like connections. Never used it myself, but if it might be the ticket just to find out if it's the method
you might want to use.

If it helps, this article goes thru some of the basics of brazing and types and such
http://www.phred.org/~josh/build/brazing.html


Some other info / resources:
http://www.phred.org/~josh/build/suppliers.html
http://www.phred.org/~josh/build/build.html
http://www.phred.org/~josh/build/design.html
 
Thanks toro1978! And Thank you amberwolf for the excellent links! There is a massive amount of info out there, and if your
thinking about going down this road, you'll need to take it all in. We all know the dangers of frame failure,.. the head tube
area is the most important place to get right. A person can get seriously hurt, or even a die, so you shouldn't get the impression
that a guy can just start building a bike frame, if your starting out. Rather, you can start learning 'how to'.

Mostly I wanted to show that in the end, it's not out of reach, nor does it take a massive amount of equipment, or space.

If your just starting out, expect to take a year or more just messing around with this stuff. And I really stress taking a course.
When I started out, I would devise ways to destroy the tube joints that I made. I would put longer tubes over the brazed joints,
and try to tare them apart, just to find out how strong they were. If your welding, it's probably a little more forgiving,..
as amberwolf said, about his bottom bracket.
If you braze a lugless joint, it's imperative that you get brazing material both inside and outside of the tube connection. That's
what I got out of the tests. When done right, the brazing part of the joint is the last thing to give,.. all the tubing around it will
rip apart first.
 
Thanks for the overview APL. About 20 years ago I purchased an oxy-acetylene torch with the idea of building an EZ-Racer for my wife who found regular upright bicycles annoying and uncomfortable. Aircraft Spruce and Wicks were the go-to materials resources back then. That was before online shopping was even a thing. My intention was to braze and I did a little bit of it. But I certainly never developed the skill. Also, storing those big tanks of gas sorta freaked me out. I wasn't using them regularly an I always worried a bit about how seals might be compromised in the AZ heat or something else might age. It wasn't like I was using the torch regularly and so would notice some problem. We moved and I sold the torch to a work acquaintance's son who was making metal craft signs. I also dumped the EZ-Racer project. I eventually realized the my wife simply doesn't like cycling. Period. But these smaller torches now have me interested again.

Amberwolf - Yeah - some form of MIG/TIG welder like you have and describe is probably the more practical approach. But somehow the more unusual approach always seems to appeal to me more. Of course, what I really should do is not add one more thing to my plate of things to be doing. But I do find building stuff satisfying. What I really should do is go home and clean up my mess in the garage. I'm sure it's bugging my wife and she's been very good about not complaining about it. And with things straightened up, I could think more clearly about where I could build stuff. :^)
 
I went with welding over brazing almost solely because I can just plug it in and go, and because it's easier/faster to do.

Brazing needs a good prepped surface, and preferably a good fit of the parts, so the filler can wick in there and fill it up to make the join nice and solid. It's tough to fill in really big gaps, and if the surface isn't prepped well, it may either not stick or may have enough contamination in it to weaken the joint.

Welding *should* be done with a good prepped surface, but I have done "emergency" welds (that have subsequently survived some serious abuse) on completely unprepped surfaces, like a broken painted tube that I just butted end-to-end (or end-to-face as a T), with just a scratch to the metal in one spot to allow starting the arc, letting the arc burn the paint off as I went.

It should also be done with a good fit, but I've also used the welder on low-current and high feed rate to fill in some big holes. I'd've had to make a patch plate/etc to do that with brazing, at least with the techniques I know.
 
Don't mean to change the subject, but I have the photos archived already, so I thought it would be a good Idea to do a short
'how to' on the mid drive-drive cog set up. (MDDC?) Incase future builds are interested. Details, details...
There are all kinds of combos possible with these parts, but this is the most basic.

If you can think of another way of saying mid drive drive cog, then put it on here, so that the search engine will locate it if
some one else is doing a search. Thanks. :)

The problem with using a rear hub motor in a mid drive format is that the threads for the freewheel on the motor are
backwards for it to work. When the motor turns the drive cog, it wants to spin it off.

So how do we stop that from happening? As amberwolf pointed out earlier, there are a few ways to do this. The common
way is to turn the motor around, and run a cog on the disc brake mount.

But you might not have a disc mount, or you don't want to reverse the voltage wires, or the spacing isn't going to work out,
or you have plans for the disc mount already. Always something. :roll:

You can try using a lock ring from a BB cup, and some thread lock, but if it fails out on the road, then you walk back. And
it probably won't handle high power.

Some people screw a track cog on, and drill between the threads, and put a pin in it, but now you've really messed up your
nice motor, and it's resale value. And it's not so easy to change cogs.

In this method, you still have to drill a little, but it might even be seen as an upgrade for resale, and it doesn't hurt the motor.


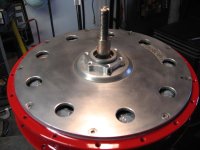
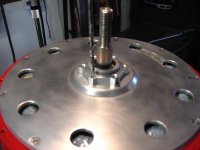
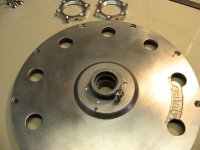
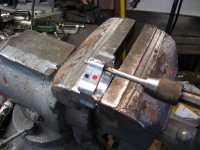
You will need to buy one or two rear hub disc brake adapters from Ebay. You can also get disc spacers to fine tune your spacing.
Screw one on the freewheel threads tight. then twirl a drill bit in the threaded holes, lightly taping on it with a small hammer,
to make a center punch mark on the motor face.

IMG_0196 copy.jpg

IMG_0197 copy.jpg

You can unscrew the adapter, but I like to use it to drill the holes a little at first, very carefully, and then take it off to drill
down into the motor face about 1/8" or so, with a drill bit the same size as the bolts. It's important that you get the holes in
the right place so that it doesn't wind up with a sloppy fit.

You might hit a steel reinforcement plate at that depth on some motors. You can either stop right there, or, if you really want
to make sure theres no chance of slippage, drill all the way through. I've never had the need to do that.

IMG_0199 copy.jpg

If you do this with the motor put together, then be very careful, and a good trick is to put a pice of vinyl tubbing on the drill bit
to keep it from plowing all the way through the motor when it breaks through the side plate.

If you use both adaptors, you might want to tap through both of them to align the threads, because the screws will want to bind sometimes. But the best way is to drill out the threads on the top adaptor, so the bottom one can pull everything tightly together.

IMG_0200 copy.jpg

You can use one, or two adaptors, and spacers, to get the position you want. Or even put two cogs on.
:!: Make sure your bolts go all the way down into the motor face, to get a good adaptor lock. :!:


Thats it! And if anyone has another way, please post it here so people don't have to look all over for it. Thanks! :)
 
That's a handy method, and easy even with "hand" tools. ;)

Another method, that doesnt' require any modification at all, is to use only one chain, the one from the pedals, and use a normal thread-on singlespeed freewheel on the motor. Place that inline with the regular chainline, but put it on "top" of the top run of the chain. Then wire the motor to run in reverse.

Then it will drive the chain normally, just like the pedals do, but still freewheel when pedalling.

If you don't want the pedals to turn with the motor, use a freewheeling crankset. If you're always pedalling anyway, then it's no different than having a stoker on a tandem. ;)
 
Thanks izeman, I'm still looking over your Kona build, your skills are fantastic! I see you've been down this road before,
as far as mid drives go. Well, it works out well in a cruiser form. And the fact that you can put a monster motor in
there is a real plus. Might get my ass whooped going off road though!

I really wish you would build one, or your own version. This is defiantly the funnest bike I've ever been on. I can see it
becoming a salt flats racer, or a drag bike as well. Hmmm. :?:

Yea, one of my pet peeves with most electric bikes are the wires,.. everywhere! Although, admittedly, I haven't addressed
the waterproof issue yet. Pretty sure the motor will be fine, as it self drains. But the batteries need a cover yet.

Keep up the good work my man! 8)
 
Pretty art Mike. :mrgreen: One-of? Or designed for volume production... Can suggest yer next project maybe? According to one theory, cyclists don't live forever... [cough cough]... Had an accident some years ago and ended up losing any sense of balance... NOT "good", bike-wise... So current ride is a recumbent trike. So if yer looking to sell any pieces, suggest going after the "older folks market" (aka "wealthier"... often) as a recumbent tricycle design? ... and adding assist, of course [hehe].

Cheers
L
 
LockH said:
So if yer looking to sell any pieces, suggest going after the "older folks market" (aka "wealthier"... often) as a recumbent tricycle design? ... and adding assist, of course [hehe].

"Wealthier" older folks go all in on power assist, and drive cars. (Poorly.)
 
^^ Hehe... Press reports from Europe were saying it was "older" folks buying into assist bikes first.

See also, rising accidents involving older folks riding electrics reported from the Netherlands. :mrgreen:
 
Thanks LockH, hey 'I'm' an older folk! When I was in high school, computers filled entire buildings, all phones had
wires, and if you wanted to show that you had achieved true 'geek totality', you wore a calculator on your belt!

It's not us old farts that are the problem, it's all you young whipper snappers scurrying around in a hurry! :roll:

Anyway,.. no plans for production. I'm hoping that my Asian brothers, and European brothers, and all my brothers
everywhere will take note, and follow up producing them, I hope to see it at Walmart next month..for $395. HA! :D

If it's a good design, it will catch on, if not, it will fall by the wayside with the rest of them. The true design test.

As far as the market goes, I'm not interested in the wealth factor. Money will only get you a dysfunctional family.
I'm more interested in designing something thats useful to most people of the world. And I think people everywhere
can use more alternatives to the car.

I see bikes like this as being good for work bikes, as well as quick trips to the store and around town, leaving the car
at home to do longer trips and heavy loads. Less local congestion.

A recumbent trike you say? Well that does sound useful to a lot of folks, and recumbents are perfect for E power.
I'll have to think on it. Just curious,.. do you prefer to ride low, or sit up higher?
 
APL said:
Thanks LockH, hey 'I'm' an older folk! When I was in high school, computers filled entire buildings, all phones had
wires, and if you wanted to show that you had achieved true 'geek totality', you wore a calculator on your belt!

So, mid-seventies then ...
(High school years, not age.)
 
Class of '70. They weren't going to let me graduate, unless I cut my 3" hair! The things I put up with..
The old ones were strict back then.

Hope I didn't come off as being angry, or perturbed, in that last post, after reading it this morning,..
Not at all! :)

Future plans? Well, I'm still working on this bike, but I have a design for a passive wind powered heater that
uses rare earth magnets for induction heat, an old Michael Faraday concept, that has been passed over.

Another damn flying machine, that uses a circular wing, and has a radial fan in the middle to blow air
outward over the wing. Why? I haven't seen it tried yet.

And a crazy electric flag idea, that uses hard sections that hing, and flap in the wind, to produce electricity.
Piezo, or shaker generators? Works at night, maybe camp sites,..who knows. Just for fun.

Plus, I wouldn't mind getting the worlds fastest unicycle drawn up, an absolutely nuts concept I've had for years.
Half unicycle, (sit inside the wheel), and half airplane, (tail out back). :oops:

Are you sorry you asked yet? Theres more... :D
 
APL said:
Class of '70. They weren't going to let me graduate, unless I cut my 3" hair! The things I put up with..
The old ones were strict back then.

Really? I was '77 and was taught to use a slide rule freshman year in '74. Calculators were around at the time and before, but were fairly expensive for a school kid. But a year later, in 1975, our physics teacher said to forget the slide rule and buy a calculator. They had dropped to the $10-20 dollar price range. Kids seemed to use them mostly to find numbers ( .07734) that would spell out words when turned upside-down. It's a lost art.

I suppose if you had a calculator on your belt in the early '70s there was surely prestige simply because you could afford such a cool, new tech gadget that used a ... gasp ... microprocessor?!?! Our school's physics department talked to the Honeywell mainframe via a Model 43 Teletype that had a 300 baud modem and used paper punch tape.
 
Back
Top