Using the Wangdd22 1500W 30A DC Boost Converter on an ebike

amberwolf said:
wturber said:
So I spent last week layering on about five or six coats of orange-ish yellow paint (a couple coats each morning) to make sure the black was well covered and then topped it off with some clear for a bit more durability (and shine).

FWIW, Krylon white primer (and probably most others) would cover the black right up, and help the color paint stick well. :)

I used Kryolon Fusion - which supposedly sticks to plastic really well. Multiple coats were cheaper than buying an extra can of primer. Though I admit I splurged on the clear coat. :D
 
fechter said:
I've seen guys that put a piece of plywood or Lexan in the bottom of the plastic crate to stiffen it up. Maybe under the bottom in your case.

I almost put in a plywood bottom since I have a fair bit of that in different thicknesses. But I wanted to keep the ability to attach bungees to/thru the bottom. I have stronger bits of aluminum if the umbrella parts don't hold up. But I have many more umbrella parts and they cost me nothing other than storage space. In fact, I wish I had remembered I had them when I was reinforcing my rack. Drat!
 
Oh - I forgot to mention that the DD hub now has ferrofluid in it. I'd like to say Statorade®, - which is what I thought I was buying from Lunacycle since they use the Statorade® trademark on their website and the shipping from Grin was a pretty silly amount. I assumed that they were just white-labeling the product from Grin. But it seems much more likely that they are just abusing Grin's trademark - which Grin seems pretty unconcerned about since they don't include the trademark symbol on their website or their packaging.
(http://tmsearch.uspto.gov/bin/showfield?f=doc&state=4804:el1jyy.2.1)

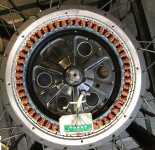
But anyway, since I had the wheel off to install the larger 180 mm disc rotor, I went ahead and opened up the motor, so that I could seal the covers and add the ferrofluid directly - thus avoiding drilling a hole and reducing the likelihood of leaks. That said, I should have drilled a hole in one of the rotor mount holes while I had it apart. Drat! Maybe next time.

I wanted to measure the lamination thickness, but the motor core seemed seemed to have a strong attraction to the motor's magnetic ring. I decided it wasn't worth the effort to try to force it free and potentially damage a motor that was working perfectly fine as it was. So I counted the magnets and windings and took a few pictures for posterity, and sealed it up.

Anyway, I can't say that I can observe any difference. Hopefully this lets the motor shed a bit more heat when climbing hills in the summer.


IMG_20180818_083624137_LL_cr_SM.jpg
 
I sent an message to the ebay seller with picture explaining why I thought the MOSFETs were fake. They sent an email back explaining that their 3rd party source claims they are real. Well duh! What else would they say? Kinda funny.

Trying to be fair, I sent an email (with photo) to NCE figuring that while I'm sure they could care less about my order, they might be interested in a distributor that is selling many more counterfeits. They have not responded. I also sent a follow up email telling the ebay seller that it is kind of silly to just take their distributor's word. Maybe they should check with NCE if they care about selling fakes.

Of course, maybe I'm all wrong and the phony looking logo is legit? Seems unlikely.

Anyway, my main concern at this point is getting a definitive idea of whether they are fake or not. I consider the money trivial and won't ask for a refund unless I'm sure that they are fake. So I went ahead and soldered one of the FETs back into the booster and the booster is now working again. In fact, the output voltage was exactly 54.0 volts - exactly what is was set before the failure. That doesn't mean the FET is legit, but it does show that the FET was the proximate cause of the booster ceasing to work. Now that I know that, I'll look for a legit source for a legit replacement FET and, buy some new capacitors and complete the repair.

Oh - I upgraded my shifter to a legit 7 speed index shifter this morning as well.
 
Alan B said:
Ebae is very hard on fakes, not that you are concerned about a refund. But the seller probably knows this and it could hurt them.

The voltage value is not really dependent on the FET, as long as it acts like an FET.

Good to know about the voltage. The logo is so phony, that I'm personally convinced that these are bogus. I know very little about electronics, but in my years doing graphics and animation I have learned that companies are almost always VERY particular about how their logo is displayed and used. They usually have standards books on this. So it seems almost unthinkable to me that the phony baloney imitation logo actually came from NCE. OTOH, its a Chinese company and maybe their sensibilities are different?

Anyway, my personal conviction on this isn't proof. If I could prove them fake, I'd be happy to report the seller, give 'em a poor rating etc. just to warn others off. It isn't like they seem very concerned about the truth of this matter. But I'm hesitant to state that these are phony without some outright proof. Too bad NCE also seems to not care.

I might install this "repaired" booster on the bike tomorrow and see how it performs (does it run hot, sag, fail?) and also check to see if I can blow it up with normal use. Not sure what that would prove. Probably nothing. But I'm curious and I have four more. :^)
 
I pulled into the parking lot at the studio this morning and my odometer had just hit 4999.9. So I rode one lap around the parking lot to hit an even 5000 miles.

 
docw009 said:
Are you still running that bike on a bunch of 36V4AH batteries. After a year, all five of mine are still quite useable. I only use them two at a time.

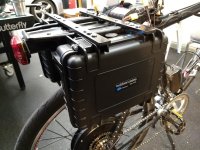
Yes. I'm running eight at a time. Four in each of two plastic cases mounted as panniers.

Tomorrow, I might do a quick overview of the bike comparing the current configuration with my original setup. It is fundamentally the same. I've just slowly made additions and modification to make things more practical and usable.

IMG_20180514_010818263_LL_SM.jpg
 
I've been thinking about this on the long walk home with no chain and no juice left 36V pack, 42V max, 32V LVC, unknown Ah so old now, 10S12P. 36Ah 36V 100A cont is 20 or 30A I dunno, also so old.

Why was I thinking about this? Because I have a 5S2P (21V 3Ah 10A) tool pack battery on my handle bar for my light.

Run light, run usb charger, and run DCDC conv.

Now I wonder with one tool pack battery that I have using a DCDC
21V 3Ah 20A pack which is 420W
+
DCDC
=
42V 1.5Ah?????? 10A?????? which is 420W!
63Wh @ babying it 25Wh/km, minus inefficiencies of lets say 10% so round to 55Wh @ 25Wh/km so 2km.
That would have saved the sweat that happened and is a rare sight. :oops:
I have a much smaller DCDC, no fins, probably 10A model, only 2 caps if I remember correctly. Might be 4, I dunno.

edit
Thinking about this now, 5S2P might as well be 5S1P 1.5Ah battery alone. Sure its more work, or spend $20, nah.
Or just have a reserve pack.

PS
Great project you got though!
 
I wouldn't buy a voltage converter so you could use your smaller battery to power the bike in an emergency. It isn't enough extra help for the size, weight, cost and trouble. I suggest just adding to your battery pack ... and installing a chain. That's been my approach.

As for the chain, I've had two chain incidents in about 5400 miles of riding that I repaired on the side of the road. I carry a spare link and a chain tool. I don't need a chain for about 98% of my ride, but I do for some steep hills and I like to pedal anyway. I know you don't care to pedal. But you can just put it in a granny gear and other than the freewheel ratchet noise have a similar effect. Alternatively, you could carry a chain with a spare "missing link" and install the chain in case of emergency. Beats walking.

BTW, broke a spoke today in the rear (motor hub) wheel. That's the second one. It's been about 800 miles since the last one.
 
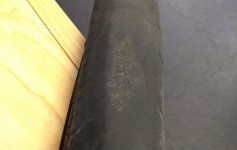
So I decided to replace my broken spoke yesterday and had to remove my rear wheel since I had to remove the tire to be able to replace the spoke. I'm glad I did. I found two spots where the tire had worn down to the fiber belts. One had almost worn through the belt as well!! I was wondering where I had skidded the tire that severely and couldn't remember anything like that. Then I spotted the other, less severe and longer spot. Wow! I had simply worn through the tread. My first thought was that this seemed awfully fast. But further investigations showed I got this tire in early November last year when my bike had about a thousand miles on it. I'm now at almost 5500. So the tire gave me nearly 4500 miles of wear. This seems to be on the lower/middle end of what Schwalbe says to expect from their pretty durable Marathon series. So I guess this tire lasted as well as could reasonably be expected.

Anyway, I put a knobby off-road tire (that came with the bike) on the back wheel for now. Time to go tire shopping.


RiBMO_wear1.jpg
 
Popped another 12 gauge spoke on the rear wheel on Tuesday. Rode with it all week and didn't break any others. Like all the previous spokes that broke, this one also broke at the curved elbow. Given the pattern, it seems likely I'll be breaking more. This may be inevitable due to the issue of using 12 gauge spokes (as Chalo warns against) or due to the use of lower quality spokes. As a reminder, this wheel has over 5600 miles on it. Three broken spokes doesn't seem horrible to me given the distance ridden on a hardtail.

I bought eight spares after the first break. Once I use up five of the spares I'll just order 36 new smaller gauge spokes and re-build the wheel.

Anyway, while I had the wheel off again to replace the spoke I figured I may as well stuff my original Innova tire inside the new WTB Slick Flatguard that replaced the Panaracer RibMo that wore out. I've been thinking about doing this to add more flat protection for some time now.

The Innova seemed to fit nicely inside the WTB. So no need to split the tire. The back tire now has a thick tube, an added plastic liner that is rubber cement glued to the tube to keep it lined up correctly, and an extra tire. I trimmed off the wire bead and about 3/4" inch of the sidewall before stuffing it inside the WTB Slick. We'll see how this works out. I had very good luck with the RibMo and the plastic liner. I only had one flat with that tire and liner combo. Maybe this can get it to zero.

I never deepened the rear dropouts when installing the motor. So the rear disc pads have always hung off the edge of the disk by 2-3 mm and have worn unevenly because of this. This didn't change when I changed to a larger 180 mm rear disc. So today I also trimmed the 160mm to 180mm brake mount adapter by about 3mm to move the brake closer to the axle so that the entire pad would engage the disc. That's worked out great with the side benefit of eliminating the rear brake squeal I've always had back there.

 
wturber said:
Popped another 12 gauge spoke on the rear wheel on Tuesday. Rode with it all week and didn't break any others. Like all the previous spokes that broke, this one also broke at the curved elbow. Given the pattern, it seems likely I'll be breaking more. This may be inevitable due to the issue of using 12 gauge spokes (as Chalo warns against) or due to the use of lower quality spokes. As a reminder, this wheel has over 5600 miles on it. Three broken spokes doesn't seem horrible to me given the distance ridden on a hardtail.

Not horrible, but me on my trike weighs much more than you and your bike ;) especially when I'm carrying cargo, and I've not broken any of the radially-laced less-than-90mm 13/14butted Sapim spokes on the 20" rear wheels, despite potholes that have caved in the edge of a rim, and despite re-using the same spokes on replacement rims.

(same with CrazyBike2, which was probably a hundred pounds lighter).

Don't know how many potholes / bad road stretches you go over regularly; that makes a difference too.

But I did have that problem on various wheels using 12g spokes (albeit of unknown quality/manufacturer; OEM-wheel stuff) on various wheel sizes. Often enough the first thing that happens is actually the rim failing--cracking around the nipple holes, which then allows the spoke to untension, and then it flexes at teh elbow, which then breaks the spoke from fatigue.

If I were you I'd check the nipple holes in the rim very carefully in good sunlight, with magnification, to see if there is any cracking around the holes where spokes have already failed. My guess is that it is there whether visible or not. If there are eyelets you may not be able to see the cracking very well. The ones I've seen are always radially outward from teh hole, and sometiems the rim around the hole is actually "mounded up" toward the hub.
file.php


So...anyway, my experience has been not that thick spokes are bad, per-se, but that spokes that are too thick for the rim they're on break the rim and that allows the spokes to loosen and flex and break.

FWIW, almost every regular bicycle wheel that I've had spokes break on (especially repeatedly) has been one that was not tensioned properly (if at all) and the spokes also broke at the elbows.

The ones that broke elsewhere were generally on wheels damaged in impacts, like a "taco" event, or placed under severe stress / overloads in sideloading.
 
amberwolf said:
wturber said:
Popped another 12 gauge spoke on the rear wheel on Tuesday. Rode with it all week and didn't break any others. Like all the previous spokes that broke, this one also broke at the curved elbow. Given the pattern, it seems likely I'll be breaking more. This may be inevitable due to the issue of using 12 gauge spokes (as Chalo warns against) or due to the use of lower quality spokes. As a reminder, this wheel has over 5600 miles on it. Three broken spokes doesn't seem horrible to me given the distance ridden on a hardtail.

Not horrible, but me on my trike weighs much more than you and your bike ;) especially when I'm carrying cargo, and I've not broken any of the radially-laced less-than-90mm 13/14butted Sapim spokes on the 20" rear wheels, despite potholes that have caved in the edge of a rim, and despite re-using the same spokes on replacement rims.

(same with CrazyBike2, which was probably a hundred pounds lighter).

Don't know how many potholes / bad road stretches you go over regularly; that makes a difference too.

But I did have that problem on various wheels using 12g spokes (albeit of unknown quality/manufacturer; OEM-wheel stuff) on various wheel sizes. Often enough the first thing that happens is actually the rim failing--cracking around the nipple holes, which then allows the spoke to untension, and then it flexes at teh elbow, which then breaks the spoke from fatigue.

Yeah - too many variables to really compare. I'm lighter, but am travelling at higher speeds over much greater distances and hence many more stress cycles. That's further exacerbated by your current 20" rims being likely of fairly high quality and my rim being middle of the road at best.


amberwolf said:
If I were you I'd check the nipple holes in the rim very carefully in good sunlight, with magnification, to see if there is any cracking around the holes where spokes have already failed.

That said, the theory of 12 gauge spokes being to large for a bicycle rim always seemed sensible to me. My only real problem with it was the severity of the problem seemed likely to be exaggerated. Spoke failures at 5000+ miles is certainly sooner than I'd expect from a regular bicycle wheel, but then those kinds of wheels seldom have to deal with the weight, speed and motor torque that I'm delivering.

Anyway, back when you posted your comment I went and looked at the rim and found small hairline cracks like you showed on a few spoke holes. So I figured that there was little point in waiting for a catastrophic or near catastrophic failure which seemed like a likely result. So I set about getting a new wheel built (which took me off the bike for a week). I found a wheel builder in Fountain Hills who seems to have a decent reputation (http://daves-wheels.com/) so I had him rebuild my wheel using a Velocity Cliffhanger rim and 13ga / 14 ga single butted spokes. From the standpoint of thrift, I should probably have ordered a DM24 rim, but Dave suggested the Cliffhanger. I think he said the center section with the spoke holes was a bit beefier and that this wheel has worked quite well for tandem bike wheels that he has built. So I deferred to his suggestion even though he probably wouldn't have balked at using the DM24. Anyway, the new wheel is on the bike and I'm back to riding in to work again.

Now that I have the old rim back I looked at it more closely and found a total of 11 stress cracks propagating from spoke holes.
Some of the cracks were quite subtle. This photo is of the worst crack that I found.

 
You're smart or got lucky. Dave is a legendary wheel builder in the MTB world.
 
2old said:
You're smart or got lucky. Dave is a legendary wheel builder in the MTB world.

Not smart, lucky. I happen to live in Fountain Hills where he apparently lives. So the choice was heavily influenced by convenience.
 
Help!!!! I was setting up my Wang for the first time and I get output voltage equal to input voltage. My 36 volt battery registers 41.5 on my VOM, and my output voltage also registers the same. How do you adjust the variable resistors so that you get an actual boost? Can this show up just on the device output or does it actually have to be drawing power? Somewhere I have a wattmeter but I need to find it. Must it be in the circuit and the bike running to get a higher reading? The little red light comes on. Is that good?
So many questions, so little time.
otherDoc
 
Got it! The key was "clockwise". Set it to about 52 volts and will test tomorrow.
otherDoc
 
docnjoj said:
Got it! The key was "clockwise". Set it to about 52 volts and will test tomorrow.
otherDoc

Its been a while since I configured mine, but there are three adjustments to be made. The other two are for amperage output - which you probably want to set to maximum, and the other is low voltage cut-off. The low voltage cut-off isn't really necessary if your battery is protected by a BMS with cut-off. But you should at least make sure it isn't set to some that is substantially higher than your battery's cut-off. I used three partially used 9 volt batteries in series to get a voltage that was around 30 volts to set mine.
 
Thanks for the help. I will work on the LVC before our test ride tomorrow.
otherDoc
 
This is a link to the instructions that I posted about a year ago.

https://endless-sphere.com/forums/viewtopic.php?f=2&t=90369&start=50#p1337830
 
Well it works! At 53 volts there is a noticeable increase in power, mostly at the higher speed end. There was some increase in torque, but not a huge one at the low speed and start up end of the spectrum. Next ride (later this week) I will experiment with the LVC and Amps variable resistors. I could also solder the shunt for more power. There were no cut outs, even on 4% hills.
So far so good! Thanks Wturber and all. Temp about 65 degrees F. We rode for about 1.5 hours.
otherDoc
 
docnjoj said:
Well it works! At 53 volts there is a noticeable increase in power, mostly at the higher speed end. There was some increase in torque, but not a huge one at the low speed and start up end of the spectrum. Next ride (later this week) I will experiment with the LVC and Amps variable resistors. I could also solder the shunt for more power. There were no cut outs, even on 4% hills.
So far so good! Thanks Wturber and all. Temp about 65 degrees F. We rode for about 1.5 hours.
otherDoc

So. How has it been working for you?
 
wturber said:
The Innova seemed to fit nicely inside the WTB. So no need to split the tire. The back tire now has a thick tube, an added plastic liner that is rubber cement glued to the tube to keep it lined up correctly, and an extra tire. I trimmed off the wire bead and about 3/4" inch of the sidewall before stuffing it inside the WTB Slick. We'll see how this works out. I had very good luck with the RibMo and the plastic liner. I only had one flat with that tire and liner combo. Maybe this can get it to zero.

Just a quick update. WTB slick with plastic liner and extra tire stuffed inside is holding up nicely. No flats in about 2000 miles. New wheel built by Daves Custom Wheels is holding up find so far. Everything seems stable at about 7600 miles.

Our studio is moving closer to home. I think more like 24 miles per daily round trip - though I haven't measure it yet. So I probably won't be racking up miles as quickly starting in May.
 
Back
Top