Very tight clearance 1/32" between Phase/Hall and rotor bolt heads HELP

bobmutch

100 W
Joined
Jul 18, 2017
Messages
160
Location
London Ontario Canada area
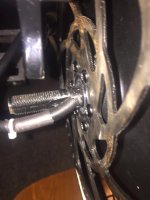
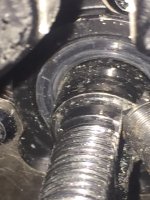
So as you can see my phase/hall cable is very close to the rotor and the 6 rotor bolt heads. So what I did was I rotate the axle 180 degree so the phase/hall cable come out the back instead of the front. Then I wrapped it tight over the top of the axle nut.

clearance1.jpg

I was concerned if I left it coming out toward the front that over time it could get a bit loose and it could get caught on the rotor nut heads.

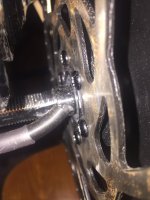
But still it is not enough. I will considering countersinking the rotor bolt holes and install flush countersunk bolts. That will give me another 3/64”. The only other thing I possibly could do is move the whole hub to the right but that would require machining the other side of the axle?

What to do?
 

Attachments

  • clearance7.jpg
    clearance7.jpg
    48.5 KB · Views: 350
  • clearance8.jpg
    clearance8.jpg
    56.5 KB · Views: 350
  • clearance10.jpg
    clearance10.jpg
    38.6 KB · Views: 350
  • clearance12.jpg
    clearance12.jpg
    38.5 KB · Views: 350
  • clearance13.jpg
    clearance13.jpg
    59.7 KB · Views: 350
Add C-shaped washers between the dropout and the axle shoulder, with the open portion of the C where the cable is. It will spread the dropouts a little, depending on how far you need to do this, most likely one washer is enough.

You will also have to add washers between the disc caliper and the frame to match the new spacing, if the caliper is mounted to the inboard side of the frame. If it is mounted to the outboard side of the frame, you would have to remove washers if present, or potentially file thickness away from the caliper's mounting holes on their inboard side so the caliper still lines up with the rotor in the same place.

It's easier to use one single thicker washer than a stack of thinner ones, as far as installation and removal goes (like for tire repair, etc), as there's less fiddly bits to deal with.

You can take a single thicker washer and notch it with a dremel or round file such that the notch is at an angle like the hole in the axle, to guide the cable out within the notch but still have a full ring at one end of the washer (so it can't just fall off the axle once the nut is loosened).

If you start with a washer that has a smaller hole diameter than the axle requires, you can also use a round file and then flat or square files to elongate the hole and then flat the sides, so that when it is installed it holds itself in teh correct orientation for the wire to go thru it's notch, and you won't have to do that manually during every reinstall.
 
amberwolf said:
You will also have to add washers between the disc caliper and the frame to match the new spacing, if the caliper is mounted to the inboard side of the frame.


Yes the IS to PM adaptor it is mounted on the inside side of the IS frame bracket so I will add the same single washer thickness as on the axle.

Would you suggest 3/16" or 1/4"? I would be more comfortable with 1/4".

Also I should be ok to turn the axle 180 degree so the phase/hall cable is coming out toward the front of the bike as I changed it toward the back so it could/would be pulled away from the rotor bolt heads because I only had 1/32" clearance between the cable and the rotor bolt heads?

amberwolf said:
It's easier to use one single thicker washer than a stack of thinner ones, as far as installation and removal goes (like for tire repair, etc), as there's less fiddly bits to deal with.

I will do the single thickness for the PM adaptor but for the spacer on the axle I will use 3 washers and glue them together using gorilla glue or ?

amberwolf said:
If you start with a washer that has a smaller hole diameter than the axle requires, you can also use a round file and then flat or square files to elongate the hole and then flat the sides, so that when it is installed it holds itself in teh correct orientation for the wire to go thru it's notch, and you won't have to do that manually during every reinstall.

Yes I will use 3 of these spacers.

spacers-with-cutout.jpg

Ok now the other issue is the best way to spread the the chain stay so my dropout getting an extra 1/4"?

Thank you very much this was the answer I was looking for.

I'll post a pic when I get it finished.

Found these at Canadian Tire

washers-for-project.jpg
 
Hi. Motor wires are a nightmare arent they!! Seems to always be a problem that crops up on here. I'm having the same issues with frame/bike I'm building. I did counter sink the rotor and fit countersunk bolts on mine to. I've found the best way to spread the frame out a bit was to get a piece of 10mm threaded bar and 2 nuts and washers,put that through the dropouts with the nuts/washers on the inside and then just wind the nuts out a few turns of each one evenly and gently to spread frame apart. You may have to grind a flat on threaded bar to fit into dropouts,also in the middle to put wrench on to stop bar turning as you wind the nuts out. I found you have to do it past the amount you need as they will spring back in,just try a bit at a time. Also obviously keep a check on all the welds etc to make sure nothing is cracking or splitting,but for such a small amount I would think it will be fine. Hope that helps.
 
Back
Top