
You are using an out of date browser. It may not display this or other websites correctly.
You should upgrade or use an alternative browser.
You should upgrade or use an alternative browser.
New "TSDZ2 Torque Sensor Central Motor"
- Thread starter larsottar
- Start date
imfrommexico
10 µW
- Joined
- Feb 6, 2019
- Messages
- 5
tomtom50 said:High quality steel frames work. I built mine on a Trek Reynolds 531 touring frame. Taste varies but I think the old lugged frames look and ride great, nicer than most aluminum frames. As for weight ebikes weigh more, but it matters less because the motor is stronger than the rider. How important is a three pound weight difference between a top-rate steel frame and a carbon frame?
From the standpoint of Tongsheng enginneers they had pretty clear design criteria for a marketable system:
1. Wide frame compatibility
2. Reasonable chainline (50mm or less) with a gear drive and torque sensor fitted in
The decision to fit to 68mm and 73mm bottom brackets is fine, those are the most common by far.
The engineers dished the back of the drive side housing to reduce chainline. If they hadn't done that it might fit some carbon frames, but the chainline would be worse for a larger number of installations.
I'm glad they compromised as they did they did. On a typical frame 50mm chainline is about as much as is acceptable before there are significant issues on the inside rear cogs.
It's not totally about the weight ...
aesthetically, there are no more welds on the frame and the shapes are more developed
It's also possible with carbon frame to pass all the cables internally
and with carbon , you have really really more reactivity , i like rigidity bike.
And yes , when you ride , 3 pounds weight is not a lot, but when you have to regularly carry your bike , it matter
But I totally understand the standpoint of Tongheng , of course the current design are more marketable and give more frame compatibilty .
sorry for approximative english speaking
raylo32 said:Question for my fellow TSDZ2 owners... The main motor power wires that come out of the housing seem very small gauge to me, like maybe 16 ga, for 750 max watts and the corresponding amps. I am running 12 ga wire from the battery but not sure of the value in that considering the downstream 16 ga. Are all these motors supplied this way?
This is pretty easy to assess using the internet. There are various voltage drop calculators that will give a good answer. For example
https://www.calculator.net/voltage-drop-calculator.html
If I punch in 16 ga, 18A DC, and one foot the voltage drop is 0.14V, 0.3% of 48V. Power delivered is ((48-0.14)/48)^2 = 0.994, 99.4% of the power is transmitted.
The drop is completely a function of length. 18A though a 25 foot 16ga extension cord would be 3.6V, 7.5% of 48V, and power drops 14.5% ((48-3.6)/48)^2 = 0.855, the delivered power is 85.5% of the power into the cord. Don't use 25 feet of 16 ga to run your TDSZ2!
The fact that part of the length is 16ga doesn't mean using 12ga for some of the length has no benefit. 2 feet of awg 16 drops 0.29V. One foot 16ga plus 1 foot 12 ga drops 0.14V + 0.06V = 0.2V. Better than 2 foot of 16ga? Yes. Enough better to matter? That is up to you.
imfrommexico said:tomtom50 said:High quality steel frames work. I built mine on a Trek Reynolds 531 touring frame. Taste varies but I think the old lugged frames look and ride great, nicer than most aluminum frames. As for weight ebikes weigh more, but it matters less because the motor is stronger than the rider. How important is a three pound weight difference between a top-rate steel frame and a carbon frame?
From the standpoint of Tongsheng enginneers they had pretty clear design criteria for a marketable system:
1. Wide frame compatibility
2. Reasonable chainline (50mm or less) with a gear drive and torque sensor fitted in
The decision to fit to 68mm and 73mm bottom brackets is fine, those are the most common by far.
The engineers dished the back of the drive side housing to reduce chainline. If they hadn't done that it might fit some carbon frames, but the chainline would be worse for a larger number of installations.
I'm glad they compromised as they did they did. On a typical frame 50mm chainline is about as much as is acceptable before there are significant issues on the inside rear cogs.
It's not totally about the weight ...
aesthetically, there are no more welds on the frame and the shapes are more developed
It's also possible with carbon frame to pass all the cables internally
and with carbon , you have really really more reactivity , i like rigidity bike.
And yes , when you ride , 3 pounds weight is not a lot, but when you have to regularly carry your bike , it matter
But I totally understand the standpoint of Tongheng , of course the current design are more marketable and give more frame compatibilty .
sorry for approximative english speaking
Understood. I have seen carbon frames made for ebike motors, for example
https://www.aliexpress.com/item/Winice-2018-new-350W-36V-battery-electric-29er-hardtail-frame-Carbon-Bafang-Electric-mountain-E-bike/32882296468.html?spm=2114.10010108.1000013.5.6f6d6f32klJoog&gps-id=pcDetailBottomMoreThisSeller&scm=1007.13339.90158.0&scm_id=1007.13339.90158.0&scm-url=1007.13339.90158.0&pvid=95230710-ef5e-4235-b724-7b9211e988df
It fits a Bafang ebike motor that has a torque sensor.

Be careful when connecting speed sensor connector on the cable which is coming from the motor. The picture shows that the pins are on the other side and one pin is bent and is not visible. The pins are easily bent.
My question is where can I buy a cable that comes from the engine to the speed sensor and has a connector that connects to the speed sensor connector.
My question is where can I buy a cable that comes from the engine to the speed sensor and has a connector that connects to the speed sensor connector.
tomtom50 said:Antenor said:Thank you for the explaniont
Do i need some sort of special cable to flash the firmware?
I saw the open source software, but it looks more complicated that i can handle
See
https://www.eco-ebike.com/blogs/eco-cycles-instructionals/tsdz2programmingfromscratch
Shows how to make the cable and connect. And it has firmware files
And the 2nd video
https://www.eco-ebike.com/pages/videos
Tells you how to flash the hex file.
It is easier than doing the open source firmware.
I'm actually also wondering this, it's not that clear what kind of cables you need to buy.
From what I've understood, please correct i'm mistaken:
1. The KT-LCD3 dispay doesn't have a connector that fits the connector on the TSDZ2 engine. So you need to cut the connector from the VLCD5 display and connect it to the cable of the KT-LCD3 display. Are the colors of the wires the same?
2.The KT-LCD3 display needs to connect to the STLINK-V2 cable with this tiny connector: Is this delivered with the STLINK-V2?

Programming the TSDZ2 engine:
3.You need to buy a speed sensor extension cable https://www.aliexpress.com/item/ton...extension-cable-110cm-length/32833464583.html this one? Not the speed sensor cable, but the extension cable right? Else you don't have enough wired pins.
This cable you need to cut, and connect it to the STLINK-V2 cable.
With this you are able to connect the TSDZ2 engine with the STLINK-V2 to a laptop.
I think that flashing is quite easy, just follow the steps, but the connecting everything together is a bit more tough to do
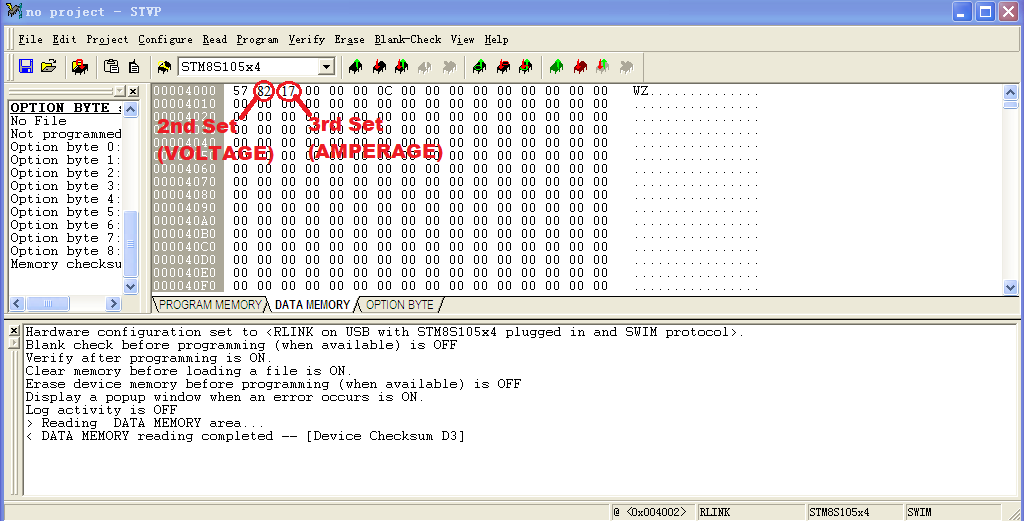
When you are programming the TSDZ2 you are able to set the engine on a specific voltage. Hence, when you want to connect a 52v batter to a TSDZ2 48v engine, you simple have to update parameters as marked below. Is that correct? So when you read a TSDZ2 48v engine, you will see the parameter: 78, update it to 82, and you are able to connect a 52v battery to it? Is it that simple?
raylo32
100 kW
I am about to get into programming mine, too. I believe this is the cable you need. I just ordered one yesterday, I have everything else. https://www.eco-ebike.com/collections/tsdz2-accessories-parts/products/extension-cable-for-tsdz2-speed-sensor. I first tried the lighting extension cable that came with the motor but that had only 2 wires, red and black. I spliced that back together for future use.
My issue is that I ordered my motor for 48V but decided to go 52V. I have tested it as set up for 48V with a 52V battery and it seems to work fine. I believe the standard 52V programming is set up for one less amp than the 48V. Not sure about anything else that would matter except perhaps the fuel gage. 48V programming won't show a low battery with a 52V battery in any state of charge. Just shows full all the time.
My issue is that I ordered my motor for 48V but decided to go 52V. I have tested it as set up for 48V with a 52V battery and it seems to work fine. I believe the standard 52V programming is set up for one less amp than the 48V. Not sure about anything else that would matter except perhaps the fuel gage. 48V programming won't show a low battery with a 52V battery in any state of charge. Just shows full all the time.
Retrorockit
1 kW
I just ordered a 48V 750W TSDZ2 kit.
I want to install it on a 26" 2003 Trek Navigator 400 Nexus 7 speed IGH bike.
It has a 73mm bottom bracket, and I understand the chainline on the Nexus sits in a little more than other "single cog" setups. Someone posted that the Nexus chailnline is 44mm, and the TS is 50.5mm.
What have users here found works for this situation?
I also own a BBSHD 8 speed derailer bike but I want something simpler to ride for guests.
The original gearing was pretty short 38x20. It's 38x16 now. It will be 44x16 when I get the kit.
My legal limts here are 750W and 28mph. But I haven't noticed any enforcement activity as long as you ride at an approprite speed for your situation.
Bigwheel
1 kW
I adapted an offset Bafang style 42t chain ring to the TSDZ2 spider to improve my chainline.

It has to be a 42t though to make it over the reduction gear housing and you have to be precise shimming it as too close in will scrub the plastic cover. Made a big difference in chain life as I use the bike primarily as an mtb and spend a good amount of time in the lower part of the gear range.
It has to be a 42t though to make it over the reduction gear housing and you have to be precise shimming it as too close in will scrub the plastic cover. Made a big difference in chain life as I use the bike primarily as an mtb and spend a good amount of time in the lower part of the gear range.
I know where you are coming from with your questions. Information is spread over this thread, which is now at 173 pages! Some is contradictory, some is not incorrect but someone else found a better solution.Strider said:I'm actually also wondering this, it's not that clear what kind of cables you need to buy.
From what I've understood, please correct i'm mistaken:
I went through the whole drill, first flashing stock firmware (I bought a unit marked 52V but it actually had 48V firmware, apparently there was a batch that left the factory this way), later doing a full conversion to Open Source firmware using a KT-LCD3.
I made a document that covers it all, trying to pull together all the best information and key links. I'll try to clean it up and post it this weekend. It has all steps and I tried for an organized step-by-step structure.
The open source firmware is great if you like a lot of information on your screen and a lot of options for configuration (I love stuff like that).
On the other hand, purely functionally, the stock firmware is quite good. Don't expect the open source firmware to give a radically better riding experience or to dramatically extend battery life.
Here is my attempt at a comprehensive tutorial for installing Open-Source firmware with KT-LCD3 and also flashing stock firmware.. Revise as you like. I hope it works for others.Antenor said:That would be great
The information is too spread over the topic
View attachment Open Source and Stock Firmware Tutorial.doc
Retrorockit
1 kW
Thanks Bigwheel. I don't have that narrow /wide Bafang gear that you show. Maybe it's the BBS02 part? I saw one guy with a belt drive that looked like the 130mm rings would clear the housing. My kit just shipped today so I don't have anything I can measure yet. With the internal gear hub the chainline won't be changing all the time. But the single speed chains like to run straight I've been told.Bigwheel said:I adapted an offset Bafang style 46t chain ring to the TSDZ2 spider to improve my chainline.
unnamed-2.jpg
It has to be a 46t though to make it over the reduction gear housing and you have to be precise shimming it as too close in will scrub the plastic cover. Made a big difference in chain life as I use the bike primarily as an mtb and spend a good amount of time in the lower part of the gear range.
tomtom50 said:Here is my attempt at a comprehensive tutorial for installing Open-Source firmware with KT-LCD3 and also flashing stock firmware.. Revise as you like. I hope it works for others.Antenor said:That would be great
The information is too spread over the topic
Open Source and Stock Firmware Tutorial.doc
Nice work Tomtom50! That will help a lot of noobies on the FOS firmware. The wiki could use some of your enhancements like the LCD3 screenshots. Thanks!
raylo32
100 kW
Not strictly related to the Tongsheng drive but I made an EGO battery mount and installed it on my bike. It accepts the 56V (really 52V) EGO tool batteries. I have a couple of their 5Ah batteries for an underused EGO battery powered snowblower. These should be good for shorter rides or to carry along as a spare for longer rides.
https://www.thingiverse.com/thing:3415459
https://www.thingiverse.com/thing:3415459
feketehegyi
100 W
- Joined
- Jul 11, 2018
- Messages
- 117
Thank you tomtom50 for this. I've actually customized the stock firmware and I also like it as it is.tomtom50 said:On the other hand, purely functionally, the stock firmware is quite good. Don't expect the open source firmware to give a radically better riding experience or to dramatically extend battery life.
I've already removed the XH-18 as well and given the following default values to stock firmware:
- 20" wheel size
- 45Km/h max speed
- Assist level 3
I only use my mobile with bluetooth connection, if I would like to use a different assist level or curious on voltage, watts, etc.
InterestingBigwheel said:I adapted an offset Bafang style 46t chain ring to the TSDZ2 spider to improve my chainline.
unnamed-2.jpg
It has to be a 46t though to make it over the reduction gear housing and you have to be precise shimming it as too close in will scrub the plastic cover. Made a big difference in chain life as I use the bike primarily as an mtb and spend a good amount of time in the lower part of the gear range.
Did you need to fabricate a spider or does the chainwheel mount directly to a TSDZ2 spider?
Can you give a link to the chainwheel you used?
What is the chainline you get in the end (stock TSDZ2 is 50mm)
Bigwheel
1 kW
tomtom50 said:InterestingBigwheel said:I adapted an offset Bafang style 46t chain ring to the TSDZ2 spider to improve my chainline.
unnamed-2.jpg
It has to be a 46t though to make it over the reduction gear housing and you have to be precise shimming it as too close in will scrub the plastic cover. Made a big difference in chain life as I use the bike primarily as an mtb and spend a good amount of time in the lower part of the gear range.
Did you need to fabricate a spider or does the chainwheel mount directly to a TSDZ2 spider?
Can you give a link to the chainwheel you used?
What is the chainline you get in the end (stock TSDZ2 is 50mm)
The chainring I used does not mount directly to the stock spider. I just cut the tabs that hold the stock ring off then I centered the ring on it and through drilled the stock adapter holes into the chain ring. Can't remember exactly how I held it all centered/still but it wasn't rocket science and I have a little drill press that is handy for stuff like that.
In order to get the tightest tolerance without rubbing I had to source some wide spacers,10mm IIRC, from the hardware store and the only thing they had close were some delrin ones and I also picked up some thin washers at the same time. I got it all together to my liking as close to the casing as possible, although I had to replace one of the cover bolts with a button head as the stock one stuck out too much, blue loctited the M6's and it has been trouble free ever since even with the delrin spacers which I thought were only for short term. I do think that some steel or alu stock would be better and would do more to figure that out if I did it again.
I got the ring off the wall at the shop I was working at and it came from an asian supplier the shop uses. However I believe it is a copy of the Lekkie ring as seen here:

If you are in the states you can pm me and I'll share the shop info with you and I'm sure he can post one out to you.
I can't quantify the exact chainline dimension but I can guarantee that it is as good as it is going to get relative to how far your motor sits off the bb. I did some crushing of my drive side chain stay, steel frames rule, and that got the drive side of the housing right up tight to the bb shell without have to use spacers which also helped.
My cassette is a 46t, and I had to use a Wolf link and new clutch derailleur to get to that. But I have found that in totally stock 52v format I have been able to get up just about anything I have pointed it at in Eco. For any lower gearing I would have to go with a different cassette and may at some point. At this time I am trying to figure out how to get a more integrated system together as the low hanging feature of the TS is a worry for the terrain I like to ride with log rollovers and such so getting the housing past the chainring would be nice.
I also ditched the stock offset crank arms and put some straight Bafang ones on to decrease the Q factor. Another tight fit on the non-drive side so I ground off the offending stock which got into the pedal spindle so that now the pedal and crank arm are one. I didn't find this out until I was riding with a friend that had a Levo and we planned on swapping pedals at some point to swap bikes and when we went to do so we ended up swapping shoes instead and luckily we had close to the same size feet.
Edited as I had the chainring size originally listed as 46t but in fact it is 42t.
feketehegyi said:Thank you tomtom50 for this. I've actually customized the stock firmware and I also like it as it is.tomtom50 said:On the other hand, purely functionally, the stock firmware is quite good. Don't expect the open source firmware to give a radically better riding experience or to dramatically extend battery life.
I've already removed the XH-18 as well and given the following default values to stock firmware:
- 20" wheel size
- 45Km/h max speed
So, now I just switch it on with a switch and ride it immediately.
- Assist level 3
I only use my mobile with bluetooth connection, if I would like to use a different assist level or curious on voltage, watts, etc.
Very cool feketehegyi! Is this hack something you could share? The TSDZ2 lends itself to stealthy rides and I'm sure there are many including myself that would like to do this. Is adding bluetooth required?
raylo32 said:Not strictly related to the Tongsheng drive but I made an EGO battery mount and installed it on my bike. It accepts the 56V (really 52V) EGO tool batteries. I have a couple of their 5Ah batteries for an underused EGO battery powered snowblower. These should be good for shorter rides or to carry along as a spare for longer rides.
https://www.thingiverse.com/thing:3415459
Thanks Raylo32! Those batteries are great for ebikes and will do fine. I know they use Samsung INR18650-25R cells which are very high power. 20 amps continuous per cell. So the 5AH is 14S2P so 40 amps. The 7.5AH is 14S3p so 60 amps. Take along the 2.5AH for a spare tank and at 14S1P it still puts out 20 amps which is plenty for a TSDZ2. I wouldn't worry about drawing too much power with a TSDZ2. The amps could be BMS limited. Have you measured actual max amps or watts?
Take a day off from yard work and use the same batteries for your tools on your bike! I was curious and googled Ego battery and cobbed the above info from this article. https://community.egopowerplus.com/ego/topics/ego-battery-review-from-a-battery-engineer
feketehegyi
100 W
- Joined
- Jul 11, 2018
- Messages
- 117
Rydon said:feketehegyi said:Thank you tomtom50 for this. I've actually customized the stock firmware and I also like it as it is.tomtom50 said:On the other hand, purely functionally, the stock firmware is quite good. Don't expect the open source firmware to give a radically better riding experience or to dramatically extend battery life.
I've already removed the XH-18 as well and given the following default values to stock firmware:
- 20" wheel size
- 45Km/h max speed
So, now I just switch it on with a switch and ride it immediately.
- Assist level 3
I only use my mobile with bluetooth connection, if I would like to use a different assist level or curious on voltage, watts, etc.
Very cool feketehegyi! Is this hack something you could share? The TSDZ2 lends itself to stealthy rides and I'm sure there are many including myself that would like to do this. Is adding bluetooth required?
Hello Rydon, thank you! Yes of course, I share it.
I've created a github page for all necessary details: https://github.com/wptm/tsdz2_maxspeed_wheelsize_assistlevel
Bluetooth is not required, only a switch to enable motor.
Hi,
Does anyone know how to remove the troque sensor ? ... so I can drill a hole into the housing behind it.

I cannot use the motors torque arm to hold the motor in position , so maybe I can drill holes into the gear housing and fix the motor to frames chainguide mount (ISCG-05). I've got a full suspension frame , that's my only option.
Cheers !
Does anyone know how to remove the troque sensor ? ... so I can drill a hole into the housing behind it.
I cannot use the motors torque arm to hold the motor in position , so maybe I can drill holes into the gear housing and fix the motor to frames chainguide mount (ISCG-05). I've got a full suspension frame , that's my only option.
Cheers !
Bigwheel
1 kW
Peetsyo said:Hi,
I cannot use the motors torque arm to hold the motor in position , so maybe I can drill holes into the gear housing and fix the motor to frames chainguide mount (ISCG-05). I've got a full suspension frame , that's my only option.
Cheers !
No need to even do that. Just let the motor housing rest against your down tube and the rotational force will hold it up against there. You can put a piece of rubber there as a bumper so that the dt won't get damaged if it is an aluminum/carbon frame. Just make sure you use the two tab bb washer to prevent the motor from twisting side to side also.
Corrected error that 6-pin TSDZ2 doesn't support brake connectiontomtom50 said:Here is my attempt at a comprehensive tutorial for installing Open-Source firmware with KT-LCD3 and also flashing stock firmware.. Revise as you like. I hope it works for others.Antenor said:That would be great
The information is too spread over the topic
Open Source and Stock Firmware Tutorial.doc
Attachments
Similar threads
- Replies
- 12
- Views
- 10,283
- Replies
- 35
- Views
- 17,118