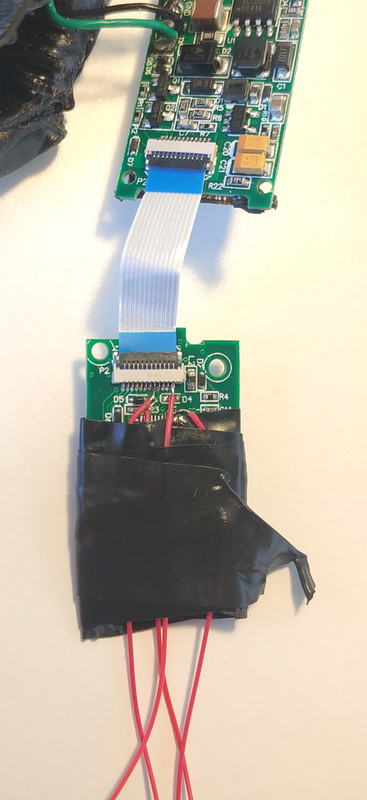
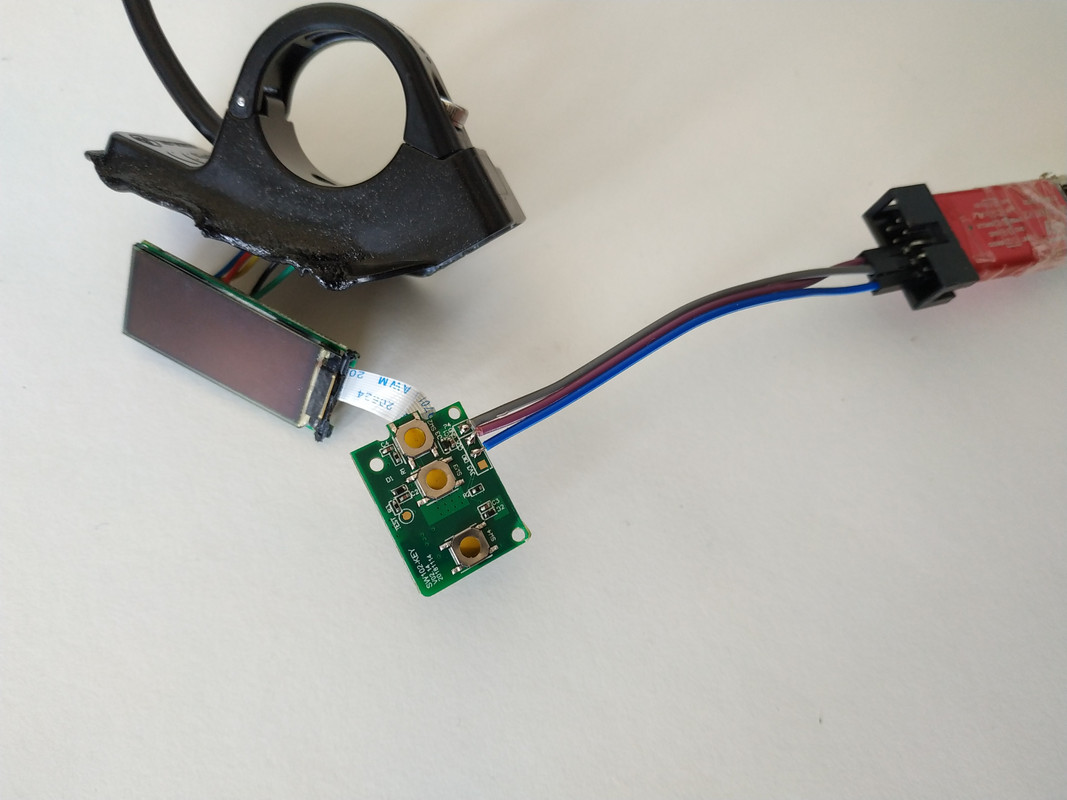
TSDZ2 mid drive with 860C, 850C or SW102 displays only -- Flexible OpenSource firmware (Casainho code only)

casainho said:
850C LCD

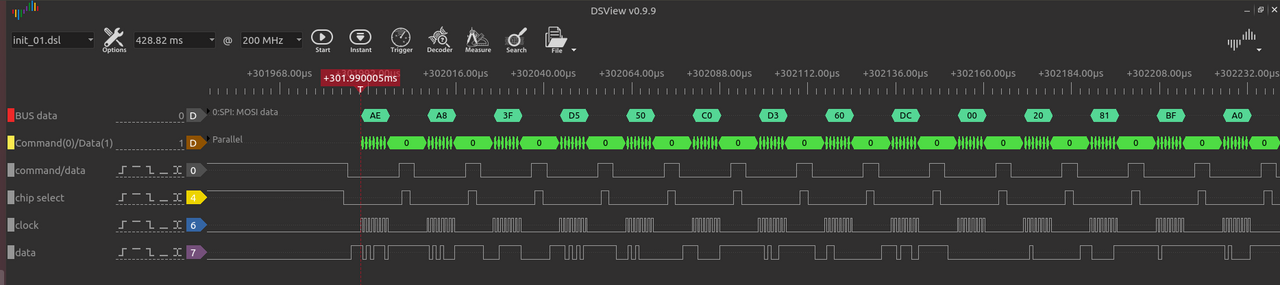
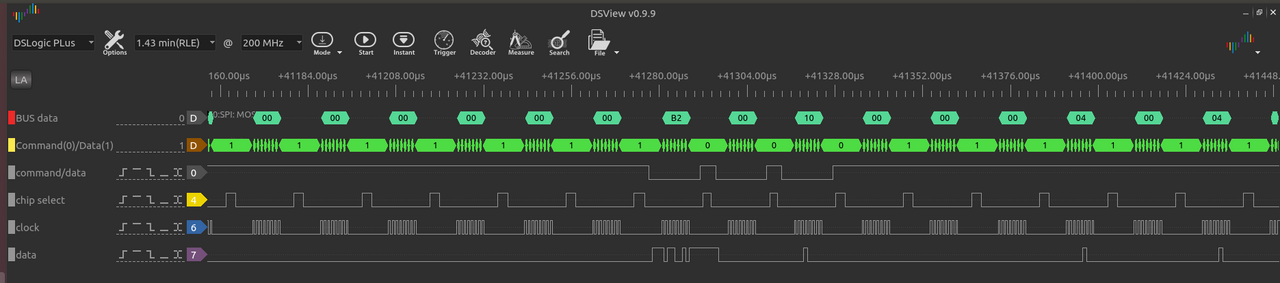
I am happy, although I did burn a 850C LCD and an USB port of my computer. I was blocked on this firmware because I was missing communication packages and the display data was hanging/blocking but now it is now more. I had to rewrite a lot of things to get it working. There is still more parts to optimize but the LCD do not blocks anymore which means it is usable at least for me.

Great news! A lot of people are looking forward to this display. You always persevere Casainho!
 
Rydon said:
Nick said:
Hey Gals,

I faced some hurdles programming the open source software to the motor. LCD was flawless following the instructions on the wiki. But flashing the motor shows several errors and only with every like 10th try I was able to read the option bytes. I use a ST-LINK clone and short wires.
The solution was to plug the brown (VDD) wire to the 3.3V power (not to the 5V). This is reproducible, plug into 5V - No-Go - plug into 3V3 - works like a charm!

I have seen similar intermittent behavior on the data tab as well. I will experiment with it. Have you tried disconnecting the voltage on the STLink and plugging the battery into the motor? I believe some of the developers do it that way for perhaps similar reasons.

I can now confirm that Nick's suggestion works. If you have intermittent or consistent communication problems or errors between the STLink V2 and the motor controller, use the 3.3v pin instead of the 5v pin on the STLink V2. This is not the case with the LCD3. The LCD3 works fine with 5 volts. The controller seems to be more sensitive to cable length issues and 3.3v just works. In fact, I would recommend changing to this on the wiki or at least pointing out to try this if experiencing intermittent or consistent communication problems.
 
Rydon said:
Rydon said:
Nick said:
Hey Gals,

I faced some hurdles programming the open source software to the motor. LCD was flawless following the instructions on the wiki. But flashing the motor shows several errors and only with every like 10th try I was able to read the option bytes. I use a ST-LINK clone and short wires.
The solution was to plug the brown (VDD) wire to the 3.3V power (not to the 5V). This is reproducible, plug into 5V - No-Go - plug into 3V3 - works like a charm!

I have seen similar intermittent behavior on the data tab as well. I will experiment with it. Have you tried disconnecting the voltage on the STLink and plugging the battery into the motor? I believe some of the developers do it that way for perhaps similar reasons.

I can now confirm that Nick's suggestion works. If you have intermittent or consistent communication problems or errors between the STLink V2 and the motor controller, use the 3.3v pin instead of the 5v pin on the STLink V2. This is not the case with the LCD3. The LCD3 works fine with 5 volts. The controller seems to be more sensitive to cable length issues and 3.3v just works. In fact, I would recommend changing to this on the wiki or at least pointing out to try this if experiencing intermittent or consistent communication problems.
Please do the changes on the wiki.
 
Lookup table will be the way to go.. As I said we would need to obtain the data with real life testing under load using a bike trainer... Does anyone have a good one??
I would prefer to start looking at technical notes about the subject, because maybe we can find a simple algorithm to do that.

I think we should increment Id current of FOC. Maybe we can setup that using the trignometric functions as we are using to keep Id current FOC = 0. Please look that the initial messages I shared when I started to look at this - search on google for "shane colton TSDZ2".
 
I did some research and I came up with this paper. It seems to be the solution for our problem, but I am no expert in electrical motors.
https://www.researchgate.net/public...to-Current_Ratio_of_Brushless_DC_Motor_Drives
The advance angle formula is at point (7).

I tested "Jbalat's high cadence mode" and I can confirm the motor reaches harder the max_duty_cycle limit, thus providing more power at higher speed. I never reached more than 90-100 cadence but the power is 15% higher at this speed. The motor does not get warmer.

SO a variation of these parameters dynamically is definitely the solution for a better and powerful motor behavior.
 
maximusdm said:
I did some research and I came up with this paper. It seems to be the solution for our problem, but I am no expert in electrical motors.
https://www.researchgate.net/public...to-Current_Ratio_of_Brushless_DC_Motor_Drives
The advance angle formula is at point (7).

I tested "Jbalat's high cadence mode" and I can confirm the motor reaches harder the max_duty_cycle limit, thus providing more power at higher speed. I never reached more than 90-100 cadence but the power is 15% higher at this speed. The motor does not get warmer.

SO a variation of these parameters dynamically is definitely the solution for a better and powerful motor behavior.
That formula you point is exactly the same I used to calc the FOC angle, but I didn't look at that paper and I got there with a different thinking so it is nice to validate what is done.

The thing is that is valid only for max efficiency but going over motor rated max speed means we will leave that zone of max efficiency and so that formula do no apply anymore. I hope there is a way to calculate FOC angle when going over max erps.

stancecoke said:
casainho said:
on TSDZ2 is even different the FOC implementation.

Ah, I remember, you calculate the advance angle from battery current and erps :)
And here are the comments I wrote on TSDZ2 firmware sources, including the part to calculate the total phase current, as did mention before:

Code:
  // FOC implementation by calculating the angle between phase current and rotor magnetic flux (BEMF)
  // 1. phase voltage is calculated
  // 2. I*w*L is calculated, where I is the phase current. L was a measured value for 48V motor.
  // 3. inverse sin is calculated of (I*w*L) / phase voltage, were we obtain the angle
  // 4. previous calculated angle is applied to phase voltage vector angle and so the
  // angle between phase current and rotor magnetic flux (BEMF) is kept at 0 (max torque per amp)

  // calc I phase current
  if (ui8_duty_cycle > 10)
  {
    ui16_temp = ((uint16_t) ui8_adc_battery_current_filtered_10b) * ADC_BATTERY_CURRENT_PER_ADC_STEP_X512;
    ui32_i_phase_current_x2 = ui16_temp / ui8_duty_cycle;
  }
  else
  {
    ui32_i_phase_current_x2 = 0;
  }
 
casainho said:
I would prefer to start looking at technical notes about the subject, because maybe we can find a simple algorithm to do that.
This paper shows a quite pragmatic way to implement field weakening with simple math, but you need to know the motor characteristic ("base speed line" and back EMF constant).

Base speeds as a function of battery voltage.PNG

And as we don't use inverse park/clark tranformation with Iq and Id as input in the recent implementation, we have to calculate the necessary additional angle from the ratio of Id/Iq.

My suggestion with the simple power law will decrease the efficiency of the system because it causes Id current, even if it is not wanted/needed. We could try it, but today I think, that's not a satisfying approach :cry:

regards
stancecoke
 
Well I’m trying to read through this but really not getting it at the moment
https://www.evs27.org/download.php?f=papers/EVS27-200013.pdf

Stancecoke just realised you were looking at the same document.. ;)
 
The implementation would be not that difficult.

You have to determine the "base line" of the Motor at different voltages with a suitable test stand by braking the motor from idle run to the defined maximum current. From this you get the linear equations for OmegaA1 and OmegaA2 depending on the voltage. (Figure 5)
With the recent speed and the according BEMF-Voltage you can calculate Id and Iq for the different operating areas in figure 5 (equations 14,15,16)
From Id and Iq you can calculate the additional advance angle for field weakening.

regards
stancecoke

Field Weakening.PNG
 
I learned a lesson the hard way today. Could not get newly flashed LCD3 displays to initialize. They just powered up with all crystals on. After trying everything I could think of over about 3 hours time I discovered that the display will not complete its initialization with a brake sensor circuit closed. Release the brake and the display will complete its initialization. I am just posting this to hopefully save somebody a little time and frustration. :)
 
Rydon said:
I learned a lesson the hard way today. Could not get newly flashed LCD3 displays to initialize. They just powered up with all crystals on. After trying everything I could think of over about 3 hours time I discovered that the display will not complete its initialization with a brake sensor circuit closed. Release the brake and the display will complete its initialization. I am just posting this to hopefully save somebody a little time and frustration. :)
Since LCD3 is now full, we can't improve much that.

The reason is that motor controller do not starts if you keep the brakes pressed at startup and that is a protection for development, in the case you flash a firmware that do something wrong and do not let you flash corrected version, like if the firmware short circuit the power mosfets at startup.
 
Rydon said:
I learned a lesson the hard way today. Could not get newly flashed LCD3 displays to initialize. They just powered up with all crystals on. After trying everything I could think of over about 3 hours time I discovered that the display will not complete its initialization with a brake sensor circuit closed. Release the brake and the display will complete its initialization. I am just posting this to hopefully save somebody a little time and frustration. :)
I experienced the same.. with the addition of tx-rx cables swapped two times (ref. Jbalat videos on wiring) :?

I reported the issue here, plus asking casainho to add a note on the wiki because it is a tricky stuff, difficult to imagine in advance
 
Hello,

I finally had time this weekend to work on setting up the build environment for the firmware. I was able to install SDCC and all the other tools required to build the project on my Linux machine. After installing all the dependencies, I was successfully able to compile the controller code using the Makefile_linux file in the controller folder. However, I ran into a "buffer overflow detected" error from SDCC when trying to build the display code. I have attached an image showing the same. Has anyone else run into this issue before? Any can you please help me fix it?

Once I have a fully functioning build environment, I intend to write a step-by-step page for the wiki that will help any newcomers to the project to set up their Linux build environment.

Thank you,
Sid
 
sidmodi said:
Hello,

I finally had time this weekend to work on setting up the build environment for the firmware. I was able to install SDCC and all the other tools required to build the project on my Linux machine. After installing all the dependencies, I was successfully able to compile the controller code using the Makefile_linux file in the controller folder. However, I ran into a "buffer overflow detected" error from SDCC when trying to build the display code. I have attached an image showing the same. Has anyone else run into this issue before? Any can you please help me fix it?

Once I have a fully functioning build environment, I intend to write a step-by-step page for the wiki that will help any newcomers to the project to set up their Linux build environment.
Please tell what is your SDCC version as on my pc I do not get that issue.
 
The ASSIST display (not the field but the actual word) blinks on and off on (both) my KT-LCD3 displays. Should I be bothered? Everything else is as it should be or appears so. Grateful for any advice.

Version is 18.2

When off-road is disabled (10.0 set to 0) the “fixed” display word ASSIST disappears altogether.

The throttle functions at assist level 0. The old firmware didn’t which had its uses.
 
It's the indication that the off-road mode is actually ON.
 
casainho said:
sidmodi said:
Hello,

I finally had time this weekend to work on setting up the build environment for the firmware. I was able to install SDCC and all the other tools required to build the project on my Linux machine. After installing all the dependencies, I was successfully able to compile the controller code using the Makefile_linux file in the controller folder. However, I ran into a "buffer overflow detected" error from SDCC when trying to build the display code. I have attached an image showing the same. Has anyone else run into this issue before? Any can you please help me fix it?

Once I have a fully functioning build environment, I intend to write a step-by-step page for the wiki that will help any newcomers to the project to set up their Linux build environment.
Please tell what is your SDCC version as on my pc I do not get that issue.

I am running Ubuntu 18.04 and this is what I see when I type 'sdcc -v':

Code:
SDCC : mcs51/z80/z180/r2k/r3ka/gbz80/tlcs90/ds390/pic16/pic14/TININative/ds400/hc08/s08/stm8 3.8.0 #10562 (Linux)

Thanks,
Sid
 
thineight said:
It's the indication that the off-road mode is actually ON.
Well, thanks again. If I ignore the configuration menu item 10 and simply press on/off and down buttons simultaneously, off-road is disabled and the ASSIST symbol stops blinking. The settings for 10.0 and 10.1 are both 1 and remain so.

Most of this is described in the description “Off-road Mode” in the configuration but not entirely.

I noticed that changing 10.0 from 1 to 0, caused the symbol to disappear so I ought to try the button pressing trick to see if that brings it back ... keep that for another day!
 
casainho said:
stancecoke said:
thineight said:
marcoq version had a sort of major update that includes also the VLCD5 compatibility and the backwards resistance sorted.
He released it only on the Italian forum by now, for the first tests.

He followed the suggestion to disable the PWM :D

Code:
#if ENABLE_BACKWARDS_RESISTANCE_OFF
    // stop pwm motor:
    if((configuration_variables.ui8_assist_level_factor_x10 == 0)||
    	(ui8_walk_assist_flag == 1)||
    	((ui16_wheel_speed_x10 == 0)&&
			(ui8_torque_sensor_raw == 0)&&
			(ui8_pas_cadence_rpm == 0)&&
			(ui16_motor_speed_erps == 0)))
  	{
  		if(!ui8_pwm_stopped)
  		{
  			// stop pwm...
  			pwm_stop();  			
				ui8_pwm_stopped = 1;
  			ui8_pwm_started = 0;
  		}
  	}

regards
stancecoke

Yes but not as you suggested to enable PWM, when erps = 0. For me seems dangerous but let's see...

stancecoke said:
zappan said:
I hope there is a solution for this as this is the only mid-drive motor that supports coaster brakes. This is crucial on hand-cycles for riders who do not have the use of their hands for braking. The Flexible Open Source Firmware is otherwise perfect for handcycles because the torque sensitivity can be adjusted according to the strength of the rider.

That's quite easy to implement in the ebike_app.c, just disable the PWM if erps = 0 and no power wanted:

Code:
if(erps == 0 && battery_target_current == 0)TIM1_CtrlPWMOutputs(DISABLE);

and enable PWM again, if power is wanted:

Code:
if(erps == 0 && battery_target_current != 0)TIM1_CtrlPWMOutputs(ENABLE);

regards
stancecoke

Hello, two users on the Italian forum did report their feedback on the code anti backwards resistance: no fried controllers so far and issue almost solved.
One user reported that sometimes the resistance starts very little and increments as long as the wheel keeps turning back.. a sort of spring.
Positive impression though.
Did anyone dig into this function yet?
Thanks
 
perryscope said:
buba said:
Okay, anyone want to test out the 0.19.0 beta 1? :wink:

Here is a link to the hex file for the KT-LCD3:
https://drive.google.com/open?id=1kgcgkNtmCiIDREVW_bBf5ekDKftLnotw

Here is a link to the wiki:
https://github.com/OpenSource-EBike-firmware/TSDZ2_wiki/wiki/Features-and-configurations-for-version-0.19.X-(BETA)

I am testing version-0.19.1-(BETA) but the wiki menu numbers don't seam to be right has this changed?

I have 11 menu's but the list of menu's in the wiki...

https://github.com/OpenSource-EBike...-and-configurations-for-version-0.19.X-(BETA)

..show just 10 menu levels Now?

Looking at the revisions it apears the motor options have moved from menu 10 to menu 8? and menu 10 has been removed/ replaced with advanced menu 11? Is there a later Beta that uses this menu layout thats documented in the Wiki?

Two questions for Buba, if he's still around:
to test your 0.19 beta which motor hex file do we need to download?
It was reported that the wiki seems incorrect for the menu numbering.. is it now fixed?
Many thanks
 
sidmodi said:
I am running Ubuntu 18.04 and this is what I see when I type 'sdcc -v':

Code:
SDCC : mcs51/z80/z180/r2k/r3ka/gbz80/tlcs90/ds390/pic16/pic14/TININative/ds400/hc08/s08/stm8 3.8.0 #10562 (Linux)
You can see that I am on master branch, with latest code and I can build correctly BUT my SDCC build version seems different from yours, even if is 3.8.0... please give a look:

Code:
cas@cas:~/OpenSource-EBike-firmware/TSDZ2-Smart-EBike/src/display/KT-LCD3$ git branch 
  15-rider_pedal_human_power_shown_on_LCD
  19-Implement_button_fast_multiple_clicks
  21-stall-protection
  33-Improving_wheel_speed_sensor_reading
  35-Improve_battery_SOC_bars
  39-Make_EEPROM_reset_and_writing_variables_robust
  46-Assist_level_and_start_power_boost_now_work_as_a_factor_of_rider_pedal_human_power
  46-assist_level_and_start_power_boost_now_work_as_a_factor_of_rider_pedal_human_power
  49-Implement_battery_current_ramp
  50-Stall_protection_kicks_in_on_startup-0.15.0
  7-Correct_calculated_value_of_Watts_hour
  74-Correct_pedal_human_power
  8-cadence-low-pass-filter
  EEPROM_fail_default_values_fix
  assist_level_as_factor_of_pedal_power
  development
* master
  origin/14-walk-assist-mode
  test_0.17_beta
cas@cas:~/OpenSource-EBike-firmware/TSDZ2-Smart-EBike/src/display/KT-LCD3$ git pull
Already up to date.
cas@cas:~/OpenSource-EBike-firmware/TSDZ2-Smart-EBike/src/display/KT-LCD3$ make -f Makefile_linux clean
Cleaning files...
Done.
cas@cas:~/OpenSource-EBike-firmware/TSDZ2-Smart-EBike/src/display/KT-LCD3$ make -f Makefile_linux
sdcc -c -I../../common/STM8S_StdPeriph_Lib/inc -I. -I../../ -mstm8 -Ddouble=float --std-c99 --nolospre --opt-code-size --out-fmt-elf --debug  -o../../common/STM8S_StdPeriph_Lib/src/stm8s_iwdg.c ../../common/STM8S_StdPeriph_Lib/src/stm8s_iwdg.c
sdcc -c -I../../common/STM8S_StdPeriph_Lib/inc -I. -I../../ -mstm8 -Ddouble=float --std-c99 --nolospre --opt-code-size --out-fmt-elf --debug  -o../../common/STM8S_StdPeriph_Lib/src/stm8s_clk.c ../../common/STM8S_StdPeriph_Lib/src/stm8s_clk.c
sdcc -c -I../../common/STM8S_StdPeriph_Lib/inc -I. -I../../ -mstm8 -Ddouble=float --std-c99 --nolospre --opt-code-size --out-fmt-elf --debug  -o../../common/STM8S_StdPeriph_Lib/src/stm8s_gpio.c ../../common/STM8S_StdPeriph_Lib/src/stm8s_gpio.c
sdcc -c -I../../common/STM8S_StdPeriph_Lib/inc -I. -I../../ -mstm8 -Ddouble=float --std-c99 --nolospre --opt-code-size --out-fmt-elf --debug  -o../../common/STM8S_StdPeriph_Lib/src/stm8s_adc1.c ../../common/STM8S_StdPeriph_Lib/src/stm8s_adc1.c
sdcc -c -I../../common/STM8S_StdPeriph_Lib/inc -I. -I../../ -mstm8 -Ddouble=float --std-c99 --nolospre --opt-code-size --out-fmt-elf --debug  -o../../common/STM8S_StdPeriph_Lib/src/stm8s_tim1.c ../../common/STM8S_StdPeriph_Lib/src/stm8s_tim1.c
sdcc -c -I../../common/STM8S_StdPeriph_Lib/inc -I. -I../../ -mstm8 -Ddouble=float --std-c99 --nolospre --opt-code-size --out-fmt-elf --debug  -o../../common/STM8S_StdPeriph_Lib/src/stm8s_tim3.c ../../common/STM8S_StdPeriph_Lib/src/stm8s_tim3.c
sdcc -c -I../../common/STM8S_StdPeriph_Lib/inc -I. -I../../ -mstm8 -Ddouble=float --std-c99 --nolospre --opt-code-size --out-fmt-elf --debug  -o../../common/STM8S_StdPeriph_Lib/src/stm8s_uart2.c ../../common/STM8S_StdPeriph_Lib/src/stm8s_uart2.c
sdcc -c -I../../common/STM8S_StdPeriph_Lib/inc -I. -I../../ -mstm8 -Ddouble=float --std-c99 --nolospre --opt-code-size --out-fmt-elf --debug  -o../../common/STM8S_StdPeriph_Lib/src/stm8s_flash.c ../../common/STM8S_StdPeriph_Lib/src/stm8s_flash.c
sdcc -c -I../../common/STM8S_StdPeriph_Lib/inc -I. -I../../ -mstm8 -Ddouble=float --std-c99 --nolospre --opt-code-size --out-fmt-elf --debug  -ogpio.c gpio.c
sdcc -c -I../../common/STM8S_StdPeriph_Lib/inc -I. -I../../ -mstm8 -Ddouble=float --std-c99 --nolospre --opt-code-size --out-fmt-elf --debug  -oht162.c ht162.c
sdcc -c -I../../common/STM8S_StdPeriph_Lib/inc -I. -I../../ -mstm8 -Ddouble=float --std-c99 --nolospre --opt-code-size --out-fmt-elf --debug  -oadc.c adc.c
sdcc -c -I../../common/STM8S_StdPeriph_Lib/inc -I. -I../../ -mstm8 -Ddouble=float --std-c99 --nolospre --opt-code-size --out-fmt-elf --debug  -otimers.c timers.c
sdcc -c -I../../common/STM8S_StdPeriph_Lib/inc -I. -I../../ -mstm8 -Ddouble=float --std-c99 --nolospre --opt-code-size --out-fmt-elf --debug  -olcd.c lcd.c
sdcc -c -I../../common/STM8S_StdPeriph_Lib/inc -I. -I../../ -mstm8 -Ddouble=float --std-c99 --nolospre --opt-code-size --out-fmt-elf --debug  -ouart.c uart.c
sdcc -c -I../../common/STM8S_StdPeriph_Lib/inc -I. -I../../ -mstm8 -Ddouble=float --std-c99 --nolospre --opt-code-size --out-fmt-elf --debug  -oeeprom.c eeprom.c
sdcc -c -I../../common/STM8S_StdPeriph_Lib/inc -I. -I../../ -mstm8 -Ddouble=float --std-c99 --nolospre --opt-code-size --out-fmt-elf --debug  -obuttons.c buttons.c
sdcc -c -I../../common/STM8S_StdPeriph_Lib/inc -I. -I../../ -mstm8 -Ddouble=float --std-c99 --nolospre --opt-code-size --out-fmt-elf --debug  -outils.c utils.c
sdcc -I../../common/STM8S_StdPeriph_Lib/inc -I. -I../../ -mstm8 -Ddouble=float --std-c99 --nolospre --opt-code-size --out-fmt-elf --debug  main.c ../../common/STM8S_StdPeriph_Lib/src/stm8s_iwdg.rel ../../common/STM8S_StdPeriph_Lib/src/stm8s_clk.rel ../../common/STM8S_StdPeriph_Lib/src/stm8s_gpio.rel ../../common/STM8S_StdPeriph_Lib/src/stm8s_adc1.rel ../../common/STM8S_StdPeriph_Lib/src/stm8s_tim1.rel ../../common/STM8S_StdPeriph_Lib/src/stm8s_tim3.rel ../../common/STM8S_StdPeriph_Lib/src/stm8s_uart2.rel ../../common/STM8S_StdPeriph_Lib/src/stm8s_flash.rel gpio.rel ht162.rel adc.rel timers.rel lcd.rel uart.rel eeprom.rel buttons.rel utils.rel
main.c:82: warning 126: unreachable code
stm8-size main.elf -A
main.elf  :
section             size         addr
DATA                 286            1
INITIALIZED          198          287
SSEG                   1   4294967295
HOME                  99        32768
GSINIT                26        32867
GSFINAL                3        32893
CONST                 12        32896
INITIALIZER          198        32908
CODE               32176        33106
.debug_line        31457            0
.debug_loc         40545            0
.debug_abbrev       2401            0
.debug_info        47598            0
.debug_pubnames     9784            0
.debug_frame       34022            0
Total             198806


stm8-objcopy -O binary -R DATA -R INITIALIZED -R SSEG -R .debug_line -R .debug_loc -R .debug_abbrev -R .debug_info -R .debug_pubnames -R .debug_frame main.elf main.bin
stm8-objcopy -O ihex -R DATA -R INITIALIZED -R SSEG -R .debug_line -R .debug_loc -R .debug_abbrev -R .debug_info -R .debug_pubnames -R .debug_frame main.elf main.hex
cas@cas:~/OpenSource-EBike-firmware/TSDZ2-Smart-EBike/src/display/KT-LCD3$ sdcc -v
SDCC : mcs51/z80/z180/r2k/r3ka/gbz80/tlcs90/ds390/pic16/pic14/TININative/ds400/hc08/s08/stm8 3.8.0 #10557 (Linux)
published under GNU General Public License (GPL)
cas@cas:~/OpenSource-EBike-firmware/TSDZ2-Smart-EBike/src/display/KT-LCD3$
 
thineight said:
Hello, two users on the Italian forum did report their feedback on the code anti backwards resistance: no fried controllers so far and issue almost solved.
One user reported that sometimes the resistance starts very little and increments as long as the wheel keeps turning back.. a sort of spring.
Positive impression though.
Did anyone dig into this function yet?
I want to look at it and I was thinking more about this and I really think it will work.

When turning back the wheel (pushing bicycle backwards), maybe we can look at motor rotation direction!!

It is like we have this sensors:
- pedal cadence sensor
- pedal torque sensor
- bicycle wheel speed sensor
- motor speed sensor erps direction (based on motor hall sensors)

We are not yet looking at the motor speed sensor erps direction, maybe it can help us.
 
Bafang 850C color LCD and Bafang SW102 LCD with Bluetooth

I burned my second and last Bafang 850C color LCD, I guess the issue is being powering them using a battery charger and try to debug/flash at the same time. I think it can be something about having 2 different grounds, one on PC and other on the battery charger.

I decided to give a try on the Bafang SW102 LCD with Bluetooth, following the same approach I did to make working the 850C LCD.

Men, my eyes are hurting!! The PCB traces are so small!! But victory, I was able to solder 4 tiny wires and record the LCD signals. Seems to be like SPI communication and I got always a repetition of data so I think we can now replicate the LCD initialization and drawing of pixels (this LCD has 64X128 pixels).

Wires I had to solder to connect to logic analyzer:
2019-03-26-10-51-37-1.jpg


Initialization data:


Drawing pixels data:


Next step is to create a project using Nordic samples for GCC compiler. Test flash and debug session and finally initialize and wrote something on the LCD.

My tecnhical notes about SW102 LCD: https://github.com/OpenSource-EBike-firmware/Color_LCD/wiki/SW102
 
I created a simple project based on a sample project of UART <-> Bluetooth communication, based on Nordic NRF SDK for the SW102 LCD microcontroller and flash and debug successfully. I am using just the same tools as I use for 850C color LCD: STLinkV2 clone + ARM GCC + OpenOCD + Eclipse.
The project code is here: https://github.com/OpenSource-EBike-firmware/SW102_LCD_Bluetooth

2019-03-27-12-14-07.jpg


Screenshot-from-2019-03-27-12-08-35.png
 
Back
Top