Townie 7D front shocks?

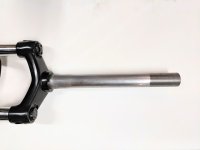
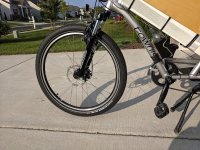
In this video a split crown ring is shown. Trying to find the correct one will be a challenge.
https://youtu.be/U9xF1Vt00bA
 
I've never seen a crown race that couldn't be removed from a fork; the only other alternative is to machine it on the fork. You may need to start taking it off using a razor blade to get initial clearance.
 
If you have any old chisel, or steak knife, pocket knife, etc., that you can sacrifice (in case it chips), you can use a wooden block, rubber mallet, etc., to tap it into the seam/gap between the crown race and the fork, moving it around in a circle tapping it in a bit further each time until the race pops off.


IF you really can't get it off, and you want a nice durable headset, you can get one by FSA that will work fine (I use The Pig, in threadless), just make sure you order the right diameter and type (threaded) for your fork.


(Re)installing the race onto the new fork is best done using either:
-- a tube that perfectly fits around the steerer, so that the tube *only* puts force on the extreme inner/upper lip of the race,
or
--a tube that only sits on teh outer (flat) lip of the race, so ti only puts force there
That way no force is placed on the bearing race surface itself, so it doesnt' get scratched or dinged, whcih will lead to bearing wear or chipping and failure.

I usually use a piece of PVC pipe and a rubber mallet...but there are tools made for the purpose, just expensive for a one-time job. If you have a local bike shop, you can bring the two forks to them and they can swap them out for you for cheap, most likely.
 
Moving the old crown race to the new fork is the best bet because you know for sure it will match the bearings, but that measured 1.5mm difference in diameters worries me. I once installed a crown race that was slightly undersized, and I had to use my home made press (7/8" threaded rod, nuts, washers, and pipe )to push it on. Needed a 2 foot breaker bar to turn the nuts. I think now that I should have tried to sand some metal off the inside of that race,

If you take it to a bike shop, I'm not sure they can match an off the shelf race just by placing the old bearing on it. Best to buy a complete headset. Not expensive, but you have to knock out the old cups and press in the new ones. Easy with a home made press.
 
My intention is to put a new raceway in the bottom of the new Suntour where is does flare out and is larger than the Townies.

The Townie's diameter as you mention is slightly different so it's not going to fit. The Suntour bottom tube flares out to 30mm so that will be a press fit or a split ring as shown in the video above. I like the idea of the pipe over the steering tube to press it into place. The ring will rest on the buttom support that measures 43.50mm

The Suntour's top is threaded and the original Townie's nut fits just fine, so no worries for that.

Thank you.
 

Attachments

  • fork suntour.jpg
    fork suntour.jpg
    70 KB · Views: 1,468
  • suntour fork demensions.jpeg
    suntour fork demensions.jpeg
    77.2 KB · Views: 1,468
If you’re not going to reuse the old crown race, then you might as well take the two forks to a shop to do the swap and determine the right one to use (at which point they’ll pop off the old one and put it on the new fork).

The job takes 10 minutes tops (I swapped out my forks weekend before last, and took 30 minutes including swapping out my handlebars and rerouting cables/wires).


Sent from my iPhone using Tapatalk
 
The dimensions of the fork seem incongruous since straight should be 1 and 1/8 inches (31.75 mm) or Tapered 1 and 1/2 inches (38.1 mm). Theoretically the race from the Electra fork should fit IMO. BTW, I've had crown races so tight that it was necessary to use a single-sided razor blade to start removing then although my lbs has a tool for it.
 
This is the Suntour I purchased.
 

Attachments

  • Screenshot_20190708-125619.png
    Screenshot_20190708-125619.png
    148.9 KB · Views: 1,450
stevecahill said:
My intention is to put a new raceway in the bottom of the new Suntour where is does flare out and is larger than the Townies.
Then you'll want a whole new headset, becuase I doubt the bearings you have could fit a larger race properly.

This requires removing the cups from the Townie frame and installing the new ones that come with the new headset (which also comes with all the bearings and races, and for threaded should include a new race-nut for the top threaded portion). I can recommend FSA as a brand that's worked well for me.

The article E-HP linked to sheldonbrown's site is a good reference I recommend reading in full.
 
amberwolf said:
Then you'll want a whole new headset, becuase I doubt the bearings you have could fit a larger race properly.

This requires removing the cups from the Townie frame and installing the new ones that come with the new headset (which also comes with all the bearings and races, and for threaded should include a new race-nut for the top threaded portion). I can recommend FSA as a brand that's worked well for me.

An option would be to just change the bottom half of the headset, and just match the finish (silver/black). I had to do that once when I sold off a fork and forgot to take off the crown race. I gave up looking for a replacement (maybe someone knows where to get one for a Blackspire Shore DH headset?), so I switched the bottom out with an old (vintage :lol: ) Chris King.
 
Very helpful information in the posts. Will update when I receive headset.

Thank you
Steve
 
UPDATE: The suspension fork is installed, as well as a Hayes MX5 comp mechanical disc brake. I have yet to dress the wires. I received the Hayes w/o the barrel adjustment screw, but set up the disc brake w/o it until I receive it.

My first impressions are that the suspension front fork even with a spring smooths out any bumps and stops any shock to travel to my wrists. I am happy with this. The front fork raised the 26" wheel about 2 inches. Not a big deal. I find the handling is just fine with this new height. I like the fact that now the handle bars are up so there is less strain on the wrists. I did however have to add a lift extension to the kick stand legs so that it would be more stable as it now has 3 points of contacts with the modification and the weight is now centered under the stand. This keeps it from falling over in a gust of wind as I have experienced in the past with both the front and rear wheels on the ground. Now the front is off the ground by 1-2".

The weight of the bike with the new additions is 85 lbs. I do have 18650's with a 10s 10p configuration. I get around 70 miles with pedal assist until range anxiety sets in. I usually charge up to 40 volts and the BMS is set to shutdown at 25 volts. So 60 miles is a good point of reference. I do not use the throttle.

In hindsight I should of installed a larger front rotor than the 160mm currently in place. 85 pounds of e-bike and the rider I am stopping 269 lbs. The disc on the front stops the bike but it is not holding fast. A non-ebike I have offers an instant stop with 160 mm rotors. Would be interested in hearing suggestions for a future upgrade of the disc brake.
 

Attachments

  • IMG_20190720_182226.jpg
    IMG_20190720_182226.jpg
    215.9 KB · Views: 1,356
  • IMG_20190720_182235.jpg
    IMG_20190720_182235.jpg
    182.9 KB · Views: 1,356
  • IMG_20190720_182258.jpg
    IMG_20190720_182258.jpg
    182.4 KB · Views: 1,356
  • IMG_20190720_182220.jpg
    IMG_20190720_182220.jpg
    184.7 KB · Views: 1,356
I'm using the Avid BB7 Mountain cable-operated disc, whatever pads came with it, 200mm rotor, and it'll easily skid the wheel on the SB Cruiser trike if I slam it on. ;) That's about 500lbs with me on it.

On a bicycle I expect I could probably do a stoppie or flip it and land on my head. :p


https://www.amazon.com/gp/product/B00553YPEY/ref=ppx_yo_dt_b_asin_title_o09_s00?ie=UTF8&psc=1
 
Glad to hear it's working well! I use the same style of kickstand. Did you end up getting a new headset for the bottom bearing race? Was the brake rotor cleaned with degreaser or brake cleaner when it was installed? From my experience with cars, once the brake pads bed onto the rotor, it will provide more stopping power.

stevecahill said:
The weight of the bike with the new additions is 85 lbs. I do have 18650's with a 10s 10p configuration. I get around 70 miles with pedal assist until range anxiety sets in. I usually charge up to 40 volts and the BMS is set to shutdown at 25 volts. So 60 miles is a good point of reference. I do not use the throttle.
That is some great range! Do you know what type of cells are used in your battery? You may already know all this, but definitely don't want to go any lower than the 25 volts that you already are. With the specs of most cells, you should be able to charge your pack up to a max of 42 volts, and that will significantly increase your range when you need it. The everyday charge of 40 volts though will help you get as many cycles as you can long term from the pack.
 
thundercamel said:
Was the brake rotor cleaned with degreaser or brake cleaner when it was installed? From my experience with cars, once the brake pads bed onto the rotor, it will provide more stopping power.

Good points. It took about 100 miles before my brakes had full stopping power when I installed my brakes and new rotors. I had them adjusted for minimal clearance in the beginning but ended up adjusting them out a click at a time over a few days as they bedded. Now a light pressure with two fingers is all I need even in an emergency stop, which is pretty good for mechanical calipers.
 
I did replace the headset just the bottom as the top fit just fine with this AheadSet Ec External Cup Threaded, Black
by 365 Cycles. @ https://www.amazon.com/dp/B003HGJPVY/ref=cm_sw_em_r_mt_dp_U_16ZnDb0YEDP13.

I did not seat it all the way down as I was nervous about damaging it. I left about 1/8" of visible space. Thought if it settles in further than I can make that adjustment. So far it has not moved. I used a plastic pipe over the tube and on the raceway to get it in place while being conservative about how forceful I proceeded hitting it with a rubber mallet.
race.jpeg

It seems to work just fine. This winter I will inspect it all.

I used isopropyl alcohol to clean the rotor 2x with rubber gloves, did not even think to use the Brakeleen I had after doing a auto brake job. I will reclean the rotor again with Brakeleen. Is this something you do every so often?

The batteries I used were Samsung 29E 18650 2.75A I purchased theses at LiionWholesale.com They were recommended by another member on Endless Sphere who uses them building packs in the Netherlands. For a 100 they were $3.05 each. So far they have held up very nice. I stand corrected my BMS is set to only allow batteries to go to 2.9 volts. I have yet to let it get to that point. To date I only charge about 1x a week. Have yet go to 42 volts, but will try next charging session.
https://www.akkuparts24.de/mediafiles//Datenblaetter/Samsung/Samsung%20INR18650-29E.pdf

Thanks for your valuable insights.
 
stevecahill said:
I used isopropyl alcohol to clean the rotor 2x with rubber gloves, did not even think to use the Brakeleen I had after doing a auto brake job. I will reclean the rotor again with Brakeleen. Is this something you do every so often?
Thanks for the response! I only clean the braking surface rotors/drums once when I first install them, to get the oil off from rust prevention during shipping. The alcohol should have done the job just fine.

Edit: Also for the charging capacity and cycles, here's an estimate from this website:

"Table 4: Discharge cycles and capacity as a function of charge voltage limit. Every 0.10V drop below 4.20V/cell doubles the cycle but holds less capacity. Raising the voltage above 4.20V/cell would shorten the life. The readings reflect regular Li-ion charging to 4.20V/cell."

Code:
(V/cell) Cycles     Energy

[4.30]  [150–250]  [110–115%]
4.25     200–350    105–110%
4.20     300–500    100%
4.15     400–700     90–95%
4.10     600–1,000   85–90%
4.05     850–1,500   80–85%
4.00   1,200–2,000   70–75%
3.90   2,400–4,000   60–65%
3.80    See note     35–40%
3.70    See note     30% and less
 
I'd look for the Suntour XCR if the price isnt that much different then the XCM, but I wouldnt bother with the XCT.
Air is good because you can air up or air down, but one little leak and its s.o.l. so thats why the coil suspension forks may be a choice too. Buy a fork with an availability of coils to put in the fork. If you go air, buy a spare rebuilt kit for it in case you get a leak.

I've looked for various good quality used forks, but non are long enough for the Townie, whether its your 7D or 21D. I've ridden both, what I did not like about the 7D was when I rode it, the chain would pop off frequently at the crank. The 21D I bought used, but it was like new. Its good to have 3 crank gears for a hub motor setup.

https://forums.mtbr.com/shocks-suspension/confused-about-low-end-suntour-suspension-forks-640272.html
he hierarchy from low to high would be XCT, XCM, XCR. V2, V3 has to do with the 'version'. higher number is newer generation.

Forks specified by different bicycle brands can be configured in a number of different ways, so its hard for me to understand exactly what you are looking at, that being said;

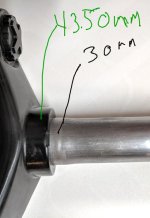
Our XCM and XCR models come with 30mm stanchions. ( the upper tubes) if you compare this to other forks in the price range, many of our competitors will often use 28mm stanchions. Larger diameter = improved stiffness and strength. Also, the pitch, or width of these two forks is 130mm. You will find that to be a bit wider than many of our competitors. Generally speaking, wider is better.

Second, our XCM and XCR models are what we call QSP, or quick service products. That means if your fork's internals ever wear out our suffer a problem, the fork can be fixed easily by replacing the entire cartridge.

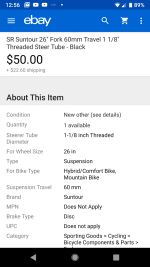
Finally, if you are shopping for a bike that is less than $1,000 I'm sure you have seen that many of those bikes are equipped with SR Suntour forks. The primary reasons for this are based on the fact that the bicycle brands have come to trust SR Suntour to supply them with a reliable product that performs well. (that may seem simple, but its a big deal) Additionally, we operate service centers in North America, Asia and Europe to back up our product.

I hope this helps and good luck in purchasing a new bike. Ride it alot!
 
When I purchased the Townie back in 2011, the chain did keep coming off. Shortened the chain and that took care of that issue.
 
Back
Top