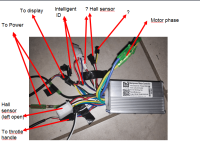
XLD Brainpower motor controller XunLiDa

Somone asked if you need install hall sensors.

Its dependent on the controller.
If the controller is a sensor controller you need to install hall cables, otherwise it won't work.

If the controller is dual mode ( it can run with hall sensors or without hall)

It should tell you what kind of controller (sensor or dual) when you buy)
Or you can ask if they don't say.
 
Hi, just want to double check regarding the "high brake". Does the one wire go to positive 12v? If so do I need a 12v step down converter?
 
First:- The second 2 pin connector on the S866 LED reader is power for the lights. To toggle lights on/off press and hold the "+" button. Warning the output is 18v with a 24v system so you need suitable bulbs or a high voltage to 5v converter to drive LED bulbs, don't know how much current it can supply as I haven't tried. Brown wire positive.

Second:- I managed to get an English version of the operating instructions for the S866 which gives all the menu options. I also got an English version of the external wiring for the Brushless DC motor controller. Hopefully I have attached both.

My problem is that as soon as I turn on, the wheel/motor turns even without turning the pedals, and shorting the brake wires doesn't stop it. However the speed changes as I press the "+" increase or "-" decrease buttons. If I apply the brake the drawn current out of the PSU goes up, but if I actually stop the wheel the controller shuts down and I have to turn off/on to reset it.

Does anyone know what the hall effect wires actually do within the controller, i.e. what is the controller expecting to see? The controller has a 6 pin connector for the hall effect, +5v, ground, and 4 wires marked sensor A,B,C,(D), (mine also has a white wire on pin 2). My bike hall effect transmitter only has 3 wires, +5v, ground and a blue wire. Looking with a scope the blue wire has a steady +4v which gets broken into a square wave as the pedals are turned, the mark/space ratio changing as the pedals are turned faster. I have tried connecting this to each of the controller I/P's in turn without any effect. The wheel/motor shouldn't turn until the pedals are turned.

If anyone has got any suggestions I would be very grateful.


LCD-S866Hand Control Panel Operation Instruction
2018Latest Edition-V1.0


ONE. The apparent size and material
The shell of the product is ABS, and the liquid crystal transparent window is imported acrylic with high hardness, whose hardness is equivalent to the tempered glass.


elevation view side view
TWO. Working voltage and connection mode
(1) working voltage: DC24V, 36V, 48V, 60V compatibility (instrument selection setting), Other voltages can be customized.
(2) connection mode:
Line sequence of the label connector
Connected to the controller Meter outlet end To the terminal


Note:The lead wire of some products uses the waterproof connector, and the user cannot see the lead color in the wire harness
三、Function description:
1.display function
Speed display, power indicator, fault indication, total mileage, single mileage
2.Control, setting up functions
Power switch control, wheel diameter setting, idle automatic hibernation time setting, backlight brightness setting,
Start mode setting, drive mode setting, voltage level setting, controller limit value setting,
3.Communication protocol:UART
All contents of the display screen (full display in boot 1S)

Show content introduction
3.1 Battery power and BMS residual power display
3.2Multifunctionaldisplayarea
Total mileage ODO, single mileage TRIP(unit: mile, km), single boot time TIME, battery voltage VOL, DST: endurance
3.3 Speed display area
AVG:average speed,MAX:max speed,SPEED:current speed;单位Mp/h, km/h
The speed signal is taken from the Hall signal in the motor and sent to the instrument by the controller.(The time of a single Hall period, unit: 1MS) The instrument will calculate the true speed based on the diameter of the wheel and the signal data(the number of magnetic steel needed by the motor Hall)
3.4 Vehicle power gear adjustment ,0-9 digital display and file bar display;
3.5Vehicle status display area
:Motor failure; :failure; :brake tip; :Headlight on prompt;
4.Setting
P01: Backlight brightness, level 1 darkest, level 3 brightest;
P02: mileage unit, 0: KM; 1: MILE;
P03: Voltage level: 24V, 36V, 48V, 60V, 64V default 36V;
P04: Dormancy time: 0, not dormancy; Other numbers are dormancy times, range: 1-60; Unit minutes;
P05: Help file bit: 0, 3 file mode:
1,5 gear mode:
P06: Wheel diameter: unit, inch; Precision: 0.1;
This parameter is related to the meter display speed and needs to be entered correctly;
P07: Speed gauge magnetic steel number: range: 1-100;
This parameter is related to the meter display speed and needs to be entered correctly;
If it is an ordinary hub motor, direct input of magnetic steel;
If it is a high-speed motor, it is also necessary to calculate the deceleration ratio, and the input data = the number of magnetic steel × deceleration ratio;
For example: number of motor magnets 20, deceleration ratio 4.3: input data is: 86 = 20 × 4.3
P08: Speed limit: range 0-100km / H, 100 means no speed limit,
The input data here represents the maximum operating speed of the vehicle: for example, input 25, indicating that the maximum operating speed of the vehicle will not exceed 25km/h; Drive speed maintained at set value,
Error: ± 1km/h; (Speed limit for power and steering)
Note: The value here is based on kilometers. When the unit setting is converted from kilometers to miles, the speed value of the display interface automatically converts to the correct mile value, but the speed limit value set at this menu under the mile interface is not converted. Is inconsistent with the actual speed limit of the mile speed;
Note: P09-P15 menu is only valid in communication state
P09: zero start, non-zero start setting, 0: zero start; 1: Non-zero start;
P10: The drive mode is set to 0: Power Drive(how much power is output is determined by the power file bit, and the switch is invalid).
1: Electric drive(by turning the handle drive, when the power file bit is invalid).
2: Power Drive and Electric Drive Coexistence
P11: Help sensitivity setting range: 1-24;
P12: Help start intensity setting range: 0-5;
P13: Power Magnetic Steel Disk Type Setting 5, 8, 12 Magnetic Steel Types
P14: Controller limit value set default 12A range: 1-20A
P15: Controller undervoltage
P16: ODO zero setting length press key 5 seconds ODO zero
P17 :0: No enabling cruising, 1: enabling cruising; Automatic cruise optional(valid for protocol 2 only)
P18: Display speed ratio adjustment range: 50 % ~ 150 %,
P19: 0 power bit, 0: 0, 1: does not include 0
P20 :0:2 Protocol 1:5 S Protocol 2: Standby 3: Standby

四、Key Introduction:

1、Under shutdown, long press key is boot;after boot, Boot key,Interface switching between ODO, TRIP, VOL, TIME.
2、Boot state,long press key is turn off,short press key,Help file+1,short press key,help file-1;
3、long press key+ key enter Mode Settings
Parameter value modification: under a parameter state,short press key Switch Parameters,short press key Increase in value,short press key reduces the value, and when it's modified,short press key Switch to the next parameter and save the previous parameter value;Parameters modified long Press again. key+ key Exit the settings interface. If not, wait 8 seconds to automatically exit and save the parameters.
Note: Due to the upgrade of the company's products, it is possible that the contents of the product section you get will be different from the specifications, but it will not affect your normal use.

Sorry haven't been able to attach the wiring diagram, it's a jpeg picture, how do I attach it??
 
Further to my post yesterday, I forgot to say a big thankyou to Philf, I now understand a lot more about how it works.
Hopefully I now know how to add pictures so lets have another go at adding the external wiring diagram in English.

No still won't play ball, I have tried all 3 ways suggested, even reducing the file size to 512kbs. Still I hope people have found the Menu programming info helpful, and if anyone can help me with the hall effect info that would be great.
 
Hello,
All fine :wink:
You have an Sensorless Motor, only Speedsignal available.
HallConnector: Connect red to red, black to black and blue to white for Speedsignal..
If you Power on, the wheel starts turning..., if the Direction is ok, unplug the learn wires and then Power down.
If not, unplug the learn wire (during spin) wait for stop and reconnect will start spinning and change Direction..

mfg Martin
 
Dear all

I need some help to repair my ebike.

Pb : my last controler died after a rainy day :(
So i decided to replace it with a brainpower controler kslzv83 and a s866 display + handgrip (instead of PAS).

My ebike is equiped with a brushless, sensorless motor - 250W / 36V
I 've plugged all the cable as described on the attached picture.

Motor line : ok
battery line : ok
display : ok
handgrip : ok/nok ? i have only one solution to plug it
When i switch on the controller :
- the display works
- i have a message error 7

When i try to use the handgrip : nothing happens :(

May i shunt some PAS connector ?
it would be great if you can help me ! :)

Thanks a lot in advance

Nico
 

Attachments

  • brainpower.png
    brainpower.png
    113.5 KB · Views: 20,650
Hello,
Error 7 means Motor Failure.
You have connect the Motor Phases and plug the Intelligent ID cables for recognize at first run..
Throttle to the Red Black White Connector
Red Black Blue is for PAS

mfg Martin
 
Hello

Thanks for the reply and help.

-> I 've connected :
  • the phase motor,
    the ID cable
    the throttle (i connect the 2 male / male connectors - red-white-black)
The other connectors are left open (brake, motor hall sensor, PAS, ...)

-> now when i swich on the lcd :
  • the wheel start turning
    i have an error 8 msg.
    the throtlle handle is not functionnal (nothing happens when actionned)

is there something to configure on the lcd ? must the PAS be connected ?

Thank's ;)
kind regards.

Nicolas
 
Hello,
At first, check your Motor Phases for short or open. Also your Motor connector and Cable.
Error 7 means Turn fault .Check and Fix it before Power up again.
If your Motor runs in correct direction, unplug the Intelligent ID Wires (during run) and switch off.
No PAS requiered , was factory set for Throttle Operation.

mfg Martin
 
Hello

Sorry to reply so late. Unfortunately i can't open the motor to check the cabling.
Anyway the motor seems to turn in the proper way but as soon as i power the lcd
  • the wheel turn and the Throttle is not functionnal
    msg error 8 appears

I apply your procedure (ID unplugged , etc ...)

Nicolas
 
Hello,
You can check the Motor without opening.
Measure the Resistance between eyery Motorphase to each other Phase .
Connect a Multimeter on the Motorplug and check with lowest Resistance Range.
Move the Cable slightly to discard a broken Wire.
Also check the Motorphases again GND( Motorcase) for shortening.

mfg Martin
 
Hello

I would like to thank you for your help.
I am in vacation until the beginning of august.
I will try to repair the motor again ;)

have a great summer.
Thanks

Nicolas
 
Hello,
Thanks and enjoy your holidays..
Some good news..
I use my XLD KSLU37 without issues.
Like the size of the Display and the Price of the Set.
So i replace on my other Bike the Lishui Set with an XLD 856C-6
Some different to the KSLU37, no Power Poti for Throttle but switched Battery Power Out ( Yellow/Black) and a Connector
for E-Brake (red/grey/black)..useless for a Geared Drive(MXUS XF15R).
You know what happens ? Error 8 and after run I ID Error 7 :oops:
But running fine on Throttle, exept Display will not show Watt and Amp, always 0.
Unplug the Hall Connector changes nothing .
Have a Ticket out to my Supplier.

Back from my Garage with some Experience.
At first, sorry for Confuse, im according to the Codelist supplied with the KSLU37.
Bike # 2 runs very well :D
Error 7 was set during running ID and will be deleted by first ODO count..all fine.
Error 8 can be forced with a wrong connected or sticky open throttle

mfg Martin
 
Hi,
My controller works perfectly but I can’t get rid of Error 07 with this display.
I’m running my motor in sensorless mode.
I have connected: 2 battery wires, 3 phase wires, throttle and PAS.
I have used auto-learn to teach controller.
Now both PAS and throttle work as expected, the motor spins fine, but Error07 remains (even after 7km of biking).
Any suggestions?
 
Update: error07 goes away if I connect the hall sensor, however it reappears if Hall sensor is disconnected.
So the controller can work in sensorless mode, but it will display error07 continously.
 
Guys,

I also own a XLD controller, with same specs and PCB.

From my research, the S86 LCD is common with other LCD, such as 124DX or equivalent.

Parameters settings looks a bit unknown, and I found some useful documentation:
https://www.pedelecforum.de/forum/index.php?attachments/s866-lcd-pdf.247290/

Copy paste from the doc:
P01: backlight brightness, level 1 is the darkest, level 3 is the brightest;
P02: mileage unit, 0: KM; 1: MILE;
P03: Voltage level: 24V, 36V, 48V, 60V, 64V Default 36V;
P04: Sleep time: 0, no sleep; other numbers are sleep time, range: 1-60; unit
minutes;
P05: Power assist position: 0, 3 file mode:
1, 5 file mode:
P06: Wheel diameter: unit, inch; accuracy: 0.1;
This parameter is related to the display speed of the meter and needs to be
entered correctly.
P07: Number of speed magnets: Range: 1-100;
This parameter is related to the display speed of the meter and needs to be entered correctly.
If it is a normal hub motor, directly input the number of magnetic steel;
If it is a high speed motor, it is also necessary to calculate the reduction ratio,
input data = number of magnets × reduction ratio;
For example: motor magnet steel number 20, reduction ratio 4.3: input data:
86=20×4.3
P08: Speed ​ ​ limit: the range is 0-100km/h, 100 means unlimited speed. The input data here indicates the maximum running speed of the vehicle: for
example, input 25, indicating that the maximum running speed of the vehicle does not exceed 25km/h; the driving speed is maintained at the set value.
Error: ±1km/h; (both assist and speed limit)
Note: The value here is based on kilometers. When the unit setting is converted
from kilometer to mile, the speed value of the display interface will be automatically converted to the correct mileage value, but the speed limit value data set at this menu under the mile interface. No conversion, inconsistent with the actual display mile speed limit value;
Note: The P09-P15 menu is only valid in the communication state.
P09: zero start, non-zero start setting, 0: zero start; 1: non-zero start;
P10: Drive mode setting
0 : Power drive (the booster position determines how much power is output, and the switch is invalid).
1 : Electric drive (driven by the rotary handle, the power assist position is invalid at this time).
2 : Power assist drive and electric drive coexist simultaneously
P11: Boost sensitivity setting Range: 1-24;
P12: Boost start strength setting Range: 0-5;
P13: Power magnetic steel disc type setting 5,8,12 magnetic steel three types
P14: Controller current limit value setting Default 12A Range: 1-20A
P15: Controller undervoltage value
P16: ODO clear setting Long press the up button for 5 seconds ODO clear
P17:0: cruise is not enabled, 1: cruise is enabled; auto cruise is optional (only valid for protocol 2)
P18: Display speed ratio adjustment range: 50%~150%,
P19: 0 gear enable bit, 0: 0 gear, 1: 0 gear
P20:0: Protocol No. 2 1: 5S Protocol 2: Alternate 3: Alternate

The interesting things is notably the P14, that can make a chap 250W controller (12A) able to run 350W motor (15A). I will test it and let you know :D

By now, I'm seeking info on how to trigger light using the onboard light button. Not found yet.
 
Hello,
Long press + Button for Light 0n/Off,
Long press - Button for 6 km/h Walk On/Off

mfg Martin
 
Help me PLEASE, before i go crazy...Whoever helps me get set up i will gladly send the a nice check for their time......I have included pics of my throttle and speed controller...I need to know which wires go where...Thank you very much.....1563703067177949683955.jpg,,,,,.15637030902581671498298.jp
 
dduett said:
Help me PLEASE, before i go crazy...Whoever helps me get set up i will gladly send the a nice check for their time......I have included pics of my throttle and speed controller...I need to know which wires go where...Thank you very much.....1563703067177949683955.jpg,,,,,.15637030902581671498298.jp
There's no attached pics, just the names you've typed in.

To attach them you have to go to the Attachments tab below the box you type in, and click Add Files.

If you don't have a connector marked for throttle, then you may "guess" that one with three wires Red Black Green or Red Black White is for throttle. Red is usually +5v, Black is usually Ground, then signal is Green or White.

The same is usually true of the throttle itself.

If the throttle has more than three wires, you'd have to list the functions it has.

If it has a switch, that part may have two wires separate from everything else (so it can be used for switching whatever you want), or it may have a single wire that goes to the 5v on the controller (so it switches the throttle on or off, and the throttle woudln't have a separate 5v line). But the colors used on switches vary a lot, so you may have to use a multimeter on Ohms to test for which kind of wiring it has if you don't know.

If it has a voltmeter or battery meter, that usually has a purple wire, but could be any color. That goes to the battery positive of the controller--but I recommend not using it because if water gets in there, or any cable damage occurs, the battery voltage can short ot other things and blow up the throttle *and* the controller.
 
Sorry, but closeups of wires won't help, it's just colored spaghetti.

You'll need pics of the connectors, such that all the wires can clearly be seen, if you don't even know which connector.

You'll also have to explain exactly what you have for a throttle, because I don't see one in any of your pics, just what might be a blank LED display.

At this point I can only point you back to my first reply, and to the rest of this thread.
 
I am sorry I am so dumb about this situation...I do not even know which wires to connect...Which wires from the throttle connect to the speed controller,,,,as in which color and do I need to hook up some that are tied together...Screenshot_20190723-052419.pngScreenshot_20190723-051024~2.png
 
Based on the controller connector labelling pic, and the throttle connector labelling, then it is basically like i said before:

The throttle itself has a red power wire, a black ground wire, and a green signal wire. (and some other wires you can ignore unless you use those functions).

The controller has a red power wire, a black ground wire, and a white signal wire.

The same color wires are connected to each other. The white and green are connected to each other.

The controller connector is labelled "handle accelerator".

The throttle wire labelled "positive wire" would go to a battery positive, if you want the switch to be able to turn the controler on and off, and the voltmeter to work.

The throttle wire labelled "electric switch wire" would go to the controller's thin red wire or orange wire, that is labelled "electric lock".


Keep in mind that if that picture of the controller connector labelling is not of your actual controller, then your connectors and wire colors could be completely different (but are probably the same).
 
Thank you very much..I am almost positive I have it hooked up correctly....one more question,, ,, I have a I have a red, green and a yellow...which one off them connects to the motor itself...which one is positive and which one is negative,,and can two of them be tied in together.... :Thank you again for you kos
 
Back
Top