TSDZ2 mid drive with 860C, 850C or SW102 displays only -- Flexible OpenSource firmware (Casainho code only)

To me yes, the only button to be disabled is the DOWN. I think that the finger will slip just on that one only.
I will wait the A9 to try it out, possibly before the end of the week..? I have a trip in my mind that might require a good walk assist a lot 😋
 
maximusdm said:
Did some more tests. I just installed the motor on a new MTB 29".
I am testing A7 with the default assistance levels.
I tested power mode because I wanted to see improvements form 0.19 first, at the moment only on flat city road.

Great! :D Please try and configure to settings you feel fit your riding style!


maximusdm said:
1. Acceleration. Previously I used 8A/s and was very pleased. Now I am using 80 and seems to me a smaller acceleration.
@Buba can you please detail what is the corresponding between old mode and new one?

The acceleration is set mainly to not cause motor jitter at startup and reduce excessive strain that did not do much other than damage. This was the reason we could have premature failure of the blue gear and also accelerated wear. This is true for the metal gear as well.

The acceleration is much faster than before in all situations! Where it might feel "slower" (actually smoother) is during startups. If you press hard on the pedals you can easily get up to high power levels but there will not be a sudden power delivery so as not to strain the system.

But will of course look and see if there is anything I can improve for the Alpha 9, Maximusdm!


maximusdm said:
2. Startup boost does not work for me. Tested with 40-60-80 sensitivity. On flat this is nice to have, but on steep hill it is a must if you stoped and want to start with a 25kg bike. I think the problem here is that on old boost mode you could set a separate assistance level, but still I cannot feel no difference between 0 and 80.

There is no Startup Boost. Are you referring to startup without pedal rotation? That is a parameter to enable assistance without pedal rotation. Higher values gives assistance with lower torque applied. If you were to set it to 100 % it would assist as soon it feels torque on the pedals.

Startup Boost is included in Power Assist, sort of. Power Assist has now a wider operating range and improved control theory. So it should assist more if you want it to.

If you are using more torque and low cadence you could try Torque Assist. Otherwise, configure the Power Assist after your personal preference and I think you will find something that fits you perfectly!


maximusdm said:
3. Power delivery. On motor mode 0 (48 std) it is impossible to get 600W+ on flat with assistence 9 whatever you do. With mode 2 (48 HC) it is better, with my custom HC mode it is a BEAST! On 5 assist i get constant 800w+ at 45km/h, on huge MTB tires. With road tires i assume i can hit 50km/h with small effort. Obvious it is burning the battery but what is important is if you need speed, it can provide. :bigthumb:

I think you really need to configure the settings. They are highly individual and depend completely on the torque sensor and user. If you do that I can guarantee that you will be able to reach any power level you wish! :)


maximusdm said:
One good thing in 18.2 and 19 was that it was possible to make the motor behave violent :D. Starting with boost of 800W is :D. Now even with 9 assist it is starting with 150w
Overall impression is a more powerful motor, but it delivers the power on a linear way with smaller angle and acceleration is slower. Can this be configured or it is possible only with software changes?

Again, try changing from the default values and you will see that there will be more power :bolt: :wink: It will be smoother than before but within limits of the TSDZ2.


maximusdm said:
Thank you!

Thank you for a detailed post and feedback!
 
thineight said:
To me yes, the only button to be disabled is the DOWN. I think that the finger will slip just on that one only.
I will wait the A9 to try it out, possibly before the end of the week..? I have a trip in my mind that might require a good walk assist a lot 😋

Thank you for a very quick reply!

Will fix!

How about I finish the A9 today? :wink:
 
Good afternoon, I personally think that one of the major showstopper for the new displays is that currently they need to be opened in a tricky way (sw102) or a special programmer must be purchased (850c).
The work to access the bootloader, beside the connector wiring that needs to be done anyway, is actually way more difficult than the LCD3, that just requires few skrews.

The questions are:
+ Do you think that in future We will be able to purchase displays that are already prepared for the Open source firmware? Maybe an agreement with the manufacturer is required.

+ Otherwise, can an experienced user (that currently has the programmer for the bootloader) collect from the community the "orders" of the displays, make the modifications, and ship them to the people? Of course a fee for the rework must be paid by the final user.

I currently have the LCD3 and I think it has more than sufficient features for my use, therefore I hope it will last long in terms of updates. In the meantime I keep myself informed about the new displays eheheh :lol:
 
thineight said:
Good afternoon, I personally think that one of the major showstopper for the new displays is that currently they need to be opened in a tricky way (sw102) or a special programmer must be purchased (850c).
The work to access the bootloader, beside the connector wiring that needs to be done anyway, is actually way more difficult than the LCD3, that just requires few skrews.

The questions are:
+ Do you think that in future We will be able to purchase displays that are already prepared for the Open source firmware? Maybe an agreement with the manufacturer is required.

+ Otherwise, can an experienced user (that currently has the programmer for the bootloader) collect from the community the "orders" of the displays, make the modifications, and ship them to the people? Of course a fee for the rework must be paid by the final user.

I currently have the LCD3 and I think it has more than sufficient features for my use, therefore I hope it will last long in terms of updates. In the meantime I keep myself informed about the new displays eheheh :lol:
850C can be programmed just like KT-LCD3, that is the other option to flash it.

Currently you can buy 850C and/or TSDZ2 already flashed with our firmware.

You just need to follow the wiki to have the information about this 2 points.

850C has some improvements over KT-LCD3, like the clock and the USB charger.
 
Ok. I am almost sure I do not fully comprehend how the new configuration works. This is why I have issues.

I have additional questions :)
1. Acceleration - I will surely make this 100%. Is it possible to put more, for example 150 if I want higher acceleration?
2. Assist without pedal rotation - I do not understand what this means, sry. If I set 0, I still have startup assistance but it is very modest. I am expecting to have power at least a few hundred when I start pressing the pedals, controlled by the acceleration logic, not power spike. You can think of it as a torque assist only with a high assist factor.
My recommendation is to set assistance level to 1 and assist without pedal rotation to 100. Please try it and let me know if you feel a real startup help.
Also can I set this to 150? :)

Thanks for your support,
Max.
 
maximusdm said:
Ok. I am almost sure I do not fully comprehend how the new configuration works. This is why I have issues.

That is totally fine, we will try to help as much as possible! :)


maximusdm said:
I have additional questions :)
1. Acceleration - I will surely make this 100%. Is it possible to put more, for example 150 if I want higher acceleration?

100 % would be equivalent of over 200 amps per second if you really push the pedals hard at standstill. Could you please configure the assist levels and try out the different riding modes? You really need to configure the assist level multipliers because I think you are lacking power and not acceleration.


maximusdm said:
2. Assist without pedal rotation - I do not understand what this means, sry. If I set 0, I still have startup assistance but it is very modest. I am expecting to have power at least a few hundred when I start pressing the pedals, controlled by the acceleration logic, not power spike. You can think of it as a torque assist only with a high assist factor.
My recommendation is to set assistance level to 1 and assist without pedal rotation to 100. Please try it and let me know if you feel a real startup help.
Also can I set this to 150? :)

Okay, this is very important:

If you have set startup assist without pedal rotation to 0 it will not assist until it senses that the pedals are rotating. When the pedals are rotating it will start assisting. it has nothing to do with power.

If you have set startup assist without pedal rotation to some value you are allowing the system to start assisting without pedal rotation if it is over a set torque threshold. If you set it to 100 % it will start even if you apply the slightest of torque. 150 % would be negative torque.

Please try and configure the assist level multipliers so you get appropriate assistance.


maximusdm said:
Thanks for your support,
Max.

Let me know if you have any more questions, Max!
 
thineight said:
The questions are:
+ Do you think that in future We will be able to purchase displays that are already prepared for the Open source firmware? Maybe an agreement with the manufacturer is required.
Currently there are 2 shops selling TSDZ2 and 850C display with our OpenSource firmware: https://www.electrifybike.com and www.eco-ebike.com.

When I started this projects I didn't expect such success and I think is good that we can keep options for DIY and commercial.

Because you asked, and because I think www.eco-ebike.com option for TSDZ2 with our OpenSource firmware needs advertisement as it is new and provides very good value for users: TSDZ2 and 850C display with our OpenSource firmware (including the update box for 850C), motor temperature sensors, magnetic brakes, etc.

https://www.eco-ebike.com/products/tsdz2-w-850c-torque-sensing-pedal-assist-with-throttle-and-e-brakes-36v-48v-52v-10-18a-250-750w


thineight said:
+ Do you think that in future We will be able to purchase displays that are already prepared for the Open source firmware? Maybe an agreement with the manufacturer is required.

I believe (?) with the SW102 at least, all we need is a display with Bluetooth enabled by default. Given that, it's possible to flash it over Bluetooth. Unfortunately the SW102s easily available don't have Bluetooth enabled so the primary point of the first flash is to get that, and subsequently upgrades can be done over Bluetooth.

Bluetooth-enabled SW102s would be a huge win, only leaving cable connection to be done.

Even better would be for them to have a compatible cable with brake sensor connectors. Actually all that would be needed there would be an adaptor cable to run from the short pigtail on the motor with a female plug for the SW102 (and brakes) at the other end.

I succeeded in flashing a SW102, but I had to chop open the side of the case. I'd love to be able to run a pristine one.
 
Alpha 9 is up!

------------------------

Here is the wiki (work in progress):
https://github.com/OpenSource-EBike-firmware/TSDZ2_wiki/wiki/0.20.0-(DEVELOPMENT)-%7C-KT-LCD3-%7C-TSDZ2-%7C-Manual

------------------------

Here is my Google Drive folder with the Alpha 9:
https://drive.google.com/open?id=1CPGT-V1ZX7FCzfhgbrPMYfbYtY4_JH2R

------------------------

Here is my branch where you can see the source code and latest changes:
https://github.com/leon927/TSDZ2-Smart-EBike/tree/testing-pwm-acc

------------------------

Here are the changes from Alpha 8:
- Walk Assist debounce time adjustable
- Walk Assist not changing assist level during accidental button bounce
- Some small display improvements
- Walk Assist, minor improvements

------------------------

Comment:
Feel free to update if you want the very latest changes. I am considering this to be a great candidate to an official beta release so more users get their hands on the 0.20.0! If no major changes are needed we could move to an official beta release via the official project page very soon!

Have not implemented the torque sensor calibration as this will take too much space. We would have to combine Torque Assist and Power Assist or do some other big changes that would facilitate enough space for the torque sensor calibration. There are ways to simplify the calibration but I am not certain it is the best thing to do for the 0.20.0 and it is not my right to decide anything regarding that!
 
jimmyfergus said:
I succeeded in flashing a SW102, but I had to chop open the side of the case. I'd love to be able to run a pristine one.

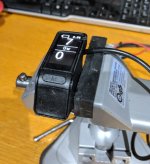
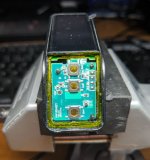
I have successfully opened and flashed two Sw102 units now using a knife and small screwdriver in the corner of the button display. the glue is very rubbery and only really under the the screen so the plastic and buttons were both almost untouched . once back together and sealed with a small amount of silicon it really does look as good as new. I appreciate that some people prefer to cut the side off, but honestly i think the knife method all be it with a much stronger Stanley style blade is the cleanest method.
for me the trick was to use the knife to spread the plastic slightly and rather than repeat cutting. then us the small flat blade screwdriver in the bottom right corner to get under the lower plastic edge and pry the buttons out. It takes a few attempts but its steady and works well i think.

I am expecting a third device in the next week or so, so i will try to record a video this time to show the whole process.
This is the first one i did and has the most scuffing to the plastic at the bottom, the second one had no marks at all on the outside.
 

Attachments

  • sw102.JPG
    sw102.JPG
    84 KB · Views: 1,427
I guess you also need the bafang extension cable since the supplied one is just 62cm?

Also, I tried eMTB with sensitivity 5 and got max assist of around 350W which was a bit low for some climbs (if I went down to max assist it boosted to 800W+)

Will try sensitivity 7 next to see if it will improve.
 
perryscope said:
I appreciate that some people prefer to cut the side off, but honestly i think the knife method all be it with a much stronger Stanley style blade is the cleanest method.
Note that by cut the side you after can glue with black silicone and the SW102 will have the same water resistant level as original: water prof. Do you think your method will also leave it water resistant?
 
btslo said:
Also, I tried eMTB with sensitivity 5 and got max assist of around 350W which was a bit low for some climbs (if I went down to max assist it boosted to 800W+)

Will try sensitivity 7 next to see if it will improve.

Yes, if you'r using alpha8 or more,
5 it s for performers only ;)
i use 7 to match 400W+ or 8 witch is easier ...

in alpha 8 grade come from 0 to 20, default is 10 .
 
Forgive me a little strange question.
Is it possible to power a 48v motor with a 36v battery? are there any drawbacks?
I have to do a long tour and I would like to use a 36v battery, at least for the stretch on the flat.
In the firmware what should I change, besides the battery? the engine type remains at 48v?
 
andrea_104kg said:
Forgive me a little strange question.
Is it possible to power a 48v motor with a 36v battery? are there any drawbacks?
I have to do a long tour and I would like to use a 36v battery, at least for the stretch on the flat.
In the firmware what should I change, besides the battery? the engine type remains at 48v?

Absolutely possible and no problems at all. The drawbacks have been mentioned by other users in the posts above.

What you need to change are the battery parameters. But the motor type should never be changed. It has nothing to do with the battery. Only configure the motor type parameter depending on what type of motor you have regardless of battery.

Other than that, have a great tour! :wink:
 
buba said:
Rydon said:
With A3 on coaster brake we are noticing that if you go from pedaling to brake quickly, as in an urgent braking situation, then backward resistance is there. If you then release the brake and then reapply the backward resistance is gone. Alternatively, if you have time to pause/coast before applying the brake, there is no backward resistance. Not absolutely sure but the resistance seems higher if you are in a higher level of assistance.

Good feedback and description! Will remember that and make some tests when I install the brake clutch! Did not expect I would be getting Coaster Brake feedback so soon so I do appreciate it as it prepares me for the different tests I need to do!

Thank you, Rydon!

Buba, just wondering if you had a chance to look at this with clutch installed. We did calibrate the PAS and had the same result.
 
casainho said:
perryscope said:
I appreciate that some people prefer to cut the side off, but honestly i think the knife method all be it with a much stronger Stanley style blade is the cleanest method.
Note that by cut the side you after can glue with black silicone and the SW102 will have the same water resistant level as original: water prof. Do you think your method will also leave it water resistant?

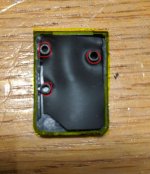
Yes I think so, the surface of the plastics that interface is not warped or damaged and if you take a little time to pick out the existing glue, its easy to add a thin seam of silicon sealant all around the edge of case where the button cover seats (highlighted below)

once clicked back this should provide as good a seal as the original.

sw102-seal.JPG

For me the key to keeping the correct button movement (clickyness) was to seat the rubber seal correctly by making sure the plastic pegs were correctly pushed through ( highlighted in red) and also remove old glue, if this does not click down far enough your buttons have no feel at all. I dont know why the bottom peg does not line up correctly maybe a molding design error? however this i think helps when opening as it makes it easier to pry up the bottom left corner with a small flat end screwdriver. You can see on this first attempt how i bend the plastic slightly doing this

sw102-button-cover.JPG

Once my spare unit has arrived i will give mine a soak test, but i guess time will tell as to the true water-proofness :)

PS. I have purchased two units form this ali-express seller that both worked great and arrived within 10 working days to the UK from China. https://www.aliexpress.com/item/4000054464868.html?spm=a2g0s.9042311.0.0.11004c4dxD5Vfg
 
perryscope said:
For me the key to keeping the correct button movement (clickyness) was to seat the rubber seal correctly by making sure the plastic pegs were correctly pushed through ( highlighted in red) and also remove old glue, if this does not click down far enough your buttons have no feel at all.
Ok, that is why I think the side access to the pads for wiring is better, because you do not touch on the key pad and in the end it just works as original. I damaged one unit by trying to cut and I was able to access the pads but in the end, the correct button movement (clickyness) was gone and the SW102 is then damaged because the original buttons clickyness are already not so great.
 
casainho said:
perryscope said:
For me the key to keeping the correct button movement (clickyness) was to seat the rubber seal correctly by making sure the plastic pegs were correctly pushed through ( highlighted in red) and also remove old glue, if this does not click down far enough your buttons have no feel at all.
Ok, that is why I think the side access to the pads for wiring is better, because you do not touch on the key pad and in the end it just works as original. I damaged one unit by trying to cut and I was able to access the pads but in the end, the correct button movement (clickyness) was gone and the SW102 is then damaged because the original buttons clickyness are already not so great.

Yes I understand why you went down that path, and I agree that not disturbing the buttons is defiantly beneficial.
Has anyone tried just drilling small holes or indeed a small slot in the correct location to connect to the programming pins using pin headers? It should be easy to create a template to get the position and depth correct and this would be also easier to seal with some silicon sealant.

Having said that I am hopeful that we may be able to program over Bluetooth from the outset so hopefully we wont need to open it at all :D
 
buba said:
Alpha 9 is up!


Here are the changes from Alpha 8:
- Walk Assist debounce time adjustable
- Walk Assist not changing assist level during accidental button bounce
- Some small display improvements
- Walk Assist, minor improvements

Thanks Buba you have made the walk assist mode just about perfect now :thumb:
 
perryscope said:
Having said that I am hopeful that we may be able to program over Bluetooth from the outset so hopefully we wont need to open it at all :D
That should be possible already, Geeksville developed a bootloader and firmware that should be accepted by the original SW102 but none of us have in our hands and original SW102 so we can't test yet.

Please read here how to flash our bootloader and firmware on a new SW102, without open it: https://github.com/OpenSource-EBike-firmware/SW102_LCD_Bluetooth/issues/35#issuecomment-525492910
 
Back
Top