E-Ducati Build

Great build platform.
Macribs touched on it earlier and I think it’s something you need to investigate. I believe that with that trellis frame the engine acted as a stressed member. Without it the frame may not hold up to road conditions. It’s not unsolveable just something you should be investigating. You may need to create a brace connecting the frame to where the engine was. It could be built into your battery box ideally.

All the best.
 
Back with the build, again.
It has been awhile...

Picking up from last time I was doing wiring/programming and ran into a little problem.

My Contactor rates from 36-48v, but Sevcon gives me battery voltage (96v) from Pin #3/4
Tried to adjust it with DVT but it doesn't work, still gives me battery voltage..
it's really frustrating...

So I just say frock it and cheat the sevcon with a switch, which is fairly easy.
sevcon gives signal (power) to turn on contactor 1-2 seconds after powering up itself
I simply add a switch between battery (48v from somewhere on the battery) and contactor's low side,
basically I'm turning on the contactor manually.

It works, so whatever.
I'm aware the risk blah blah blah and STILL trying to solve this sevcon problem, so if anyone knows... please, help.

Then, there's another problem and yes, it's sevcon again...
When the motor is in forward (#pin18 to ground AFTER turning on the controller) and spinning, I accidentally pulled the wire which caused it to disconnect from Ground. The motor FREAKED OUT, and spun like crazy, like power spike or something.
I've no idea why.... imagine riding down the street and accidentally touched the directional switch....

Oh and if the directional pin is grounded BEFORE the keyswitch turns on, then the controller throws a flashing error light and doesn't turn on.

These are the problems that I ran in with the system, so far...
other than these problems, everything goes well.

Please, if you're familiar with the system, help me!!
 
next update goes here, adding pic and all that
IF I FIGURE OUT how to upload pic to another site... and pull url
photobucket is kind of stupid and doesn't load..
 
Just use the attachments tab, below where you type when posting, and attach the pics directly to the post.

This way anyone that can see the post can see the images, *and* they aren't lost when external sites do stupid things or go away.
 
That's a nice build!

Really looking forward to see the pics, just upload them directly on the forum it's much better. If they are too large you can easily resize them using Microsoft Paint.

Greetings from Shanghai ;)
 
Very nice build!! Really awesome and very nice design you came up with initially (the sketch). I will be following this.
 
Update #??
After I said frock it with sevcon, i went on with something else....

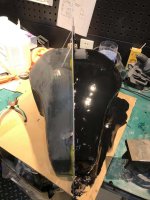
Ducati 1098's fuel tank doesn't fit my liking, and obviously we don't need "fuel tank" this sort of thing...
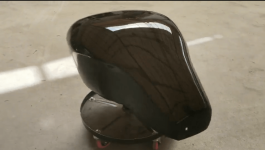
With searching and surfing online, I found nothing that entertains so decided to make one myself, out of fiberglass.

Prior to this day, I had zero experience with any of the things that I'm about to do. Has no drawing or designing talent, but I've a dream. :lol:

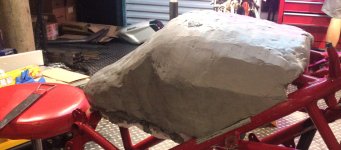
Anyhow, i started out with a block of foam. Cutting into rough shape and used industrial clay, which later learned that you had to microwave it to soften... that was a hard lesson.
WeChat Image_20181018011740.jpg

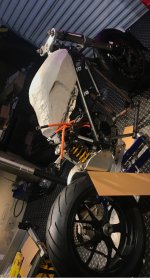
this is how it will look on the bike..
WeChat Image_20181018012206.jpg

Then
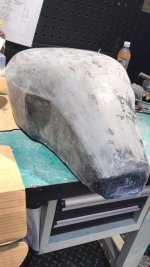
I harden it with tooling resin, bodyfiller all that good stuff
13edcb37dc048ed429cea3806de2d99.jpg

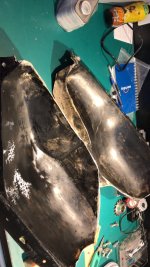
Next step is to make a mould,
btw i got all these mould making stuff from easy-composite.

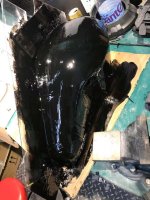
this black stuff is gel coat, and laying it with woven fiberglass, and fiberglass mat
87bb5d30fd01c335e3e888b4db21656.jpg
8885fd598bd1c6ff97b2981495620f5.jpg

I'm missing some pic here, will upload it if i find it...
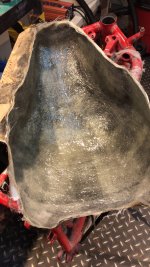
so this is the mould...
437af8984c36c8bf154739c4ecada67.jpg


and with some fiberglassing....
b314b5825183f440c0a12098eadf2f8.jpg


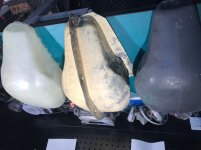
Finally...
b482704295c57b5e32cb155cb154c88.jpg


cost me about 2282Yuan, about ~$335 USD, but the process was fun, and painful.
 
Update #???? (I've problem with Timeline orders, please excuse me)

As i've mentioned before
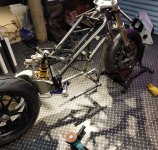
it's hard to find a welder that is willing to do what i ask around town, so i decided to weld the frame myself...

and again... I've no experience prior to this day... AT ALL.
bought a small chinese tig machine made by RILAND (WS-200). It's ACTUALLY not bad.
Cost about ~ $235USD
went out to a place called NO-where and got a giant argon gas tank.
Cost about ~ $100 USD Deposite ~$5/month( Tank rental)
~$10 USD full filled argon.
Bought some 4130 Chromoly alloy tubes (30/22mmOD)x 2meters/ea
Cost about ~ $100 USD


WeChat Image_20181018011709.jpg

WeChat Image_20181018011718.jpg

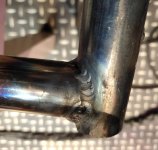
what my weld looks like, i've tried my best...
 
The tank is interesting--you might look at AussieJester's old Custom Cruiser build from several years ago where he made a "tank" for that in a similar way to yours.
 
update #????

after making fuel tank cover,
i tried to do some bodywork thingy with filler and all that, but obviously turned out bad.

so i sent it to a local auto repair /bodyshop to get it painted/refined.

this is what it turned out to be
Untitled.png

it's a screenshot from a video i took,

there are some paint tears but OVERALL it's pretty good, and only cost about $38 USD
 
prety cool if you ask me!

are you chineese? :roll:
if you "just" modify a ducati you do have some pocket change...

but verry nice project, currently working on a street legal mini buggy, (zero s 2017 driveline)
with the zf 75-5 same as yours +- and the sevcon size 4

but still struggle to decide if i am going with a custom wiring loom (trottle and maybe a small display for power and battery level)?
i dont know what is should do because everthing now works fine, except the speed will be way off when installed in the buggy.

goodluck with the build!

greetings form holland
 
It looks promising :)
About the welds, on top of the pipe it just needs some more material added. But it seems to have melted in to the material really good, it sure is better than most welds I have seen here on this forum. On the lower part, I think the problem is that it is air tight. When you are welding, you build air pressure in the tube. And when it gets air tight, it sprays out and you get these damages in the weld.
You can drill a small hole somewere in the tube to avoid this, or just leave a small gap somewhere and fill this later when it cools down.

When it comes to making a mold for fiberglass, the finished product is not better than the mold it is made from. But the "plug" (sorry, I dont know the name in english) can be made of pretty much anything. Wood and putty, or what it is called, filler. Then pant it, and make your mold from it. It is good if the mold can be as close as possible to the finished product, that mean less filler..
 
Oh, I see now that what i commented on was more of the side of the weld. If it is tight to get to the top of the weld you can stick out the electrode (the wolfram) a little longer and adjust the gas flow a little higher.

I think it may be a good idea to practice a little on some scrap metal, you can try to put it in some different angles to see if you can reach in and make a good weld.
 
j bjork said:
Oh, I see now that what i commented on was more of the side of the weld. If it is tight to get to the top of the weld you can stick out the electrode (the wolfram) a little longer and adjust the gas flow a little higher.

I think it may be a good idea to practice a little on some scrap metal, you can try to put it in some different angles to see if you can reach in and make a good weld.

thanks for the tips man!
 
update # ???

Uhm, so i put everything together and ran the bike.

works.

but it doesn't feel like 40+ kw bike.
it's more like a 15kw.

not sure if i'm using the correct DCF file...

so... please guys, if you can share your file with me.
or teach me how to adjust these variables to achieve higher power output...

right now, it's really slow....


I've attached the DCF file currently using. thank you guys in advance.
 

Attachments

  • 1507.rar
    32.3 KB · Views: 97
Aaaah the fiberglassing of a tank cover all looks very familiar :)
Re: Sevcon inverter, yeah the DCF file will be the source of your troubles.
18650 cells aren't known for their power - 20 A per cell is really asking a lot of them.
Is it slow to take off, slow to achieve top speed, or just slow all over?
Check the motor peak torque setting as this will impact the take-off as well as top speed.
A weak battery will be more obvious at higher speeds.
 
jonescg said:
Aaaah the fiberglassing of a tank cover all looks very familiar :)
Re: Sevcon inverter, yeah the DCF file will be the source of your troubles.
18650 cells aren't known for their power - 20 A per cell is really asking a lot of them.
Is it slow to take off, slow to achieve top speed, or just slow all over?
Check the motor peak torque setting as this will impact the take-off as well as top speed.
A weak battery will be more obvious at higher speeds.

LG HG2 is rated 20A CDC, so i think it'll do alright...

It's slow all over, gets to around 100km/h @ around 10 seconds (~62mph)

it's really slow at accelerating, 600cc bike will easily beat it.

I did change the peak torque to 100, but it's ugh, yeah. not so much differ..

oh and batteries aren't hot at all, not even warm, at either terminal or the pack itself,
 
What sort of voltage sag are you seeing? And at what currents?
 
These projects are big and expensive. Chances are life got in the way.
 
i guess so we all got these up and downs in life. just hope he finnished it and didn't post it :)
curious how it came to geather!

greetings louis
 
I'll try to do an overall update for the bike, it's "pretty much" done but the power is still not feeling like it's going full out.
 
aaron_mason said:
fechter said:
TilmanBaumann said:
Looking fantastic.

Maybe a cheap Chinese BMS but instead of driving the real load, only let it drive the DC/DC and through that a high current contactor for the motor driver.
That way you lose current sense from the BMS. But at least you allow the BMS to cut off the load if it needs to. Should work, although I never tested it.
That would work for protecting the pack during discharge. For charging, it may take a little interface circuit to run the contactor. If the charging current is low enough, the BMS might be able to handle it.
This is the same way I’m connecting the BMS on my electric vesa conversion. The drive current from the BMS trips a relay that closes the contactor. That way all the BMS protections (temp, low voltage) are still in place, and it will charge and balance the cells. I leave the regen and current limiting to the controller.

Good option but most cells won't go seriously out of balance during one ride. If they do you probably shouldn't be using them. You could probably wire a cheaper bms to balance during charging only.
 
Back
Top