APL's DIY axial-flux motor

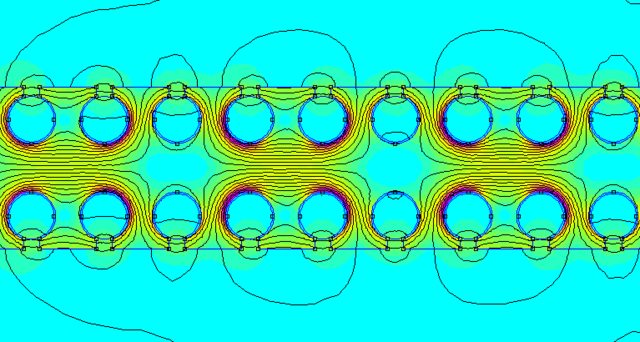
At the edge of the tooth the winding is facing away from the rotor so it's best to have 0 end turns but it's just not possible in reality and soon as they become floating from the core they become sleepy and Freddie will get them and that's the story for most motors pushed way to hard the dreaded end turn failure.

Really we want to look at the machine/motor final rpm and pole count work out its frequency and base a winding gauge on this so skin effect is kept in line and use a litz winding wire kept tight to the core to dissipate it's heat straight into the laminates encapsulate the end turns with a thermal potting to help keep them cool and the stator rear direct to case from there with water or air cooled

If it's a single stage rotor and stator use a hallbach array to focus the field at the single stator but I like the dual idea for little width gain twice the power is available but it is more complex of a design to much for me I can't even work the motor design software lol just love all the different designs and appreciating how they work.

The rotor I've seen on these aerospace grade motor are carbon so they can change rpm extremely fast for robotics type application I'd pinch as many ideas from latest tech to get a simple design that is cost effective and lethal.

It's all down to the shape of the motor for rpm really if it's pancake it will have slow rpm but a crazy fool could make a multistage design in a small can with the magnets in the centre around the size of a 80 can rc motor with double figure kw power and being dual stator the width can be fatten up on the rotors magnets the diameter reduced and with the field acting from both sides it would rip along good rpm ramge steong torque and direct to case cooling both sides be a proper ripper but hard to make specially diy, China bang them out in a heart beat could clean up if they started dropping them on us.
 
Haibach array's are nice if you can pull it off, but the reality is that its not that easy to do. Custom made magnets are
in order, and planning for fitment is crucial. Allowing for glue filler if they are tight fitting, as anything will throw off the
360 degree fit.

This thread is mostly for us shop rats that want to get our hands dirty building motors at home, so things are generally
kept a little simpler. Still, having said that, I wouldn't want to keep anything out of reach. All ideas are welcome here.

I've seen plenty of square tooth stators that have equal amounts of wire going vertically and horizontally. And there are
some trapezoid motors that have an extreme amount of wire on the end turn. Again, all these cores have overhang
covering the wire.

AFM_Stator_Frei.png

The picture of the FEM solenoid that major posted got me thinking about why the outside of the coil is not used to gain
more core flux. Is there not just as much Lorenz force as the inside of the coil?
Would it be practical to have an inner core 'tube' so to speak, and an outer core tube, that slide over both sides of a coil
with tooth overhang on top to form the tooth face? (I should probably draw it up, to get a visual.)
Or is there nothing to be gained there.

While i was looking around, i found this Wikipedia article on coil windings thats full of interesting stuff, and worth an
archive here. I haven't read it all, but it's worth a glance.

Wiki.;https://en.wikipedia.org/wiki/Coil_winding_technology

I also found another interesting axial design using a segmented core system. It's going back to the sidewinder style that
we've discussed before, but with SMC cores. Hmmm... interesting.
(haven't found the source article yet)

Module Stator.jpg

SMC stator segments.jpg

With all those teeth, it might even be a slow rpm axial motor for once. I'm not sure how the cores would be wired up.
The bolts fit in between the air gaps on each side of the modules.
 
That modular setup looks good, can you see how they're fixed in place? Can't make it out from the pics, guessing it's just a screw hole or clip moulded into the coil holder but it'd be interesting to see how strong they've made it as it doesn't look like much strength is needed.

I wouldn't have thought there'd be much air gap, partly from strength (I cant imagine it would hold up to the strain) but mostly from how the field works with that kind of winding. It's pretty much the same as overlapping windings, with that a single phase will be wound around three cores with part of the turns of the other two phases wound around the cores in between. The first phase will be creating a field in those three cores with the other two phase either increasing or cancelling the field on each of those three cores (or doing nothing if they're unpowered).

Same with that kind of winding, if two coils next to each other are the same polarity the core between them will be more or less neutral, they'll be working like a single coil. If the next winding is the opposite polarity there will be a field at the exposed core in between... that's not making a whole lot of sense is it? :/

Sketched it out in FEMM, didn't include the magnets so the field is just bridging the gaps, shows how it works internally ok though. From L to R the first 2 sets of windings are the same polarity, the 3rd opposite:
fX5XEhul.png
 
If you look at the second photo you can see an indentation or groove on the left and right sides of the two SMC cores.
When these two groves are in the gap between the segments, theres enough room for a long tubular threaded nut to
go down in between them, and some kind of washer/holder on top to hold them down tight.

It looks to me like the two sides of the segments with the air gap form one tooth, making each tooth powered by two
coils. Those two coils have to have N-N or S-S facing the gap, which makes the next gap/tooth the opposite pole.

I don't see how this pattern can be broken or altered all the way around. Unless I'm missing something. Problem is,
most of the motor calculator designs don't use that ABC, ABC, N-S,N-S, winding pattern all the way around, very few do,
at least in the blue zone, which are the most desirable patterns. Wind generators almost always use it.

Blue works best, red is not quite as good, and white will 'work' but not desirable.

Winding_Diagram_Table.jpg

So I guess I'm still a bit confused as to why they would choose to use a substandard pattern for quality motor build
such as this. Obviously I'm missing something. Maybe the pattern can be changed.

Nice job on the FEMM sketch, I'm still trying to wrap my head around it. But I think something might be amiss there,
I'm thinking every other coil is flipped, and that the tooth with the air gap is a monopole on each side.
But I'm probably completely wrong, as usual. :)
 
I finally got the new PC, loaded up the program, overcame some wifi problems, and am finally able to experience the
grate headache we call cad design. Learning curve is a bitch, but I'm making headway. Nothing to show yet though.

Most of the stuff is pretty straight forward, and I don't get to much grief, but some of the little things will drop me.
Like trying to make a simple measured slot for example. In my mind I should be able to just grab a hole and drag it,
but no.. you get a figure eight. Punch a square, click on the corners and use the radius tool? Seems kind of cave man.
Square and two circles, and erase the inner construction lines? Geez, it's slot, come on!! My kingdom for a slot. :roll:
Simple things like that. (I'm sure theres an ah-ha moment coming up soon, usually is.)

On the other hand, the create a pattern tool is awesome! Saves tons of measuring and work, so I guess it all evens out.
Anyway, I'll get it, I got a loooong cold winter coming, and lots of aspirin. At least I'm finally moving on it. :thumb:
 
First rendering of the axle and plate,..pretty rough, and not really precise, but hey, it's something.
Had trouble keeping the two objects on the same plane, and I couldn't get the color to change, but
it's start. Cores are probably going to spank me good. :confused:

Cad 1..jpg

Also have to figure out how to export it as a photo yet.
 
Congrats, that's damn good progress! :) Don't worry about the non-intuitive stuff, that's just one approach to that problem and there are several to chose from, it doesn't take long before considering which option to go with for every part of a model.

Personally I'd do 3 2d drawings for that one, the plate with all it's slots and drillings face-on then extrude it to the thickness, half a cross section of the shaft and rotate it around the axis and the bolt holes face-on, extrude them and subtract them from the shaft (and maybe also the plate so they're sure to match ;) ). That's just my preference and if drawings shared online are anything to go by it's not a particularly popular one but it works for me and that's what matters most, finding what you're most comfortable with.

Again, hats off for getting this far. 3d CAD can be damn frustrating, especially when starting out and that really is damn good progress. Hopefully the benefits are starting to shine, add other tools such as FEMM and it quick becomes clear we have better tools and resources available to us today than professional designers had until recent years and many of them at little or no cost.
 
Thanks! I'm using the DesignSpark Mechanical program. Youtube; https://www.youtube.com/results?search_query=designspark+mechanical

Yes, there is much frustration,.. since I make so many mistakes I have to constantly go back to the previous step,
but many times it will go too far and lose some of the features I just made. If I don't notice it right away, I'll be
missing certain things, like I'll have 8 holes instead of 6. I think I might not be 'saving' steps correctly. I'll work
on that today, along with trying to get the color chart to stick on a feature.

Anyway, Your right about doing everything in 2D on the same plane first. I had nothing but trouble with the shaft.
Doing a half-shaft and spinning it would be much better, and the measurements would be more precise than push-
pulling circle layers. Thanks for the tips.
I'll have to redo all of this the right way anyway, because it's just not 'correct', but this is a good practice Frankinstine
rendering for now.

Took about 4-5 hours to get this far, and most of that time is trying to get past some simple little damn thing, I
have high hopes over the next week!
 
Things are getting easier, except for the precision part,.. I'm just shooting for the looks at the moment. I think
I can go back and change things,.. maybe not. But this is mostly for practice.

Figured out the color thing, and some other stuff, but I can't seem to figure out how to export a screen photo to
my other PC yet. So I'm using a camera, which kinda sucks, but whatever.

I'm trying to figure out how to make a coil to go with the cores at the moment, but can't figure any way to get any
coil detail, except for just making a block shape and coloring it copper. Seems to be what a lot of people do.


Anyway, finally getting a little grip on this cad thing.
 
Dang! looking good.

Learning a CAD program is on my bucket list too, but I don't think I'll ever have time until I retire.
There should be a way to export the view, but you could also use Ctrl+Print Screen to capture the screen (or Snipping Tool) and paste into a photo editing program.
 
fechter said:
Dang! looking good.

Learning a CAD program is on my bucket list too, but I don't think I'll ever have time until I retire.
There should be a way to export the view, but you could also use Ctrl+Print Screen to capture the screen (or Snipping Tool) and paste into a photo editing program.
I usually do it that way too, my screenshot app has a handy "Host on Imagur" option so all that's needed is copy and pasting the provided link into a message. I must give that CAD app a try sometime, it's looking damn good :)
 
I've tried the screen print option before, years ago, but never got it to work. Didn't do the Ctrl. though. That's the
problem with this PC stuff, you can be one click away from success and not know it. I'll try a little harder to get
it figured out today, since I was mostly annoyed and didn't give it too much effort before.

I'm also starting to wonder about threading holes,.. haven't seen any drop box's for standards. Are they really going
to make me put every single thread in every hole? :roll: Hope not.

This program is nice for a beginner,.. way, way, better than Tinkercad, but not near as sophisticated as Fusion 360.
It's right up my ally, as I've always thought in terms of mechanical drawings, and thats kind of what it's made for.

Two tools that I would add are a way to bend things, like a wire or tubes, and an easy way to duplicate an object.

I had the thought this morning that I could send all these parts to a 3D printer, and have it make a full size, or even
a miniature version, and then put it all together.
Not really necessary, but it would be cool to have a model, and you could check out the fitment of the parts. Even
wind some wire :)
 
Plain old PrtScn key captures your entire display (including multiple monitors) to the clipboard.

Ctrl + PrtScn captures just the in-focus window (the one you last clicked on or Alt-Tabbed to); it includes any window frame, so if you have a FullScreen view option, do that first and you won't have to trim the application stuff off the image.

The only things this doesn't work with are "video overlay" types of display, generally only used for video playback, but occasionally used by 3D-realtime-rendering (OpenGL, etc). Those will get you a completely black result.


After you've used the PrtScn button, go to your favorite image editor, and Paste (Ctrl V) the clipboard in. Some of these programs paste as a new image automatically, with the size of the image determiend by what you paste, and some of them paste into existing image, not resizing it up or down to match the clipboard, so you'll have to check out the options in your program to make this as easy as possible.


Then you just save the image as your preferred image format.


There are probably programs out there that will use a hotkey to directly capture the screen to a file, like phones and tablets do these days. I havne't used one, though.
 
For threaded holes, there should be some way of doing it. Fusion likely has a built in option and parts libraries would work, import a threaded part (threaded bar, a bolt, etc.) and subtract it from the part you want threaded holes in. Failing that they're easy enough to do yourself, draw out threaded bar for the various sizes and export them (.stl works ok but .step would be better) and then import the saved file wherever you need it.

I rarely draw them unless it's something to be 3d printed and I think it's the same for most folks. Bare in mind those kind of shapes cause a lot of load, every surface is made up of small triangles (kind of like drawing a 2d circle using lots of straight lines), the more complex the surface, the more triangles so a threaded hole is going to make the PC work many times harder than a plain hole. It's not a big issue for simple drawings but at some point slowdown will be noticeable as they get more complex, I've had some drawings take over 8 hours to render!

Same for windings, someone has no doubt written tools wind a wire around a surface but you'll very rarely see anyone using that kind of thing, it's almost always a solid representing where the wires go and maybe a texture to represent windings (like cross hatching etc. in 2d drawings). FEMM does the same btw, just a shape for where the windings go and with how many windings, what gauge wire, how much current, etc. set in the menus.

If you want to draw them then scripting would probably be the best approach, very useful to learn as it could come in useful for pretty much every drawing but by no means essential, the majority of folks never go near scripting and that includes professionals who've spent most of their career doing 3d CAD.
 
Thanks for all the help guys, I tried the PrtScn, and the Clipboard stuff, but wasn't doing something right.
I finally found the snip tool, and was able to send it to Gmail, so now I can access it from any PC, and put it in Photos.

Whew! I don't understand these programer guys sometimes,.. theres only two things that most people want
to do with a photo,.. put it in your photo archive, or send it via Email. Simple. So why everything else but?!!

Anyway, yea, the threaded hole thing.. I figured it's probably not included much. I'll just put in the pre-thread hole
size or smaller, so it can be drilled and tapped. I can see if theres a big threaded bolt, or shaft, then a person
might want to show that it's threaded.

Same with the coils, they aren't printed or machined anyway, so all thats needed is a simple repensitation. Still, there
will be times in the future where it would be nice to be able to do. I'm still rolling it over in my head.
Maybe make a comb out of several half circles, and pull it over a surface to create the rounded groves.
If I could bend one wire, I could duplicate and add them all together. I'll figure it out someday.

I threw some dummy coils in the drawing, and now I'm working on the finer points, like getting the axle right, and
putting vent holes in the rotors. I 'do' like the fact that you can separate a part, move it out, and re-work it as
much as you want, at any time. That's not something you can do with a mechanical drawing that's done in ink.
 
Newest rendering,.. I added some coils, spacers, fan inserts, and some vent holes, plus drilled out the back iron edges.
There are still some .032" fiberglass protectors that glue onto the core faces, but I won't include them here.

The fan inserts really kicked my butt, but wouldn't you know, as soon as I was almost done, I discovered an easier
way to do it. :roll: That's OK, as the fans and spacers will probably get changed a bit anyway.

Still getting used to this program, and things seem to get gnarly once you take parts off plane, and line them up
in an exploded view. It's hard to get them back onto plane for rework.

But, I have to thank you for getting me into this stuff,.. now I can't get enough! I think you created a monster... :shock:

Next step is to push everything together into an assembled motor, and then maybe try to do a 'cut in half' view.


After that, I guess it's time to think about building the dang thing.
 
Looking good. Where will the phase wires and hall sensor leads exit?
 
What's the bearing choice ? angular contact or a mixture of straight ball and thrust.
I like the effort you have gone to but this looks more low figure production run than diy quality, it also looks hard to produce but that's proberly why they are not on every street corner the axial designs need a lot of work to get something efficient, reliable and simple to manufacture that China can knock out and be worth while.

I think the biggest call for it is in small scooter hub motors where space is retricted the axial power density shines, plus the small overall width would allow for some decent rpm in a small 8inch mini moto tyre with 8kw continuous would be something to wake the market up.
 
Phase wires will be much like before on the previous motor, under the 40mm ID bearing on the non drive side.
The three separate holes will come out in the middle of the axle at an angle. I could drill an extra hole for hall
sensor's, but I'm not planing on useing them.
Sorry,.. I forgot to put those in.

View attachment 1


The bearings are a bit massive, and I suppose I should look around for some lighter ones, but these are common
and cheap, and easy to get anywhere. Plus they are bullet proof, and fit the motor well.

Most companies use the same bearing #, these are NSK 2008, (40mmID/68mmOD) and NSK 2006, (30mmID/55mmOD.)
They are standard ball bearings, but big enough to handle big horsepower motors, so they're more than enough for
this motors stresses. Side stresses on dual rotor axial's don't amount to much since the equal and opposite flux's on
each side cancel each other out.

Well, it's mostly DIY,.. I'll have to have the core's CNC'd somewhere, but I plan to do everything else in my garage,
on my 1950's mill and lathe.
 
I knew you'd get the hang of it! You're making some great progress, keep it up!

What's the green plate the cores bolt into made from?
 
G10-FR4 green Garolite, 1/4" should do it. If I have to, I can bond a smaller Alum. reinforcement plate to one side.
Screws should go up against a metal disc anyway, so they don't crush the softer garolite.

Coleasterling, speaking of machine shops,.. can I contract your services to make the cores for this in the near future?
 
I'm gonna keep following there's lots I can learn from this thread top work hope all goes well keep up the fast progress, the spindle looks :bigthumb: the bearing choice is far from weak I like where your going best of luck.
 
I was able to put all the parts together for a assembled view,.. sort of. I had some difficulty getting things tilted
and angled just right, and some parts just didn't fit well. I didn't pay strict attention to sizes and planes, consequences
of trying to run when you can't walk.. but I learned a lot. You get the jest of it.
If I have a part made or printed, I'll redo the part in a separate file, and make sure that it's exact.

View attachment 1

I had to settle for a front view, instead of a cut-away,.. I still don't get the 'split' tool yet. I'm not sure I can make it
work on an assembly or not. Well, this will do for now.

Cad - Front view.jpg

I guess the next step is too get some aluminum round stock and see if I can spin a new axle. I should probably work
on getting a new lathe chuck as well, since the one I have is completely worn out. Always something... :roll:
 
Looking good ! :)
I don't know thé CAD software you're using. But all the one I have used si far used two different type off file for Part and assembly. Is this one similar ? If it's the case part are assembled using constrains and most of the time you can design a part directly on top of another one directly in the assembly. It's one off the biggest strenght of CAD, you can be sure all your parts fit together :)

Envoyé de mon Redmi Note 3 en utilisant Tapatalk

 
Back
Top