Xtracycle Build Log

agniusm said:
Its possible to diy but its fiddly and will end up expensive. ... Nothing to do with what i sell more in general

I agree with that post in that DIY options can often be more fiddly and more expensive. My first E-bike experience was exactly that. I thought I'd save a bit by purchasing a $50 900w currie scooter motor and building an ebike around that. I soon discovered there were multiple challenges involved that I hadn't accounted for... fitting a sprocket to the opposite side of the rear wheel, or doing a jackshaft, or driving bike cassette with a front-freewheel. I wound up spending more money doing the latter, but I was really proud of what I had put together, and it was fun to ride and be able to shift, and it out-performed many of the kits available at the time. Top speed of 35mph back in 2008-09! I did all this without the Endless-sphere resource, and learned a lot along the way. One more reason to get into DIY versions is like john61ct says below, because you enjoy it. I'd add the 4th reason: educating yourself and adding to your skill-set.

john61ct said:
And the third reason: because you enjoy tinkering, a fun way to pass time even if no "productive" result

John I couldn't agree more! I'd have just bought a Radwagon if I really wanted a cargo bike without any of the fuss of building it. I mean that's only $1500, and I've already spent ~$500 on this build... and a BUNCH of my time.

I'd re-frame the argument over a make-vs-buy decision away from "saving or spending money" to "what do you want to spend, time or money?". You're going to spend both, you just have to decide how much of each is worth it to you.

I'm game for designing a DIY battery pack that someone can print and get components for on amazon/ebay. I'll put that project in a different build thread though, right now I'm exploring different design ideas.
 
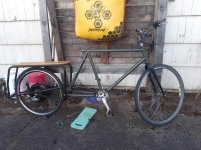
Another updated image, just mocked together for look/feel.
Assembledish.JPG
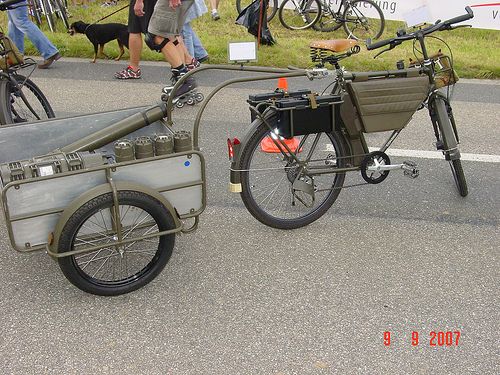
I'm contemplating battery placement at this point. Due to the shear length of the thing I do want to keep the battery as low as possible, but I'm torn between that and a "gas tank" on the top tube similar to what you'd see on a military motorcycle, or like the one below:
28683dad109166f38c3686227573939a.jpg
 
Hi Rassy! Glad to see you're still pedaling, and I hope you're out enjoying this fabulous weather of late!
I think I might've finally killed that battery you gave me way back when. I rebuilt it and put it in a wood box, now the BMS kicks off whenever I go to hit the throttle any more than the weight of a gnat. Maybe there's something I'm not seeing though, I haven't taken the time to go though each cell cluster's voltage yet.
 
That is not surprising, It was identical to Ping's 1st generation battery. I purchased it about 15 years ago from "anna" on eBay because Ping batteries were selling faster than I could "win" an eBay auction for one. I think it may have actually been a Ping reject. Of the two batteries I got, the BMS was bad on one from the start (which Anna eventually replaced after I purchased a new BMS from Ping). Glad you had some fun with it after I could no longer keep it balanced many years ago!

I'm 80 now and enjoy riding my trikes as much as ever. Nice day today and I plan to take a solo ride down to the river paths, probably 15 to 20 miles round trip.
 
dequinox said:
I'm game for designing a DIY battery pack that someone can print and get components for on amazon/ebay. I'll put that project in a different build thread though, right now I'm exploring different design ideas.
Someone can do that already. Snath posted how to make one and its all off the shelve parts. The main thing is not so many want to get too involved. For me, doing it for myself would be easy if i even didn't have my system. Drill bit to make dimples. Couple sheets of metal to make a die, some bolts to bolt it all and copper strips. All that is cheap to free but you have to spend a lot of time and most people are just not into that. And i dont blame them. There was a time when i would do every little thing or part but now it just costs too much time and that is one thing you cannot put value on. Good luck though. I hope you will find a good solution.
 
There are options, yes. I'm trying to simplify it a little, to the point where it's light, easy to print, requires minimal fasteners/accessory materials, and is easy to assemble/disassemble for maintenance reasons. I'm still doing some cad sketching right now... I chip away at it when I have time.

I guarantee your product, as in the N.E.S.E. pack design, will outperform whatever it is that I'm working on. There's hardly ever a DIY substitute or replacement for a properly developed product. That's the main reason people spend the big dollars on stuff like what you've developed. :)
 
OK a little update for this evening. I've finally got the correct sort of front wheel and I'm getting the disc brakes on today/tomorrow. I should be able to cut the fork stem and install the star nut in order to complete the headset/fork work. I can then move on to derailleurs and chain, kickstand, shifters, and seat. I will then begin placing and installing ebike components.

So far I'm feeling pretty good about it. There's not a solid plan for a battery box yet, but I'll get there soon. I'm thinking metal... and I also need to order a battery. I'm thinking ebay for now... just because of the budget.

Costs so far are below.

Purchased:
-$15 frame
-$62 fork
-$140 free radical
-$20 xtracycle wood deck
-$80 rear 1000W motor kit 26"
-$40 paint job
-$23 disc brakes kit
-$35 Headset
-$24 bottom bracket
-$12 grips
-$75 front wheel
-$7 front derailleur

TOTAL: $533

Salvaged:
-Goose-neck
-Handlebars
-Seat & post
-Crankset
-Rear derailleur
 
Made some headway over the weekend. Installed and adjusted the front disc brake (never done before, probably gonna have to do again as it feels "sploshy"), got the rear derailleur hooked up and changing gears (most anyways...), and got the chain on.

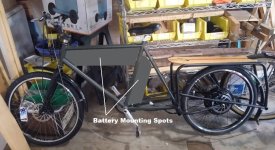
Here's what it looks like now (minus the above) with a few possible battery box locations:
Xtracycle June 20.jpg

I gave it a ride around the yard and made a few mental notes. Need wider handlebars, the front brake issue, and I need a real aluminum seat post adapter.

Issues to sort still:
-Front derailleur, on the way
-Rear derailleur, wrong size 7/8/9 I think... has too large a range. Ordering a different one. Also it knocks on the screws of the motor when in 1st, so... that's a thing.
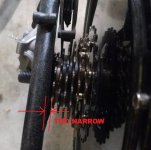
-Rear dropout still too narrow... chain rubs on frame. I'm going to have to put a spacer on the inside of the dropout on the freewheel side.
high gear clearance.jpg
-Handlebars too narrow for shifters, grips, and all.
-New pedals are needed... *creak creak crack*
-Seat sucks... need a new one.
-Chain idler needed? maybe...
-Oh, a torque arm for a rear motor on a Free Radical... that'll be interesting.

All in all coming along ok. I'm liking the look, and will probably have some olive green canvas/cordura bags sewn for it, copying the originals.
 
Just found this thread, cool build dude. Looking forward to seeing how it comes together. Good luck.
 
Thank you! I'm a little stuck on disc brakes at the moment. They aren't working right in the front, and in the rear i don't have the proper adapter bracket... So in the midst of solving that... I post as i have time.

Wolfeman said:
Just found this thread, cool build dude. Looking forward to seeing how it comes together. Good luck.
 
dequinox said:
Installed and adjusted the front disc brake (never done before, probably gonna have to do again as it feels "sploshy"),

The manual that comes with the caliper should have an easy adjustment method in it for that specific caliper.

But in general, this works on my Avid BB7: loosen the screws that hold the caliper to the mounting adapter. There are probably the same cup/cone type washers on it you'd have on rim brake pads, so the caliper can self-align with the rotor. (these are not the ones to the fork itself from the adapter)

If the caliper has a depth adjustment on both pads, tighten them both equally to the rotor. This will align the caliper and pads to the rotor.

Tighten the bolts down on the caliper to it's mounting adapter.

Back off the pad adjustments until the rotor just does not scrape the pads when hand spinning the wheel offground.

Now the pads are aligned and spaced.

NExt, if it still feels mooshy, the cable and/or housing probably has too much play. Make sure you're using brake housing and not derailer housing. Make sure you're using a good cable with no broken strands (each strand takes about half the cable strength away). Make sure the handle is pulling the cable as soon as you start moving the lever, if there's too much slack take it up with the barrel adjuster. If you have a road bike lever and a mountain bike caliper, or vice-versa, the cable pull of the one won't match the pull needed by the other. Simplest is replacing the lever to match the caliper but if you can't for some reason, the Problem Solvers' Travel Agent fixes this.
 
Thanks for the input Amber. I've been staring at the brake problem for months doing nothing about it, but you bring up some interesting points. The Problem Solvers look like a potentially useful option, and might be on par with trying to find long-pull brake levers with power cut-off made for ebikes for cost and difficulty.

Mainly I need to get my rig down to the LBS to get a caliper mount for the free-radical fit, and get a seatpost adapter the correct size.

Also have handlebars to pick out, and now to mount my first-ever brand new ebike battery.

I'm actually considering returning it and getting something a bit bigger... this one I bought is made with the samsung -29E v7 cells. I'd much rather have one with the -35E cells. It has slightly higher capacity and tolerates higher currents better. I'm working with the ebay seller to see if I can exchange.

Other than that on this build, I have a sweet pair of panniers being made! I'll post pictures when they are mounted.
 
A few updates:

I got my new -35E battery after nearly a 3 week tussle with the ebay seller cowellcowinbattery. The first problem was my fault. I selected a 29E battery which I later realized didn't have the specs to support the 40amp BMS that they put on it. I sent that back at my expense. Then I ordered a -35E cell pack, and they accidentally shipped another of the same battery. They realized their mistake quickly, but asked me to deal with FedEx as far as turning the package around. A little weird, and annoying, but read on. Once the package was turned around they immediately shipped my correct battery out and it was here within 3 days, and they refunded me $10 for the inconvenience. If the battery doesn't immediately die I'll recommend them generally. Buying from random sellers you risk your investment. If we can identify good sellers, it might help us get batteries with samsung cells at a decent price. Also, this company ships from California.

Second, I took the whole rig out for a test run today, and found a few issues:
1. Front brakes are weak, and barely apply stopping force. I've used these disc brakes for the build (up front)
2. Rear wheel's spokes are loose. Need to loosen (a bit) all spokes and re-tension.
3. Rear brakes work ok. It's a different caliper design, and it dirt simple but seems effective. It rubs a bit, but I haven't fine-tuned it yet or attempted to true up the rotor if it's wobbly.
4. Rear tire has a thinner section on it. You can feel it while riding and identify it visually when spinning the wheel.
5. Need to hook up front derailleur and adjust the rear one.
6. Need to design and install chain idler pulleys for the long distance... it is too loose. 3D printer is going to help with this one.
7. New handlebars are coming, need to install.
8. New seat needed.
9. Need to mount battery and do wire routing. Battery needs a version of Justin's shark pack stabilizer. Might try to DIY that.
10. Need to install rear fender.

I've got a host of other things I'm going to put on it, like footrests for the kids, bike bags are being made, front & tail lights, other accessories, but the main stuff for functionality is above.

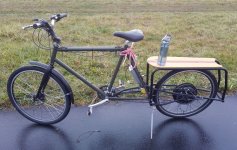
Here's a photo of the current rig from today:
20201215 olive drag.JPG
 
dequinox said:
1. Front brakes are weak, and barely apply stopping force. I've used these disc brakes for the build (up front)
Well, despite the listing name, those aren't actually Avid BB7 calipers; they're some generic thing that is probably the same as on BSOs. :(

Actual BB7's look like this:
https://www.amazon.com/gp/product/B00553YPEY/ref=ppx_yo_dt_b_search_asin_title?ie=UTF8&psc=1

If no adjustment of cable at caliper or lever allows proper braking force to be applied, even with the pad adjustment leaving it actually touching the rotor before lever is pulled, then eitherL

-- they're really crappy brakes (a category that *all* the generic disc brakes I've ever had fit within; only my Avid BB7's have ever worked correctly),

-- or the cable housing is the wrong type (derailer isntead of brake),

-- or the lever is the wrong type (road instead of mountain, or vice-versa),

-- or the cable itself is bad (kinked, broken strands, etc),

-- or the pads are simply unable to grip the rotor due to a pad or a rotor problem (slippery-dirty, glazed, etc).
 
neptronix said:
Omg, it's coming together finally :mrgreen:

:lol: :lol: :lol: right you are, it's been a long project! I have kids and too many other hobbies as well!


amberwolf said:
-- they're really crappy brakes (a category that *all* the generic disc brakes I've ever had fit within; only my Avid BB7's have ever worked correctly),
I concur, they are crappy. I managed to adjust them such that they function a whole lot better, but still find them underwhelming.

-- or the cable housing is the wrong type (derailer isntead of brake),
It's definitely brake cable housing, just wound stainless lined. I could do with the PTFE lines stuff.
-- or the lever is the wrong type (road instead of mountain, or vice-versa),
The brake levers are those that come with the typical Amazon 1kw ebike kits. They seem to be mtb style. In just barely able to get enough throw out of them to get some stopping power. They are doing much better than my last post, but are rubbing still. I am learning the adjustments' finer points.
-- or the cable itself is bad (kinked, broken strands, etc),
I've ruled this out as it's brand new cable i got at my LBS.
-- or the pads are simply unable to grip the rotor due to a pad or a rotor problem (slippery-dirty, glazed, etc).
I thought maybe there was a contaminating coating on the rotor or something contaminated the pads at first. I've since adjusted them to where they function on an adjust level.

Amber see bolds above for brake topic responses. Next challenge is the derailers. I have a rear derailer that has scratched the hub motor paint off... :cry:
I have to go get more shifts cable housing for the front one in order to see how that functions. This frame has an oval shaped base near the crank, and i has to significantly grind back the strap to make it fit. Consequences of buying cheap... again. :lol:

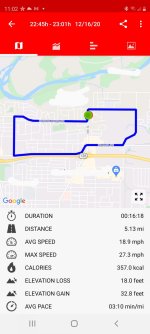
Aside from all of that i took it for a run last night. I got 27.3mph for a top speed (probably down a hill a bit) and did 5.13 miles on 217 W-hrs in about 16 min, so about 42 w-hr/ mile. I was riding the throttle hard and not pedaling, plus the brakes are dragging a little. I need to true up the rear disc and fine tune the front calipers position.
Screenshot_20201216-230242_Zeopoxa Cycling~2.jpg
 
dequinox said:
It's definitely brake cable housing, just wound stainless lined. I could do with the PTFE lines stuff.
You said it's "wound"? If so, then it is could still be derailer housing, or at the least may not be compressionless. Brake housing should be compressionless, and if it is spiral-wound it often is not. With any significant length of housing, you get so much squish in just the housing that the cable doesnt' get pulled enough. If the housing has a bunch of parallel "wires" running from one end to the other, and a good tight (often kevlar) wrap around that, it'll be a lot less compressible than a spiral-wrapped generic housing.

I switched to Jagwire housing from regular cheap "bell" brand housing (from the cheap multicable kits wallyworld sells, I think), and it made a significant difference.

But the biggest difference was simply using a good caliper, the Avid BB7 (am also using the Avid Speeddial lever, but it also worked on a generic ebike lever during some tests--the Avid lever is just easy to adjust and setup for my specific hand-pull needs, and regular levers can't do that). The BB7 can, by itself on the front, stop the heavy SB Cruiser trike, or even skid the wheel, using the 200mm rotor. (could probably do it with a 180, maybe even a 160).

None of the generic ones could do that (promax, unnamed, etc). The only thing that could, before the BB7, was my dual-rim-brake setup, where I had one rim brake in front of the fork, and one behind it, using a dual-pull brake lever, and various Koolstop pads.

The only problem I have had with it is that the caliper mounting tabs on the crappy fork lowers I'm using on my custom built fork actually bend whenever I have to brake really hard (rare, but happens in traffic), leaving the tabs bent a bit and the pads rubbing on the rotor, until I bend them back. :/ Not the fault of hte brakes, though--just shows how much force they apply in such a situation (pulling hard so it suddenly nearly locks up the wheel from 20MPH on a 600lb-with-rider/load trike).


The brake levers are those that come with the typical Amazon 1kw ebike kits. They seem to be mtb style. In just barely able to get enough throw out of them to get some stopping power.
That sounds like they're the wrong lever type for the brake, and/or the housing is the wrong kind. If you can pull the handle down near or to the bar before getting significant braking, then typically the levers have the wrong amount of pull for brakes they're connected to.


Amber see bolds above for brake topic responses.
If you're already higlighting and using the Bold function, you could just use the Quote function instead--much eaiser to read and reply to. ;)
 
You said it's "wound"?

Yes definitely not compression-less. There's only one company, according to my LBS bike mechanic, that makes a compression-less housing that won't explode given enough force... can't remember the company name. I'm not entirely prepared to upgrade that far yet.

the biggest difference was simply using a good caliper
Agreed. I'm in the functional zone for now, but I'll likely upgrade in a while to avoid the crumple zone... of a car that is...

pulling hard so it suddenly nearly locks up the wheel from 20MPH on a 600lb-with-rider/load trike
:shock:

If you're already higlighting and using the Bold function, you could just use the Quote function instead--much eaiser to read and reply to.
Something was learned today... :bigthumb:
:lol:
 
Last nights ride: 8.1 miles on 321.7 w-hr... so about 40w-hr per mile. Not very efficient, and the weight of this bike is lower than that of my first build. That was a brushed mid-drive, and got about 35 w-hr per mile. I'll need to do a little debugging to see if I can improve this number.

It's also a little weak up hills...
 
dequinox said:
Last nights ride: 8.1 miles on 321.7 w-hr... so about 40w-hr per mile. Not very efficient, and the weight of this bike is lower than that of my first build.
You might want to put your system/bike into the https://ebikes.ca/tools/simulator.html , and vary the voltage of the battery and the current limit of the controller, and / or the wheel size, to see if any of them improve your results, but still give you the performance you need. If so, you might be able to make changes to improve your range.

Using two DD hubmotors as 2WD on Crazybike2, which was about 220lbs, when I was 180lbs, total 400, would typically get me around 30wh/mile in stop-and-go traffic, and I could get almost down to 20wh/mile on long continuous rides with nearly no stops. (all on the flats, no real wind just a bit of breezes sometimes, at 20MPH cruising speed (max speed as well).

Faster speeds very quickly increase power usage due to air resistance, so that could be part of your usage there, as just 5MPH more, above 20MPH, could sometimes cause up to double the power usage depending on the aero of you and the bike.

If there's much in the way of hills/slopes, or lots of stops/starts, that is also part of it.
 
I think the rubbing brakes have a lot to do with it, and I was pretty hard on the throttle at takeoff. I've been wanting to get a phase-runner so I can throttle current. The basic amazon kits don't have that capability as far as I know. Also, I have no idea what the winding is :roll:
 
You don't really need to know the specific winding. Set up the bike so the rear wheel is offground, unloaded, and spin it up to max speed. Note the wheelspeed (your speedo has to have it's sensor on the motor wheel for this), and then you can do the calculation to find out the RPM based on the MPH and the wheel circumference the speedo is set to. (I don't know the math offhand, but there's a lot of googleable pages about it; it's easy).

Once you know the unloaded RPM, you can guesstimate the loaded RPM as around 80% of that (depends on the rest of the system), and thus the max speed of the system on level ground with no wind.

But with the RPM you can try to match a similar motor on the simulator to use as a stand in for yours when experimenting with the simulator to find a more optimal setup.

It's likely taht the cheap controllers have no way to change their settings like for current limit, but if you have a cycle analyst you can use that to do it. V3 is most versatile but the v2 has some ability as well.
 
Ah yes the no load speed idea slipped by me, thanks. I'll give that a try. I've often thought an rpm gauge would me a good investment too, that would simplify this procedure.

Yeah the controller has no real ports for programming or anything. Also its kind of massive compared to a phase-runner. It might be nice to have a cycle analyst on this bike, but that might be a down the road purchase. Wife's already eyeballing me on this one. :pancake:
 
A turnigy watt meter ( ~$25 ) is a nice ghetto alternative to a cycle analyst. Throw a cheap bike computer on and you're golden.
 
Back
Top