C Cab Hot Rod Power Advice

amberwolf said:
Just_Ed said:
I originally was going to go with
images


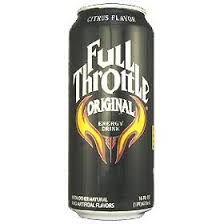
But they aren't available anymore, unless you pay big bucks online.
If I could come up with about eight empty (cosmetically good) 'Full Throttle' cans I would use them.
While looking at your custom front wheel posts, I ran across this again, and thought that perhaps you could print out your own labels to wrap your existing cans with (and then lacquer or clearcoat them to weatherproof them). If you use several side views of the cans, you can "unwrap" the label into a flat image by adding each panel to the next, then print that out to scale for the cans you have. Wouldn't have to be perfect, just enough to get the idea across.

You could even edit the ingredients list to be a parts list for the build, including blood, sweat, and tears. ;)

https://www.google.com/search?sa=X&source=univ&tbm=isch&q=full+throttle+energy+drink+can+label+image&ved=2ahUKEwiH_JjixoPtAhXBIDQIHSZnCycQjJkEegQICRAB&biw=1054&bih=576&dpr=1.75

https://www.drinkfullthrottle.com/product-page.html

full-throttle-citrus-can.png

full-throttle-agave-can.png

full-throttle-energy-drink-logo-bottom-1.png

Great idea. I think I will have a go at doing that, Thanks amberwolf

I like the idea of editing the ingredients.
 
amberwolf said:
Did you get your labels made? ;)

Well... yes and no.

I got as far as printing out the flames and that's about it.
Been doing other things and using computer time on writing and movie making.

Full throttle logo.png

But some time allocated to working on the car.

It took a while to visualize and make the supports for holding the calipers.
The planets have lined up this week, thus some progress as of this afternoon.

DSCN4873.JPG
DSCN4888.JPGDSCN4889.JPGDSCN4890.JPG

I'm at a point that I need to visit my metal supplier and buy another length of 3/4" rod.
To be used to get all pillow blocks lined up and facilitate setting the axle square.

Dinner bell just rang. Munchies time
 
Getting there! Still anxious to see the first test ride results.

But you need those brakes. Don't want to end up like Tiger Woods.
 
fechter said:
Getting there! Still anxious to see the first test ride results.

But you need those brakes. Don't want to end up like Tiger Woods.

Yeah! me too/either.

Not too much longer and it will be time to go back to the electrical setup.
A bad thing, about Tiger. I don't golf but I like watching it. Especially when he is playing.

I have a minor sense of what has happened to him.
I tried to kick a British car off the road, with my motorcycle. I lost.
Tore up my foot pretty bad.
 
The car is getting a wee bit heavy for me to move around.

Fortunately, my overhead 2x12 center beam is perfect for a hoist.
With a little additional reinforcement and some 1 1/4" angle iron rails, I'm able to move it around.

The shop is 24' long. The rail system will be 20'.
The trolley is rated at Max 2 ton. The rail system, ????? :shock:

The photos show it only half completed. Just 10' of rail installed to this point.
I strained a neck muscle and it needs to get better before lifting the last rails over my head. They are all cut and the tabs welded on. Just need to be 'hoisted' up to where they will live.

DSCN4949.JPGDSCN4950.JPGDSCN4951.JPGDSCN4952.JPGDSCN4953.JPG
 
SlowCo said:
Great to see an update from you! And what a nice hoist. :thumb:

Thanks SlowCo

The hoist will give me that third hand, I often wish I hand.

The brake calipers and discs are just about completed. The master cylinders need another set of plungers made and the bracket welded into place. Then I need to hook up and bleed the brake lines.
I cut down virtually all my dying backyard trees,
so I need to make sure I have another way to stop. :lol:

Then it's back to the spaghetti sorting...uh, I mean wire sorting and function testing.
 
Back on the road again ...well one can dream!

A function test of the new hoist. First, I removed the 70 lb battery.
How nice that was, not having to strain my back lifting it out of its cradle.

Then as envisioned, I lifted the rear of the chassis up to a working height.
Was able to get all hydraulic hoses mated up and temporarily secure.

DSCN4958.JPG

No more unnecessary hands and knees work.

DSCN4960.JPG

Now to finish the plungers and weld in the master cylinder bracket.

DSCN4962.JPG

And fashion a foot brake pedal.DSCN4795.JPG
 
Looking good! It's nice having a overhead crane. Being able to move the load when it's up in the air is super useful. All I have is a chain tossed over a ceiling joist. :oops:

I must say that your welds are looking nice. Amazing what practise (and a grinder) will do. :thumb:

If you put in enough battery and controller. That thing will do wheelies! 🏁🏁🏁
 
nicobie said:
Looking good! It's nice having an overhead crane. Being able to move the load when it's up in the air is super useful. All I have is a chain tossed over a ceiling joist. :oops:

I must say that your welds are looking nice. Amazing what practice (and a grinder) will do. :thumb:

If you put in enough battery and controller. That thing will do wheelies! 🏁🏁🏁

:lol: Now there's a picture. And another idea. Maybe I should plan for 'wheelie bars'.
Hmmm, what better way to further the 'illusion' of power.
I doubt the bicycle front wheels will last long, doing wheelies.
 
nicobie said:
Who cares? :mrgreen: everything is replaceable.

:shock: Well, actually I do. :)

Those are not your run-of-the-mill everyday bicycle wheels. They are custom-made (altered) by me,
to meet the needs and design of the vehicle.

Each wheel/rim is fabricated (widened) with two rims fastened together, special DIY hubs, and spoked with an offset.
I would rather not have to remake them again, right away.
 
Have the mechanics tight, now for the electrical.

Had it working in the beginning, but not so much now.
This should be nothing more than make the connections and push to go.
I checked the continuity of the wiring harness to the throttle as well and that seems okay.
Not sure about checking the throttle ???

Getting 56 volts from the battery to the terminal blocks.
Continuity check shows okay.
Not getting any voltage from either controller to the throttle/potentiometer connector.

Hoping the controllers are okay, just something I'm doing wrong ... :? :confused:

What say you?
 

Attachments

  • DSCN4967-1.jpg
    DSCN4967-1.jpg
    124.2 KB · Views: 427
Do you have the "keyswitch / ignition / doorlock" wire from the controller connected to battery positive? This is needed to power the low-voltage power supply (LVPS) of the controller to turn on the brain /etc and provide 5v/etc to the outside world.
 
amberwolf said:
Do you have the "keyswitch / ignition / doorlock" wire from the controller connected to battery positive? This is needed to power the low-voltage power supply (LVPS) of the controller to turn on the brain /etc and provide 5v/etc to the outside world.

Hi Amberwolf

Answer no, at this moment. I thought that with voltage going directly to the controllers they would 'fire up'/work.

I did have the full harness wired up including the 'forward/reverse switch and the key on/off switch.

Is this incorrect thinking?
 
Just_Ed said:
Answer no, at this moment. I thought that with voltage going directly to the controllers they would 'fire up'/work.

I did have the full harness wired up including the 'forward/reverse switch and the key on/off switch.

If the key switch connects the KSI wire to battery positive, then turning the key on will turn the controllers on if they also have battery positive to their main B+ wire.

Without this connected, the brain and other low voltage stuff in there doesnt' get any power, because that KSI wire is the power supply to the LVPS that creates 12v and 5v. (which is why you can use it to turn the controllers on and off).
 
You need a skinny wire going to B+ in addition to the big red one. On mine, it's orange. On yours it could be anything. You must have had it connected before when you were testing.
 
fechter said:
You need a skinny wire going to B+ in addition to the big red one. On mine, it's orange. On yours it could be anything. You must have had it connected before when you were testing.

You see that is what is puzzling to me. It's been a while but after I function tested the system the last time all I did was remove the wiring harness. (Unplugged the connectors). I have been reviewing our conversations #13 or so. It appears I may have the same problem as back then.

Anyway, I will hook everything back up today and try again.

I will keep you posted.
 
OK, I've had another go. But no success as yet. It's been too long since we worked this together, and I've lost all the brain cells that I generated back then.

I'm just not comprehending. This wiring setup is just for the driver-side motor.

Anyway, here is a current picture of how I have it wired/connected. Still, nothing works.
The foot throttle is to the left out of the picture range.
I also tried using the hand throttle...didn't work.
DSCN4968.JPGDSCN4969.JPGDSCN4970.JPG

FYI
Controller%20wiring%204[1].png

I certainly don't remember using any other wiring.
Also, the wiring color code is not consistent, so it best not rely on that too much.
Once it is all up and running then I will record what color codes will be used.
 
Check to see if you have battery voltage on the key switch wires. With the key on, you should see battery voltage on both wires (measured against B-). That's the orange wire I was referring to.
 
fechter said:
Check to see if you have battery voltage on the key switch wires. With the key on, you should see battery voltage on both wires (measured against B-). That's the orange wire I was referring to.

I just came in from doing just that. And that all checked, correct.

I must have a loose/bad connection somewhere. After checking the voltage and continuity at various points, it just started working.

So I'm 'not' losing it entirely. It worked forward and backward.

It worked well enough to let me know I have more to do with the brake discs. Something doesn't sound good.
And I hope with the seats in and any additional sound deadening efforts it quiets down some.

At least some of the frustration and doubt is gone.

But don't leave guy's there will be more to this saga for sure... :lol:
 
Back
Top