Optimized TSDZ2 Firmware

mxlemming said:
The other problem with the interrupt pin/timer count is that normally hall sensors are buried inside motors and the noise in their lines can be terrible.

I too had this doubt (even if the inputs are configured as schmitt trigger) and before moving to the interrupt implementation, I did a test by storing the last 5 Hall states detected by the interrupt (a 16-bit variable is enough) and in several minutes of testing, an incorrect sequence was never detected. And so, at least for the TSDZ2, it seems reliable.

I must also say that the Android app has helped a lot in running the various tests necessary for development. Without the app it would have been much more difficult.
 
Blacklite said:
This paper might be of interest -
http://koreascience.or.kr/article/JAKO201620240596781.pdf

There is a method of calculating the relative hall errors in real time, and an absolute error using back-emf. What’s interesting is that the absolute error is only calculated on startup, and they note that it was consistent across restarts. Meaning that possibly could be a manually set value (initial “tuning”) and then have the algorithm correct for the relative position errors real time.

I must admit some of the maths is beyond me so it might not be a usable approach. And/or the processing might be too involved. There are a couple of divide-by-3’s, but from memory that can be accomplished to a reasonable level of precision without wasting too many cycles by sum’s of bit shifts.

The other thing I can’t really get from the paper is if it only applies to a steady state speed.

I’m really keen to try mspider65’s firmware updates, but my display is an 860c so not sure how to at this stage. It’s unfortunately beyond my coding skills to port these changes back into casainho’s code that works with that display.

It appears that the document describes the effect I have described. Currently my firmware considers a single ΔT (the average) for all the Hall transitions since I have not found big differences between one transition and another.
I'm curious to see the result of the calibration performed on other motors besides mine. In any case, it would not be a problem to use a different ΔT for each Hall state.

Unfortunately the TSDZ2 controller does not allow to perform a back-emf measurement and the only way I have found to calculate the absolute offset, is that of the minimization of the current.
 
mspider65 said:
mxlemming said:
The other problem with the interrupt pin/timer count is that normally hall sensors are buried inside motors and the noise in their lines can be terrible.

I too had this doubt (even if the inputs are configured as schmitt trigger) and before moving to the interrupt implementation, I did a test by storing the last 5 Hall states detected by the interrupt (a 16-bit variable is enough) and in several minutes of testing, an incorrect sequence was never detected. And so, at least for the TSDZ2, it seems reliable.

I must also say that the Android app has helped a lot in running the various tests necessary for development. Without the app it would have been much more difficult.
I think this is more dependent on the motor than the controller, and perhaps the filtering on the inputs.

I've found motors where it's completely unusable. Perhaps the tsdz has significant filtering?
 
mxlemming said:
Later I moved to a crude pll - estimating the error each time I detect a hall state change and subtracting this error (with a correction factor of about 0.2) from my pll increment.

The result is no abrupt changes in angle, and a hugely reduced sensitivity to errors in hall sensor placement. Combined with a more accurate way of determining hall sensor position (basing it on the timing of edges is prone to error, much better to integrate the angle for each state over a revolution) and pll gains set reasonably I went from "just about ridable with frequent over current" to "beautiful sinusoids" and about 2x the current before tripping.
I am very interested on your PLL implementation - is your code on github?

I remember that for KT motors controllers, after certain speed, like 200 ERPS, I started to do the interpolation for a full ERPs and not for each 60 degrees from each hall sensors, so there was no errors associated with each 60 degrees - in TSDZ2, if we compared 100 ERPs to the 700 ERPS, the speed is then 7x more quick so the time for 1 ERPS interpolation is equal to 1/6 ERPS.

And for the values mspider65 did measure, the error values at every 60 degrees are constant, so I think using the previous ERPs measured timing of each hall sensor may be enough (maybe adding a bit of low pass filtering / average).

Would be really great to have all this automatically calculated and so user would have one less configuration to do...
 
https://github.com/davidmolony/MESC_Firmware/blob/feature/srm_flash_storage/Core/Src/MESCfoc.c
See:
void hallAngleEstimator() (ignore the void hallAngleEstimator_new(), it was a prototype I tried that just didn't work)
and
void getHallTable()
for the functions that generate the angles and generate the table of angles/hall states.

I should probably merge everything back to master now... at the moment I have quite a few branches.

Edit: I just realised I am using floats in this. Should be possible to eliminate them/turn to Q31_t or something.

I also spotted a few little cleanups I could do to eliminate a few pointless operations. It still runs plenty fast enough for me though, so no biggie.

It works by directly converting 3 inputs from hall sensors into a number by bitmask and shift - the inputs should be consecutive for this to work with out an if-else-if kind of table...
e.g. PB4,5,6 are 101 =>5.

This is used as the index for the hall table - if a change in state is detected
______________________________________________________________________________________________
e.g: foc_vars.halltable[5-1][2] => returns the middle angle (uint16_t) for that hall sector
The error of the estimated angle (generated by dumbly adding an angle each period, see below) to the hall angle is calculated

[Then logic for determining direction, converting the error to a number that can be used given angle overflow possibility]

Last hall period in PWM cycles is averaged with previous with exponential smoother (least number of clock cycles smoother) and period counter reset

The inverse of the last hall period is calculated (as float, I have an FPU so meh, you can fiddle it into uints or whatever you want)
_______________________________________________________________________________________________
Then, every PWM period the (calculated error*gain0.2 + the average angle per hall state)is mulitplied by the 1/last_hall_period and added to the foc_vars.Hallangle - which is the angle in uint16_t used by the rest of the firmware.

If the gain was 1, then every hall period the angle error would be completely compensated, and it would track the hall sensors exactly, but lagging the error... if you see what I mean...
As the gain approaches 2, it becomes unstable and the error is magnified each hall period - it vibrates aggressively.
As the gain is lower, it has a smaller and smaller correction, and so errors in the hall sensor placement become less and less important. I found below 0.05 it starts to step out, and below 0.1 it becomes noticeably laggy at low speeds - at high speed it is fine. There might be something in adjusting this gain factor according to the speed. I found 0.2 just worked fine so went no further in optimising.
 
I'll also note that I found the errors in angle were not such a great problem - the torque generated is proportional to the sin of the lead angle, so small angle errors around 90 degrees lead don't cause much noticeable difference in anything... sin wave is flat at 90degrees... I found the PID loops are easily able to just deal with it.

The real problem was when you get step changes in the angle as the interpolator suddenly goes "oh,I'm somewhere else25 degrees off, never mind, have this number that's just 25 degrees different to where we thought we were...

This has the PID loop controlling the currents suddenly in a panic because the sinewave (foc_vars.Hallangle in my case) has suddenly changed, sin and cos have suddenly changed, so the park transform does a suddenly different conversion and there is a huge sudden shift in Va and Vb experienced by the motor that the PID had not converged for, cue current spikes, funny noises and overcurrent events.
 
The real problem was when you get step changes in the angle as the interpolator suddenly goes "oh,I'm somewhere else25 degrees off, never mind, have this number that's just 25 degrees different to where we thought we were...

If you limited the maximum change of the angle per time step, it would likely be a lot easier on the PID loops. Increasing the Derivative term on the PID would likely help this as well but the lag would increase if you did that.
 
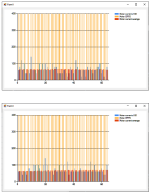
Hi mspider65 - thanks for sharing your great work on the tsdz2. I've been trying out your changes on the 1.1.1 osfw. So far I've only put the hall sensor reading on the fast timer - and I'm not seeing much of a change in current spikes as a result - is that what you saw? Would I expect to see more of an improvement with the changes in posts 2+3?

First graph is v1.1.1 as-is, 2nd is with the hall sensors moved to the timer. If anything my new changes show more current! Test is setting a target motor current of 1A.

Of course, it's quite possible it's my implementation :)

v111_comparison.png
 
beemac said:
Hi mspider65 - thanks for sharing your great work on the tsdz2. I've been trying out your changes on the 1.1.1 osfw. So far I've only put the hall sensor reading on the fast timer - and I'm not seeing much of a change in current spikes as a result - is that what you saw? Would I expect to see more of an improvement with the changes in posts 2+3?

First graph is v1.1.1 as-is, 2nd is with the hall sensors moved to the timer. If anything my new changes show more current! Test is setting a target motor current of 1A.

Of course, it's quite possible it's my implementation :)

v111_comparison.png

To do a better test you should run te motor with a fixed duty cycle instead of a fixed target current.
And the changes as of post nr. 2 are the most important.

About software changes, there are many delicate aspects to consider. In particular, the prority and the concurrency of the different interrupts and the execution times of the different algorithms.
 
mspider65 said:
beemac said:
Hi mspider65 - thanks for sharing your great work on the tsdz2. I've been trying out your changes on the 1.1.1 osfw. So far I've only put the hall sensor reading on the fast timer - and I'm not seeing much of a change in current spikes as a result - is that what you saw? Would I expect to see more of an improvement with the changes in posts 2+3?

First graph is v1.1.1 as-is, 2nd is with the hall sensors moved to the timer. If anything my new changes show more current! Test is setting a target motor current of 1A.

Of course, it's quite possible it's my implementation :)

v111_comparison.png

To do a better test you should run te motor with a fixed duty cycle instead of a fixed target current.
And the changes as of post nr. 2 are the most important.

About software changes, there are many delicate aspects to consider. In particular, the prority and the concurrency of the different interrupts and the execution times of the different algorithms.

Thanks I'll try that as a better test.

Yes i've spent quite a lot of time reading the changes to try to understand everything that you're doing - was a bit stuck this morning as i couldn't get the 'up' side of TIM1 to fire - but then I found you'd changed the countermode to centrealigned3 from 1... documentation on those settings is hard to find.

Right now I'm getting some odd results - when I split the main control loop in two - so the pwm calcs happen on down - and then get set on up - with the loop split the motor runs about 15% slower - but uses about the 15% more current - but sounds like I should move on and implement the next stage and then run better tests!
 
beemac said:
mspider65 said:
beemac said:
Hi mspider65 - thanks for sharing your great work on the tsdz2. I've been trying out your changes on the 1.1.1 osfw. So far I've only put the hall sensor reading on the fast timer - and I'm not seeing much of a change in current spikes as a result - is that what you saw? Would I expect to see more of an improvement with the changes in posts 2+3?

First graph is v1.1.1 as-is, 2nd is with the hall sensors moved to the timer. If anything my new changes show more current! Test is setting a target motor current of 1A.

Of course, it's quite possible it's my implementation :)

v111_comparison.png

To do a better test you should run te motor with a fixed duty cycle instead of a fixed target current.
And the changes as of post nr. 2 are the most important.

About software changes, there are many delicate aspects to consider. In particular, the prority and the concurrency of the different interrupts and the execution times of the different algorithms.

Thanks I'll try that as a better test.

Yes i've spent quite a lot of time reading the changes to try to understand everything that you're doing - was a bit stuck this morning as i couldn't get the 'up' side of TIM1 to fire - but then I found you'd changed the countermode to centrealigned3 from 1... documentation on those settings is hard to find.

Right now I'm getting some odd results - when I split the main control loop in two - so the pwm calcs happen on down - and then get set on up - with the loop split the motor runs about 15% slower - but uses about the 15% more current - but sounds like I should move on and implement the next stage and then run better tests!

Exactly, with the first two steps you will get precision in the angular rotor position calculation. With the step 3 you will calculate the correct spatial (angle) and timing (hall delay) absolute references to reach the best efficecy. All the 3 steps are necessary to have the best result.
 
beemac said:
Thanks I'll try that as a better test.

Yes i've spent quite a lot of time reading the changes to try to understand everything that you're doing - was a bit stuck this morning as i couldn't get the 'up' side of TIM1 to fire - but then I found you'd changed the countermode to centrealigned3 from 1... documentation on those settings is hard to find.

Right now I'm getting some odd results - when I split the main control loop in two - so the pwm calcs happen on down - and then get set on up - with the loop split the motor runs about 15% slower - but uses about the 15% more current - but sounds like I should move on and implement the next stage and then run better tests!
Beemac, thanks for your effort to actualize the firmware for the TSDZ2 wireless and other displays!
I am following this thread and I will help in anything I can.

Are you protecting your motor and motor controller while testing? I used a lab power supply with current limitation (a cheap chinese one) that did show the current value and yes, at higher motor speeds the current did increase to much...
I also used a car fuse, cheap to buy in local store.

I also used a bike trainer stand and a throttle, the trainer let you put some load on the wheel.
 
casainho said:
beemac said:
Thanks I'll try that as a better test.

Yes i've spent quite a lot of time reading the changes to try to understand everything that you're doing - was a bit stuck this morning as i couldn't get the 'up' side of TIM1 to fire - but then I found you'd changed the countermode to centrealigned3 from 1... documentation on those settings is hard to find.

Right now I'm getting some odd results - when I split the main control loop in two - so the pwm calcs happen on down - and then get set on up - with the loop split the motor runs about 15% slower - but uses about the 15% more current - but sounds like I should move on and implement the next stage and then run better tests!
Beemac, thanks for your effort to actualize the firmware for the TSDZ2 wireless and other displays!
I am following this thread and I will help in anything I can.

Are you protecting your motor and motor controller while testing? I used a lab power supply with current limitation (a cheap chinese one) that did show the current value and yes, at higher motor speeds the current did increase to much...
I also used a car fuse, cheap to buy in local store.

I also used a bike trainer stand and a throttle, the trainer let you put some load on the wheel.

Thanks am not 100% i'll get things going but I'll give it a go... hadn't thought about protecting the motor - I am using a DC booster as a cheap lab power supply and it does have constant current setting so I should set it low just in case. i'm hoping because I'm not starting from scratch that I'm less likely to have the motor do anything really strange but you never know. For now I'm using walk assist to test as it sets pwm target rather than current - and so it's easy to stop it if the motor starts making horrible noises!

I don't have any simple means at the moment of creating load as I don't own a trainer - but I'll cross that bridge when and if I get encouraging results with it running unloaded.
 
mspider65 said:
beemac said:
mspider65 said:
beemac said:
Hi mspider65 - thanks for sharing your great work on the tsdz2. I've been trying out your changes on the 1.1.1 osfw. So far I've only put the hall sensor reading on the fast timer - and I'm not seeing much of a change in current spikes as a result - is that what you saw? Would I expect to see more of an improvement with the changes in posts 2+3?

First graph is v1.1.1 as-is, 2nd is with the hall sensors moved to the timer. If anything my new changes show more current! Test is setting a target motor current of 1A.

Of course, it's quite possible it's my implementation :)

v111_comparison.png

To do a better test you should run te motor with a fixed duty cycle instead of a fixed target current.
And the changes as of post nr. 2 are the most important.

About software changes, there are many delicate aspects to consider. In particular, the prority and the concurrency of the different interrupts and the execution times of the different algorithms.

Thanks I'll try that as a better test.

Yes i've spent quite a lot of time reading the changes to try to understand everything that you're doing - was a bit stuck this morning as i couldn't get the 'up' side of TIM1 to fire - but then I found you'd changed the countermode to centrealigned3 from 1... documentation on those settings is hard to find.

Right now I'm getting some odd results - when I split the main control loop in two - so the pwm calcs happen on down - and then get set on up - with the loop split the motor runs about 15% slower - but uses about the 15% more current - but sounds like I should move on and implement the next stage and then run better tests!

Exactly, with the first two steps you will get precision in the angular rotor position calculation. With the step 3 you will calculate the correct spatial (angle) and timing (hall delay) absolute references to reach the best efficecy. All the 3 steps are necessary to have the best result.

Thanks - I'm just starting on step 2 :)

I did notice an opportunity for a tiny bit more speed optimisation - in the asin function - i've changed the table so it's just a straight lookup - don't have to iterate over the sin table to find the return angle. Downside is about 80 more bytes of lookup but I think that's a reasonable tradeoff as it's much faster and always takes the same time.

Code:
uint8_t ui8_asin_table [128] = {0, 0, 0, 1, 1, 1, 2, 2, 2, 3, 3, 3, 4, 4, 4, 4, 5, 5, 5, 6, 6, 6, 7, 7, 7, 8, 8, 8, 9,
 9, 9, 10, 10, 10, 11, 11, 11, 12, 12, 12, 13, 13, 13, 14, 14, 14, 15, 15, 15, 16, 16, 16, 17, 17, 18, 18, 18, 19,
  19, 19, 20, 20, 20, 21, 21, 21, 22, 22, 23, 23, 23, 24, 24, 25, 25, 25, 26, 26, 27, 27, 27, 28, 28, 29, 29, 29,
   30, 30, 31, 31, 32, 32, 33, 33, 33, 34, 34, 35, 35, 36, 36, 37, 38, 38, 39, 39, 40, 40, 41, 42, 42, 43, 43, 44,
    45, 46, 46, 47, 48, 49, 50, 51, 52, 53, 54, 56, 58, 59};
    
// calc asin also converts the final result to degrees
uint8_t asin_table (uint8_t ui8_inverted_angle_x128)
{
  return ui8_asin_table[ui8_inverted_angle_x128 & 127U];
}
 
ok - i've copied across most of your code mspider65 - and things seem to work ok! I've not brought across the pas algorithm yet or some other bits in the lower part of the loop as if I do that I think I'll need to make more changes to how the ebike_app part controls the motor.

Going to call it a day for today I think - but the code is posted here in case anyone wants to have a look and make any comments. Bear in mind it's got a lot of commented code in there now so a bit of a mess.

Tomorrow i'll do a bit of comparative testing - see if I can repeat the results :)

https://github.com/4var1/TSDZ2-Smart-EBike/tree/motor_control_experiments
 
Regarding my third post about the technical details, i found a TI document addressing the same problem.
https://www.ti.com/lit/an/slaa561/s...384043&ref_url=https%3A%2F%2Fwww.google.it%2F

In my experiment I calculated the optimal lead time for a fixed load (no load).
But since the lead time varies with the speed of the motor but also the load, to complete the optimization, the optimal lead time should be calculated by varying the load as well.
In fact, the function that calculates the FOC angle tries to correct this component.
However, proceeding experimentally, making the same optimization for different fixed loads, it would be possible to fill a table of optimal "lead times" values and then use these values based on speed and load.
 
beemac said:
ok - i've copied across most of your code mspider65 - and things seem to work ok! I've not brought across the pas algorithm yet or some other bits in the lower part of the loop as if I do that I think I'll need to make more changes to how the ebike_app part controls the motor.

Going to call it a day for today I think - but the code is posted here in case anyone wants to have a look and make any comments. Bear in mind it's got a lot of commented code in there now so a bit of a mess.

Tomorrow i'll do a bit of comparative testing - see if I can repeat the results :)

https://github.com/4var1/TSDZ2-Smart-EBike/tree/motor_control_experiments

At least initially, to avoid unwanted errors i suggest you to port the full motor.c code.
If you get only some portion of the code and you mix with the existing code, you are more likely to make mistakes.
E.g.
- you should ensure both half PWM routines run in less than (PWM Time / 2) even in the worst case.
- you must care about the ADC signals conversion, (in my code ADC is HW triggered and no more SW triggered)
- etc...
 
mspider65 said:
beemac said:
ok - i've copied across most of your code mspider65 - and things seem to work ok! I've not brought across the pas algorithm yet or some other bits in the lower part of the loop as if I do that I think I'll need to make more changes to how the ebike_app part controls the motor.

Going to call it a day for today I think - but the code is posted here in case anyone wants to have a look and make any comments. Bear in mind it's got a lot of commented code in there now so a bit of a mess.

Tomorrow i'll do a bit of comparative testing - see if I can repeat the results :)

https://github.com/4var1/TSDZ2-Smart-EBike/tree/motor_control_experiments

At least initially, to avoid unwanted errors i suggest you to port the full motor.c code.
If you get only some portion of the code and you mix with the existing code, you are more likely to make mistakes.
E.g.
- you should ensure both half PWM routines run in less than (PWM Time / 2) even in the worst case.
- you must care about the ADC signals conversion, (in my code ADC is HW triggered and no more SW triggered)
- etc...

Thanks yea I've still to port the current sensing code i have the first half almost entirely your code but the 2nd half much less so at the moment - all the pwm code for instance is original as that's strongly tied to ebike_app.c - in the end I may well end up trying to take motor.c in entirety - but either way I still need to adapt the parameters at some point where the motor code interfaces with the rest of the ecosystem as units/scales differ for quite a few parameters it seems.

I have to say the motor seems to sound smoother and quieter with the changes I've ported across so far - but I've not had time since the weekend to do much more testing so that's just my unscientific observation :)
 
beemac said:
- but either way I still need to adapt the parameters at some point where the motor code interfaces with the rest of the ecosystem as units/scales differ for quite a few parameters it seems.

Yes i understand but there are not to many parameters shared between motor.c and ebike_app.c.
Just target current, target duty cycle, ramp-up, ramp-down, and measured current if i remember well.
 
mspider65 said:
beemac said:
- but either way I still need to adapt the parameters at some point where the motor code interfaces with the rest of the ecosystem as units/scales differ for quite a few parameters it seems.

Yes i understand but there are not to many parameters shared between motor.c and ebike_app.c.
Just target current, target duty cycle, ramp-up, ramp-down, and measured current if i remember well.

Hey - just posting in case you've got some more wisdom for me :)

I'm struggling with issues that i think are related to ADC conversion - the battery current measured is always very low - so when divided by the pwm_duty_cycle it's always close to zero - so the motor runs away as the current control code in osf never limits the current since it's never even close to exceeding the target current set by ebike_app...

I've looked at your changes - and i've even copied in your code for current measurement into motor.c and it's still the same - other than setting the trigger for ADC conversion to happen on TRGO (and so I don't trigger conversions explicitly in code - but read the values in the same place in the loop you do) there's nothing else significant i'm missing is there?

Edit - don't worry - it's not that - the current measurement is ok - for some reason the osf ebike app code is setting the target current way too high - probably due to a different measurement being incorrect... I'll keep troubleshooting!
 
beemac said:
question though - for you or @casainho - the comments and in 'post 1' you indicate that TIM1 runs (with prescaler 0) at 19Khz - is that correct? Isn't it 16Khz? I can't find definitive info on that - 16Khz seems more likely...
On my firmware I increase to 19kHz. Original is 16kHz.

Higher frequency is needed to draw the PWM / voltage waves for motor higher speeds. Since the max 4000 RPMs of the motor means 90 RPM cadence, to go to 130 RPM cadence the motor need to run faster and so the voltage waves, because I think at least each wave needs like 25 points / PWM points.

But the more high it is the more losses should happen and less efficiency at least on the electronics.
 
casainho said:
beemac said:
question though - for you or @casainho - the comments and in 'post 1' you indicate that TIM1 runs (with prescaler 0) at 19Khz - is that correct? Isn't it 16Khz? I can't find definitive info on that - 16Khz seems more likely...
On my firmware I increase to 19kHz. Original is 16kHz.

Higher frequency is needed to draw the PWM / voltage waves for motor higher speeds. Since the max 4000 RPMs of the motor means 90 RPM cadence, to go to 130 RPM cadence the motor need to run faster and so the voltage waves, because I think at least each wave needs like 25 points / PWM points.

But the more high it is the more losses should happen and less efficiency at least on the electronics.

ok thanks - have found the corresponding code now - hadn't read it fully before - mspider65 uses the same config pretty much

TIM1_TimeBaseInit(0, // TIM1_Prescaler = 0
TIM1_COUNTERMODE_CENTERALIGNED3,//TIM1_COUNTERMODE_CENTERALIGNED1
(421 - 1), // clock = 16MHz; counter period = 842; PWM freq = 16MHz / 842 = 19kHz;
//(BUT PWM center aligned mode needs twice the frequency)
1); // will fire the TIM1_IT_UPDATE at every PWM period cycle
 
beemac said:
mspider65 said:
beemac said:
- but either way I still need to adapt the parameters at some point where the motor code interfaces with the rest of the ecosystem as units/scales differ for quite a few parameters it seems.

Yes i understand but there are not to many parameters shared between motor.c and ebike_app.c.
Just target current, target duty cycle, ramp-up, ramp-down, and measured current if i remember well.

Hey - just posting in case you've got some more wisdom for me :)

I'm struggling with issues that i think are related to ADC conversion - the battery current measured is always very low - so when divided by the pwm_duty_cycle it's always close to zero - so the motor runs away as the current control code in osf never limits the current since it's never even close to exceeding the target current set by ebike_app...

I've looked at your changes - and i've even copied in your code for current measurement into motor.c and it's still the same - other than setting the trigger for ADC conversion to happen on TRGO (and so I don't trigger conversions explicitly in code - but read the values in the same place in the loop you do) there's nothing else significant i'm missing is there?

Edit - don't worry - it's not that - the current measurement is ok - for some reason the osf ebike app code is setting the target current way too high - probably due to a different measurement being incorrect... I'll keep troubleshooting!

I found my problem - i'd not updated the code that waits for the adc to settle down before reading offset values - so that was still using TIM3 and expecting it to be a 1mS timer! So it wasn't waiting long enough and not getting proper offsets...

Happy days - has been bugging me for a week why everything seemed to be working ok except torque readings and I couldn't see what in motor.c was affecting it.. answer was - nothing :)
 
Hi @mspider65 - the timer triggers in main that call motor and ebike every 4/50mS i think have an issue. I found the problem since because of the timer arrangement changes I copied your method across - but when I put my serial trace on I saw packets were being sent before the last packet was finished causing serial errors which weren't there before - so had a bit of a dig to see what was causing and noticed that your timer loops may fire early when the counters get close to wrapping causing a little jitter in how regularly the calls are made - and causing (in the osf firmware anyway) serial errors as packets don't get a chance to send before the next one starts every now and again... so causing a bad crc every few seconds or so...

it's these constructs that are problematic i think. Say if the test fires at tim4 counter = 254. Next firing the counter will be 3 but the two cycles before that when the test is say 0,1, or 2 minus 254 will be greater than 4 - so it fires a bit early.

Code:
    ui16_1mS_counter = ui8_tim4_counter;
    if((ui16_1mS_counter - ui16_motor_controller_counter) > 4) // every 4ms

I'm testing a change - to just detect change in the 1ms timer counter (this is ok as long as the loop runs faster than 1mS - and it does) - to give a 1mS pulse - and use that to increment separate trigger timers for the 4mS and 50mS calls... That seems to work and gets rid of the serial errors I was seeing.

I'm still testing - but this is the idea:

Code:
    ui8_1mS_counter = ui8_tim4_counter;
    if (ui8_1mS_counter != ui8_last_1mS_counter) // 1mS pulse
    {
      ui8_last_1mS_counter = ui8_1mS_counter;
      
      if (++ui8_motor_controller_counter == 4) ui8_motor_controller_counter = 0; // every 4mS
      if (++ui8_ebike_app_controller_counter == 50) ui8_ebike_app_controller_counter = 0; //every 50mS

      ui8_motor_controller_trigger = ((ui8_motor_controller_counter | ui8_motor_controller_trigger) == 0);
      ui8_ebike_app_controller_trigger = ((ui8_ebike_app_controller_counter | ui8_ebike_app_controller_trigger) == 0);
    }
   
    if(ui8_motor_controller_trigger) // every 4ms
    {
      ui8_motor_controller_trigger = 0;
       motor_controller();
      continue;
    }

    if(ui8_ebike_app_controller_trigger) // every 50ms
    {
      ui8_ebike_app_controller_trigger = 0;
      ebike_app_controller();
      continue;
    }
  }
 
beemac said:
Hi @mspider65 - the timer triggers in main that call motor and ebike every 4/50mS i think have an issue. I found the problem since because of the timer arrangement changes I copied your method across - but when I put my serial trace on I saw packets were being sent before the last packet was finished causing serial errors which weren't there before - so had a bit of a dig to see what was causing and noticed that your timer loops may fire early when the counters get close to wrapping causing a little jitter in how regularly the calls are made - and causing (in the osf firmware anyway) serial errors as packets don't get a chance to send before the next one starts every now and again... so causing a bad crc every few seconds or so...

it's these constructs that are problematic i think. Say if the test fires at tim4 counter = 254. Next firing the counter will be 3 but the two cycles before that when the test is say 0,1, or 2 minus 254 will be greater than 4 - so it fires a bit early.

Code:
    ui16_1mS_counter = ui8_tim4_counter;
    if((ui16_1mS_counter - ui16_motor_controller_counter) > 4) // every 4ms

I'm testing a change - to just detect change in the 1ms timer counter (this is ok as long as the loop runs faster than 1mS - and it does) - to give a 1mS pulse - and use that to increment separate trigger timers for the 4mS and 50mS calls... That seems to work and gets rid of the serial errors I was seeing.

I'm still testing - but this is the idea:

Code:
    ui8_1mS_counter = ui8_tim4_counter;
    if (ui8_1mS_counter != ui8_last_1mS_counter) // 1mS pulse
    {
      ui8_last_1mS_counter = ui8_1mS_counter;
      
      if (++ui8_motor_controller_counter == 4) ui8_motor_controller_counter = 0; // every 4mS
      if (++ui8_ebike_app_controller_counter == 50) ui8_ebike_app_controller_counter = 0; //every 50mS

      ui8_motor_controller_trigger = ((ui8_motor_controller_counter | ui8_motor_controller_trigger) == 0);
      ui8_ebike_app_controller_trigger = ((ui8_ebike_app_controller_counter | ui8_ebike_app_controller_trigger) == 0);
    }
   
    if(ui8_motor_controller_trigger) // every 4ms
    {
      ui8_motor_controller_trigger = 0;
       motor_controller();
      continue;
    }

    if(ui8_ebike_app_controller_trigger) // every 50ms
    {
      ui8_ebike_app_controller_trigger = 0;
      ebike_app_controller();
      continue;
    }
  }

Hi beemac,
the loop calculation are correct, only just change the > with >= to run every loop with the correct frequency.
 
Back
Top