E-S Stealth Electric Bike Owners

@ Cowardlyduck - Thank you for the information, I never knew that tester existed. I'll be taking a look at that. While I'm not saying it couldn't be the throttle or possible a bad controller, I would think it would be something in around what I was working with (i.e. removing the connectors and pulling the rear tire). Last night I looked at some of my posts before I got sick a few months back. I was working with 1abv and he was suggesting that I look at the phase wires and connectors as that is more than likely the problem. He suggested looking at the wires and upgrading them and the connectors to 10 gauge wires.

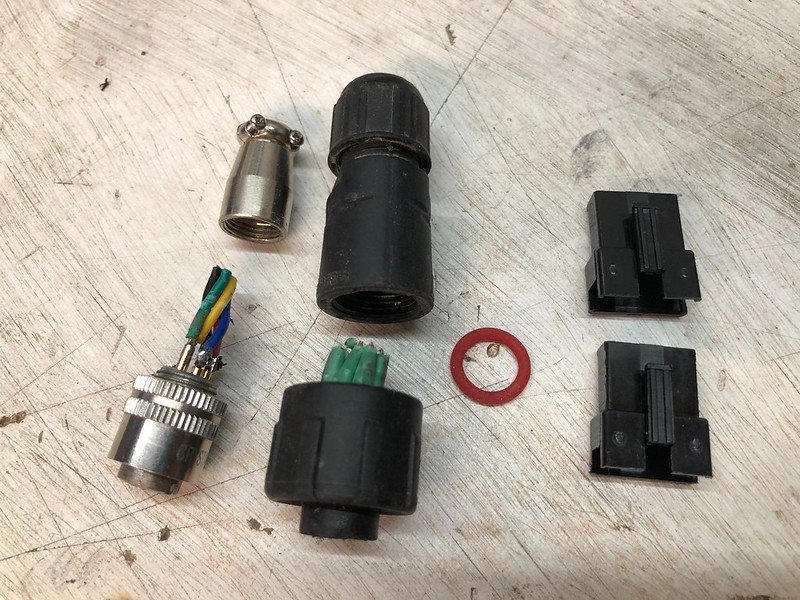
@ Theodore, Thank you for the reply back sir... I hope you are doing well.!! - To your comment, yes, I had the wheel off and reconnected more times then I care to say. I did clean all of the connections and sprayed them with t-9. Yes, although it is challenging to put that connector back, I feel 98% confident that it was connected as best I could. Again, looking back at what 1abv suggested, I decided to disassemble the hub and replace the wires as suggested with 10 gauge wire. I'm happy to report the a few connectors were corroded and loose and there was corrosion on 2 of the phase wires where the insulation was cut.

I'm going to order 10 gauge silicon phase wires, however, I'm at a loss for the type of connectors I need. Does anyone know what they are called...? I'm assuming I can order everything from Amazon. Oh, and do they make a replacement kit or anything for the hall sensor and temp wire..?

Thanks guys, I really appreciate all of your help..
 
These are great motor connectors and what I use! https://www.castlecreations.com/en/connectors/cc-bullets-8-0mm

Good to 300 amps…..going higher than that? Let me know!

Tom
 
bigbore said:
Billy.A said:
Gday Rix
I took the bike to Stealth HQ and they put a new tyre on for me with about a 3 hour turn around.
I live very close to their HQ
I was going to go with a rear Moto rim but changed my mind .
I have a new tyre from a different batch now so ill see how this one goes :shock:

Stealth's after sales service is Excellent which gives me so much peace of mind.
I love riding this thing! :flame:

I have a request for Billy.A,
The next time you are at Stealth HQ could you ask if it is possible to buy the spare parts needed to be able to fix the V-boxx yourself?
I have the bad impression that they do not provide the necessary parts for Bomber owners who are able to do repairs themselves.
It seems to me that 1abv has rebuilt the tooth of a gear of his V-boxx by welding and then reshaping the tooth some years ago.
1abv correct me if I'm wrong

Hey all,
So yes I did weld up a tooth but I also emailed stealth and I managed to purchase a few parts for a vboxx they had kicking around which included the gear I needed. The welded one is a spare as of now.
 
Piggybacking on what CD said those are xt150's they will plug right into your controller plugs. Make sure to get quality ones from hobby king or some such place. There are crappy ones out there.

Some may disagree but the stock mini XLR hall sensor connector and is a huge pain in the ass. I hated how they connect and stock the cables were too short.

I used a M14-9 IP67 IP68 9 Pin Waterproof Connector for the halls and temp sensor for a while. But it too was a giant pain in the ass to solder because its round and the pins were very close together. I finally bought a tiny solder iron which would have helped. I also had issues when the waterproof cap was attached it would strain the tiny wires and sometimes tear them. I wound up going with JST's wrapped in self fusing tape. I also made the hall wires a touch longer because on my bike they were a pain to connect.

The JST's are not waterproof but with the self fusing tape on it im not worried about that. Its is so infrequent that I need to disconnect them that when I do I just cut the tape off. The JST's are way easier to deal with and super easy to put together esp with a vise that usually comes with a jst kit. My 2 cents...
 
WHAT????what is this madness??????

51406443258_e28fa37fc3_c.jpg


Excuse me? are those single crown USD forks????

51406170941_b4c4ab8fff_c.jpg


and what is that poking around in the background???

51405423372_2c563c8b04_c.jpg


Yes that is the legendary Stealth Bomber number 143 that you may recognize. The man, The legend Rix was so cool give me Bomber 143 so that I can breath life back into it. We spoke on the phone and let me tell you he is such a great guy in person as he is in these pages and has left an everlasting imprint always happy to give advice and always testing and modding. Well as you know this is the forum for the OG gangster ebike so in the future you all will be getting a first hand seat to rebuilding. Now it may take me a minute but it will be worth it for sure! Rix thank you again you are the man!!
 
1abv said:
Hey all,
So yes I did weld up a tooth but I also emailed stealth and I managed to purchase a few parts for a vboxx they had kicking around which included the gear I needed. The welded one is a spare as of now.

You were lucky. Last year when I reassembled my V-boxx I wanted to put new gaskets on but they couldn't supply them to me.
 
@ Litespeed - Thank you for the link to the connectors. Since I'm going with 10 gauge wire, I should be good to go..

@Cowardlyduck - Thanks again, I wish I knew about that tester before taking the hub apart, but it is what it is. I'm looking to see about sourcing a tester in the States. I didn't realize it until I looked last night, but I do see the XT150 stamped on the phase wires. Its the hall connector that should be fun to find and do.

@1abv - Nice to hear from you, I hope you are doing well..!! - Thank you for the advice, I'll give Hobby King a call and see what they have. I'm sure I can get everything (10 gauge silicon wire, connectors, etc) directly from there. so if I understand you correctly, you did NOT use the M14-9 connector and went with the JST Fusing kit in its place. Forgive me, I'm just trying to picture in my head what you did. I think you posted in a previous post that you wiring in a modular setup so its easier to take apart when needed. I thought that was a great idea, but now I'm a bit confused if I should go with the M14-9 route, or JST kit... I just can't picture what that is.

Also, if I understood you correctly, the ONLY wire upgrade that you did was on the 3 phase wires going to 10 gauge silicon, correct.. everything else was left alone..?

Thanks..!!
 
Big bore
Absolutely. This was more of a let me see what I have kicking around my shop rather than polling stock off a shelf. Thankfully they had those spares at that time. I’m sure if I asked now they would probably not have them.
 
bigbore said:
1abv said:
Hey all,
So yes I did weld up a tooth but I also emailed stealth and I managed to purchase a few parts for a vboxx they had kicking around which included the gear I needed. The welded one is a spare as of now.

You were lucky. Last year when I reassembled my V-boxx I wanted to put new gaskets on but they couldn't supply them to me.

Does a VBoxx even have any gaskets. I hope I never have to find out.
 
@1abv... if you have a picture of your setup, that might help as well. I know you're all about taking project pictures.. :lol:
 
Well... I have some time to work on the bike today a little further and here is what I found when I removed the plastic wire covering. the insulation along the wires were cracked and broken off, even down to the connection area on the hub. I wasn't expecting that at all. I also disassembled the controller to inspect the wires inside as well. They look to be in good shape, nice solder joints, etc.. which leads me to my next question.

For those of you that replaced the phase wires, did you also replace them on the controller side, or just the motor side...thoughts..? I'm also think that, while I have to hub apart that I should replace the bearings. I'm trying to find a part number but there is nothing on the bearings themselves.

hub.jpg


wires.jpg


controller.jpg
 
that's really interesting. All of our boards are obviously hand soldered. My caps on my old board were all horizontal while yours are all vertical. I did not redo the controller wires. They seemed to be in fine shape. On the other hand the motor phase wires were just like yours. All cracked. Have you checked your caps on the controller to make sure they are not burnt at all? From the pics they look good. In my controller the caps were fine it was the legs of the caps that were all broke.

I dont think switching out the controller wires will really do that much. seems like breaking issues are by the motor side. Mine were like that. The controller wires were fine the motor wires were cracked.

TV the Vboxx does have gaskets. If yours tears you can use yamabond or some such RTV to make a gasket works fine. its only grease in there. Its grooved on one side but really what ever its grease so a little RTV would be fine.

As far as pics:
51418425525_dbd983e373_c.jpg

Left to right..
Mini XLR - this is what came with the bike.
M14-9 IP67 IP68 9 Pin Waterproof Connector- this is what I switched to. I also made my harness modular. You can see how tight it gets in there esp w shrink for all of the wires. Big pain in the ass to solder and the cap beacuse its tapered does not have a lot of room for all those wires and shrink.

JST This is what I have now, still modular harness just swapped out the M14 with this.
 
Technically you can go even further (I have) and replace the hall sensor wires with ultra thin 36awg wire to fit even more in through the axle. I did this as well as grinding the channel larger and replacing the silicone wire with heatshring when I added fans inside my hub motor so I could run the 2 extra 20awg wires I needed for the fans. Worked (and is still working) well!

Cheers
 
51416651413_63649e1349_c.jpg


Ok so I couldn't help myself... I switched to speakON for the charging cable. The way Neutrik designed it is pretty cool. I tinned my wires from the charger and the connector has screw terminals. Chucked some Locktite on the screws.. easy!. They also come with cable stress relif. On the bike side the one that was in stock was a solder on type. I used the 4 connector version but am only using 2 of the connectors. The 4 connector has a nice metal latch where the 2 connector has a plastic one.

bike side:
https://www.showmecables.com/neutrik-speakon-4-pole-male-chassis-mount-connector-nl4mp?msclkid=e69d190b01a617a879c1783bf062c18c&utm_source=bing&utm_medium=cpc&utm_campaign=(ROI)%20Shopping%20-%20New&utm_term=4576923312757148&utm_content=Connectors

Cable side:
https://www.showmecables.com/by-category/connectors-adapters/connectors-adapters-pro-audio/speakon-connectors-adapters/speakon-4-pole-female-connector

This mod requires hogging out the existing hole because the speakON is a bit wider. Used a step drill bit for that part. The small bolts still line up fine and im using the old rubber XLR cover


51416651408_5dfbec436c_c.jpg


BTW I didn't know this until I used it but a really nice thing about the speakON is that its a twist lock system vs a straight push in of the XLR. So you don't rely on friction for a connection.
 
1abv said:
WHAT????what is this madness??????


Yes that is the legendary Stealth Bomber number 143 that you may recognize. The man, The legend Rix was so cool give me Bomber 143 so that I can breath life back into it. We spoke on the phone and let me tell you he is such a great guy in person as he is in these pages and has left an everlasting imprint always happy to give advice and always testing and modding. Well as you know this is the forum for the OG gangster ebike so in the future you all will be getting a first hand seat to rebuilding. Now it may take me a minute but it will be worth it for sure! Rix thank you again you are the man!!

Thank you for the kind words, I am really looking forward to seeing what you come up with and seeing bomber 143 brought back to life. Glad it has a great home. :bigthumb:
 
Beautiful view..!! - Thats one hell of a headlight you have on there too... holy cow is that bright.
 
Hey guys... a majority of the parts that I ordered are scheduled to be here on Monday. So I'm chomping at the bit to get started.

QQ - I was doing a little more research on swapping out the phase wires and I noticed from some of the pictures that I found on the forum that, some hubs do NOT have the junction block that I've shown in the picture below. I'm "ASSUMING" that all that needs to be done is de-soldering the joints that I've highlighted in yellow arrows below, removing the old wire and soldering up the new wire. I ask because some of the pictures that I'm seeing, the wires are soldered directly together.

I've also been told that, with the new 10 awg wire, I have to remember to strip the insulation long enough to match the axel shaft in order for ALL of the wires to fit though.

If there are any other tips that I'm missing, please let me know....

Thanks...

Resized%201.jpg
 
My bike was out of action for about a week just recently, whenever I can't ride it for more than a few days like that I totally feel like this guy :(

[youtube]u0EpbzPBkuw[/youtube]
 
StudRock said:
Hey guys... a majority of the parts that I ordered are scheduled to be here on Monday. So I'm chomping at the bit to get started.

QQ - I was doing a little more research on swapping out the phase wires and I noticed from some of the pictures that I found on the forum that, some hubs do NOT have the junction block that I've shown in the picture below. I'm "ASSUMING" that all that needs to be done is de-soldering the joints that I've highlighted in yellow arrows below, removing the old wire and soldering up the new wire. I ask because some of the pictures that I'm seeing, the wires are soldered directly together.

I've also been told that, with the new 10 awg wire, I have to remember to strip the insulation long enough to match the axel shaft in order for ALL of the wires to fit though.

If there are any other tips that I'm missing, please let me know....

Thanks...

Resized%201.jpg

My motor is exactly the same inside. Same board. By your pics it looks like the old school c-lyte 5304 please anyone chime up if im wrong....
I wound up de-soldering the stock wires and soldering new 10 awg to that board. I think that board may be some kind of stress relief? or "clean" spot to have all of the wires soldered.
BTW if you do have the same motor the bearings you need are: (btw these are the sealed variant)
6005-2RSH
6004-2RSH
I think that the H at the end is a SKF thing. When I ordered a new set of bearings for my bike they were not SKF and did not have the H at the end. They were still sealed bearings and fit perfectly.
 
Okay, now you have me thinking what type of motor it is. The bike is a 2016 with a SN# of 744. You're saying 5304, but I think you mean 5403. While I have the hub apart is there any numbers to look for to confirm....?

Yes, because of the holiday, all the parts are delayed. I should start to get some of the wires and XT connectors tomorrow.
 
Yes indeed you are correct! Your bike is newer than mine! I have older motor. The motors look identical from the pics! Makes me wonder if the bearings are the same.
 
Okay... for the life of me, I can't find out how to tell what motor's we have (5403, 04, etc... There is absolutely no marking on the inside of the hub that I can see. I did a google search and wasn't able to find anything... Any thoughts..?

@abv... Well, regardless we'll find out, I ordered a set but then I was told they wont be in until late September, so I just ordered another set from Amazon...

I am interested in finding out how to tell what Crystalyte motor I have..

Any help guys..?
 
Well, I received part of the delivery today, the phase wires and XT connectors.

No pun intended, but Phase 1 of the project is completed. Now I'm just waiting on the hall wires and connectors and the axle bearings. At least I can get the wiring done today.

Resize%203.jpg


Resize%204.jpg
 
Back
Top