
You are using an out of date browser. It may not display this or other websites correctly.
You should upgrade or use an alternative browser.
You should upgrade or use an alternative browser.
Fitting chainrings to hub gears
- Thread starter Miles
- Start date
voicecoils
1 MW
Cool. Do you mean it lets you mount a front (crank) chainring to a splined freehub body that a standard cassette normally slides on to? I can't find it on their own site.
Do you know if it's splined for Shimano, Campag or...? Cheers!
Do you know if it's splined for Shimano, Campag or...? Cheers!
voicecoils said:Cool. Do you mean it lets you mount a front (crank) chainring to a splined freehub body that a standard cassette normally slides on to? I can't find it on their own site.
No, hub gears have a different 3 spline fitting.
If you download the manual: http://www.schlumpf.ch/handbuecher/WHB.md.engl.pdf it's on page 20. That's the only reference I could find.
voicecoils
1 MW
Miles said:No, hub gears have a different 3 spline fitting. If you download the manual: http://www.schlumpf.ch/handbuecher/WHB.md.engl.pdf it's on page 20. That's the only reference I could find.
Doh! Ah yes, my Shimano Alfine came with a few rear cogs, so they must be splined that way. I haven't swapped one yet myself. My Alfine seems to be struggling with the 48t to 16t reduction with just pedal power, I'd be interested to see how it might hold up under additional electric power.
12p3phPMDC
1 kW
- Joined
- Mar 16, 2009
- Messages
- 462
Excellent find Miles....
That really opens up the possibilities for off the shelf reductions
to internal gear hubs.
As far as I know, these should work with
All Shimano Internal Hubs, Nexus and Alfine
All Sturmey Archer 3 sp and 5 sp.
Unfortunately the 8 speed sturmey is different (bigger ID)
I'm not sure about SRAM (SACHS). I think they use a 4 tooth or something.
The largest 3 spline cog I could source before was a 23 tooth.
The smallest is 13 I think.
St. John Street Cycles (UK) and Harris Cyclery (USA) seem to be the best sources
for 3 spline hub gear cogs. and now Schlumpf + Chain ring suppliers!!!!
12p3phPMDC said:I'm not sure about SRAM (SACHS). I think they use a 4 tooth or something.
SRAM hubs use the same 3 spline - so, apart from the new Sturmey 8 speed, we're set

12p3phPMDC
1 kW
- Joined
- Mar 16, 2009
- Messages
- 462
Schlumpf is also coming out with 3 spline 8mm Carbon Drive sprocket
for internal gear hubs....
They sure do make cool products.....
it's planetary paradise.... 8)
for internal gear hubs....
They sure do make cool products.....
it's planetary paradise.... 8)
Stellar....12p3phPMDC said:Schlumpf is also coming out with 3 spline 8mm Carbon Drive sprocket
for internal gear hubs....
..........it's planetary paradise.... 8)
flyinmonkie
10 kW
That could make it easy to run 2 chains to an internal geared hub. That opens up the drive possibilities from just crank drive for the motor. Very cool find.
FM
FM
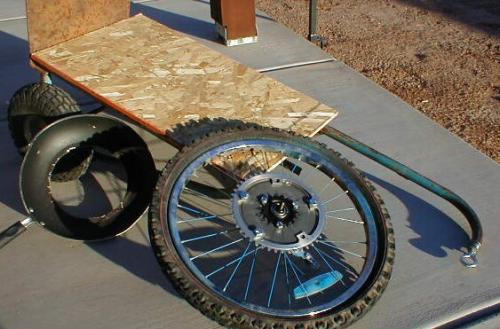
Here's another option for creative builders. The used skillet was $2 at a thrift store, free trash-bike ring is 47T. Box dolly (modified into a trailer) was $5.
I love the simplicity of Grinhills build with the single stage here: http://www.endless-sphere.com/forums/viewtopic.php?f=28&t=10635
I'm a little leary of the GEBE spoke adpater. Miles' find seems to be a perfect way to over come this.
Anyone up for creating a parts list to pull this off? I'm wondering on motor, esc, and sclumpf components to go about 35 mph top speed. I'd probably machine me a mount like Grinhills on a hard tail.
PS, loving the skillet build!
GGoodrum
1 MW
Here's what I did:
View attachment 2


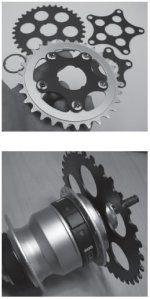
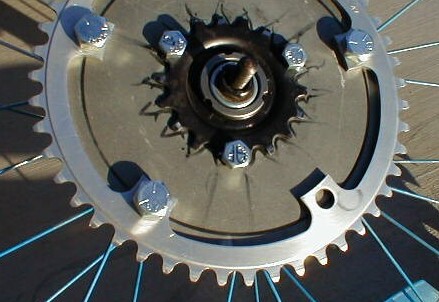
I started with a Dimension Big Cheese 110mm BCD BMX adapter plate, and used a 2-1/8" hole saw I got from Lowes to allow the plate to fit over the frontend of the Nexus hub. I then used a 16T Nexus cog, which has about a 64mm BCD for four holes that match up perfectly with the four holes on a 74mm BCD "granny gear" 22T sprocket. All that was left was to drill four matching holes in the Big Cheese adapter plate, and bolt the three pieces together. I'm using some small anodized aluminum spacers I got from McMasters to space the two sprockets apart a bit.
There are readily available 110 BCD sprockets up to about 54T, but if you need bigger, I recently found another adapter plate that can also be used with 130mm BCD sprockets. I think it was from UtahTikes,com, but I'll have to go look where I got it from on the receipt. For this bike, which is the same 20" Mariner in my avatar, there is a clearance issue with using anything larger than a 36T (a 40T one is shown...). I actually went down to a 34T, to give a bit more clearance, and because it better matched the gearing I was after.
What I'm doing is setting up this bike to be a "test mule", of sorts, for a variety of motor and controller configurations. First up is a redo of my original Cyclone 1000W setup, using the stock 55A controller. The battery will be a 16s5p a123 pack. After I get a baseline with this setup, I'll swap in one of method's 18-FET Infineon controllers, and boost the current to about 80-90A. Next will be the same Cyclone motor and Infineon controller but I'll add an 8s5p a123 pack. Finally, when the sensored 3220s are finally ready, I'll swap out the Cyclone motor for a sensored 3220 7-turn.
I have a jackshaft that is mounted right behind the seat post, between the chain and seat stays, that drives the 34T sprocket with a 12T track cog. The other end of the jackshaft has an ENO FW attached to a 55T #25 chain sprocket, which in turn is driven from 24T #25 sprocket on the Cyclone motor. I'm using the standard Cyclone crank, but with just the 44T chainring. There are two big advantages of this approach, over the motor driving the front crank. One is that since the power is not having to go through the crank anymore, you can get away with the cheap FW up front. The second big plus is that you get the pedals back. Going through the crank, you just about lose all use of the pedals in most higher power/higher speed setups.
Anyway, I will start a new thread on this in the next day, or so, once I get it finished. All I have left to do is fashion a tensioner pulley for the motor-jackshaft chain, and reverse one of the phases on the Cyclone motor.
-- Gary
View attachment 2
I started with a Dimension Big Cheese 110mm BCD BMX adapter plate, and used a 2-1/8" hole saw I got from Lowes to allow the plate to fit over the frontend of the Nexus hub. I then used a 16T Nexus cog, which has about a 64mm BCD for four holes that match up perfectly with the four holes on a 74mm BCD "granny gear" 22T sprocket. All that was left was to drill four matching holes in the Big Cheese adapter plate, and bolt the three pieces together. I'm using some small anodized aluminum spacers I got from McMasters to space the two sprockets apart a bit.
There are readily available 110 BCD sprockets up to about 54T, but if you need bigger, I recently found another adapter plate that can also be used with 130mm BCD sprockets. I think it was from UtahTikes,com, but I'll have to go look where I got it from on the receipt. For this bike, which is the same 20" Mariner in my avatar, there is a clearance issue with using anything larger than a 36T (a 40T one is shown...). I actually went down to a 34T, to give a bit more clearance, and because it better matched the gearing I was after.
What I'm doing is setting up this bike to be a "test mule", of sorts, for a variety of motor and controller configurations. First up is a redo of my original Cyclone 1000W setup, using the stock 55A controller. The battery will be a 16s5p a123 pack. After I get a baseline with this setup, I'll swap in one of method's 18-FET Infineon controllers, and boost the current to about 80-90A. Next will be the same Cyclone motor and Infineon controller but I'll add an 8s5p a123 pack. Finally, when the sensored 3220s are finally ready, I'll swap out the Cyclone motor for a sensored 3220 7-turn.
I have a jackshaft that is mounted right behind the seat post, between the chain and seat stays, that drives the 34T sprocket with a 12T track cog. The other end of the jackshaft has an ENO FW attached to a 55T #25 chain sprocket, which in turn is driven from 24T #25 sprocket on the Cyclone motor. I'm using the standard Cyclone crank, but with just the 44T chainring. There are two big advantages of this approach, over the motor driving the front crank. One is that since the power is not having to go through the crank anymore, you can get away with the cheap FW up front. The second big plus is that you get the pedals back.
Going through the crank, you just about lose all use of the pedals in most higher power/higher speed setups. Anyway, I will start a new thread on this in the next day, or so, once I get it finished. All I have left to do is fashion a tensioner pulley for the motor-jackshaft chain, and reverse one of the phases on the Cyclone motor.
-- Gary
flyinmonkie
10 kW
Gary,
I look forward to seeing the different set ups as they are trialed. I really like my chopper not driven through the crank, it is so nice to be able to pedal as well as motor. It has been a simpler and cleaner build that way as well. I forgot about using a big cheese to get 2 sprockets on an internal geared hub. Nice work. More ideas for my next build... hum...
FM
boostjuice
10 kW
GGoodrum said:All I have left to do is fashion a tensioner pulley for the motor-jackshaft chain, and reverse one of the phases on the Cyclone motor.
-- Gary
You might already have this, but if you dont, it saves you having to cut and swap the phase wire plugs. Swaps the hall wires instead. Got it from Paco.
>>>>>Headline Controller direction swap
The resistors themselves are just zero-ohm links, so just a dob of solder to bridge the two pads is all thats needed. Much easier than trying to rework 0603 sized components.
GGoodrum
1 MW
My Chinese is a little rusty, so I'm not sure what you are supposed to do with this, but thanks, nonetheless. What I ended up doing was simply popping out the blades on the connector forthe black and white wires, and swapped them.
What I also worried about was whether or not the timing would be screwed up, which would be the case if they didn't use neutral timing. Apparently , this is not a problem, if Paco is publishing ways to reverse the motor direction.
Thanks -- Gary
What I ended up doing was simply popping out the blades on the connector forthe black and white wires, and swapped them. What I also worried about was whether or not the timing would be screwed up, which would be the case if they didn't use neutral timing. Apparently , this is not a problem, if Paco is publishing ways to reverse the motor direction.
Thanks -- Gary
boostjuice
10 kW
Yes its a shame its not written in English, however all that is needed from it is the pictures of the hall sensor jumpers for the two directions.
GGoodrum
1 MW
Ah, now I see that these areas are little jumpers, and that there are two configurations shown. Thanks.
MitchJi
10 MW
Hi,
Great idea. Thanks Miles for starting the thread and Gary for your post.
With the pedaling the issue is (IMO) getting the reduction correct.
Both serial and this dual right side sprocket (DRSS) approach separate the Chainring-BB from the drive line. Serial has two big advantages:
1. Chains are not back-driven (quieter and more elegant).
2. No FW required on the crank.
IMO the DRSS approach has two big advantages:
1. A full stage of reduction. This means you can get about the same reduction with a DRSS using a one-stage reduction drive as the other options using a two-stage reduction drive. I think there are 3 options for a drive using the gears in a geared hub (if there are more I'm pretty sure Miles will let me know ). Crank drive, serial drive and DRSS. Using (for example) a 48t Chainring with a 16t rear sprocket:
Crank-Drive: drive 16t and 48t on the BB they cancel out. You can tweak the sprocket sizes to get some reduction but not very much if you want it to work well with pedals.
Serial-Drive: 16t drive output to 16t rear sprocket. Once again you can tweak the sprocket sizes to get some reduction but not very much if you want it to work well with pedals.
DRSS-Drive: you can pretty easily use 16t to about 48t (if it fits). Even more with #35 or #25 chain.
Maybe you meant you get the pedals back with a single stage reduction drive?
2. Also as compared to a Serial-Drive in addition to being more compact due to the elimination of the second stage if you want to mount it near the chain-stay between the Chain-ring and rear sprocket it requires less space for another reason. With a Serial-Drive the closest the drive sprocket shaft can be to the Chain-ring is the radius of the Chain-ring plus the radius of the sprocket plus the distance required for chain wrap. This requires about 6"to 8" between the BB and the rear tire. With a DRSS-Drive the drive sprocket could be next to (alongside) the Chain-ring which means it can fit with a much smaller distance between the BB and rear tire. Might even be able to squeeze it in on something like D's Kona.
If they weren't so expensive and if the ratios work well and if it works with FW cranks a a Schlumpf or similar 2 speed BB might be a great combination with a 3-speed geared hub. 3 speeds for the motor and pedaling plus a BB overdrive for high speed pedaling.
I must have missed that thread. Would you post a link?
Great idea. Thanks Miles for starting the thread and Gary for your post.
I'm don't agree with those advantages though. Matt posted that cheap FW's are fine. He uses one on his 8kw recumbent and hasn't had any problems. Someone asked him why they fail on Cyclone's and he said its the weight of the rider pedaling. If thats correct the cheap FW won't last very long. Also Sickbikes sells the cheap FW's for about $20 and the White for about $65 so the price difference isn't a big deal. I think its worth paying the additional $45 for a sealed FW vs one with recommended periodic cleaning and lubrication.GGoodrum said:Here's what I did:
I have a jackshaft that is mounted right behind the seat post, between the chain and seat stays, that drives the 34T sprocket with a 12T track cog. The other end of the jackshaft has an ENO FW attached to a 55T #25 chain sprocket, which in turn is driven from 24T #25 sprocket on the Cyclone motor. I'm using the standard Cyclone crank, but with just the 44T chainring. There are two big advantages of this approach, over the motor driving the front crank. One is that since the power is not having to go through the crank anymore, you can get away with the cheap FW up front. The second big plus is that you get the pedals back.
With the pedaling the issue is (IMO) getting the reduction correct.
Both serial and this dual right side sprocket (DRSS) approach separate the Chainring-BB from the drive line. Serial has two big advantages:
1. Chains are not back-driven (quieter and more elegant).
2. No FW required on the crank.
IMO the DRSS approach has two big advantages:
1. A full stage of reduction. This means you can get about the same reduction with a DRSS using a one-stage reduction drive as the other options using a two-stage reduction drive. I think there are 3 options for a drive using the gears in a geared hub (if there are more I'm pretty sure Miles will let me know
). Crank drive, serial drive and DRSS. Using (for example) a 48t Chainring with a 16t rear sprocket:Crank-Drive: drive 16t and 48t on the BB they cancel out. You can tweak the sprocket sizes to get some reduction but not very much if you want it to work well with pedals.
Serial-Drive: 16t drive output to 16t rear sprocket. Once again you can tweak the sprocket sizes to get some reduction but not very much if you want it to work well with pedals.
DRSS-Drive: you can pretty easily use 16t to about 48t (if it fits). Even more with #35 or #25 chain.
Maybe you meant you get the pedals back with a single stage reduction drive?
2. Also as compared to a Serial-Drive in addition to being more compact due to the elimination of the second stage if you want to mount it near the chain-stay between the Chain-ring and rear sprocket it requires less space for another reason. With a Serial-Drive the closest the drive sprocket shaft can be to the Chain-ring is the radius of the Chain-ring plus the radius of the sprocket plus the distance required for chain wrap. This requires about 6"to 8" between the BB and the rear tire. With a DRSS-Drive the drive sprocket could be next to (alongside) the Chain-ring which means it can fit with a much smaller distance between the BB and rear tire. Might even be able to squeeze it in on something like D's Kona.
If they weren't so expensive and if the ratios work well and if it works with FW cranks a a Schlumpf or similar 2 speed BB might be a great combination with a 3-speed geared hub. 3 speeds for the motor and pedaling plus a BB overdrive for high speed pedaling.
GGoodrum said:Anyway, I will start a new thread on this in the next day, or so, once I get it finished. All I have left to do is fashion a tensioner pulley for the motor-jackshaft chain, and reverse one of the phases on the Cyclone motor.
-- Gary
I must have missed that thread. Would you post a link?
GGoodrum
1 MW
MitchJi said:I'm don't agree with those advantages though. Matt posted that cheap FW's are fine. He uses one on his 8kw recumbent and hasn't had any problems. Someone asked him why they fail on Cyclone's and he said its the weight of the rider pedaling. If thats correct the cheap FW won't last very long. Also Sickbikes sells the cheap FW's for about $20 and the White for about $65 so the price difference isn't a big deal. I think its worth paying the additional $45 for a sealed FW vs one with recommended periodic cleaning and lubrication.
Well, in my case the pedaling is pretty much just for show, so I think the freewheel will last for a long time.
MitchJi said:Both serial and this dual right side sprocket (DRSS) approach separate the Chainring-BB from the drive line. Serial has two big advantages:
1. Chains are not back-driven (quieter and more elegant).
2. No FW required on the crank.
IMO the DRSS approach has two big advantages:
1. A full stage of reduction. This means you can get about the same reduction with a DRSS using a one-stage reduction drive as the other options using a two-stage reduction drive. I think there are 3 options for a drive using the gears in a geared hub (if there are more I'm pretty sure Miles will let me know
Crank-Drive: drive 16t and 48t on the BB they cancel out. You can tweak the sprocket sizes to get some reduction but not very much if you want it to work well with pedals.Serial-Drive: 16t drive output to 16t rear sprocket. Once again you can tweak the sprocket sizes to get some reduction but not very much if you want it to work well with pedals.
DRSS-Drive: you can pretty easily use 16t to about 48t (if it fits). Even more with #35 or #25 chain.
Maybe you meant you get the pedals back with a single stage reduction drive?
In my setup, the pedals have a completely separate drive. The chainring can be whatever is required. With my previous Cyclone setup, I had a 24T granny gear on the crank, and a 23T cog on the hub. That gave me the gearing i was looking for, but it rendered the pedals useless, even in 3rd gear. Now, I can go back to the stock crank setup. That's what I meant by getting the pedals back.
MitchJi said:2. Also as compared to a Serial-Drive in addition to being more compact due to the elimination of the second stage if you want to mount it near the chain-stay between the Chain-ring and rear sprocket it requires less space for another reason. With a Serial-Drive the closest the drive sprocket shaft can be to the Chain-ring is the radius of the Chain-ring plus the radius of the sprocket plus the distance required for chain wrap. This requires about 6"to 8" between the BB and the rear tire. With a DRSS-Drive the drive sprocket could be next to (alongside) the Chain-ring which means it can fit with a much smaller distance between the BB and rear tire. Might even be able to squeeze it in on something like D's Kona.
If they weren't so expensive and if the ratios work well and if it works with FW cranks a a Schlumpf or similar 2 speed BB might be a great combination with a 3-speed geared hub. 3 speeds for the motor and pedaling plus a BB overdrive for high speed pedaling.
The ultimate solution, I think, is to have the pedal FW on the rear hub, instead of on the crank, but I haven't figured out how to do that yet.
MitchJi said:GGoodrum said:Anyway, I will start a new thread on this in the next day, or so, once I get it finished. All I have left to do is fashion a tensioner pulley for the motor-jackshaft chain, and reverse one of the phases on the Cyclone motor.
-- Gary
I must have missed that thread. Would you post a link?
I haven't actually started ths thread yet, but will soon. I made some major changes, to clean things up a bit, and to do the setup for a 3210. I blew up my Cyclone 55A controller, so I'm not going to do the Ccyclone test first.
-- Gary
flyinmonkie
10 kW
Awesome, I love the discussion. I see benefits to driving through the crank (acts as a gear reduction if set up properly) and a dual right side chain (can set the pedals up to be useful, and if you put the freewheel on the hub, then you can lose the freewheel on the crank).
Will be cool to see someone sort out a drive sprocket and a freewheel on an internal geared hub, until then, I'll stick with my freewheel screwed on my uniglide cassette hub.
FM
Will be cool to see someone sort out a drive sprocket and a freewheel on an internal geared hub, until then, I'll stick with my freewheel screwed on my uniglide cassette hub.
FM
flyinmonkie
10 kW
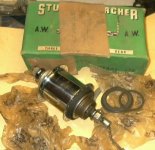
If you don't mind going old school with your hub and if you can come across one, this could be an options. Sturmey Archer made a variety of their hubs with a threaded driver instead of the pronged one. If the threads are right for a freewheel that would make it very easy, otherwise an adapter could be made.
FM
FM
Attachments
Similar threads
- Replies
- 8
- Views
- 1,043
- Replies
- 13
- Views
- 248
- Replies
- 1
- Views
- 215
- Replies
- 34
- Views
- 1,690