Mounting TWO freewheels on one rear wheel hub

DISH

10 W
Joined
Oct 19, 2009
Messages
94
There seems to be a lot of interest in mounting multiple freewheels on the rear wheel. Here's a trick I've used in the past.
01_freewheels.jpg
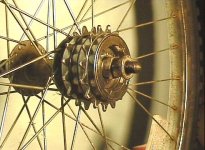
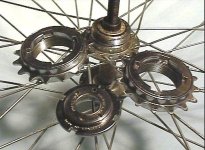
You will need the following parts, a wheel with a hub that takes a screw on freewheel, of course the freewheels, and the secret part, the bearing cup from the bottom bracket of an older bicycle.
02_freewheels.jpg
Mount the first freewheel as you normally would:
View attachment 7
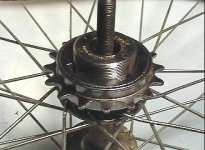
Screw the bottom bracket bearing cup into the mounted freewheel:
04_freewheels.jpg
If you want to alter the spacing you can put washers on the hub, use freewheel spacers which come in various sizes (I have 0.5 mm up to at least 4 mm so I know they come in at least those sizes), or use the lock ring from the bottom bracket bearing cup as a spacer.

Now screw the second freewheel on:
View attachment 6

I know, I know. You wanted a HUGE gear for the motor and a small gear for the human side.

Enter the bolt on freewheel:
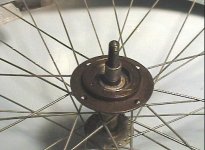
06_freewheels.jpg

I dropped an 80 tooth scooter freewheel on the bolt on freewheel for illustration. This takes smaller gauge chain but is compatible with the gears on many scooter motors. You can also get gears for standard bicycle chain that will bolt on to this freewheel.
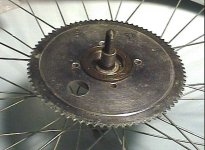
07_freewheels.jpg
Now screw the bottom bracket bearing cup into the bolt on freewheel. (Remember to mount the gear to the freewheel using bolts and nylock nuts or at the very least lock washers, otherwise it will come loose!)
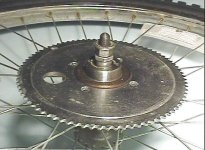
08_freewheels.jpg
80 tooth scooter gear and 16 tooth standard bicycle chain gear both mounted on freewheels on the same wheel hub:
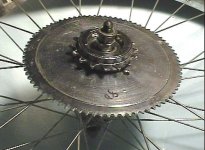
09_freewheels.jpg
Side view of the 80 tooth and 16 tooth freewheel gears:
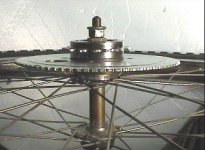
10_freewheels.jpg
 
dish,
Perfectly ellegant, & a great tutorial for the crew who have older equipment (like myself :D )

edit: removed non-information from other thread, Good show Admn. this needed it own thread

add a flip flop hub & I have disc brakes on the old iron.

Etard, you lookin at this?
I can hook you up with the adapters if you never saw the answer in the other thread.

Dish,I am certain there are many who just benifited from your photo series. Thank you.Todd
 
This is perfect for low budget low power setups.. what is the item we should look for? It does not look like the cup of an ashtabula crank setup, is it for sure an OPC ashtabula part?
 
That is a slick setup for somebody who doesn't want a 3spd hub and a disk brake.

Great guide for folks! Thank you for sharing it!
 
I recall one of the characteristics that was of interest was that ...for a high-power set-up, the splines and an ENO freewheel for the motor could take a lot more abuse. But, I think there will continue to be a lot of interest in in E-bikes with 500w-1,000w, and for those this is a great option. I appreciate you posting this, DISH.
 
liveforphysics said:
That is a slick setup for somebody who doesn't want a 3spd hub and a disk brake.

Great guide for folks! Thank you for sharing it!

but you can still have a disk brake.. :D

vanilla ice said:
This is perfect for low budget low power setups.. what is the item we should look for? It does not look like the cup of an ashtabula crank setup, is it for sure an OPC ashtabula part?

its the fixing cup for a standard bottom bracket.
 
vanilla ice said:
This is perfect for low budget low power setups.. what is the item we should look for? It does not look like the cup of an ashtabula crank setup, is it for sure an OPC ashtabula part?
This part is not from a single piece (ashtabula) crank.

You want the adjustable bearing cup from a two piece crank setup that uses a spindle and two bearings. What a lot people do not realize is the common variety of this bearing cup has the same ISO/English/BSA 1.37 in x 24 TPI thread as a standard freewheel. You do need to check this before using though as there are some variations that use different threads.

^^^ This part is ideal for this application as it's made from hardened steel as it was intended to hold the bearings for the crank.

See the following URL for some of the non standard threads you may run across:
http://en.wikipedia.org/wiki/Bottom_bracket

For this project you MIGHT also be able to use the threaded part that holds a sealed bottom bracket. However, when using this part you have to be careful as these can be made out of material which is NOT suitable for this project, such as plastic, aluminum, soft steel, etc.

There is an excellent photo and details of the part I am talking about posted at the following URL: (Unfortunately the photo is copyrighted so I can not post it here.)
http://www.exchangecycletours.org/bboverhaul.htm

liveforphysics said:
That is a slick setup for somebody who doesn't want a 3spd hub and a disk brake.
In my collection of junk is a rear wheel with a 6 bolt disc brake on one side and a screw on freewheel on the other. I haven't checked around to see how common this is but I assume they can still be bought.

I have some ancient three speed rear hubs that take a screw on freewheel but I don't have a clue as to what they are or where they came from, other than the fact that they are ANCIENT and I would not trust them for a new build.
 
does anyone know the maximum amount of cogs you can have on the back if you use this setup?
 
Don't discount the option of using an internally-geared hub (Nexus-8, Sturmey-Archer 3-sp, etc) as a jackshaft, not hard to do. Many have said that once you have motor-power on board, they often found having only 7 gears to be more than adequate. Add a large front chainring, and having only two FW's on the rear wheel has a lot going for it.
 
try this one at 4 yankee bucks.
http://www.niagaracycle.com/product_info.php?products_id=10308
I strive to be king of the cheap solutions :mrgreen:

I use these guys for all my new parts latly. They ship slow but what a deal.
 
nice find thud. i paid $9 canadian for that piece just the other day.

now this has me wondering what its made out of and who did the broaching. http://www.niagaracycle.com/product_info.php?products_id=418853&osCsid=b979d22b6e0dd29db795077a2ed95c3a

assuming its the same setup as a sram dd.
 
now this has me wondering what its made out of and who did the broaching. http://www.niagaracycle.com/product_inf ... 7a2ed95c3a

The main assembly will be made of aluminum - the cog itself will be steel. What you have there is a way to turn a more recent/expensive freehub into a single-speed without buying a new wheel. It locks to the splines, and comes with enough spacers to set the chainline pretty much wherever you need it. Unlike the OP, this is a way to add zero freewheels to a hub that already has the freewheeling mechanism built in.

Regards,

John - mostly lurker, recumbent and single-speed rider.
 
John,

This is awesome... very cool for those wishing single speed pedal and motorized... I've been looking around at the available thread on freewheels... it seems 13t is the smallest (not quite 11 but it will do - by onyx) and then I see all the other sizes available...

Is there a 3sp blank freewheel that you know of? One which would allow sprockets to be installed and spaced with washers?

Im wondering if it's not possible to use the 9s spacing standard with 3/32" chain to mount 3 sprockets (one on either size of freewheel sprocket for an additional set of speeds... I suppose I could take a 13t, grind down some teeth and then bolt 2 solid sprockets through the remaining teeth (then I would be limited to a 16t for the small side but that could be fixed with larger chainring). Even a 3sp with derailer would be nice.

Any suggestions or ideas?

-Mike
 
mwkeefer said:
Is there a 3sp blank freewheel that you know of? One which would allow sprockets to be installed and spaced with washers?
How about the old 5-speed freewheel cassettes from OTSs? You can take off the ones you don't use, and put other spacers in there. Not sure if there is room for the whole thing on the axle plus the inside second freewheel, though.
 
Re: Mounting TWO freewheels on one rear wheel hub
by mwkeefer » Tue Dec 22, 2009 2:07 am

John,

This is awesome... very cool for those wishing single speed pedal and motorized... I've been looking around at the available thread on freewheels... it seems 13t is the smallest (not quite 11 but it will do - by onyx) and then I see all the other sizes available...

Is there a 3sp blank freewheel that you know of? One which would allow sprockets to be installed and spaced with washers?

Im wondering if it's not possible to use the 9s spacing standard with 3/32" chain to mount 3 sprockets (one on either size of freewheel sprocket for an additional set of speeds... I suppose I could take a 13t, grind down some teeth and then bolt 2 solid sprockets through the remaining teeth (then I would be limited to a 16t for the small side but that could be fixed with larger chainring). Even a 3sp with derailer would be nice.

Any suggestions or ideas?
-Mike

First, Amberwolf gives very practical advice if you have an older, freewheel-type hub. If you have a newer e.g. "9-speed" freehub, you can buy the cogs and spacers separately. You can buy 9-speed or 8-speed cogs and spacers - it matters if you're going to use indexed shifting. Then just stack 'em up, cog-spacer-cog etc. with the locking ring on top. For that you don't don't need the fancy adapter at all, just get the loose cogs and spacers. One of my 'bents has a mid-drive made from a freehub, with just that kind of setup. You use a standard indexed shifter and limit the derailer throw with the limit screws. Again, this is a single-drive solution, not a multi-freewheeling solution, because the freewheeling is provided by the freehub carrier, to which all the cogs are locked via the splines. In general, the cheapest way to go about this, if you already have the wheel, is just to do surgery on the cassette you already have - pull out the cogs you don't want to use and buy spacers to make up the difference, or stack the unused cogs and their respective spacers at one end and ignore them (by setting your limit screws appropriately). It's actually easier to do all this on a modern freehub - surgery on an old-style freehub is a chore.

Now: if you want one motor gear and multiple pedal gears, and you’ve got freewheeling at both the motor and crank, you can put a really big cog at the inside (where it would usually be), then spacer-“dead” cog-spacer, then the cogs you want to shift. The “dead” cog is just a cog you’re not going to use, because you can’t put two chains on adjacent cogs. So if you have a stock 9-speed system and you want to run two chains, you can keep 7 shift-able gears. The 7 can be as narrow or wide as you want, within the geometry and chain-handling of your derailer.

Hope this helps,

John
 
Okay... I may be an idiot (okay I am) but... I've searched everywhere for those bolt on freewheels and NADA.

I have a GGoodrum adapter for freewheel and it seems the same bolt pattern but I'd love to source just the bolt on freewheels...

And yes - the idea I am entertaining is the second in your response:

Stock 9sp Freehub but replaced with TickTac BMX wheel (threaded on both sides) and then the largest #219 I can get (seems to be about 102t, i have a 92 in extron) followed by 5-6 gears which can be shifted for pedal use would be perfect...

I was also looking towards allowing the motor to shift (I know #35 chain) across the rear cluster instead of using an internal geared hub... yea I need to back off throttle to shift but... it would work in theory right?

I have no plan for running a chain from my crank anymore... I created a small dynamo which is geared off the chain ring... it produces 63v at a pedal cadence of about 45-50rpm and I plan to use that as my "human powered" transmission, feeding that small (2-3A max) current back into the controller.

The ebike laws say you must have functional pedals but they don't specify if those pedals must be mechanically coupled.

So for my purposes, I can use the entire rear hub for drive gears.

-Mike
 
mwkeefer said:
The ebike laws say you must have functional pedals but they don't specify if those pedals must be mechanically coupled.

So for my purposes, I can use the entire rear hub for drive gears.

-Mike


HAHA yeah hope that works out well for you...

"A bicycle pedal is the part of a bicycle that the rider pushes with his or her foot to propel the bicycle. It provides the connection between the cyclist's foot or shoe and the crank allowing the leg to turn the bottom bracket axle."

If your "pedals" cant be pushed on and turn the crank arm thus rotating the rear wheel they are no longer "functioning"

KiM
 
Brother Kim -

As i said... my coupling is using a generator combined with the pedals and chainring of the bottom bracket. I just don't use a transmission chain to the rear end, instead I have created a form of series hybrid where my pedal power (they still work, provide resistance and can move the bike along on their own) is converted to electric as close as possible to the bottom bracket and then pushed into the pack/controller.

It is still fully compliant with all the laws in the US and I would guess that unless I've missed the verbage "chainring must have physical chain based connection to rear wheel drive" which I don't think is in any of the eBike laws (US or Foreign) then... it's all good.

For european where pedal first is required, I think this will also work very well.

Yea it's not the most efficient method of connecting the chainring gear... but it is a method of connecting and really... in the US, we don't have to pedal <= 20mph by law. I've only done bench setup so far and I need to create an inverted controller (to keep voltage output at 1v or 2v above pack voltage and regulate current output, since I will pedal at different cadences and create various potential voltages above 62v)

I'm sorry if I explained it poorly before.

-Mike
 
Mike:

First of all, I'm fascinated by your series-hybrid build - I've thought of doing something similar since first reading about a design study done in Europe (Germany?), perhaps a couple years ago. Sadly, I lack the skills to even begin with sourcing the dynamo, let alone building the regulator. I hope you have/start a thread on it, which I'll follow with great interest. We could probably move this conversation there, since it has diverged quite a bit now from the OP.

I think that, for your application, unless you're running over a kilowatt you might as well stick with regular 8- or 9-speed bicycle chain. This will let you use all the gears on the original rear wheel. 8-speed chain with an 8-speed cassette will give you somewhat more durability at lower cost than the 9-speed kit, and significantly better durability and power-handling (at drastically lower cost) than any of the 10- or 11-speed stuff. You would need an adaptor from your motor/reduction unit to something like a 110mm or 130mm bcd chainring, just like the rings on your crank. Then you use one (short?) chain from the crank to the dynamo, and another from the motor/drive to the rear wheel. I'm not sure what the adaptor you have is for - do you have a link to a picture of it?

John
 
mwkeefer said:
Okay... I may be an idiot (okay I am) but... I've searched everywhere for those bolt on freewheels and NADA.
Do you mean these?
SPR-SB4HA.jpg
http://www.electricscooterparts.com/sprockets.html#fw
And #25 sprockets to fit them are a bit further up the page, though it's easy enough to mod regular ones to fit. Lots of the older 5- and 6-speed Eagle hubs I have around here only need a tiny bit of lathing out on the inside of the sprockets to slip over one of these freewheels (or even over a regular single-speed freewheel), and most already have "lightening" holes in them that line up with at least two of the bolt holes, sometimes all four depending on their shape.
 
I was looking at this (again) an di have a few more questions:

-IF an internally geared hub is used, will it work for the pedal and motor, or just pedal?
-With an internally geared hub, can you still keep the dérailleur attached to the back and use the front 3 chain rings, or is it completely incompatible?
-With the freewheel pictured above, how do you remove it after you put it on?

thanks.
 
An internally geared hub will use any power input that goes to the wheel on that side. So if you have both drivetrains feeding it, it takes power from both.

Remember that an internally geared hub may not be able to take the torque some motors can put out, and could break inside from a sudden application of too much power.

If you have the room for it, you can fit a multispeed cassette onto an internally geared hub, and use the hub's gears, the derailer-controlled gears, plus any gears and derailer you have on the cranks, to get a wider range of gearing choices, if you need to have them.


Removing them usually uses a special tool that inserts into splines or pinholes in the inner diameter of the freewheel, and is rotated counterclockwise to unscrew it. The one in my post above yours is not showing the side with the removal splines, but it has four deep "notches" in a cross pattern on the other face of it, which the tool inserts into.

I have made a tool that works by welding up bumps on a wrench face, then grinding and filing them square. Then I just use a large washer and the axle nut to hold the wrench in place loosely while I whack it with a hammer once in the CCW direction, and that starts the freewheel removal process.
 
Back
Top