Commuter Booster - <1kg Friction Drive

I meant for handling 100 amps of electricity. I would never make a spring.

I noticed that the 63-74 motor has the casing screws. would it be possible to cut a piece of slick bike tire and wrap it around, securing it with washers and screws that are a little bit longer than the ones there? I think it would make the most sense if the two materials coming together (bike tire and motor) were the same. It would definitely bite in a lot more than bare---and could withstand some pounding. Just a thought.


Is there a way of drilling perfectly spaced holes in aluminum without a jig? I just marked them with pencil but I can never get them all absolutely perfect in line. Is there a tolerance with hole placement? I haven't ordered my motor yet to test fit.
 
Kepler and a few others have tried this and all come to the conclusions that it is not good when wet.

I would bow to the experience of others and stick with the belt sander/grip tape type solutions given your two week time frame.

As for the 100 amps and 8 gauge copper wire. It will be fine.

- Adrian
 
hillzofvalp said:
Is there a way of drilling perfectly spaced holes in aluminum without a jig? I just marked them with pencil but I can never get them all absolutely perfect in line. Is there a tolerance with hole placement? I haven't ordered my motor yet to test fit.

Use a centre punch to make a small indentation in the metal. Then the drill bit won't wander when you drill.

Personally I would just wait until you get the motor to drill. Just to make sure you get the spacing right.

- Adrian
 
A punch?

What is the real advantage of going with the HV160 for $225 on ebay? I know it can accept a lot of input and take a lot of current. It's also a US manufacturer with high reputation I believe.

Also, I'm trying to stay away from hobbyking right now. I still have one of their helicopters that they sent me by accident.

Do you know of another source for the 63-74 motor? For some reason I want to get that motor, I'm not 100% sure why. MAybe because it's big and it's the one your using. I will try a different motor it's just that I'm not sure I could match the performance of the 63-74. Advice?

Thanks.
 
E bike controller with friction bike motor
http://www.youtube.com/watch?v=JRuuM-1Pwzs&feature=mfu_in_order&list=UL
 
Yes, there was a discussion a while back about the option of adding hall sensors to the RC motors. There is no plug-and-play kit for sale anywhere yet, but all the details and pics are just a quick ES search away. You would have to order the hall sensors online, and then fabricate a bracket to hold them in the proper place.

http://endless-sphere.com/forums/viewtopic.php?f=30&t=15686

ES member Gwhy has added halls, and is using a conventional E-bike controller from ES member Lyen. I believe the controller with the minor mods neccessary was less than $100.

http://endless-sphere.com/forums/viewtopic.php?f=2&t=16910#p249247

Plus if you have added halls to an outrunner, another controller option that doesn't require mods (for a slightly higher price) is the 6-FET from ebikes.ca

http://www.ebikes.ca/store/store_controllers.php

One of the major benefits of using the tiny RC ESC-style controllers is that they are very small and light, which is clearly one of the goals of this build. If you also want a tiny ESC, the Castle-Creations HV-160A has proven to be the best. Though I suspect the 120A "might" be adequate for this build, the greater heat-absorption/shedding of the 160A is an available insurance. The 160A also allows for future performance upgrades.

http://www.castlecreations.com/products/phoenix_ice_hv.html
 
Can't I just run a little fan over the hv 120? I think it's a $100 dollar difference between the 120 and 160. I think I might go all out and get the 160, and have it for other future ev projects. As for the Hyperion ZS 4035, I can't find any hard testing of it for this application. It does have a smaller 6mm shaft, almost half of the turnigy 63-74. I would really like to avoid hobbyking, but idk if the price will justify dealing with them.
Also, what capacitors would I need to buy for my hv 160/120?

Adrian, just to clarify things, I go back to school around the 10th, and my primary goal was to have all fabrication out of the way. I don't need to have everything finished by the 10th. The other issue is that I don't want to order something and it not get to the right place at the right time. But the primary issue is fabricating the arms and mount. I'm going to go check out the lbs. Btw, if you think that posting in your thread is inappropriate, I will start my own thread. I see it more fit to start one when I actually have a prototype.

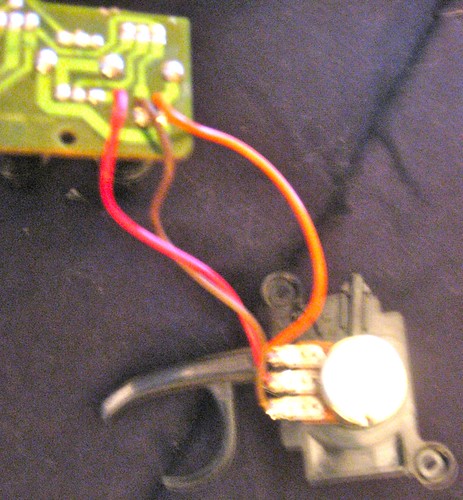
Lastly, would it be possible to rewire a servo tester with a different form factor pot? couldn't I fashion a nice trigger I can mount on my handlebar out of an old rc remote and wire it in into a servo tester? This way you could incorporate a spring mechanism that is more practical than physically turning the pot down when you want to slow down, very similar to thumb throttles. Here's the assembly out of the stock Losi Mini t RTR:

5311868862_d579d8c441.jpg

am I missing something, or is this not the easiest way to go? I would try mounting it right where the brifter rubber hoods start, cause I ride up there a lot while commuting. I could have my stonger fingers on the brakes and my ring or pinky on the throttle trigger. It could even be mounted on the side of the brifter, and the trigger could stick out parallel to the brake lever.

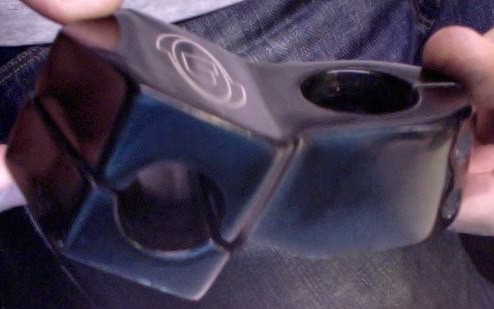
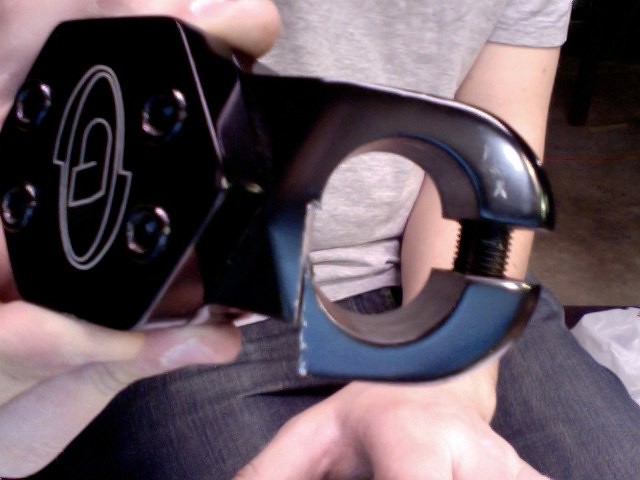
update: just pulled these off my old bmx bikes. One is from a powerlite p19 (pictured). However, my other dyno threaded bmx stem is zero rise and might work splendidly if I modify the clamp hole that is designed for 3/4" handlebars. MOdification would involve cutting off the post that goes into the fork.
5313737022_6b3a4bf833.jpg

Solution to mounting on seat tube issue:
5313892624_d67ede73c4_z.jpg

though I don't think I should've made that cut. I should've gone at an angle so that, when tightened, this piece won't flex. Oh , well. It should work.
 
hillsofvalp, I doubt you will make your timeline, this field is still very new and experimental. There are simply no guarantees that if you "do this, you will get that". I recommend that it would benefit you to start a new thread (though it is not required). I guarantee that every step will take longer than you think it will...

Regardless of the motor "kV" selected, if you use something from the 63mm diameter family, and use the motor-shell as the drive-roller (2-1/2" roller), any ESC with a continuous rating of 100A (or more) should be fine. If the selected ESC has caps already, the factory caps should be adequate. However, if you need to add caps (two caps should be enough), here are my recommendations:http://endless-sphere.com/forums/viewtopic.php?f=28&t=21197&start=15#p325342

You haven't mentioned if you plan to use 6S (22V) or 12S (44V), If 12S you must used a "HV" ESC (High-Voltage) from any one of several manufacturers, if only 6S, you have many 100A+ ESC options, depending on desired features. If you use 8S or 10S, get a 12S-capable charger and a 12S ESC, or you might not be able to sell them later.

Matts E-bike systems use a 12S RC-motor to drive the axle, and after he has tried everything, the HV-160A from CC is the only survivor. If you have a separate friction roller that is a small 1.0"/1.25" diameter (Like EVTodd, and also me) a 70A ESC has proven to be adequate, with 85A being useful for heavy duty.
 
Thanks for the info. I may or may not have mentioned that I'm running 7s 26650s. Getting a hyperion 1420i.
I don't need to have everything working by a set date.. I just wanted to avoid bringing a bunch of tools to school.
Turns out I have access to a bunch of tools at school anyways (ev club), it's just a bit more tedious.
I'm considering just building up a front hub wheel, though I'm concerned that my fork/headset won't take it (lightweight racing frame and old headset).
If I bought a castle HV 120 would I be able to use it with a front hub motor if my friction project falls through?
 
hillzofvalp said:
Btw, if you think that posting in your thread is inappropriate, I will start my own thread. I see it more fit to start one when I actually have a prototype.
I reckon you should start your own, since you seem willing to modify things, and do them a bit differently your build will likely morph into something that isn't a direct copy of my evolving design. Then you will also get a better record of your build in one place, as well as getting better input from others.

hillzofvalp said:
Lastly, would it be possible to rewire a servo tester with a different form factor pot? couldn't I fashion a nice trigger I can mount on my handlebar out of an old rc remote and wire it in into a servo tester? This way you could incorporate a spring mechanism that is more practical than physically turning the pot down when you want to slow down, very similar to thumb throttles. Here's the assembly out of the stock Losi Mini t RTR:

5311868862_d579d8c441.jpg

am I missing something, or is this not the easiest way to go?
I like it. What sort if pot do these have? 5k? What range of motion? I really like the idea of a trigger throttle, I just hadn't found a good pot/mechanism I could use. This could be just the ticket.

- Adrian
 
No idea about the CC HV-120A ESC running a hub, who knows? edit: adding a small fan to any ESC is always a good idea.

hillsofvalp, If you are a gambler, you have a few of the more-affordable options for 7S. I am using the Miking 120A ESC, and some of the Mystery ESCs are rated for 7S. Search carefully though, two seemingly identical 100A Mystery ESCs will have specs with one maxing-out at 6S and the other at 7S...ALSO! some will list the volts as 7S, but on the same page its also listed as 22.2V (which is of course, actually 6S). Best of luck...

120A 7S Miking (with integral BEC)
http://cgi.ebay.com/120A-Brushless-Motor-Speed-Controller-ESC-Plane-Heli-RC-/300509442569?pt=Radio_Control_Parts_Accessories&hash=item45f7c23209

120A 12S Turnigy (no BEC)
http://www.hobbyking.com/hobbyking/store/uh_viewItem.asp?idProduct=8921

120A 12S Mantis (no BEC)
http://cgi.ebay.com/Brushless-ESC-MANTIS-120A-HV-OPTO-x1-/180552117640?pt=Radio_Control_Parts_Accessories&hash=item2a09bead88

120A 7S Force-Control (with integral BEC)
http://cgi.ebay.com/120A-Brushless-Motor-Speed-Controller-ESC-Regler-Trex-/380304361303?pt=Radio_Control_Parts_Accessories&hash=item588be80757

120A 10S TurboRIX (no BEC)
http://cgi.ebay.com/New-RC-Plane-High-Voltage-120A-42V-Brushless-Motor-ESC-/260432182737?pt=Radio_Control_Parts_Accessories&hash=item3ca2f7bdd1

120A 12S Hobbywing (no BEC)
http://cgi.ebay.com/Hobbywing-Platinum-120A-H-V-PRO-ESC-120A-Brushless-ESC-/300401734505?pt=Garage_Doors_Openers&hash=item45f156b369

100A 7S RC-Smart (BEC not listed)
http://cgi.ebay.com/RC-Model-100A-Brushless-Speed-Controller-ESC-SL019-/300480784053?pt=Radio_Control_Parts_Accessories&hash=item45f60ce6b5

100A 7S RC-Timer (no BEC)
http://cgi.ebay.com/RC-Hobbies-ESC-100A-Brushless-Motor-Speed-Controller-/120449686593?pt=Radio_Control_Parts_Accessories&hash=item1c0b5c5c41
 
Great stuff! I have a "Mystery Meat" ESC, the 100A variety for 6S I believe, if I understand correctly, you're having good luck just using the "auto detect" method i.e. just plugging it in and letting it decide your cell count based on voltage, or do you program yours?

Thanks!
 
Do the above ESCS work with hub motors? And for clarification, 7s M1 is 3.3x7V not 3.7x7V.. so 23.1V (not 25.9V).

This trigger has about 18 degrees movement in forward and "reverse" directions. If connected to a hub motor it would allow you to brake. Might be able to re align to skew towards a max of 36 degrees travel, but I'm not sure you would want to do that. Also, (to my surprise) it is a 5k pot. :) I'm pretty excited about trying it. It could be an easy way to brake too, with negative trigger.

The Losi radio I have is one of the cheapest radios you can buy. More expensive than I thought though (got mine with complete kit). ~$27 shipped with a quick ebay search:
http://cgi.ebay.com/Team-Losi-CTX1000-27MHz-AM-Transmitter-Mini-T-/150542907221?pt=Radio_Control_Parts_Accessories&hash=item230d0e7755#ht_1680wt_9077

I was looking forward to CC ESC because I could log data, interface and program with a pc. Thanks for all of your links, I'll look into it more. One thing that boggles my mind is how small these are with no heatsinks. How would I cool them even with a fan? there's no place for the air to go.

As for starting my own thread, i'll get on that tomorrow. With regards to friction drive, I was able to get 4 perfectly cut arms (rectangular, 152x54mm :| ). My step dad took the Al sheet to US Steel :). Exactly how much trouble will I have with friction drive? I know this method is in testing in all.... but can't I just slap it on there with a door spring and make adjustments by sliding the mount up and down and drilling, say, 10-15 settings in the arms for adjustments? If I get a hub motor I'll have to run more wire, have a $350 wheel built up to my liking, and possibly even ramp up my battery capacity if necessary. For some reason I am thinking that hub motors take more energy, but friction drive isn't as efficient. Initally I'm going to be running 4.6Ah and I don't know if I could use a hub motor for a minute. (this should go in my thread, sorry).
 
I don't know if anyone has used an RC-ESC to control a hub-motor. You might be the first to try that. Please post the results if you do.

I just posted those ESCs as cheaper options compared to the Castle Creations 120A ESC. If you use a Castle Creations 120A for this application, you will not be disappointed. I have used the Miking ESC, and it seems to be working OK for me, except the LVC doesnt work on it. I made a point of saying "If you are a gambler"...every cheaper option listed is a gamble, so, "do you feel lucky"?
 
Update:

Okay chance for John to say I told you so. My stair grip tape let go mid ride.
View attachment 2

This was about 11km into a shake down ride in 32 deg-C heat. For the first time I heard the motor slip, and thought that weird. Then a sort of flapping sound. Hmmm wonder what that is. Then after riding up a couple more hills, the flapping sound got worse. Better pull over. :roll:

Looks like there was too much power, combined with too much heat for the grip tape glue. Resulting in the grip tape trying to take all the shear load itself, and it just let go. Better go seach for John's recommendation for the belt sander material, plus some you beaut glue tape stuff.

Apart from that everything went really well. Motor got warm, but didn't melt. ESC was cool. Bike felt nice and light, and you really don't notice the added weight of the Commuter Booster + batteries. You do occasionally notice that the motor touches the tyre briefly when jostling over bumps.

I rode with two 5s5000mah 20C LiPo's, in a little frame bag. Here is the pic.
2011_01_07 - CB v2 _001.jpg

Here are the stats from the Watt Meter, for this little 11km ride which is a part of m normal commute to work, including the worst couple of hills.
2179.1 Wp - Peak Power
120.46 Ap
8.012 Ah
148.5 Wh

Here is what the GPS tracked, so you can see average speed, and the sort of terrain.
2011_01_07 - CBv2 - Trip Stats.png

The good thing about the grip tape letting go, was it provided a nice contrast to having the assist and not, as the last leg home I had to do on my own and included a half decent hill. For the previous hills I was still pedalling, and working up a light sweat but wasn't uncomfortable, even though it was a hot day. But the last hill without the assist definetely had me mopping the forehead.

Ebikes are cool. This system really doesn't have much down sides. It hardly adds any weight to the bike, it has zero impact on the rolling resistance, your bike just feels like it always did. Then when a hill comes up, a little push of your thumb and it flattens out. It makes a bit of a whine to let you know it is working, but the pedestrians I passed didn't turn heads trying to find out what it was. Once I iron out a few more bugs, and bolt this on to my road bike, I think this may just become my main ebike. :D


- Adrian
 
adrian_sm said:
I rode with two 5s5000mah 20C LiPo's, in a little frame bag.

Here are the stats from the Watt Meter, for this little 11km ride which is a part of m normal commute to work, including the worst couple of hills.
2179.1 Wp - Peak Power
120.46 Ap
8.012 Ah
148.5 Wh

Ebikes are cool. This system really doesn't have much down sides. It hardly adds any weight to the bike, it has zero impact on the rolling resistance, your bike just feels like it always did. Then when a hill comes up, a little push of your thumb and it flattens out. It makes a bit of a whine to let you know it is working, but the pedestrians I passed didn't turn heads trying to find out what it was. Once I iron out a few more bugs, and bolt this on to my road bike, I think this may just become my main ebike.
Nice Update! :wink:

How do those Watt Meter readings compare to your other eBike for same ride?

That is a most excellent stealth setup. :mrgreen:

Look forward to your continued perfection...

Get Kepler to lend you his super-controller & see if you notice much difference...

Ohhh, Kepler? :lol: Where art thou vice? :twisted:
 
adrian_sm said:
Update:

Okay chance for John to say I told you so. My stair grip tape let go mid ride.

- Adrian

Well I for one are in complete shock :lol:

I decided to get serious and went to a 40 grit belt sander material. Works a treat and hardly wears. Also gives great tire traction and as long as the drive doesn't slip, causes no major wear on the tire. :twisted: :evil:

It is quite thick and stiff though. Not many of the double sided tapes will cut it and also they tend to add too much diameter to the drive especially with the heavy duty belt sander material. For this the Uglue works a treat. For those who havent used it before, its kind of like double sided tape except it lays down a layer of glue suspended in a gell like material. Its nice and thin and has twice the holding power of double sided tape. Plus its water proof. Its a US product but Jaycar stock it so its easy to get.

Give that a go and problem will be solved.
 
adrian_sm said:
Update:
Ebikes are cool. This system really doesn't have much down sides. It hardly adds any weight to the bike, it has zero impact on the rolling resistance, your bike just feels like it always did. Then when a hill comes up, a little push of your thumb and it flattens out. It makes a bit of a whine to let you know it is working, but the pedestrians I passed didn't turn heads trying to find out what it was. Once I iron out a few more bugs, and bolt this on to my road bike, I think this may just become my main ebike. :D
- Adrian

This is what I have been saying for months. :mrgreen: Great variation of the concept 8)
 
Kepler said:
I decided to get serious and went to a 40 grit belt sander material. Works a treat and hardly wears. Also gives great tire traction and as long as the drive doesn't slip, causes no major wear on the tire. :twisted: :evil:

40.... Now ya tell me, and I just got the 80..... :roll: :D


On another note. I am thinking of going for the button throttle again, but this time with 5s lipo, the small motor, and inserting a little throttle ramp control into the mix. After today's ride most of the time I was full throttle, or just easing the throttle up to it. This could make for the simplest/cheapest throttle mod for ease of use and road bars. Worth a try anyway since I have all the parts.

- Adrian
 
I've got plenty of 40 grit I will cut you a piece :)

I have tried a simple button with a moderate ramp to full throttle. I didn't like it much. I found it worked the drive too hard when I wanted assistance going up a hill and my speed was too low. Depends on how you use the drive though so worth giving a go to see if it works for you.
 
I just completed the remote shunt mod on my Turnigy Watt Meter. I even put a nice little switch in too. 8)

Here is what I did....

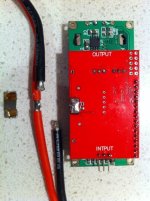
Step 1 - Remove the old shunt.
IMG_1733.JPG
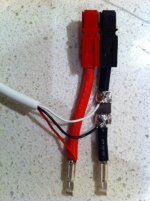
Step 2 - Wire inline with a few battery connects on the end of some 3-core cable.
IMG_1735.JPG
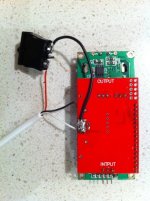
Step 3 - Connect the 3-core wires to the right spots on the main PCB, adding a switch on the +ve line.
IMG_1738.JPG
Step 4 - Shove it all back in the box. Done.
View attachment 3

Thanks Jeremy.

- Adrian
 
If anyone else is thinking about doing this mod, please remember when you re-solder the shunt remotely it affects the shunt resistance, and hence reading. Therefore you you will need to recalibrate it.

Luckily the meter has a little adjustment pot just for the purpose. So all you need to do is adjust the left hand pot in this image while verifying the current with something else like a DMM or CycleAnalyst. I used my CA. It tooks heaps of turns of the little adjsutment screw but it is all good now. The voltage reading was still spot on, so no adjustment required there.

file.php


So:
- left pot is for current
- right pot is for voltage.

- Adrian
 
Update: 63-74 motor on the road bike

Managed to fit the CBv2 with the larger 63-74 200kv motor on the road bike.
This is a bike with a large frame (i am 6'2") and there is only just enough room. I can still optimise the pivot/clamp block to give me a bit more room by getting the pivot shaft closer to the seat tube, but I suspect that most road bikes frames won't work with the bigger motor. They will end up needing something like the smaller
50-65 270kv motor I have on CBv1.

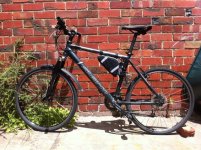
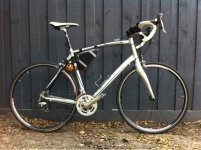
Here is a pic of my roadbike with the 63-74 CBv2 with 2x 5s5000mah LiPo in the frame bag, combination button/servotester throttle, and the CA on the bars. Ultimately for this DIY version I would like to replace the servotester and CA with a modified wattmeter, I just need to get my head around the AVR assembler language. There is also quite a bit of wasted space in the frame bag (rectangular pack in triangular bag), that adds visual bulk, I might try Hyena's drain pipe battery tube as I can't find a decent electronics type enclosure that I am happy with, they all have too much wasted space, but they might have allowed me to mount the ESC and batteries all in one neat package...

Anyway, I reckon it looks pretty good for a 2kw e-bike. 8)

2011_01_08 - CBv2 on roadbike.jpg

- Adrian
 
Back
Top