15S LiPo charger using DC DC converters

jag said:
Hi Jeremy,

Any updates on how your DC-DC converter chargers performs?

I was also curious if in practice one could make a universal LiPo, LiFePO4 charger, by switching voltage adjust resistors. This would mean going below the -20% down adjustment rated in the spec. I was curious if you tried it in practice, and at what the lowest output voltage the converter would work (Fig 17 in the spec on the other hand could be interpreted that the low voltage shut off should be as low as 1V, but that is probably optimistic...)

I also noticed that you limit current with resistors, instead of relying on the internal CC current limitation. Is that because you wanted a tapering off charge current or that the CC mode didn't work well?

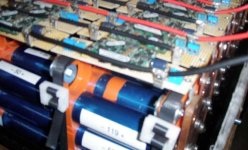
I've only done a few charges with them, but they seem to work OK. I can't get these DC DC converters to go down low enough to charge LiFePO4 - they are pretty much on their lower limit at 4.2V, even the voltage trim equation doesn't hold up down at this level.

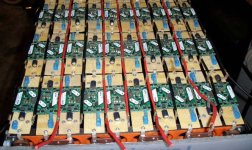
I opted to include the current limiting resistors purely because I didn't need the full power that these converters could put out. In the light of experience I'd say that the resistors might not be needed - there would be enough voltage drop at high current in the connecting wires to keep everything within limits, provided that you have a power supply that can drive it OK.

The LiFePO4 charger that I built a year or two ago, using modded 3.3V DC DC converters, still works very well. It charges to 3.63V per cell at up to around 15A. I didn't bother using resistors to limit the current with that one but the charge leads get a bit warm, so I'm guessing they are doing the current limiting.

It would be possible to build a charger that uses a single power supply, but two sets of DC DC converters, one set for LiPo and one set for LiFePO4. Might be a solution for a "universal" charger.

Jeremy
 
Any reason you couldn't get away with a RC charger type lead setup? Where you use heavy gauge wire for the main -ve & +ve leads, then lighter gauge for all the between cell connections.
 
Hey Jeremy,

Back in 2007, that remind me the old great project i did about 12s Artesyn BXB150 DC-Dc converter active balance charger. :mrgreen:

http://endless-sphere.com/forums/viewtopic.php?f=14&t=2824&hilit=bxb150&start=30

But your's seem more professionel made with the custom PCB !

Instead of adding resistor in serie with the output i decided to modify each DC-Dc for current limiting CC feature. I reverse ingeneered the BXB150 and found a way to modify the limit to avoid them to overload with a cell voltage lower than the dc-dc output.

The very nice feature I also added is that I’ve added precision potentiomener to the resistor input for the voltage trim and I have two of them. One adjusted to 4.200V for lipo and limn cells and one pot adjusted to 3.650V for the lifepo4 cells.

A I have 3x 4pdt relay that switch the resistors to get 3.650V or 4.200V on each 12 channels at a time

That make this charger universal lithium charge and balance


Doc
 
adrian_sm said:
Any reason you couldn't get away with a RC charger type lead setup? Where you use heavy gauge wire for the main -ve & +ve leads, then lighter gauge for all the between cell connections.

This wouldn't work with this setup, as The main charge leads are the individual DC DC converter outputs. All the charge current is going via the balance port leads. On my packs these are paralleled up and so the individual balance leads to each cell don't get to see high charge currents. It wouldn't work well with a smaller pack with maybe only a single cell on each balance connection. Having said that, I've charged a 10S, 2P pack with it a couple of times and everything stayed cool. The charger was built to charge a 15S, 8P pack of 5Ah LiPo, so the current in the balance leads won't be a problem for that purpose.

Jeremy
 
Doctorbass said:
Hey Jeremy,

Back in 2007, that remind me the old great project i did about 12s Artesyn BXB150 DC-Dc converter active balance charger. :mrgreen:

http://endless-sphere.com/forums/viewtopic.php?f=14&t=2824&hilit=bxb150&start=30

But your's seem more professionel made with the custom PCB !

Instead of adding resistor in serie with the output i decided to modify each DC-Dc for current limiting CC feature. I reverse ingeneered the BXB150 and found a way to modify the limit to avoid them to overload with a cell voltage lower than the dc-dc output.

Doc

That's what gave me the idea for the first DC DC converter charger I built, the LiFePO4 one!

Jeremy
 
What i added is alsi diodes in parallel to each DC-Dc output to avoid reverse current flow to one or more to the dc-dc while connecting the battery to the multiple dc-dc. We know that all the conatct pins are not made at teh same time so to avoid momentanous reverse current this help Then i added a fuse in serie to protect everything:

file.php


file.php


I also added a quality caddok shunt in serie with each output to monitor individula current to each 12s channel

Here is a picture of them:

file.php


Doc
 
Jeremy Harris said:
adrian_sm said:
Any reason you couldn't get away with a RC charger type lead setup? Where you use heavy gauge wire for the main -ve & +ve leads, then lighter gauge for all the between cell connections.

This wouldn't work with this setup, as The main charge leads are the individual DC DC converter outputs. All the charge current is going via the balance port leads.

I was think that rather than have a bunch of individual chargers connected to individual cells that happen to be connected in series, take advantage of the fact that the pack you are charging has the cells connected in series. Essentially connecting all your DC-DC isolated outputs in series with appropriate heavy gauge wire, with the start of this string being -ve, and the other end being the main +ve for the pack to be charged. Then tap off between each DC-DC through the more typical balance leads. As the net current going down the balance leads should be low I thought this would work.

This is probably another case of me fundamentally missing something, so sorry if you need to take the time to walk me through it. But it seems like your setup could easily handle charging packs in any cell configuration, where as mine would require tailoring to the specific number of cells in series.
 
Hi Jeremy,

It's great to see you're already using this type of system. I've been thinking about using this approach for a pack made up of 70Ah prismatic cells for my Mini. I've bought a couple of the potted BXB100 converters to play with. I've also been thinking about possible problems with leaving cells connected at the final charging voltage.

There have been a couple of reports lately on the EVDL about LiFe cells puffing up when they've accidentally been left connected to a charger (in CV phase) at 3.65 volts for a day or two. CalB also now gives a "float voltage" of 3.40V in its specs. This is roughly the voltage at which the phase transition takes place during charging. I plan to set my converters to 3.50V and use a mains timer switch to kill the power after the typical charging period. I'm not sure what the equivalent safe float voltage is for lipo.

I'm still looking for a simple way to provide LVC. The cell logs are good, but a bit overkill for my needs.
 
I'm curious, what happens if you connect too many of these to a single power supply. Do they drop the current or stop working altogether?
 
patrickza said:
I'm curious, what happens if you connect too many of these to a single power supply. Do they drop the current or stop working altogether?

The power supply shuts down and the DC DC converters stop working. On the one occasion I tried this (when I was trying to run the charger from a single 350W Meanwell) the power supply went into hiccup mode and kept trying to power up.

Limiting the output current from the DC DC converters also reduces the input current, so allowing a smaller power supply to be used, even when charging a totally discharged pack. I'm doing this at the moment. My charger is limited to about 8A per cell maximum by the low value resistors on each output, really just to stay within the 500W limit of the power supply I'm using.

Jeremy
 
Hi Jeremy,
thanks for beeing the guinee pig for us :)
Now that we have a working proof of concept , I ordered 35 of these dcdc converters. They arrived today, and I checked this thread to download the (gerber) file for the pcb. Is it placed in the repository or somewhere else? What was the value of the trim resistor?
With two 0.1ohm resistors as limiters, what was the max current?
Do you think it would be better to have a heat spreading copper layer on the top, too? Did you use standard 35µm copperthickness?
I'm also thinking to implement a charge-ready indicator LED per channel.
Someone else interested in sharing the labour cost for professional build pcbs? IIRC it's around 250-300€ fix for making films etc...

Best regards
Olaf
 
I have built a charger for my Headway 13S6P pack. I am using the 48 volt to 3.3 volt Synqor converters. I do not have my 48volt source yet. I have put 20A fuses in the wires from the converters to the cells. When I connect the wires to the cells it blows the fuses. Is this to be expected or have I done something wrong?

Thanks for your help,
 
Post a diagram of exactly how you have everything connected, as it is right now. Drawing up the diagram may itself solve your problem, if you find a connection is wrong somewhere (which is what it sounds like). :wink:
 
galeson said:
I have built a charger for my Headway 13S6P pack. I am using the 48 volt to 3.3 volt Synqor converters. I do not have my 48volt source yet. I have put 20A fuses in the wires from the converters to the cells. When I connect the wires to the cells it blows the fuses. Is this to be expected or have I done something wrong?

Thanks for your help,

If you bought the 3.3V version from the same vendor: they are rated 50A. ( newer versions are at least rated 38A )
I smoked up my first converter, when I tried to switch it on/off like it should be. Maybe it was just bad luck, but I don't want to take my chances.
Seems they don't like to have reverse current on the output while the circuit is still under power but switched off.
I had to hardwire the on/off pin to the negative input pin to make it work. Now I can't switch them on individually, causing a major inrush current on the input side. Make sure your 48V source is able to handle that.
-Olaf
 
We also are building a charging set up using the SynQor DC to DC converters. Our set up is a bit different from the ones I see described in that the chargers are mounted directly to the cells they will charge.

The battery is built up with 50 3 cell buddy packs (it is designed to have 4 cell packs but we ran out of money)View attachment battery layout.pdf. The charger boards mount onto the Buss Bars that contain the cells of the buddy packs.

The charger boards contain the SynQor boards, a capacitor, a 20 turn pot, screw post to attach the cell log wiring and the connectors. the board is designed as a plug in module. the drawing shows the first version, the final version contains a capacitor in the power feed and a wire wound resistor in the lead to the positive parallel buss bar of its buddy stack. We also had high current and heat problems and decided to handle it with a simple coil made out of 24 inches of 16 gage magnet wire. We went that route because of simplicity, cost and the fact that the coil could disapate a lot of heat.View attachment Sub Board Layout copy.pdf
IMGP1231.JPG
We have since opened up the coil for better cooling

We are setting the charging voltage of each board individually using the 20 turn trim pot resistor. The chargers have been used during the testing and matching phase of the battery build and work quite well. The only concern we have at the moment is if the inrush when we power up the 48 volt buss will be a problem. We have discussed a precharge set up but until everything is assembled (this weekend we hope) we wont know. We have had some battery FUBARs that have required us to dis assemble the battery pack for a while.

Our battery is built up from 150 Headway 38120P cells in a 50S/3P configuration. We are using the Headway blocks to give us a tight pack as the space is limited.IMGP1216.JPG
Complete battery without metal frame_ with the 800 amp circuit breaker in place.JPG
The pack will be mounted into a 1/4 scale ultralight, super modified class pulling tractor that weighs 1350 pounds. It will be used to power a 13 inch GE series wound motor that drive a narrowed Ford 7.5 inch axle with a 5.14:1 gear.big13leftfront.jpg

Should be a real strong contender in this class with the torque that the electric can supply. The competition are powered by big motorcycle engines over 1 liter, 100 plus horsepower but generally 40 or 50 ft lbs of torque.

I guess we will see,
Jim
 
Jimdear2 said:
Should be a real strong contender in this class with the torque that the electric can supply. The competition are powered by big motorcycle engines over 1 liter, 100 plus horsepower but generally 40 or 50 ft lbs of torque.


Nice build....would i be correct in assuming the only 'tractor' part on the whole build
is the green 'front section' (likely fiberglass mold of an original too LoL)

Best of luck with it

KiM
 
Jeremy thanks for posting this!!!
 
AussieJester said:
Jimdear2 said:
Should be a real strong contender in this class with the torque that the electric can supply. The competition are powered by big motorcycle engines over 1 liter, 100 plus horsepower but generally 40 or 50 ft lbs of torque.


Nice build....would i be correct in assuming the only 'tractor' part on the whole build
is the green 'front section' (likely fiberglass mold of an original too LoL)

Best of luck with it

KiM

KIM,
The steering column, steering box and steering wheel are from a Cub Cadet. The hood is actually from a John Deere garden tractor. This class is the garden tractor equivalent of the 9000 pound modifieds in the big tractors. You know the ones with multiple engines that only vagely resemble tractors.

For regular garden tractors I have a converted Cub Cadet at 48 volts (going 72 volts this summer). I use it for pulling and general stuff at the farm. Before you ask, I force fan cool the motor when pulling, the filter you see is to keep dirt and dust out of the motor.

Jim
 
Anyone know where to order these dc-dc converters now?
 
Arlo1,

Although the SynQor boards are getting rare, these type 1/4 brick converters are pretty easy to find on ebay priced from about 5.00 to 30.00 each.

I just now went to eBay and entered a search string of 48 dc dc converert and found 218 entries I found similar boards by SynQor, Lucent, CD Technologies, tyco, Wall industries and others.

Look for the model number and see if you can find the data sheet with a google search and see if the board will do what you need. One BIG hint make sure the board output can be adjusted to the output voltage you want and that the board will pass enough amps to charge your battery in reasonable time. Voltage output usually is adjusted with an add on resistor.

Jim
 
We have finally got the battery assembled and mounted and strapped into the tray. We are finishing up the 48 volt buss to the chargers tomorrow and should start fitting it into the tractor this weekend.

The battery is in a 3P/50S configuration with space provided for a 4P/50S layout. that is 175 volts and 24ah now and 32 ah when we add the 4th layer next year. At a rated 25C we should get quite a kick out of it.

Physically it is 32 inches long, 16.5 inches wide, 10 inches high and weighs in the area of 110 pounds.

You can see from the photos that we have started the buss to board wiring. 10awg wiring to the boards with spade connectors.

The wiring for the Cell Logs will be routed in a similar fashion and will connect to the screw posts on each board.

Currently we have the boards set to charge each 3 cell battery stack to 3.5 volts. so far that lets the battery relax out to about a nominal 3.4 volts once power is removed from the charger, approx. 80% SOC. The Cell Logs will give us readings on the charging voltage per cell stack and nominal voltage per cell stack. We think with careful monitoring we will be able see if any single cell gets out of balance within a stack. If one stack charges up way sooner or slower and or there is a considerable voltage difference shoud be an indicator of trouble. We will also have the cell logs trigger a warning if a cell stack reaches a TBD (to be determined) LVC setpoint (initially no lower then 2.2 volts) and trigger a contactor cutoff if it drops below.

Once we get the battery into the tractor we will start the first full pack charge. Since we have deliberatly left the cells unbalanced we want to see how long it takes the multiple charger to bring the cells into an 80% SOC charge top balance. From there we will cycle the pack a few times as we seat the brushes. We want to run it in for at least 48 hours.
 

Attachments

  • Battery2.jpg
    Battery2.jpg
    49.2 KB · Views: 1,765
  • Battery3.jpg
    Battery3.jpg
    79.2 KB · Views: 1,765
Jimdear2 said:
Arlo1,

Although the SynQor boards are getting rare, these type 1/4 brick converters are pretty easy to find on ebay priced from about 5.00 to 30.00 each.

I just now went to eBay and entered a search string of 48 dc dc converert and found 218 entries I found similar boards by SynQor, Lucent, CD Technologies, tyco, Wall industries and others.

Look for the model number and see if you can find the data sheet with a google search and see if the board will do what you need. One BIG hint make sure the board output can be adjusted to the output voltage you want and that the board will pass enough amps to charge your battery in reasonable time. Voltage output usually is adjusted with an add on resistor.

Jim

The problem is most of them are not enought amps. 20 amps at 3 volts is 60 watts x 24 cells is 1440 watts total charging for my bike and it will be more efficient then bulk charging and shunting off the rest to ground and for those of us who want to sell our friends on e-bikes we need quick efficient charging!
 
Arlo if you are looking for more amps I think this one does 50 amp :twisted: how much power do you need for 9bucks?
http://cgi.ebay.com/SynQor-PQ48033HTA50NRS-DC-DC-Converter-48V-3-3V-Out-/380231094671?pt=LH_DefaultDomain_0&hash=item58878a118f
John
 
johnnythefox said:
Arlo if you are looking for more amps I think this one does 50 amp :twisted: how much power do you need for 9bucks?
http://cgi.ebay.com/SynQor-PQ48033HTA50NRS-DC-DC-Converter-48V-3-3V-Out-/380231094671?pt=LH_DefaultDomain_0&hash=item58878a118f
John
Its only 3.3 volts out. I need to charger to 4.2 I have been looking all night but I will find 24 of them soon.
 
Cool thread guys, I came across it after Arlo posted about it in another one.

I tried to make something similar a while ago from PSP chargers that were supposedly rated at 4.2v 2a to directly charge through the balance taps. After buying half a dozen I was pissed to find they only output 700ma.

These look like the way to go though, and it's good to see you guys have had success.
Your set up is particuarly impressive Jim!

Like Arlo I after a quick look on ebay I could only find the 3.3v ones on ebay and I'm guessing they don't have enough adjustment range to get up to 4.2v?

My plans are slightly different - I was going to use a meanwell to bulk charge almost to full pack voltage - say around 4.1v/cell and then have a series of these little dc-dc converters to top it up to 4.15 or 4.2v. This would enable the pack to still be charged fairly quickly but nicely balanced as well with the lowered powered dc-dc converters. These gutsy little ones could do the whole job though.

Arlo, keep us posted if you find any good cheap 5v ones like Jeremy is using. His original link is dead now but I assume they're from the Israel seller that's selling other varieties of these things on ebay.
 
Back
Top