Keyne's DH Comp Build - now with liquid cooled HX35! :)

excellent work,this bike is going to be top notch :) .
 
keyne said:
You'll probably recognise her surname - Braun-Elwert.

Can't say I've seen her in yet, but I'm sure she will be before long. ;)

I like how you made your battery enclosure. I am working on one at the moment and deciding how I want to do it. I'll be watching to see how it all comes together.

Clay
 
Hey Keyne,

This is a really nice build, I have just started my first eBike project using a Giant DH team so i'll be watching your thread closely for hints and tips. I think the work you've done so far is absoloutly top draw! thats one hell of a bar you've set me.

I'm still in the very early stages so more planning than building but hope to get the parts on order soon. I'm in a bit of a dilemma at the moment as to which hub motor to go for I'm thinking X5 or HT or even a HS but i'm not too sure i've noticed you've started your build with an X5 but plan to swap it out for a HT. I'll be very interested to find out what you think of the HT compared to the X5 in direct comparison to each other.

Keep up the good work!
 
Quick Update: I haven't had a lot of time to work on it recently - due to a holiday and other factors.
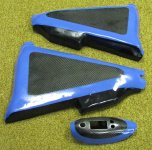
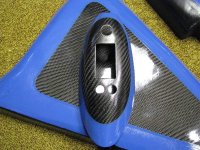
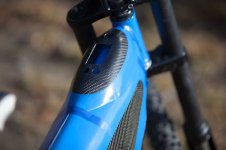
I have managed to complete the side panels and "speedo-pod" (as my wife calls it) - I'm amazed how much sanding I had to do!
The panels just need another couple of coats of paint.
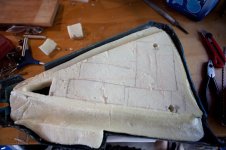
I've produced a large block of foam (using the side panels and frame as a mold) for mounting the batteries securely.
I've ordered the 6 pot gatorbrakes - they are on their way.
Should be able to post photos this weekend.
 
keyne,

I have a friend who is making a copy of my Giant but with the HT motor.

he is a kind of Solidwork EXPERT and is modeling everything he think.. or just mind!!!

Here is the list of all cad he did for teh giant!!!.. I thought that might interest you and some other members! :wink:

( sorry it's in french but i guess you'll understand something anyway)

_dessin de l'ancien X5 hub-motor arrière avec disque
_dessin du nouveau hub-moteur (HT - HS) de Crystalyte arrière avec disque
_dessin du cadre principale (frame) du Giant DH Comp
_dessin du swing arm (frame partie arrière) du Giant DH Comp
_dessin des pièces mobiles pour la suspension (sur le frame) du Giant DH Comp
_dessin du porte dérailleur arrière du Giant DH Comp
_dessin de l'amortisseur du Giant DH Comp (Manitou Swinger SPV 6-ways coil)
_dessin du bearing (SS 6000 2RS Double sealed ball bearing 8 X 10 X 26mm) qui va sur le Giant DH Comp
_dessin du bearing (SS 6003 2RS Double sealed ball bearing 10 X 17 X 35mm) qui va sur le Giant DH Comp
_dessin d'une tige de selle (Easton Havoc 30,9mm X 350mm)
_dessin de la jante SUN Ringlé - Double Track 24'' 36 holes, ERD = 476mm Diam.= 507mm
_dessin d'un disque (de frein) 8'' avec 6 trous standard
_dessin de clamp quick release pour siège et roues
_dessin d'une roue avant complète (jante 24'' + pneu 24'' X 3.00'' Kenda Kraze + moyeux + disque + spokes & nipples)
_dessin d'un moyeu avant SUN Ringlé - Abbah SOS DH 36h
_dessin d'un dérailleur arrière (Shimano cage moyenne)
_dessin d'un pédallier complet avec pédales
_dessin de toutes les pièces impliquants mon kit de torque-arm
_dessin de plusieurs écrous, boulons et washer métrique McMaster
_dessin de rayons et nipples
_dessin de cassette 7 et 9 vitesses
_dessin de pneu (24'' X 3,00" Kenda Kraze)
_dessin de batteries A123 & Headway
_dessin du BMS TpPacks ver2.6
_dessin de plusieurs connecteurs circulaires militaires
_dessin d'un chaine et d'une maille
_dessin du boitier CycleAnalyst ver. 2.2
_dessin d'un contacteur KiloVac
_dessin d'un template en anglais pour le testeur de hub-motor de Lyen
_dessin de connecteur Anderson SB50 & SB350
_dessin du contateur Albright SW200
_dessin d'un Shunt 60mV 500A
_dessin d'un pot box Curtis PB-6
_dessin d'un moteur Advanced DC FB1-4001A
_dessin d'un relais Bosch 12V 30A
_dessin d'un controlleur Curtis 1231C-8601
_dessin d'un Voltmètre et Ampèremètre à aiguille Westburg
_dessin d'une batterie 6Vdc Trojan T105
_dessin de fusible variés et porte-fusible
_dessin d'une pompe à vacuum GAST - Vacuum Pump MOA 12Vdc MOA-V111-JH
_dessin d'un controleur Crystalyte
_dessin de différents terminaux électriques et jumpers
_dessin de Rail-DIN 15mm et 35mm
_dessin d'une grille de fan 60 X 60mm
_dessin d'un Brushless Fan NMB 2404KL-04W-B50
_dessin de tie-wrap, tie-wrap holder, borniers, ferrules et etc... (plusieurs autre chose)


Here is the file of the forque arm he did:
 

Attachments

  • 2011001C - Giant DH Comp frame rear swing arm - hub motor Assy.pdf
    228.9 KB · Views: 573
  • 2011001A - Giant DH Comp frame Swing Arm Assy.pdf
    332.4 KB · Views: 337
Hi Doc

I'm also a CAD user (it's my job), and I have the DH-Team, which soon will have a HT35 motor too.


I'd really like a copy of those files please! I can add my battery box, and tweak the dropouts, and I'd have a good model of my bike.

I'll send you a PM

Cheers

Mark
 
I was hoping to post a photo of my pretty panels this weekend, but I had a disaster. I had done all my careful preparation, sanding, priming, masking etc. I was just up to putting on some clear coats. 10 mins after the first clear coat, I went to check on them and the paint has gone all milky and starting to bubble! :shock: It worked as a reasonable paint stripper! :x So I spent the rest my spare time this weekend re-preping the panels to have another go! Quite a few backwards steps. I will have to ask more questions at the paint shop - we live and learn :roll:

The good news is that for the short time I had them mounted on the bike before the clear coat stage I think they looked pretty awesome! :D
 
keyne said:
I will have to ask more questions at the paint shop - we live and learn :roll::D

Sorry to hear that you had painting probs, i have too many times.
Few things i have come to live by, never mix paint types i.e epoxy and acrylic
and never mix different brands of paint. Both can be done yes, but i have had
enough disasters in the past years that i won't risk it anymore. If you etch prime
and fill with acrylic, paint the colour and clear with the acrylic...same deal w for epoxy
two pack etc.

Hope you get it all sorted looking forward to seeing the finished job :)

KiM
 
Panels update:

I've got the panels to a state I'm happy with, they're not perfect, but I'm sick of working on them. If I did it again I would do it quite differently!

Here they are, please excuse the low quality pics and horrible carpet colour in my office. They look a lot cooler on the bike because the fit so well, but the bike is 300km from the panels at the moment and they won't be reunited for another week or so.

panels 001_s.jpg
panels 002_s.jpg
Pretty happy with how the "pod" came out - still a lot of work to do on my custom speedo though ;)
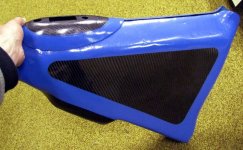
panels 003_s.jpg
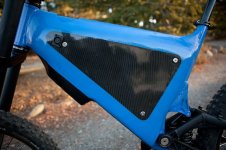
This gives you a good idea of how it all fits together. The space for the controller is pretty obvious at the bottom - the void below the black section.

Thanks to fullThrottle for recommending marine grade polyurathane to stop UV degredation of the carbon fiber sections - and it didn't react with the paint!
 
That turned out really nice! Different rim colour gives them less of a fuel-tank look.

How will they hold together - tape or latches?

How light are they?
 
Three bolts on each side - they just clamp themselves onto the frame. The top join may get a line of tape each depending on how it looks - the top join just butts together, the bottom is designed to overlap - the bottom join will get a line of black tape. They aren't light - 500g each - they are pretty strong though! Could have got away with much less.
 
There is thin foam tape on all contact points to stop rattling. I have used some 2 part polyurathane pour foam to make a piece of foam to fill the cavity perfectly (pics to follow next week) and I will cut out voids in this to hold the batteries, bms, wiring etc - there should be no movement and no noise. Rubber grommets for entry and exit points, controller and "pod" bolted to panels with nuts epoxied in place on the inside of the panels.

Still have to order a chain, new seat and new handlebar grips then there is just the small issue of the bms ... ;)

Still working on the watercooled HT3525, but will just use the X5305 until that is ready for testing - should be great either way!
 
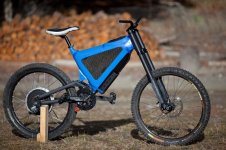
I got a chance to do some work on the bike today. Here are some pics of the panels on the bike (just taped on for the photo). I think the paint job does a reasonable job of stopping it from looking like a large box on wheels! :wink:

PaintedPanel1.jpg

The bike is really asking for a few cool decals!

PaintedPanel2.jpg

My derailleur arrived yesterday - SRAM x9 short cage. Looks pretty sweet!

A new saddle is on order along with the chain.

I laced up a 9C motor I had lying around unused from another project, so this bike will have the option of three motors - 9x7 9c, x5305 and HT3525. It will be interesting to compare them!

I also got in some work on my BMS/dashboard section of the project - the LTC6802-4 isn't nearly as complicated to implement as I thought. I'm much more at home with electronic design than molding carbon fiber!

Having trouble with the brakes though - my 6 pot Gatorbrakes arrived, but they have a completely different mounting system to what I thought was standard. Anyone know what adaptor they require?

I'll be able to do some work on the bike tomorrow too, so hopefully more photos soon :)
 
My GatorBrakes are IS mounts. You must be used to post mounts. I used this to mount GatorBrakes to post mount forks:

http://cgi.ebay.com/TEAMSSX-New-KREX-rotor-adaptor-Manitou-fork-203mm-/300570412641?_trksid=p4340.m263&_trkparms=algo%3DSIC%26its%3DI%252BC%26itu%3DUCI%252BIA%252BUA%252BFICS%252BUFI%26otn%3D10%26pmod%3D290561384882%26ps%3D63%26clkid%3D871486603272170498
 
That looks brilliant. Awesome job. Best looking build I have seen in a long while.

- Adrian

keyne said:
 
Man , that one looks brilliant!! Hopes mine get half as nice.

Photo tip: Put something under the pedal on the other side of the bike. That's how we do it in the shop.

.manitu
 
Thanks guys! Don't worry about the stake, when the bike is actually finished you won't be able to see anything holding it up! ;)
 
NIce build! :wink:

More esthetic than mine with my Mad Max style :mrgreen:
 
I managed to drill the mounting holes and charger socket today. I will try to get some black bolts some time.
boltedpanels.jpg

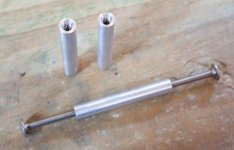
They are mounted using these things that I got a friend to turn on a lathe:nut_things.jpg

Here's a pic of the 9c I built up yesterday (not tightened up yet) - will be interesting to compare it with the x5 and HT35
View attachment 2

I've started work on mounting the batteries - building up packs and padding them etcView attachment 1

They all fit into the polyurathne foam block that is formed to fit the frame and panels - just cut holes where required:battery_compartment.jpg
 
Back
Top