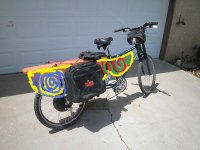
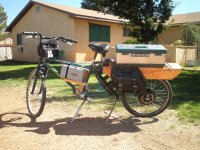
Dogmans Full Suspension Longtail Frankenbike.

Well, thanks for the compliment. I have hesitated to go frankenbike for a long time because of my crap welding skills. The way this one went together so good blew my mind. Once I saw it could hold my body weight with no bolts or welds at all I got realllllly excited! Clearly I was heading the right direction.
I did add a piece of angle iron to the seatpost to beef it up, but it still needs to have a real welder go at improving it with a good wire feed tool. What REALLY amazed me was that it doesn't want to fold over in the middle. Again, by sheer luck I happened on the right frame, and cut it in the right place to have both stiffness up and down and stiffness side to side. So the welds won't be trying to bend back and forth even a little bit. What a lucky break I happened upon.

Hopefully it will carry 100 pound cargo, including about 50 pounds of battery. I'm really dreaming of riding all over Coloroado or northern NM now! With about 2k wh of battery and minimal camping gear, I could ride for a week pretty cheap. A week off in summer is a problem though.

Edit. Just back from a 20 mile ride, with a ping riding on the beam rack. Wow. I really start to get it, how people fall in love with a longtail bike. Still just can't belive how smooth and stable it rides. Handles 20 mph on wicked washboards fine, no hands riding is perfect at any speed up to 25 mph. Very comfy ride over the crappy roads with heat cracks. Ideal for the 100 mile rides I think.

Gonna be interesting to get the rack rebuilt better, and see how she does with 100 pounds of cargo.
 
Been riding it to work for a few days. Getting a LOT of looks from folks. Rides much more comfy than the commuter I've been riding for two years. That one is pretty nice FS too, but something about the longtail is just cush.
 
dogman said:
That one is pretty nice FS too, but something about the longtail is just cush.
Well, at least with CrazyBike2, it has flex in the frame and gives me some suspension just from that. I notice it more the more heavily loaded it is.
 
If nothing else, a longtail puts the rider further from the rear wheel, and more in the center of a teeter totter. So the wheels can go up and down while the rider doesn't. Just like the best seat on a bus is center between the two sets of axles.

I'll see if I can get something up on youtube on this bike soon. Riding by on a washboard dirt road or something. Along with a how I did it thing.
 
Nice work, Dogman. Congratulations :!:

This is a first :arrow: Fully Suspended Power On Demand Electric Long Tail ..EVer.

If it were Xtracycle aware, it could be called SEXPOD LT :lol:


Seriously though, the only thing missing .. passenger accouterments 8)
 
Somebody willing to ride on my bike with me would be remarkable. 30 years ago my wife rode on the back of my motorcycle, once.

All I would need is a 2x4 added crosswise, just in front of where the frame is welded at the rear dropouts for a footrest.


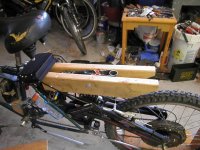
Been improving the cargo beam. Here is how I attached the main support.Naked cargo beam..jpg

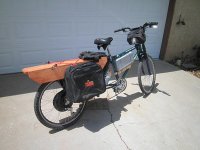
Finished up. The pingbattery is moved to the triangle where it belongs. Left pannier is a messenger bag.View attachment 2

Right pannier is a laptop bag, part of the loot you get when you are a balloon fiesta pilot. Right rear view.jpg

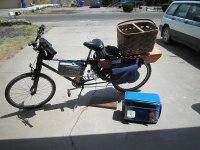
One option is to screw the basket to the cargo beam , then carry groceries in a soft cooler that fits perfect. I am considering two of these coolers, as panniers.
I can easily carry awkward large cargo now, including a 50 pound bag of dog food.Picnick basket..jpg
 
Tell the truth Dogman, this build is an elaborate repositioning of the water bottle. :wink:

I love the utility! I can't wait to hear how you get along with this layout.
 
Man-o-man you are one heavy duty carpenter. 2 x 4's PLUS 1 x 5?, that beam will support 6T. The 1" alone with some glue and screws would be more than needed.
The comfort, strength and usefulness of this creation just continues to grow.
I look forward to your detailed post on the build.
 
gogo said:
Tell the truth Dogman, this build is an elaborate repositioning of the water bottle. :wink:
Gotta make sure it is as far from the front fork as possible, ya know. ;)


Those cooler bags look like they'd make good panniers. Are they hard material (plastic, metal?) inside? If not, you might consider a piece of 1/8" aluminum plate inside, on the side being bolted to the bike. Some fender washers on the inside bolthead, and the nuts on the other side of the beam, and it'll hold a lot of weight.

That's what I did with that car-battery-sized plastic box I put my Vpower pack in, and that's not light, and it hung on three bolts from the cargo rails of CrazyBike2 not only during the DeathRace heat I crashed in, but for weeks afterward just fine, until I moved it to the battery space in place of the NiMH. There's pics of what I mean back in the CB2 thread the day of/before the race.

It's the same thing I'm planning with these computer-tower carrying bags:
file.php

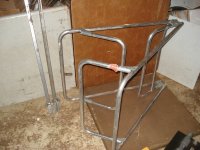
for the new bike, although they will also have an aluminum railing to tie them to instead of bolting, for some trips where I will want to bring them inside at destinations. The railing will be made from this old cot frame, so that I can leave it as foldup for when I have no cargo, so the bike will be narrower.
DSC02567.JPG


The bags have about the same volume inside as my big metal cargo pods, just longer and narrower.

I just wish they weren't black, because of the sun heating them up. Do you think bleaching them would work out without destroying the material or threads?
 
Gotta make sure it is as far from the front fork as possible, ya know. ;)

haahahhaahahaha - sorry but that's hilarious


The bike is looking more and more like an extracycle - but home and with suspension - awesome! I like the way the wood looks... you could make a whole bike and trim it like a classic station wagon. It'd look really f'in classy.
 
Just for those not in on the bottle joke. On my first commuter ebike, in just about the first week of riding, I got a bottle stuck into the forks. Over the handlebars, breaking both collarbones. Three years later, still trying to get the soft tissue damage healed. That bottle mount was underside of the downtube. That very same kind of mount is where the bottle is now, but it's behind the pedals on this bike. 8)

The reason for the big 2x4 supports was to give a wide enough thing to attach the beam to. Starting out with a large oval tube to attach to made just bolting to the top of it a problem. An even moderately good welder could simply have tacked on a few bits of square steel tube of course. I just went wood because I could simply bolt it on easy as pie. Gives me plenty of meat to sink a long screw into, attaching the long cargo beam. At least half of the cargo beam is cantilivered, so there will be a lot of pull on the screws near the front.

As you can see, the 2x4's had to be a bit short or they'd rub the rear wheel. I could have just put spacer blocks, then used longer 1x4's for the inner beam, but 2x4 was what was laying around in the garage.

AW, I knew you'd have the answer for how to support a huge pannier! Now I know what to be dumpster diving for, an aluminum cot. With those supporting it, I could go to large duffle bags or whatever for a camping trip. I was kind of eyballing aluminum walkers and such for bent aluminum tubes. What I really want in the end, is some decent real motorcycle panniers. Hard shell locking ones ideal, but even the larger size leather would be bitchin. I do have one samsonite make up case, but really those are not so big. I've also looked at lots of other things like wicker hampers and such. Most are not so strong. The plastic totes for example, will fail catastrophicly at some point. With a support underneath they could work. 5 gallon screw top buckets is the cheapest strongest idea so far. Get them from somebody with a pool.

Still not completely done with this thing yet. I need to build a proper battery box to replace the beat up toolbox. Definitely thinking the woody look, with some nice paneling for the sides. Might even try to make it all one big panel piece, that starts at the headtube, and sweeps all the way to the rear tire. Another option would be to do it with coroplast, and then airbrush it with the tie dyed hippie look swirls. :lol: Really fit in with the homelesss crew then. View attachment 1hippie.jpg

It rides soooo dang nice, I may just end up parking my regular commuter for a really really long time. On the other hand, If I ever screw up charging the battery and have to ride it up the hill home unpowered one time, that could be the end of it getting used daily.

Even more fun that ever, to blast past a pedaler on this monster. The looks I get everywhere, from everybody are priceless.
 
Awesome job Dogman. I love the fact you even managed to get rear suspension into a cargo bike. Top stuff.
 
+1 On the cat litter buckets. I just discovered them a few weeks ago. I was thinking of folding lawn chairs for free pre-bent al tubing? Some Cloraplast is very thick strong stuff made of different material than the common sign. Greenhouse and solar water heaters are made with it. There is a aluminum skinned building cladding product made with bubble and it is incredibly strong/light. Alucobond is one trade name.
 
I used to use one on DayGlo Avenger, on top of a rear rack, even before I motorized it; this pic is of after I started one of my first attempts (which was a miserable failure, from before I understood *anything* about motors, really):
file.php


I hadn't yet tried lower-down side-panniers, but had planned to move the buckets down to the sides, with some larger 40lb FreshStep ones that I'd seen. Never got around to that, but I did once setup two regular buckets bolted on the left side to a long rail mounted from BB to dropout and the top of the rack. Was ok, but just wasn't enough room in a single bucket for some stuff I needed to carry, and so I ended up going back to baskets, until I got my big metal boxes. :)


Nowadays if I needed a bigger bucket, I would take two identical buckets, and cut one short side off of each of two of them, overlap the edges, apply silicone at the overlap, and pop-rivet them together (from the inside, so the rivets don't catch on the cargo). Then apply an aluminum plate to the inside to spread force across more plastic surface area, drill thru that, and bolt the new double-size bucket to the bike. The lids would also need to be cut, overlapped, and riveted, so that they will still fit on and seal against water/etc. :)


I highly recommend the Tidy Cat ones over the Fresh Step, as the TC's last longer in the sun. Plus the bright yellow is more noticeable in daylight, and the logos sand off easier. (or you can use denatured alcohol to wipe them off).
 
Good call on the kitty litter buckets. Square shape would make it easy to mount. I was looking at square trash cans and baskets for similar reasons.

In the end, I bet I screw all kinds of crazy things to it depending on what I want to carry. That was part of why I wanted so much wood on the back. You can swap out stuff in a few seconds with a screw gun, to carry different things.
 
Your success has inspired me to go ahead and do it:
http://endless-sphere.com/forums/viewtopic.php?f=2&t=33291
though I have done little besides fit parts together a bit so far.
 
Pic of the bike as it is more or less finished. Completely weatherproof top of the rack box for must stay dry items.

Frankenbike longtail.  Bouncing Betty..jpg

Actually, I have added two more bags behind the motorcycle panniers.
 
Looks very useful. :) I never have gotten mine much past the above; too many things going on, end up never deciding what to do so I don't do anything, need to just DO something and build it, then fix it if it fails. :lol:
 
Back
Top