Back in the Saddle: Going to California: 2011

Yeah....any ally welding you do is gonna weaken the frame also......bolting something on could work short term though not ideal

The L angle extrusion does not have much torsional stiffness.....been there done that.

You need to add some material with very stiff torsional rigidity, or add some triangles in rotational plane somehow - ie from as high on the trailer steerer tube as possible to as low on the seat tube as possible....but I can't think of anything stiff enough that would work......

OR add something like the 8020 aluminum down the middle which has great torsional rigidity but is heavy...
 
:idea: I’ve had an epiphany: Structural Foam! Right down the middle. Lightweight, adds rigidity, inexpensive, DIY. :idea:

Whatcha think? :)
~KF
 
wow....i have no idea of the rigidity.....could possibly add a damping factor into the equation.......that's some outside the box thinking going on there - what brand of barley you been sacrificing tonight? I want some......
 
No barleys were sacrificed tonight; I'm on the wagon trying to leave. It popped into my pointy lil' head after watching an episode of "Doc Martin" on Netflix. 8)

Technically it is referred to as Closed Cell Spray Foam, of which there are many types. High-density is preferred. I am familiar structural foam composites from previous projects, and in fact had considered a composite foam core for the base of the trailer: Lightweight – yet rigid, with laminated exterior.

I am trying to source some now. Home Despot doesn’t carry exactly what I am looking for; they have the “spray insulation” version. There’s a two-part version that is really strong, but I don’t want to drop $500 for my application. Figure 2-3 cans would be enough. Need to treat the top and down tubes of both bikes, and possibly the stays as well. And it will certainly add dampening! :D

~KF
 
Is the spray foam going inside the tubes or are you going to clamp a skin on the outside and use it to glue a stressed skin to the frame tubes?
 
dbaker said:
Is the spray foam going inside the tubes or are you going to clamp a skin on the outside and use it to glue a stressed skin to the frame tubes?
Goes inside the tubes :)

There's a thing called a skin-affect; when you have a rigid foam and a rigid skin, the two materials work together to create a very strong structural bond because the resonate frequency of the dissimilar materials can dampen audio-acoustic waves. The two frames connected have a low resonate frequency, and I suspect that the hub motor on the trailer was contributing which the slightly out-of-balance wheel. If I am not careful, I could also induce a resonate frequency at the handlebar that would have the waveform travel from the front to the back and front again without dampening. BTW - the Steering Dampener is set to a modest level; slight resistance but not stiff.

Volumetic Calculation

  • 2009 Felt Compulsion 1 FS Frame: 7005 Double-Butted Aluminum
  • 2011? Because Simple Frame: Aluminum 6061-T6

Code:
Frame    Tube    Dia-in  Len-in  Qty  Vol-in  Vol-oz   Comments
----------------------------------------------------------------------------------------------
Because  Top     1.25      23     1    28.2    15.6    Consistent
         Down    1.75      23     1    55.3    30.7    Squashed to ovid at seat/stays
         Seat    1          4     1     3.1     1.7    Consistent
         Stays   1         13     4    40.8    22.6    Squashed to ovid, narrowing towards axle
Felt     Top     1.38      20     1    29.9    16.6    Hydroformed
         Down    2         24     1    75.4    41.8    Hydroformed
         Seat    1.38       7     1    10.5     5.8    2-part with shock mounting in the middle
         Stays   1         11     4    34.6    19.1    Round to Square; lengths averaged

Total                                 277.9   154.0

We are interested in the total fluid ounces to know how many cans of foam to purschase. I sourced this stuff at Home Despot:

  • GREAT STUFF 16 oz. Big Gap Filler Insulating Foam Sealant
    618bf5df-f792-4936-ac39-544fe9d7748d_300.jpg

    The Great Stuff 23 oz. Big Gap Filler Insulating Foam Sealant is designed to permanently fill gaps in many materials, including drywall, metal, masonry, glass and most plastics. It helps seal out drafts, insects and moisture.
    • 1 Can equals up to 24 tubes of caulk
    • For indoor/outdoor use on a variety of materials, including wood, drywall, metal, masonry, glass and most plastics
    • Permanently fills gaps larger than 1 in., helping to block drafts and entry of insects and moisture
    • Cures rigid in 8 hours

  • Presume that 1 tube of caulk = 10 fluid ounces (U.S.), one can of this stuff expands to 240 fluid ounces. The total volume of the bike frames (discounting wall thickness) is 154.0 - therefore one can should do both bikes. There will need to be some dissassembly and I am uncertain if I can get foam into all the voids easily.
  • For the Felt Frame, easiest access is through the Head Tube, although access through the Bottom Bracket might be required unless I can snake a filler tube down there. The stays would need to have the vent holes opened; not keen on that.
  • The Because Frame can be access easily at both the Head Tube and the Bottom Bracket, and I think the Stays are opened at one end there as well. This is the frame that requires the foam more so than the Felt.
I think I'm going to break the two frames at the hitch and make a dash over and fetch this stuff this AM.
Rigidly, KF :lol:
 
dbaker said:
Buy 2 cans :)
Yeah! :twisted:

OK – I have disassembled the Trailer to where I have access to the top and down tubes. This was more work than I expected. I don’t think I’ll be able to squirt into the top stays though; the bottom stays have a large vent right behind the BB.

I am not going to shoot into the Felt frame; that’s just too much to do in one day – too much disassembly. We don’t know what the gain will be if any, so let’s stay with the largest target.

Anyways – I’m away to the store. KF
 
Wow... i missed this thread !!!... have to go back and read up on previous pages..

I've messed with that foam stuff, very messy stuff !!!!! ( Wear gloves if you use it !! )

http://ypedal.com/PSI/PSI.htm

I don't think it will help with your wobble problem tho....

check the alignment of the wheels !!
 
dbaker said:
KF, how is your cell phone working with Speedict?
Green Machine said:
I was also wondering how the speedict is working out.

Kf why are you running both speedict and CA?

Haven’t had time to complete the setup using XP. Though I was hoping to do so this evening or tomorrow or wait until I can get to a PC on the road. I think that answers both questions. :roll:


The Foam Fix worked! Posted results of the latest weight test on the Trailer thread.

The Weight Test Version 2
New and improved! With more power flashed to both controllers, and a stiffened trailer frame. I took the exact same route as I did previously with the last weight test.

Reflashed controllers as Front Hub w/ 18A Battery/45A Phase, and Rear Hub w/ 22A Battery/55A Phase. The difference was profound and I could climb the Redmond Hills from a dead-stop on an incline. At one point I was doing 31 mph up Education Hill pulling the fully-loaded trailer! :twisted: I think that’s about where I need to be. Except – that I want more power in case I lose one wheel.

And that’s exactly what happened as I got to the top; the Secondary Controller/Read Wheel cut out again. :cry: CA is still active so the PCB is partly on, but the Controller is not responding to Ebrake/Regen or Throttle or Speed changes; it’s like it turned itself off internally. The problem does not happen when it’s just me and the bike; only when pulling a heavy load.

I wonder if I am hitting the LVC and shutting down the Controller? :?

Regardless, the Trailer is now certified for cross-country; the foam fix worked and I am pleased to give it a try now without being a fraidy-cat. :mrgreen:

That’s where I am at: Still in Redmond trying to figure out the last bugaboo that’s blocking me.
Happier, though not yet happiest. KF
 
On the Side of the Road

Officially – I am buggered, although I hope it is only for a moment, a day perhaps. The secondary controller that I had slaved for running the eBike rear wheel is still unresponsive. There are some odd peculiars about the unit that I cannot explain fully.

  • CA shows that it is consuming negative watts. I have double-checked the wiring and it appears wired correctly. Both Primary and Secondary CA’s are in exact parallel except for voltage sense which I manually dialed into parity within 0.1V.
  • All signals from the Dashboard are received: Throttle, eBrake, 3-Way, and Cruise.
  • VCC-L gets powered from ON/OFF switch.
  • Local onboard power is supplied, though +5V is suspect to only producing +4.3V.
Regardless – the MCU is unresponsive and I fear is lost, possibly due to a transient. Sadly I have invalidated the warrantee since modifying the device; the fault is mine. :oops:

I have several spare controllers and will spend the day sorting out a replacement, then followed by a test drive or two. Thankfully I don't have to go far for agressive mountain riding.

So close, and yet so far away… KF
 
So close yet so far! Just pick a couple extras up from Lyen and get the show on the road :D

It definately sounds like something is pulling your regulator down. Could be the chip. Very well could be something else like a bad cap. Have a look inside and see if there is something obviously suspect.

This has been a hell of a journey, and you haven't even left yet :D
 
So true! I haven’t given up. My buddy down south in Fresno says I’ve got to go cos I’ve spent my summer vacation trying to have a summer vacation! It’s 80*F outside and I’m inside soldering SMD’s :cry: - I so have to get on the fricken road it ain’t hardly funny… OK, it is funny; I’m enjoying myself – really. :lol:

I have several 6FET controllers to pick from, but I settled on a 12-Fetter from Dennis that I bought last year when first considering 74V; I had already beefed out the controller for high-current and the PCB is one rev behind the 12FET Lyen PCB; same MCU and layout except fixed regulator. I think it’s set for 74VDC but if not, I might bypass it and run 12V from the DC-DC converter straight in – maybe… On the flipside I noticed that it only sports the IRFB4310; not as strong as IRFB4110, but heck I’m never going to use that much power anyway. The PCB is almost a clone of the Lyen so no extra hunting around to find stuff. Although I have to say R12 is right up front and easy to get to. :wink:

The other associated bugger is that my EBikesKit Throttle also died. This took me a while to figure out. It wasn’t until I tried all known good controllers that I ended up checking the signal and there is none; kaput. I have a Magura ready as a hot-swap; tried that and low and behold – everything works except for the controller without a brain. :roll: So – after I get done with the controller swap I need to string a new Throttle. Not a big deal – just a time sink. I have to add the battery cable up forwards anyways for the new saddle bags. Which reminds me; I took this photie yesterday before the ride...

BatteryPackaging.jpg


Battery Packaging
This arragement makes it soooo easy...

  • On the left, I created two basic battery “wrappers” (one shown) that essentially hold the entire local battery array together and with handles for easy insert/withdrawal. The florescent Cordura is self-illuminating under any light conditions. There are 15 batteries in this unit which resides on one side of the trailer (in a toolbox).
  • The Ortlieb bags use last year’s arraignment wherein I have 50% of last year’s load (9 batteries shown) on each side, and contained by a U-shaped Aluminum brace. This retains the form when the assembly is inserted into the Ortlieb bag. There are two additional padded panels front and back (not shown) that protect both ends from debris.
  • Lastly on the right are the forward-mounted saddle bags made from two Timbuk2 bags that I stitched together using 4” wide polypropylene webbing. Each Timbuk2 bag holds six batteries.
  • MIA: Not shown are the 18 batteries that I have already loaded in the triangle area of the ebike.
Add it all up and you get 78 batteries: 18 + 12 fore, 18 aft, and 30 astern on the trailer.

Did I say that I liked how the trailer handled now that it is stiffened with cheap-arse foam? :D

I have to get this pesky controller/throttle snafu fixed and git my hiney-butt down the road. :oops:

Back to the salt mine, KF
 
While we know all too well that coincidental failures do happen ;) I would guess the dead hall throttle, presumably previously on the now-dead controller, might've been killed by a regulator problem on that controller. (which could've also possibly taken out the MCU and/or anything else powered by 5V)
 
amberwolf said:
While we know all too well that coincidental failures do happen ;) I would guess the dead hall throttle, presumably previously on the now-dead controller, might've been killed by a regulator problem on that controller. (which could've also possibly taken out the MCU and/or anything else powered by 5V)
I am just grateful that the other controller came back to life! The two do not share +12V or +5V; just VCC, VCC-L, and GND.

Quick Status
  • Replacement 12-FET is ready to test; completely modified and ready for bear. It has been flashed for 24A Battery/60A Phase which I discovered is what my old 6FET was set to last year when I made the 101 Club and succeeding Road Trip. (The Front Hub controller is set to 18A/45A; the only caveat I have about that is if the rear controller fails - the front hub is too weak to carry the weight up the steep hill alone unless I get off).
  • Battery Harness progressing; I’ve reworked existing efforts to create the forward harness which will service Saddle Bags and Triangle batteries. The Trailer Batt-Box harnesses have been split so as to reuse ½ of the pigtails for the Ortlieb bags. I just need to add extensions to the length and they will be finished.
  • Magura Throttle mounted, though it needs the cable shortened (it’s like 8 feet long!). It would be nice to have a switch to cut out the Secondary controller for cruising/economy – but there’s no time left to experiment.

Tomorrow (now today) I’ll put this all back together, hook up all the batteries, charge, and make another test drive with everything loaded sans the faring; it must pass the abusive local hill climb at least twice without ANY issues. In fact I really want to run it about four times; climb 2000 feet in 24 miles; about an hour stress test. <whew>

Well – that’s all I have for tonight; pooped out.
Until tomorrow then, KF
 
you know they even did some test flights on the shuttle before they added the rockets. you need to put miles on it over time and keep inspecting the butt weld for signs of metal fatigue. that is what i worry about with a long excursion before the burn in cycle has finished. i think rassy went through several revisions over 6-8 months on his trailer. my project has gone viral.

while keeping the plaster intact on the bedroom walls, i ripped all the windows out of the upper floors, pulled down the sheetrock in the closets off the bedrooms, in preparation for adding a layer of foamboard, and now i am rewiring the upper floors to get two separate 25A 240V circuits up there so the heaters won't overload the old single 20A circuit.

have to do that before the attic is permanently sealed with 14" of insulation blown in side to side, and every nook and cranny.

work, what is it good for anyway? man is born to suffer, work is suffering, but in the end you have changed your world, just a little. being able to run the 6 gauge cable out to the porch from the service panel is big, very close to having the neighborhood EV charging spot now too.

i expect to cut heating btus in half with the new windows and all the insulation and the real kicker is enclosing the ends of the house to stop the drafts through the framing. but of course that is the hardest. the new windows are like big view, without all the woodwork around the windows, it is all view downtown now. where there was a 30" wide 48" high DH window on the end of the dormer will now be 6 feet wide 4 1/2 foot tall slider. about 8 times the light. that helps a lot in here because of the long dark days here all winter. flooding the stairwell and downstairs.
 
Midnight Status:
I bark at the moon... <ARrrooooo!>

I was thinking I might leave today but then by 10 AM it became wishful thinking; too many little details to complete. Here’s what’s been done since 6:30 AM…

  1. Finish Trailer cable mod; termination
  2. Finish Ortlieb cable mod; extension & wye
  3. Sort out Controller-side power bus connector
  4. Shorten Throttle Cable
  5. Shorten Rear Hub cable if possible
  6. Tried configuring Speedict one more time: Got it to recognize the device on XP but wouldn't take latest firmware upgrade (might already be installed). Android couldn't connect to device. Tried both apps; no joy. Taking the unit with to resolve on the road. Maybe with a 2nd set of eyes this too shall be overcome.
It doesn’t sound like much, and that was my thinking when I got up out of bed. But these little jobs are tedious. For instance, signal wires solder quickly – actually they go pretty dang fast now as I’ve developed better technique. Battery cabling though takes time because I tie off each connection with a lineman-hitch (I forget the proper name but it was something I learned when I was in the Navy): Take two big wires, overlap them, then take a single piece of strand (I use silver-plated copper because it’s ready to wick), and then I tie the two wires together. Finish by soldering. Works well for holding large joins together. Not long ago my Uncle said “Screw that – I use Butt Splices”. That made me laugh; I am such a fool. :lol:

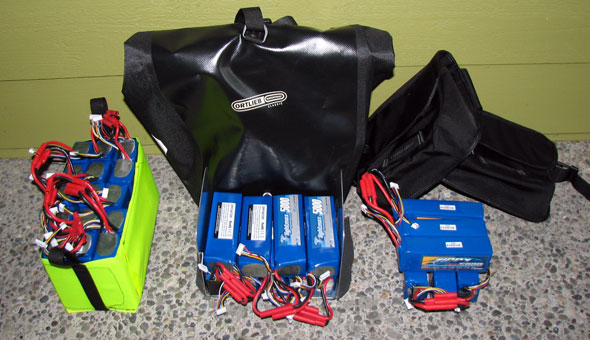
Once I relinquished spending another afternoon in Redmond I added more nice-to-haves tasks. The eBike bus was originally redesigned around the Speedict device; there are two sides: Battery and Charger, and the Controllers and DC-DC converter on the other with Speedict in the middle. It’s the other side that was funky and ghetto, cobbled together from past efforts. This I remanufactured and it made the whole assembly fit better. I also had to take into account how to create extensions to that bus for the Road Trip which could be reverted or removed after said adventure.

The replacement Magura Throttle had an 8-foot long cord which I reduced to a reasonable length; too many wires means clutter means probability something will catch, tear, fail.

The same was done to the rear hub as the original wire length was designed for the trailer and not the bike. With these last three items the rats nest developing post-trailer mods was greatly reduced.

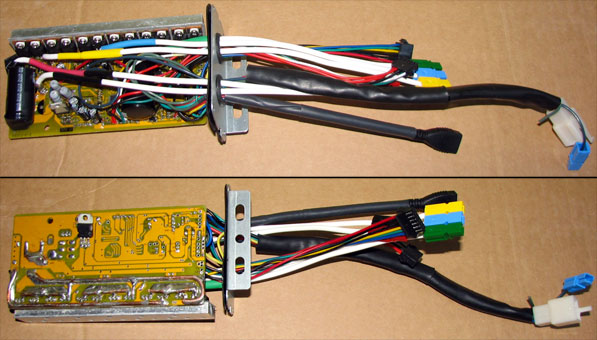
Replacement Controller
Oh I wanted to share some pictures of this other controller. It’s essentially the same layout as the Lyen 12x4110 except it has older-style power regulation. I think I bought this April last year and began to modify it – boosting the traces with this mombo 10-AWG solid copper wire. I shouldn’t laugh cos the 6FET controller that I’ve been using all along up till most recently had the exact same modification – and THAT controller took me to Californy. So I hope the magic rubs off. I never got around to trace-beefing the Lyen boards cos I didn’t think they needed it for what I am trying to do, I mean come on: two 12x4110 controllers pulling two hub motors = plenty of horsepower.

EB212.4310.Slaved.jpg

  • Battery and phase wires are Mil-Spec silver-plated 10-AWG.
  • Halls connector is the USB-2 Micro-B Female.
  • CA connector
  • Programming Connector
  • Slave Cable: 6-pin Molex carries signals, Blue APP = VCC-L from the key switch, and spare green wire is for future use, likely +12V from the DC-DC converter when I get around to it – but not today…
  • Two big Caps are the lowest ESR rated I could find.
  • It’s been flashed to provide 24A Battery and 60 Phase and drives the rear hub.
In the afternoon I began putting the bike back together. The saddle bag wiring was problematic and took a while to sort out. The bike faring and saddle bags are now good to go, although I might add another safety belt just in case. All batteries are unified onto the same bus, both controllers check out, both wheels turn: We are ready for another test drive. This time however I am going to load up the trailer as if I am going to leave – mainly cos I really want to.

The things that are left are sundry items. Will tomorrow never come?
Waiting for the Sun… KF

[youtube]A0kypyGSKsE[/youtube]
 
Kingfish said:
This time however I am going to load up the trailer as if I am going to leave – mainly cos I really want to.

The things that are left are sundry items. Will tomorrow never come?

Waiting for the Sun…
:shock: :shock: :shock: :p :p :p :wink: :mrgreen:

Good to know the foam worked to get the trailer back in the game of your adventure in leaving "again"...

...for another shakedown...

May you finally succeed to be... on the road again... :twisted:
 
Monday July 25, 2011

I got up this morning thinking I am ready to leave. Started down the ticker of things that needed doing which included repacking to drop weight. About the time I was thinking that I’m ready for a test drive – it started chucking down rain; great. :( Decided to mount the faring on the trailer to keep it dry for the test. That took 2.5 hours. After going at it since 6:30 AM my back was starting to fatigue and at Noon I had to lay off and take a nap from all the bending over. That’s the day shot. Got up and worked through nice-to-haves and Fit & Finish.

  • Remount Mirror on Right side of Magura Throttle; lubed throttle/handlebar interface w/ silicone spray
  • Ortlieb Strap to keep them from drifting backwards; modified bags and am using rope x2
  • Safety strap for saddle bags; also stitched rubber to bottom of webbing to inhibit slip
  • Blue stuff on the axles; check - all good.
  • Mount trailer faring
  • Reflash Primary; both now 24/60. Decided if either motor/controller goes TU I will still have a spare capable of climbing most hills.
  • Repack
There wasn’t much left to do after that – except mount trailer blinkies, but that can wait. Decided to spend quality time with my new cell phone and figure out all that I can do with it. One item that I am going to do is leave my trusty camera behind since the phone has up to 8 mpix capacity; that’s two pounds of camera that will be off the bike. :)

I still haven’t figured out how to get the music player to just play the whole fricken album though. I think I’ll just set it on A and have it play through to Zed and be done with it.

I think that’s about it for me; I’m beat. It rained much of the day. Calling it an early one.
Z z z… KF

ADDENDUM: Forgot to add... The secondary CA is still reporting negative watts on idle. I noted this was odd because it doesn't matter which controller it is hooked to; it just reports negative watts... like -6 or -8W. The settings between the two CAs are identical except for Voltage Sense and Wheel perimeter. Very strange. :?
 
I think you mentioned using one throttle to control both controllers. Do you have to use any special wiring techniques to prevent any snafus, when throttling to two controllers w/one throttle?

Also, did you rig-up a switch to "idle" one motor on the fly for more efficiency? Any tricks in doing that also to prevent any snafus?

Hey, it's Tuesday, and you are on the road today :?: :?: :?: :arrow: :shock:
 
deVries said:
I think you mentioned using one throttle to control both controllers. Do you have to use any special wiring techniques to prevent any snafus, when throttling to two controllers w/one throttle?

Also, did you rig-up a switch to "idle" one motor on the fly for more efficiency? Any tricks in doing that also to prevent any snafus?

Hey, it's Tuesday, and you are on the road today :?: :?: :?: :arrow: :shock:
I just run the power, ground and signal to the throttle, and pass the signal back to the other controller. Both controllers share ground and +VCC – but beyond that they run their subsystems – except common signals which I share.

I never got around to disabling the throttle on the secondary; sadly there is just not enough Time in the day. The alternative was to hook up a spare 3-way switch and manage power that way – and I nearly did so except there isn’t room left on the handlebar without reorganization. The Magura takes up about ½ inch too much as it is. Though if I had Time, that would be a good way to create a hybrid electronic transmission if you get my drift: two separate 3-Way controls similar perhaps to how a bicycle has two derailleurs.

Speaking of Time, I need to go – literally. :)
~KF
 
Back
Top