Spot-Welding a123 Prisimatic tabs

oatnet

1 MW
Joined
Apr 26, 2007
Messages
2,360
Location
SoCal, USA
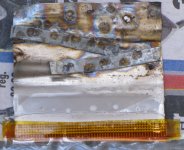
I've built a few packs from the prisimatic a123 cells by folding the tabs together 3 times around a balance wire, crimping it flat, and sealing it with a dab of solder at the end.

With most mechanical joins, the contact area is only on the side where the tabs overlap, and if the fastener holding the tabs together comes loose, the tabs separate/arc. With my technique, BOTH sides of each tab become contact areas, and it takes a great deal of force to unroll the folds. The folds are further secured by a layer of heat-shrink (that oozes adhesive all around the join), a plastic clip, and a layer of fiber tape. I got some skeptical opinions at the time, but I've pulled 100 amps through this termination without any sign of heating. However, I also recognize that at some point, despite being sealed in the amber of heatshrink adhesive, the tabs could oxidize, and add resistance, so bonding the metal is also desireable.

I saw some footage of an a123 factory, which shows them laser-welding the pouches, and it stuck in my brain. I don't have a laser welder, and while I could probably tig-weld the tabs together, they would get very hot which would trash the cells. Spot-welding is out, because the battery tabs are thin and made of low resistance metal that won't heat up when the welder's current goes through them.

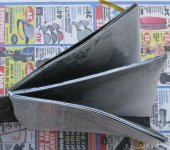
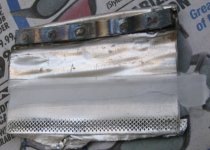
Then I had the idea to put a thin strip of steel on either side of the weld, making a sandwich with thin steel strips on the outside, and the battery tabs on the inside. When I zapped the sandwich with the spot welder, the steel on either side had enough resistance to get hot, which melted the battery tabs, and welded them together.

I use 3 vice-grips to hold the sandwich together, exposing only the section of steel strip I am about to weld. The vice-grips help dissipate the heat, and I have a wet paper towel resting on top of the tabs. I hear water sizzle when the weld happens, but by the time I shake off a glove and grab the tab it is ice-cold again, so I don't think the cells are getting heat at all.

This is Harbor Freights $160 "115v spot-welder" I could have purchased the same product on ebay for $35 less, but I wanted to be able to return it. Anyhow, on to the pics...


00_cutting strips IMG_5994.jpg

01_cutting strips IMG_5993.jpg

02_stack of strips IMG_6045.jpg

03_Balance Charge Cells IMG_0201.JPG
 
Here is the actual Weld process. Note that picture #5, showing the inside of a weld, needs to be clicked on to be viewed in a new page. Most of the pics need to be clicked on just to open full size. :roll:


View attachment 8

2_closeup of one weld IMG_0207.JPG

3_welded tab IMG_0209.JPG

4_closeup of 2 weld spots IMG_0248.JPG

5_Opened Weld IMG_0264.JPG

6_Lay In balance wireIMG_0218.JPG

7_First Fold IMG_0217.JPG

8_two more folds IMG_0219.JPG

9_crimp IMG_3123.JPG
 
Nice work!

Doc
 
NICE WORK OATNET. would it help if instead of mildsteel strips you used stainless steel strips?. I am partial to stainless steel for everthing. 8) 8)
 
Thanks Doc!

Thanks Bluestreak! You can spot weld some varieties of stainless, some other you can't. Since this is sacrificial metal, not structural, mild steel was enough for me, cheap, and readily available. :D

-JD
 
Great info, oatnet. Thanks for the post.

Mods - this should be stickied.
 
looks good. I like the clamping method.

Has anyone actually tried tig welding the tabs?

I would be willing to bet you could weld with less heat tig welding than you can with spot welding.
 
Thanks for the kind words, guys! :D

I would love to tig them but I'd think the process would dump a TON of heat into the cell and I'd expect damage. :( Ever touch a small piece of 1/8" after doing a 1" seam? HOT! I did a lot of 1/8"
aluminum in class, but nothing thin as the foils these tabs are made of, so they could require less heat. Maybe you could penetrate a puddle before the tab heats up, and "spot weld" it that way, but I am skeptical. :D

The TV show I mentioned, about a123 manufacturing the prismatics and packifying them, showed cells being joined and the process described it as laser-welding. IIRC, the cell zipped past a device and then two pieces of severed tab fell away... I guess that happens FAST, and doesn't dump heat. Surely amongst us battery geeks, we have some laser geeks who have the hardware and skills and want to give it a shot! :lol:

Now I need to work a new termination method for the packs. I used to crimp and solder an 8ga wire on there, but after dissecting solder joins made by myself and others, solder doesn't seem to stay bonded long-term. It gets up into the ends of my crimped/rolled tabs and keep them in place, but I can't count on it for actual conduction.

I am thinking (4) 14ga wires, each terminated in a 45a Anderson, for a total 180a rated throughput, and well able to handle 240a (15c). That is futureproofing, the max I would choose to run this chemistry at, but for right now it will be driving my Methods Controller @100a peaks. Anyhow, I thought I'd crimp in the wires with slivers of steel and some sacrificial aluminum, zap it and see if I can melt it solid. Hmm, wonder if solder would bond to the tabs while they are molten, if I used that instead of aluminum.

-JD
 
regmeister said:
Wow oatnet, that's great info.

I was thinking fish paper might work well in the place of your newspaper. I had a link to a really inexpensive source for it, but unfortunately can't find the link.

http://search.digikey.com/scripts/DkSearch/dksus.dll?Detail&name=560GC-ND
http://www.polymerplastics.com/composite_vulcan2.shtml

probably a bit too expensive for the application though.

I just realized I missed this post - thanks for the comments, and I'll look into those alternatives!

-JD
 
Even posterboard would be orders of magnitude better than newspaper... fish paper or other phenolic based material would be even better.
 
Hay Oatnet, I can use stuff as a heat sink between the tabs and cell. You could make a jig as to take the heat. I don't know the best thing. But it can be a toothless aligratetor clip or something parelle jaws ? It's beatiful. Good work.
 
oatnet said:
Thanks for the kind words, guys! :D

I would love to tig them but I'd think the process would dump a TON of heat into the cell and I'd expect damage. :( Ever touch a small piece of 1/8" after doing a 1" seam? HOT! I did a lot of 1/8"
aluminum in class, but nothing thin as the foils these tabs are made of, so they could require less heat.

-JD

Yeah, 1/8" thick aluminum requires a lot of amps. But that thinner stuff would require a lot less. (general rule in my classes were 1 amp per .001" thickness. +15% for aluminum)
I imagine a weld w/ no filler right on the ends would work on those tabs, or you should be able to do just as you mentioned... just use the tig to do some no-filler tac welds. Agreed the heat-sink would be a good jig.
 
Been seek for a few days, bad for getting projects done but but gives me a chance to get around to things like trimming the pics for this post on how I addressed terminating the cells.

While spot welding is a great way to join the tabs on a123 prisimatics, it was not effective for connecting power leads to the pack. Instead I put a pair of copper straps on either side of the a123 tab, soldered wires to them, and screwed the straps together.

00_IMG_1504.jpg

View attachment 17

View attachment 16

15_IMG_1955.JPG

20_IMG_1955.JPG

25_IMG_1956.JPG

View attachment 12

35_IMG_1967.JPG

40_IMG_1969.JPG

45_IMG_1970.JPG

50_IMG_1971.JPG

55_IMG_1972.JPG

60_IMG_1974.JPG

65_IMG_1975.JPG

70_IMG_1978.JPG

75_IMG_1996.JPG

80_IMG_1999.JPG

85_IMG_2004.JPG

90_IMG_2001.JPG
 
Thanks oatnet. I was thinking about something similar using copper strips but now I don't have to think as hard! :) This seems like a pretty foolproof way of connecting pouch a123 cells. What sizes are the nuts and bolts?
otherDoc
 
docnjoj said:
Thanks oatnet. I was thinking about something similar using copper strips but now I don't have to think as hard! :) This seems like a pretty foolproof way of connecting pouch a123 cells. What sizes are the nuts and bolts?
otherDoc

I think the bolts were 6/32 x 3/8", I realized I needed more length and went to a larger size so I don't remember clearly. I'm sure a lot of folks have thought of doing something similar, I hope this gives them ideas on what they would like to do (or not do! :shock: ). Mostly I hope I've shown that these cells are pretty easy to work with.

-JD
 
your stuff is inspirational. you do such good and thoughtful layout and then you have the good sense to do it right the first time.

you are right, this is how 'engineers' learn to do stuff. the right way.

better than learning from mistakes, like the current blowout on the total platform in the north sea. more bad engineering there.
 
dnmun said:
your stuff is inspirational. you do such good and thoughtful layout and then you have the good sense to do it right the first time.

Thanks dnmun, that is nice of you to say! :mrgreen:

-JD
 
I bought (110) cells from Victpower, thanks to Doc Bass for pointing that deal out to me. I tested them all for volltage, most were around 3.27v, 2 were 3.24v. I noticed (1) with a misaligned tab, it jumped out at me, if there are others I didn't notice them on this quick check.

I also have a few cells from the cell_man era, in the 16ah and 20ah flavors, so I thought I would compare and contrast. I noticed right away that the foil used on the new USA cells feels thicker and more solid, more puncture and flex resistant. Both 20ah cells are exactly the same dimensions, and tabs line up in the same spot and are the same dimensions. The new USA cells weigh 6.7% more, which I would attribute to the thicker foil.

I think it would be really hard to counterfit these cells, and have the same dimensions, really similar weight, and have identical tab placement and construction. They look clean and new and unused.

boxed_IMG_2964.jpg

compared_IMG_2986.jpg

View attachment 6

head to head 1 IMG_2988.jpg

top_to_top IMG_2989.jpg

edge_IMG_2992.jpg

USA_20_494g_IMG_2993.jpg

UNKNWN_20_466g_IMG_2994.jpg

KOR_16_399g_IMG_2995.jpg
 
Thanks oatnet for that timely information. My order of 14 is on it's way fromVictpower. They seem like a class operation so far.
otherDoc
 
Someone asked for this a while ago, I got around to cutting open a dead 16ah a123 prisimatic, that had previously been used for my spot-welding testing. There was a chemical smell, but no juice or powder flying around. Like any prisimatic, the layers of subcells are stacked on each other like a book. Enjoy! :D

-JD

0 new cell IMG_2236.JPG

1 unfolded IMG_2237.JPG

file.php


3 tab IMG_2244.JPG

file.php


View attachment 4

file.php


7 tab side IMG_2246.JPG

8 tab top IMG_2248.JPG

file.php
 

Attachments

  • 2 opened IMG_2239.JPG
    2 opened IMG_2239.JPG
    111.3 KB · Views: 8,834
  • 4 tab full IMG_2244.JPG
    4 tab full IMG_2244.JPG
    391.7 KB · Views: 8,833
  • 6 open like a book IMG_2242.JPG
    6 open like a book IMG_2242.JPG
    121.7 KB · Views: 8,834
  • 9 bare tab IMG_2250.JPG
    9 bare tab IMG_2250.JPG
    82.2 KB · Views: 8,834
In this thread dnmun speculated on spot-welding cotter pins to join a123 packs. Today I tried it out, and I like it. :D :D :D It does not shift around like the two steel plates used to so it is easier to setup. I don't have to adjust the two pairs of vice grips for each weld, just clamp it on one side with vice grips and zap zap zap down the row, it is much faster. This is a simple, effective method for welding cells together in high-quality join, without heat-damaging them.

I used stainless steel 1/8" x 2" cotter pins, .65 each from my local Ace hardware. The rest of the technique is the same stuff I have been posting here for two years.

View attachment 10

IMG_4291.jpg

View attachment 8

IMG_4295.jpg

IMG_4296.jpg

IMG_4297.jpg

IMG_4299.jpg

View attachment 3

View attachment 2

IMG_4302.jpg

IMG_4303.jpg
 
Back
Top