Cycle Analyst V3 preview and first beta release

Hyena said:
NeilP said:
I would really like to see this as an 'undocumented' secret feature.
Something along the lines of
Push and hold the both front panel buttons simulatneously for 4 seconds to switch to road legal mode. another 4 second push to go to wide open mode.
I would like to see no reference to it in the setup screens..
While you're at it, I want a cheat mode that unlocks unlimited amp hours :p
Oh, and "no clipping" mode for when riding in traffic :lol:
Why is the suggestion for having a quick two button push to change modes in the same 'impossible' league as ' unlimited Ah'. Or a ' no clipping ' mode?
 
Hyena said:
It was more a joke about the secret combination of buttons to unlock hidden features - like cheat modes in games
Ah ok, I'll not feel so insulted then :wink:
 
teklektik said:
Trackman417 said:
Is there going to be a LMH switch for the new CA now? If so could it be integrated with the same switch that crystalyte uses for their controllers?
This is a feature currently available by tinkering together a few resistors. As mentioned in an earlier post, section 9.2 of the CA v2.23 Manual explains a feature allowing external control of current limiting. You can rig the Xlyte LMH switch to limit with percentages of the Max Amps configuration (e.g. 33% 66% 100%). In this simple version the throttle range will not be expanded to fill the full range of throttle movement, but WOT will give you no more than the LMH setting exactly as if you had adjusted Max Amps. If this will do what you need, I can post details (just trying not to wander OT unless there is interest :wink: ).

Details are good!!! PM me so I do not clog this thread with questions... :mrgreen:
Thanks for the offer!
 
Hey Justin,

I only caught up with this thread last night and a pic of me too.... Anyways, I can see you have a lot on right now, but try to put me on that list for the New V3 and the other bits we discussed. Can't wait to have a play with it, stellar work as ever :wink:

Was a pleasure to meet up again, and hope you can get over again soon, you will not recognise the place next time you come.

All the best
Paul
 
Nice improvements. Signed up!

One of my thoughts has been a "percent throttle" that would simultaneously limit on a number of parameters, whichever was the highest at the moment. So the throttle puts out 0-100%, and whichever is the highest % value at the time becomes the determining factor. There are a list of items that could be included (whichever is highest at the moment):

Battery Current (power)
Speed
Phase current (torque, might require a sensor)
Motor Voltage (similar to speed but quicker to measure)

This way, if the throttle is at 10% you would not get more than 10% of speed, power, or torque. In different situations different values would become the limiting factor, but you would get a full range control on whatever was the limit at the moment. This would make the throttle work a lot nicer without all the other complicated algorithms. It would essentially start out as a torque/power throttle but would not keep climbing in speed when the speed reached the percent setting.
 
Hi all,

Just to inform other interested people that I have received a very polite email from Grin that there is some delay in shipping the beta units, and that they did not want to ship an incomplete unit. They included a very detailed description of the issues, and hope to ship them out quite soon.

I am very impressed with the fact that they do this final QC step prior to shipping, that they have a plan for solving the issues found, and how this is communicated to the clients. Very high standard, and very good! Keep it up Justin!

At this moment I am mostly looking forwards to the throttle remapping features and the integration/feedback loops with the temperature sensors. :mrgreen:
 
OK excellent , im in for one too

thanks for the update
 
He has very kindly upgraded the postage to priority :D unfortunately that still meens a couple more days wait for me in the UK :cry: I,m busy till Tuesday anyway, it may just arrive by midweek in time for me to get straight on with fitting it 8)
 
Tench said:
He has very kindly upgraded the postage to priority :D unfortunately that still meens a couple more days wait for me in the UK :cry: I,m busy till Tuesday anyway, it may just arrive by midweek in time for me to get straight on with fitting it 8)

Same here in Basel.... :cry:
 
Got mine, thank you Justin!

Now, to work. 8)

-JD
 
teklektik said:
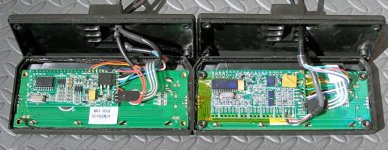
v2.23/v3.0 side by side...
Easy front connection points with thu-board strain relief for wires.
O-ring moisture seals on screw bosses.
Link back to post with board connections

so, in your case only the DP connection and the communication bus is connected? What is your plan with the V3?
 
hjns said:
so, in your case only the DP connection and the communication bus is connected?
That's the out-of-box condition for beta folk - DIY cabling - I actually didn't expect that much done... cool.

hjns said:
What is your plan with the V3?
I have a kind of non-standard situation with two controllers, so first get the basic CA transplanted, copy over Rshunt + stats (mileage, etc), and get basic dual controller throttle running. Then hook up external hi/lo power and boost switches - they will need to work a little differently on the v3. A bit of ghetto wiring before finalizing until I see how the new features work. ...Little steps... :wink:

This time, though, I'm going to cut a piece of LCD screen protector (like for cameras) and fit it to the CA. I scratched my v2.23 screen last time (stupidly) wiping off abrasive trail dust (Grrr).
 
Setup Summary for CA vB12

The setting summary for the newer v3B13 release is available here.
Unofficial basic setup notes are available here.
Values shown are not the delivered defaults.

[...] = numeric entry field
{ ... | ... } = menu chooser

  1. Setup Calibration
    1. Cal -> Range
      { Lo (W) | Hi (kW) }
    2. Cal -> RShunt
      [1.403] mOhm
    3. Cal -> V Scale
      [31.07] V/V
    4. Cal -> Zero Amps
      (Press/Hold to normalize the currently detected Amp reading to 0.0)
  2. Setup Spdometer
    1. Spd -> Units
      { mi | km }
    2. Spd -> Wheel
      [2150] mm
    3. Spd -> #Poles
      [01]
    4. Spd ->TotDist
      [01748] km
  3. Setup Speed Lims
    1. SLim -> Max Speed
      [99.0] kph
    2. SLim -> Start Speed
      [00.0] kph
    3. SLim -> IntSGain
      [200] Gain
    4. SLim -> PSGain
      [0.59] V/kph
    5. SLim -> DSGain
      [002] Gain
  4. Setup Power Lims
    1. Plim -> Max Current
      [99.0] Amps
    2. Plim -> AGain
      [150] Gain
    3. Plim -> Max Power
      [1800] Watts
    4. Plim -> W Gain
      [50] Gain
  5. Setup Throt In
    1. ThrI -> Cntrl Mode
      { Pass-thru | Current | Speed | Disabled }
    2. ThrI -> Min Input
      [0.00] Volts
    3. ThrI -> Max Input
      [4.99] Volts
  6. Setup Throt Out
    1. ThrO -> Output Mode
      { Voltage | R/C Pulse }
    2. ThrO -> Min Output
      [0.90] Volts
    3. ThrO -> Max Output
      [3.74] Volts
    4. ThrO -> Up Ramp
      [500]
    5. ThrO -> Down Ramp
      [500]
    6. ThrO -> KV Comp.
      [0.95] V/kph
  7. Setup RPM Sensor
    1. RPM -> PAS Poles
      [08]
    2. RPM -> Dir Plrty
      5v={ Fwd | Rev }
    3. RPM -> Strt Delay
      [50] x 18ms
    4. RPM -> Stop Delay
      [15] x 18ms
  8. Setup Trq Sensor
    1. Trq -> Trq Scale
      [+200.0] Nm/V
    2. Trq -> Trq Offset
      {4.04V 4.06V}
      (Press/Hold to update eeprom offset voltage on left with current voltage on right - similar to Zero Amps)
  9. Setup Cntrl Mode
    1. Ctrl -> Aux Funct
      { Off | Amps Lim | Speed Lim | Power Lim | Pas Level }
    2. Ctrl -> PAS Mode
      { PAS Off | RPM Cntrl | Trq Cntrl }
    3. Ctrl -> Assist Level
      [0500] mA/Nm
  10. Setup Temp Sensr
    1. Temp -> Sensor
      { Disabled | 10K Thrmstr | Linear Type }
      (If Temp->Sensor = { Linear Type }
      1. Temp -> 0 Deg
        [0.99] Volts
      2. Temp -> TScale
        100.0 Deg/V
        )
    2. Temp -> Thrsh Temp
      [090] oC
    3. Temp -> Max Temp
      [130] oC
  11. Setup Battery
    1. Batt -> Chemistry
      { LiFe | SLA | NiMH | LiMn | LiPo }
    2. Batt -> String#
      [20] Cells
    3. Batt -> Capacity
      [20] Ah
    4. Batt -> RBatt
      [028] mOhm
    5. Batt -> Vlt Cutoff
      [50.0] Volts
    6. Batt -> V Gain
      [0800] Gain
    7. Batt -> TotCyc
      [0070] Cyc
    8. Batt -> TotAhrs
      [00911] Ah
  12. Setup Display
    1. Disp -> Main Disp
      { Watts | Amps }
    2. Disp -> Averaging
      [5] Duration
    3. Disp -> RS232
      { 1 | 5 } Hz
    4. Disp -> Vshutdown
      [10.0] Volts

Printable version:View attachment CA_vB12_ConfigSettings.zip
 
Back
Top