Building battery from MAKITA Konion PACK

I'm going to assemble around 350 to 400 cells in a pack, but I've come to a problem that proves hard to solve. What glue to use between the cells. I've tested three different substances so far.

Adhesion is between two parallell cells glued to two parallell cells.

1. Normal bathroom silicone. Good adhesion, came loose at ~40N. Good shock properties. Good elastic properties.
2. Wood glue, Brown stuff. Did not state usable for plastics, normally used to glue chipboard/MDF. CRAZY adhesion. Tore the green plastic before giving in. Never expected this. Adhesion? 500N? Not elastic or shock absorbant.
3. Clear acrylic. Adhesion similar to silicone.

I will encapsulate the cells with fibreglass + heathrink after fully assembling them - the glue is mostly for easing the assembly process. Silicone or acrylic will net me the abillity to easily take it apart again, but I'm a bit worried about long time stabillity. Wood glue will make it impossible to exchange cells - but the cells will be firmly attatched to each other..

Any experiences, as of now - I think I'm going with silicone.
 
I used to use a generic glue gun with just a small dollop between cells and it worked well enough, but for my next 200 cell project I'm just going to use clear, thin tape for 10p strings. The glue from the glue gun was pretty hot as well, which may not have been good for the cells, and also added more weight that I was interested in. I'm tab welding them all together so that will keep everything together as well. Good luck with your build! Post photos! :D
 
Quick question for the konion lovers out there...

I'm beginning to assemble a 20s10p pack from Doc's V packs I just got. I have a single 4.2v 1.5A charger to work through these 200 cells to get them synced up for assembly. :shock: I'm thinking at this point wouldn't it be easier to build my 10p strings with matching resting voltage cells (of which there are great similarities in each pack of course) and then series them all together and blast the whole lot with my 84v charger or would the lower resting voltage parallel strings take too much current or something??

So like it would series like this:

3.12v(x10) -+ 4.06v(x10) -+ 3.75v(x10) -+ etc out to 20S...

I need a quicker solution somehow or I won't be riding for weeks. :lol:

EDIT: FYI I'm not worried about internal IR or matching exact capacity with CBA etc. etc. I want to build and ride.
 
Do you have a old laptop charger? You can probably tie strings of 5s and charge them with that ;) Will bring the cells to ~4V.

Start out with cells in balance. After charging; lower voltage means higher capacity. Rate the cells from A to E based on voltage. Group the cells based on this, and your result will be quite close to what you'd achieve with a better analyzer.
 
You can make 10p3s blocks for 12v and make a long string 6 blocks = 74v and have an extra 12v block for replacemant. Yes replacement. Or 21s for 86v. These are used cells.
 
999zip999 said:
You can make 10p3s blocks for 12v and make a long string 6 blocks = 74v and have an extra 12v block for replacemant. Yes replacement. Or 21s for 86v. These are used cells.

That would be too much work. :) I plan on using the existing 10 cell holders and just snip the negatives within a pack, turn them around parallel with the others and make 20 4.2v ~13.5ah blocks in series. Easy peasy. I may go 18s too as I have a 75.6v charger. We'll see what fits in my triangle.

Can anyone answer my original question? :D
 
This is what I meant... flip every other pair and charge all at once... the pack in the photo happened to have a dead pair so this is a 4 pair experiment. I also found another 4.2v 1.5A single cell charger so paralleled them for 3A. Now we're getting somewhere! .3C charging whoot!! :lol: :roll:

IMG_0584.JPG
 
That's how mine are use the makita block as 10p. Charge blocks to 4.1v. I used 3 for 12v subpacks. Hook up two togethere with 6s sense wires for checking and balancing 24v. Easy to fit a RC charger for balance at 6s. Yes balancing or to find a low string voltage. I cut the taps over hang on the pos. end with good small sissiors. Carefully. I found the shipping rail for cheap blinds at Lowes and the 10s pack snaps in and can be hang from top rail and one under. This way you could make two 24v for 48v or three for 72v. !80 cells 18s.
 
999zip999 said:
Charge blocks to 4.1v

Think I'm going to tweak one of my chargers to around 4.16-4.18v as that's what all the V cells want to settle at anyway. 4.1v isn't enough to trigger the "self balancing" I don't think. On VTs sure. Think I need to up my tab welder to 18-20v from the current 16v also as I'm not super happy with the penetration I'm getting. Might experiment with making my copper rod contacts more fine point also.
 
Been pack building the last days. It's clear to me that the internal resistance test is a nice test to determine what cells to group where.

I have seen quite a few High-impendance ones in the 700mOhm range, clearly unusable. About half my cells come in at 20mOhm for 2p, the rest is inbetween 25 and 40mOhm - with some extremes. Corroded connections allways exhibit bad properties - it is not because I do not get good enough connection; I think it has to do with the life the cells has been living ;P

As for the perfect factory matching; most of the time they're pretty close, but sometimes the cells vary as much as 50% between eachother. I even have one cell die from it's unconnected 2p mate xD

Bottom line, if you have enough cells - you'll encounter a few weird ones.
 
Teh Stork said:
Bottom line, if you have enough cells - you'll encounter a few weird ones.

I'm always amazed at the packs that are completely rusted... like did they leave them in the ocean or something? :lol: And the packs that have tons of crap in them like black soot or sawdust. It's amazing what gets in there.

Got any photos of your pack? My 18s10p triangle pack should be done by tonight after about 20hrs of labor. Hope I don't have any bad welds or anything anywhere.. was pretty thorough, but ya never know until you throw a few thousand watts through it. :)
 
Put my balane wires on and have 3 hyperion sentry cell checkers. Wow they are great with a light blub to take down a high cell a little faster. So 18s with 3 - 6s balance plugs. Let the games begin. I did bulk charge with a bulb on one cell for balance. Was cell checking with just MM. Yes open one pack and to see a little smoke then a cute little flame shot out. i was still able to hold in hand. Going thru 50 3.0ah packs you see all kinds of abuse a dented cell inside the case ? 5 types of bms's some with temp. and some not. Some of the rust ones test good. Many zero's just dead cells. Or as soon as disturbed it runs to zero
 
pwbset said:
I'm always amazed at the packs that are completely rusted... like did they leave them in the ocean or something? :lol: And the packs that have tons of crap in them like black soot or sawdust. It's amazing what gets in there.

Got any photos of your pack? My 18s10p triangle pack should be done by tonight after about 20hrs of labor. Hope I don't have any bad welds or anything anywhere.. was pretty thorough, but ya never know until you throw a few thousand watts through it. :)

I'll upload once I've finished it all up :) Middle of exams here too, not enough time! :p
 
DSC00142.jpg

I've got a boring square pack, but this pack will be much more stealthy compared to my old. The mdf-frame is made to fit inside my bicycle frame, just to act as a mock up. The pack is 19s8p (152 cells), quite how many wh'r it will put out I do not know before I try it some. I'm hoping for 750Whr. All these cells are between 35 and 45mOhm, they are only matched on internal resistance - not capacity. If one cell is weak capacity wise - I'll add another cell to make it a 9p cell. The measured capacity of those cells I've taken the time to do this with ranged between 2500 and 2800 - so I do expect the pack to be well balanced as it is.

I used normal SN62 solder and cleaned the tabs with alcohol before soldering to them. I used two strands of tinned 20Awg wires as interconnects - but I'll increase this to 6 strands for awg 12 equivalent. I plan on using "meat paper" inbetween 8p cells to reduce friction, making sure that the green insulation isn't rubbed through.
 
Lookin good Teh Stork. For what it's worth the only failures I've ever had in homemade konion packs was due to going over a bump and having a tab weld or solder point pop off because everything was too loose. I finally got the best of that problem by binding together the cells as tightly as possible with duct tape, foam padding etc. etc. and allowing as little movement between cells/parallel groups as possible. I'd worry much more about that than exposing a little green covering. Just my .02. Then again I'm not very good at soldering. :D
 
If you want to prevent movement between cells, would a string of hot glue not be a quick and easy solution when assembling the pack?
 
Punx0r said:
If you want to prevent movement between cells, would a string of hot glue not be a quick and easy solution when assembling the pack?

I used to use hot glue between cells and found that the hot glue can easily just tear the green covering off the cell if mishandled/bumped, hits the cell with unnecessary heat and adds an appreciable amount of weight to the pack. For my lastest build I just kept the existing cell spacers and tab welds for simplicity.

IMG_0592.JPG
 
Yeah, duct-tape was what I planned on using. Intra-cell I'll use bathroom silicone, even tho I'm very uncertain of the outcome of that- I want the pressure to lie on the cell container - not the cell tabs ;)

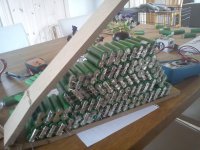
I upgraded the pack to 190 cells, this is how it looks now. Goal is ~900wh.
DSC00145.jpg
 
pwbset I cut the overhang on the pos. end so it wouldn't touch the neg. case of the cell. But cutting if not careful will pull the tab off the cell. I hooked the sense wires as 6s or 24v. and hooked a hyperion EOS pack sentry and bulked charged on a kingpan to 74.4v. But was having a lot of balance troubles difference cells random. So left it on the charger with sentries. I found that 5 and 6 cells where at 4.135v and the rest at 4.099v - 4.111v ? So balance with bulb without sentries and will see how they keep balance. The cell checkers where radomly off till left on charger then showed high on 5 and 6 ? Have new hyperion 1420 want to get back to it's old state of balance, because had no trouble till cell monitors ? And didn't want to spilt pack, is easy to do as 12s plus 6s.
 
999zip999 said:
pwbset I cut the overhang on the pos. end so it wouldn't touch the neg. case of the cell.

Yeah I dremel off the excess pos side stuff... the above photo that hasn't been done yet. Helps prevent shorts for sure.

999zip999 said:
I hooked the sense wires as 6s or 24v. and hooked a hyperion EOS pack sentry and bulked charged on a kingpan to 74.4v. But was having a lot of balance troubles difference cells random. So left it on the charger with sentries. I found that 5 and 6 cells where at 4.135v and the rest at 4.099v - 4.111v ? So balance with bulb without sentries and will see how they keep balance.

You're not hitting them hard enough yet to "self balance". If you have the ability charge your pack to 4.2v/cell and cycle it like that a few times. I bet you notice that the cells come into balance with each other better on their own and rest down to around 4.15-4.16v/cell. That's just what these cells do on their own, which is why people don't bother with balancing them. I only ever monitor pack HVC/LVC and have never had a problem in 100s and 100s of cycles over the years.
 
Thanks once I like it's balance at 74.4v I will turn it up and balance 4.2v to see if they like it. How high can they go ? 4.25v. ? I use sicciors as it doesn't leave a hair hanging, But have to use the dremel ( foredom with foot pedal ) for cutting them from series and splitting the neg. Can leave a hair that can get caught under the taps.
 
I wouldn't go above 4.2v per cells. Anything above that shortens their life.
 
999zip999 said:
Thanks once I like it's balance at 74.4v I will turn it up and balance 4.2v to see if they like it.

I guess my point was that if you take the pack to 4.2v it will "balance" itself. You're doing a lot of manual balancing work that's been proven over and over to not need to be done (with good cells anyway... runts are a different story). Just trying to save you some time that's all. :)

I will double check my pack for dremel threads... I recall seeing a few and just blowing them off or brushing them off. Now I'm paranoid I missed some. 8)
 
Back
Top