DrkAngel
1 GW
3/16" chain, not 3/8".slats said:Yes, thanks guys, that makes sense. 3/8" chain would fit the 3/8" freewheel and OK on a 1/8th motor sprocket.
Cheers,
Steve
Keep us informed on how well it works! 8)
3/16" chain, not 3/8".slats said:Yes, thanks guys, that makes sense. 3/8" chain would fit the 3/8" freewheel and OK on a 1/8th motor sprocket.
Cheers,
Steve
slats said:Fractions huh. I should have listened more in school. but you're saying that a 3/16" chain would be fine on the 1/8" sprocket without slipping or anything.
I just bought on ebay from patsbelair for us$32 the LONG YIH Co. 7 Speed Freewheel 11-30t ,11-32t, 11-34t .
I'm running the ezip on ping lifepo4s . I bought 2 15AH for US$ 670 and put them in the curry boxes. Ping was really helpful with the wiring and advice with quite a few emails and pics going back and forth. my ride to work is 12 Km along a dedicated bike track following a creek and I've even started peddling a bit to get in the spirit with the lycra mob. I kept it to 24 volts, i was a bit nervous about cooking the motor.
Anyway, if the parts arrive, i'll start putting it together at easter .... if not then it will be July.
It would be nice to go a bit faster. drkangel, are you on 36v with your ezip and these mods?
Steve
vansingela said:I just purchased a 2008 EZip, but I am a little disappointed with the top speed -- I am looking at doing this upgrade. Is it advised to upgrade the motor as well, or is the southpaw enough?
International shipping is USA First class mail.DrkAngel said:ACS Southpaw 1/2 x 1/8" 16T freewheel
Alternate source - with International shipping:
Outside Outfitters


Looks proper!RyanTo said:Will this 7 speed freewheel work(I have the skyline but I'm sure it's the same)? It talks about a 3/32 chain compatibility..
Epoch 11-28T 7 speed freewheel
If not is there anywhere else to get a 11-xx sprocket for more peddling top speed? The link someone previously posted seems to be out of date.
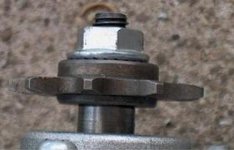
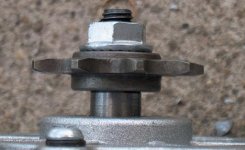
Do you mean 3/16" thick washer? 3/8" seems like a lot, and if I'm following you, you say that it should be 1/16" plus another 1/8" for safety, so 3/16" total. I figure once I start putting it together I can pick up a handful of different washers at Home Depot and see what fits, but I wanted to confirm.Two possible solutions:
1. Seal all joints, I used duct tape, to keep grinding residue out of freewheel. Grind notches down, about half way. Remove tape and install.
2.(Recommended method!) Insert a 3/8" standard washer as a spacer, clearance is very close, 1/16" might be enough, 1/8" thicker than necessary.
1. Grind notches on old style freewheel, to allow removal tool. (One method)anarce said:Great post! I ordered the 16T freewheel and I'm getting ready to mod my eZip Trailz. Unfortunately I couldn't find the chain link kit at the local bike shop and had to order one online, so I'm waiting for parts again. I'll try to take some pictures along the way to add to this thread.
I'm a little confused by this part of your instructions:
Do you mean 3/16" thick washer? 3/8" seems like a lot, and if I'm following you, you say that it should be 1/16" plus another 1/8" for safety, so 3/16" total. I figure once I start putting it together I can pick up a handful of different washers at Home Depot and see what fits, but I wanted to confirm.Two possible solutions:
1. Seal all joints, I used duct tape, to keep grinding residue out of freewheel. Grind notches down, about half way. Remove tape and install.
2.(Recommended method!) Insert a 3/8" standard washer as a spacer, clearance is very close, 1/16" might be enough, 1/8" thicker than necessary.


anarce said:OK, I successfully completed this mod last night! Thank you for all the great info, DrkAngel! I rode to work this morning and was running at 18-19 mph on the flats with just the motor.


Yep! It's much harder to spin than the new freewheel.DrkAngel said:If you spin the removed, OEM freewheel, does it still feel like it is filled with tar.
It has the "C".Does your motor have the "C" insignia, or the inverted triangle?
Pretty close, but not perfect. I might try bending the bracket, but it's probably ok as-is. I need to adjust the motor mounting plate a little so that the chain is tighter.Check your sprockets, are they still nicely aligned?
No, the shifter is terrible and stiff. I was hoping it would get smoother with time. Has yours improved at all?Shifts easily?
(2008 is nice but 2009 shifter is almost painfully stiff)


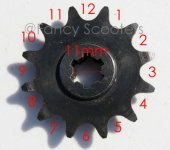
Almost ready.DrkAngel said:Still waiting on my machine shop buddy to finish my 11T motor drive sprocket.
Searched till I found a possible 12T item!