The F3: "N minus one"

Quick update:
1) I got the power parts - servo tester, HV-160, and Astro 3210 - all working on the bench. Nice to know I can turn electrons to revolutions with parts I actually have in hand.
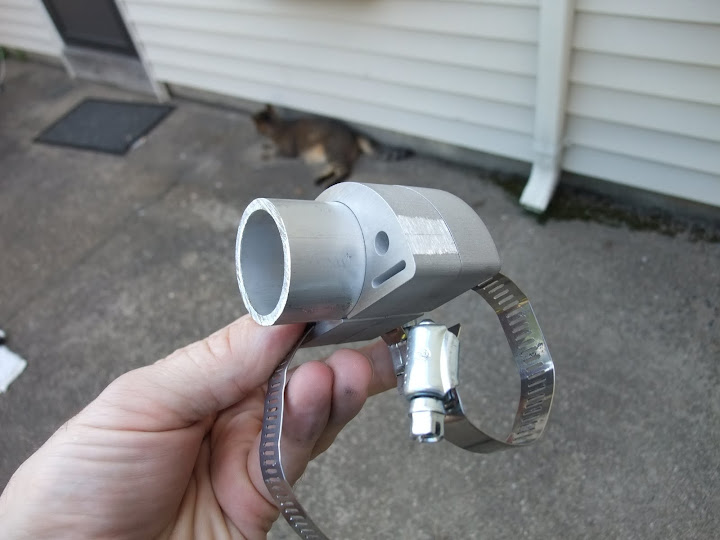
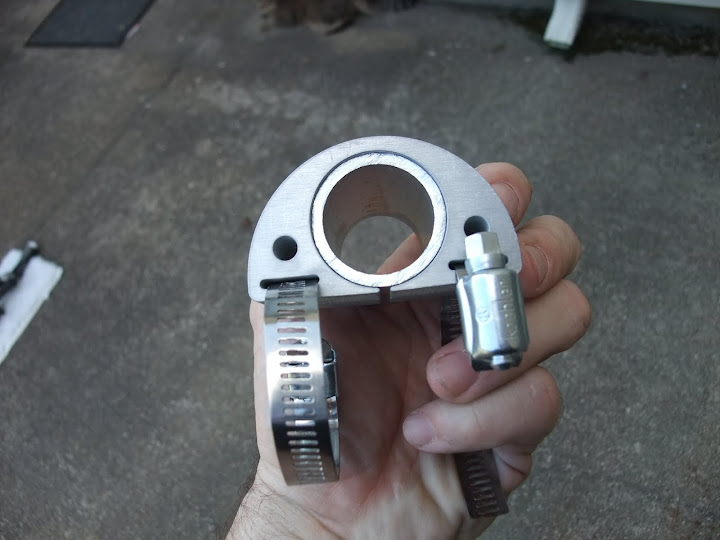
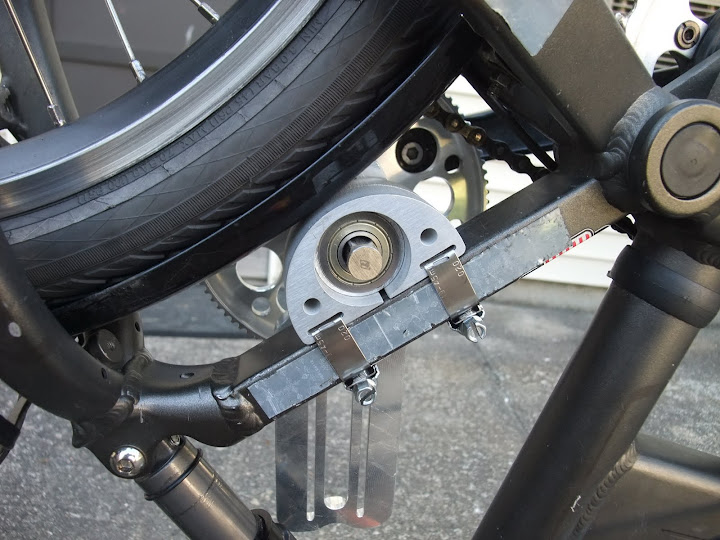
2) My custom brackets should arrive today! WOOT! With them in hand I can permanently install the reduction drive and build this thing up for real!
 
I got my first taste of the EV grin today!

All the mechanicals are installed (Pictures to follow). The electrics... Let's just say packing tape and velcro was involved. I rode around on 6S LiPo a bit, this thing will be scary once I bump it up to 12S!
 
Thx for the update. I hope your HV160 will last with 12s battaries. Btw. Are you also thinking about a custom battery cases and mounts for your bikes? A carbon housing like the one you make for the belt-drive would be neat :)
 
crossbreak said:
Are you also thinking about a custom battery cases and mounts for your bikes? A carbon housing like the one you make for the belt-drive would be neat :)
The long term plan includes something along those lines. It looks like I can mount two LiPo bricks above, and two below, the top tube between the steering stem and the folding hinge. I'll likely print up brackets on the MakerBot to hold the LiPo and wiring firmly in place. Then cover it all with a pair of CF panels left and right - they'll stiffen the MakerBot plastic brackets, plus provide a puncture-proof layer for when the bike falls down sideways.

This will all have to wait till after I get the CF enclosure for the drive parts done though... I just don't have the time to juggle all this stuff!
 
Well, I'm disappointed...
The e-drive is great - it has some nice get up & go. What I definitely do not like is the large amount of extra drag I feel when riding on pedal power only. The left side chain and freewheel add a substantial amount of drag, not to mention noise. I have some ideas as to how to best mitigate this, I'll post something soon. In the mean time, I'll do some minor tweaks, such as exploring whether I can go back to the larger 16t freewheel and adapter, and loosen up the chain tensioner a bit...

:cry:
 
OK,
Thanks to the RC throttle interface build tutorial, I have a proper half-grip twist throttle, instead of reaching behind me and fiddling for the potentiometer on the servo tester. Much easier to stay on the bike with a proper throttle!
 
Here's a few pictures of the last stage of the build. Sorry I didn't take more pix - but I had critical parts for both bikes delivered on the same day and so I was chasing daylight.

Here is the custom bracket I designed and had water jetted at bigbluesaw.com. The standard mount supplied with the Recumpense V4 drive is simply too tall to work where I wanted to place the drive. The mount is 2 times 0.625" wide, making it just about exactly the same depth as the square tube it will bolt to
DSCF3333.JPG


Notice the small relief cut at the bottom. As I tighten the hose clamps, the mount will squeeze down around the shaft collar and hold it nice and firm
DSCF3335.JPG


Here it is mounted. Notice I have the shaft collar inset into the mount. The inboard half of freewheel adapter will fit inside the bracket, which I have to do in order that the FW teeth have a good chain line. Everything has to fit like clockwork here, in some places I have only 1mm of clearance.
DSCF3336.JPG

DSCF3337.JPG
 
Here's the working bike:
DSCF3343.JPG


A closer shot of the drive system. Note the gratuitous use of hose clamps, e.g., for the chain tensioner
DSCF3345.JPG


One more shot (guest photographer: Mr. Blurrycam)
DSCF3346.JPG
 
cross break said:
The chain drag could be met by adding a freewheel at the rear shaft. But it's hard to find one that fits :?
I have a couple of fixes in mind:

Near Term:
1) I oiled the chain :oops: and adjusted the chain tensioner. Drag has been reduced, but again this chain moves much faster than a standard bike chain, and it has a tight bend at the FW that basically slings excess oil right up my left leg.
2) I will change the FW from the 13t I'm using now to a 16t, which will lower drag a bit and give me more teeth of engagement.
3) I should be receiving my carbon fiber panels soon. Enclosing that FW will help with the noise and the oil, and keep loose clothes/wires/etc out of that chain

Long Term: I plan to design and build a left hand freewheeling mount for the NuVinci/110mm BCD chainring. I'll make (outsource) 10-12, to get the per-unit cost down (the total cost is near fixed whether I make 3 or 12, so why not have extras?) I'll be able to use one on this bike and another on my A-Line, then keep a spare or two and hope I can sell the rest.

This bike is turning out real nice so far, I have half a mind to pick up another Dahon Jetstream and build a spare (I actually already have another Dahon Jetstream, but it's a 2007 model and is just slightly different enough that I'd need different mounts, etc.)
 
Two related updates:
1) Even with just 6s, this thing has some excellent low-end torque. I'll certainly have to get my V3 CA installed ASAP to have some throttle mapping take some umph off the top! I gave it too much throttle on my first long ride, it wheelied and threw me straight to the ground!
2) My rear brake is a Magura HS33 (hydraulic rim brake). Having ordered/received a bleed kit, I found the time today to install a pressure based brake e-brake cutoff switch. Again, I need to install that V3 CA to make it functional. I have a kit on the way from bikes.ca full of JST connectors that will allow me to wire the CA up nice.
 
OK, made a small change today that has made quite a big diference!
I swapped out the 13t drive freewheel for the 16t. That dropped my secondary drive reduction from 4.07:1 to 3.31:1 (13t / 53t is now 16t / 53t). This has had several impacts:
1) Loss of torque. This is a good thing, there's less wheelie danger. This is a commuter bike, not built for thrills.
2) Higher top end speed. Nice. This is subjective, I don't have a speedometer installed yet.
3) Less friction. I can feel a noticeable reduction in drag when pedal only performance.
4) Less noise in the freewheeling chain. I like that.

Also, moving from an odd number of FW teeth to even means loss of 1/2 link of chain. That's a good thing, the chain line is almost tight enough to run without a tensioner at all. I'm leaving the tensioner in the loop for now, when I'm in a better position to do testing I'll try without the tensioner.

Here the two FWs look the same
DSCF3355.JPG


But this picture shows the reality - there's definitely a difference.
DSCF3357.JPG
 
crossbreak said:
The fact that you dont need a tensioner is great :D

I almost wanted to ask you if you would like to add a different kind of tnesioner, one that varies distance between the shafts.
bultaco-montesa-rear-alloy-chain-tensioner-pair.jpg

I just like using them ;)
Wow I'll do some looking into them, they look like they can definitely solve problems, perhaps on my other bike.
 
crossbreak said:
Also have a look at bended alloy ... it's too easy, cheap and helpful to miss :shock:
I definitely want to pursue this now. My hose clamp was not strong enough and it snapped. One of those two pictured there:
DSCF3337.JPG


In a heartbeat, the FW went out of line and threw the drive chain. In about 1 rotation of the rear wheel, the chain wrapped tight and stopped the rear wheel to zero RPM. Good thing I was at the very top of a hill, slowing to stop at a stop sign - I could be covered with road rash if this happened at speed.

So, I've removed the entire drive system until I fab up and install respectable drive mounts. Back to pedal-power only for me for a while!!
 
I also learned it the hard way ;) i like pedaling but i'm a hill hater, too.

keeping the distance between the shafts is the key. I used to install a bar between them. A bar bends. then I used two bars, screwed together with bushings. That helped a lot. I also postet this in my turnigy 80-100/ gearless-hub/ tongxin roller-drive mid-drive project.

The best admit in IMO is to install two freewheels on a transmission-hub, one for the motor, one for the pedals. This way we still have one chaindrive to fail :D

I'd like to use an 3-speed old sachs and try, but atm , I don't have time for this. Good luck with rebuilding your mounts, keep us up
 
No pix, but spent a couple hours tonight installing a V3 Cycle Analyst. My first CA install. I have the throttle input working and the e-brake cutoff too. Tomorrow morning I'll be soldering a wire on the CA board that will give me proper throttle output (I hope, if I don't short it out), which will be awesome. I'll certainly be using lots of other CAv3 features later on, but for now all I wants is throttle mapping, e-brake cutoff, and some basic Drain Brain functionality
 
Spent a little more time today working on the bike. Bottom line up front: a good crimper is your friend! I'll be ordering a crimper for JST connectors ASAP.

First I spent a couple hours creating a 10s2p pack for the bike. That's a decision based solely on light weight parts that weren't designed to go over 35mph.

Next I got the CAv3 to a point I can live with for a while. Specifically, I have the speed sensor installed, and JST connectors for throttle-IN, e-brake, and throttle-OUT built up and installed. I learned a lot along the way. Near-future enhancements will be wiring up a DC-DC converter so I can run the front lights off the CA, and after that wiring in temp sensors for the controller and the motor (which to date have only just become warm with some decent uphill riding).

I was able to ride the bike under the exclusive control of the CAv3 today. I didn't have a speedo before so I don't know what my top speed is. But at 6s, I got just over 20mph. Not bad... but my gearing was topped out, so I might end up installing a smaller rear cog to keep pedal assist as an option at higher speeds (10s, 12s...)

Looking back on the day, I spent trivial amounts of time wiring up Andersons (I have an Anderson crimper) and a lot of time/effort/energy putting JST pins onto wire (using a crimper that's not designed for JST, but "close"). The Sparkfun crimper is $60, it's worth it considering I'll probably have to re-wire half the JST's I jury rigged today, and that I'll be doing another batch of JST's for my other build once I get to the electrical system installation.
 
Also...
First thing tomorrow I'll be dialing the throttle ramping way down on the CAv3. My one check-ride was fraught with front-wheel lifts from even slight bits of throttle twist. The previous solution of using an eleven dollar e-bay servo tester worked better... but with the caveat that I have done nothing CAv3-wise with respect to torque limits, throttle-ramp, or even throttle-OUT range mapping. I put those off intentionally figuring I wanted to get my packs all set up nice first.
 
Alan B said:
Took me a long time to get around to paying $60 for that tool but it has been appreciated. It is pretty well made.
Thanks Alan, that put me back on track and the order is submitted. I was starting to lose interest, but I had trouble today with some of my first connections, and the time lost troubleshooting was awful.
 
Once I realized that after 5 years orbiting the 'Sphere, I not only joined the EV Grin club but I also joined the M.E.N.S. club, I had to think of a more fitting name for the folding bike. So here goes: The MENSTRUAL Cycle:

Motorizd Electric Nonhub System, Torque-Raised Ultraportable ALuminum Cycle.
 
MattyCiii said:
Once I realized that after 5 years orbiting the 'Sphere, I not only joined the EV Grin club but I also joined the M.E.N.S. club, I had to think of a more fitting name for the folding bike. So here goes: The MENSTRUAL Cycle:

Motorizd Electric Nonhub System, Torque-Raised Ultraportable ALuminum Cycle.

Will it bitch and nag about everything once in awhile? :lol:
 
MattyCiii said:
So far it's been totally useless 5-7 days every lunar cycle. :lol:


Huh, maybe this is why the race bike is so damn bitchy about being ridden hard sometimes.
 
Back
Top