HowTo convert a MAC hubmotor to make the axle spin
this is an alpha version, i do not own the MAC so enjoy this with care, dont just start this but think about it and tell us before you do something you might regret.
Tools needed:
-3-arm puller
-snap ring pliers
-bench vise
-drill set (at least 3mm, 4mm, 5mm)
-M5 screw tap and iron
-file
-sandpaper #200 for use with steel
-disassemble, like shown here:
http://www.ebikessf.com/disassembled-bmc-motor, make sure you wear good leather gloves when removing the rotor. The strong magnets can easily hurt your skin if something goes wrong.
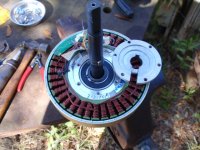
- unscrew this plate remove it, remove also the snap ring
 EDIT: You dont have to get off the rotor from the shaft if you use a eZee motor. It is hard to do that and may damage the rotor with eZee motors as StudEbiker sadly had to experience
  Instead pull out the shaft. I'm a little confused how exactly this procedure differs between MAC,BMC an Ezee motors. How this is done with these different motors will be posted here soon.
This picture show how forces have to be applied to get the axle out:
StudEbiker said:
You need to support the stator through the openings in the rotor somehow and then pound out the axle from the side opposite the sun gear. There's really not even a need to remove the gears for this conversion as they will come off with the rotor.
Or you can make a puller like Mr. Electric did.
http://endless-sphere.com/forums/viewtopic.php?f=28&t=45245&start=225#p678899
mrelectric made a special puller for this purpose from a steering wheel puller by reshaping it on a grinder:
- remove this key

- use #200 sandpaper (should be purposed for use with steel) and grind the piece of the shaft where the stator is placed on (where the key was) a tiny bit down. You can stop this if the shaft can be turned in the stator carrier easily by hand. Lubricate this surface.
-dremel off at least 1mm off this advance on the stator carrier, maybe you must place two shim washers (high precision washer) where it was. Dont know since I have not seen a detailed pic of the bare axle yet. With my bafang this was necessary. We have to discuss this point, maybe you first try assembly without grinding this off and look if the axle may spin.

-make the heat bridge. It is a ring with 6 holes which replaces this part by a much thicker one that connects the hub side plate and the stator
View attachment 3 Dont know how thick this it has to be, the one I made for my bafang is 6mm thick. Use the original part as a former plate. Drill 6 holes into the hub side place, again using the old part as a former plate by putting it on the side plate and center it perfectly using the axle, use a drill dia that perfectly fits the holes of the old part (maybe 3mm?) . It is really important that this is centered right, otherwise the shaft will slip and do friction, only tiny bits of misalignment can be balanced during assembly, maybe 0.1mm, but not more.
- bore out the six existing holes in the stator carrier with a 4mm drill, cut M5 threads into it using a screw tap.

. Make sure you move it back and forth, and use lubricant to prevent the screw tap from breaking. Drill out the sideplate and the heat-bridge using a 5mm drill. Make sure all holes keep being centered perfectly.
- assemble, frequently try if the axle may turn during assembly. You should leave the planetary gears and clutch out for the first tests. The first stept in assembly is the axle, then screw on the heat-bridge and hub-side-plate using M5 screws.