Giant trance 29er electric

All is not lost,
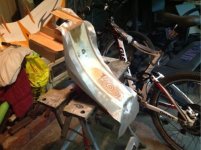
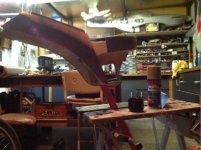
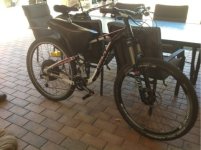
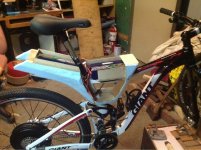
Two swoops with the wrecking saw and were back in business, I took it for a pedal round the block and its fine, I just have to get used to the shape, a bit more here bit less there I recon ill be able to live with it,with the idea of most of it being covered by legs when ur going.
What y'all think
 

Attachments

  • image.jpg
    image.jpg
    149.1 KB · Views: 2,176
This one with the covers on , held in with about 50 tuff little magnets
 

Attachments

  • image.jpg
    image.jpg
    149.2 KB · Views: 2,176
I've been a bit concerned about where the torque arms finish on the swing arm thinking that they may make a stress point where it might crack I put a dint in my other giant all to easily they are quite thin,also bolting up the front plates I could crush the swing arm , I just noticed it had a hole in the dropout going up the tube there I recon I might push an earplug or something down there fill it with epoxy and shove some carbon rovings up it, get my bolts a bit tighter then 8)
 
Oz, what are the specs on the GM controller? it looks very compact. Where did you get it from? I am putting my batts in and below the triangle. Still contemplating a mounting solution but I know it will fit so the easy part is done.
 
It is nice and small that's good
Not sure these units are all there cracked up to be
May go to a Kelly I think
 
Just looking at it I recon I might put the two front batts below the crossbar on top of each other, controller on top of crossbar, might allow me to have a bit bigger space for a better controller, and a better overall shape
 
Did a bit of wire joining today, I had to see how it went with the little controller ect.took it for a spin.
Result wasn't to bad I spose, still nothing getting hot with the big wheel,and its doing about the same speed. Not quite as good off the mark as it was with the 28 inch wheel and supplied controller. Tops out at 40 k. I didn't touch the controller settings,just put it in.so I might be able to ramp it up amp wise a bit, seems like it will handle it.
My watts up was telling me its pushing 25amps , 1220 watts.
So I guess I'll dial it up till it pops and get another.
 
I've been away from it the last week doing a bit of griswalding with the family, I bought the speedict along trying to get it going
The galaxy s2 has trouble holding the Bluetooth connection, I downloaded the app to a cheaper Samsung android and it worked fine. So it looks as though I might need to learn how to root a phone, or whatever the hell needs doing. Give it an ice cream sandwich :?
Danny at speedict has been more than good helping with that.
The speedict mercury app looks fairly easy to get around, I look forward to getting that working
I get a bit of time on it next couple of days then nightshift for a week before I can hit it hard again.
Will post more pics when it gets changed around a bit at the front, make smaller above and below the cross bar.
 
pendragon8000 said:
This build looks RAD!
Keep up the good work. Don't be to harsh on yourself about your build. I was the same, yours will look pretty sick once painted I reakon. More photos :)

Thanks for the kind words there,
It's not quite come out as I thought, but we move on. It should be fairly functional in this configuration.
At this stage I'm not that concerned about the weight high back, the last 6 months or so ive been dieting, and I recon I've lost more weight in chins, and that's up higher again.
 
NeilP said:
29 and full sus..that is going to be one smooth ride
The bike shop initially talked me out of buying a susspention bike, because of bob whilst pedalling
So I bought a hard tail, thought about it for a week or so, I go stuff it I got a motor. And bought the trance.
Glad I did, it's a great bike, and the bob whilst pedalling for what I do is really minimal, and to have both front and rear actuall suspention, not just springs is so good. Surprising how well the little rear shock can soak up the bumps.
The bike itself is different than anything else I have ridden, and the first grunter I've owned that I actually fit on ok, its unusual how much front wheel you see when riding. I had a short go of a mates normal mouintain bike when he had a go of mine while riding in the bush and it felt so wrong, I was glad to swap back before I hurt myself. It's nice to wheel stand too, but I must stop doing that as I just can't get using the brakes to stop from flipping it. I have pulled it over a couple of times and hit the ground having to run as fast as I can, that's just going to end in tears one day.
Were leaving the high country today so back to a bit of bike building tonight :D
 
pendragon8000 said:
Nice one. Looks like a fat seat. Btw do the you tube thing like this...[youtube]CEq9SSQ2LEk[/youtube]
Just use the bit after ?v= no spaces
Thanks man :) I was muckin with that for ages.

Well today I found out about the wonders of the aloe Vera plant.
Had my controller out , put it back in with the pos neg ass about, with the negative in on the deans give it a good shove to minimise spark and BOOM! Completely blew the positive terminal off. Burned myself pretty good.
I put my battrey checker on the packs and two were at 75 percent ( I had used them a bit) and two were at 43 percent???
Would this have been a result of the short or something whack in the way I have them wired up????
This is my battery connector ( tempory, I'm going to use ec5's as they are shielded both ends)
I really don't know how I let myself do something so dumb, and now have a more healthy respect for the voltage.
 

Attachments

  • image.jpg
    image.jpg
    41.9 KB · Views: 2,128
Looking looking thinking, this that. I now have so many little jobs to do I can't be bothered starting any of em .speedict, get another rom in phone, i dont know how to do that! i got a bit done today in between fixing the kitchen to make the new fridge fit (spilit the overhead cupboard and the pantry make another slot for cookbooks ) visitors, and the damn thinking!! I don't like pulling apart and doing again but I wish I could just get it together and build the thing, I'm over it. I haven't been able to put it to plan and this is how I do stuff, but seriously
This battrey holder has been an head f"@$()/ as far as it goes I have been making the front part and left the back till I could be fagged thinking about how it would finish up, and its not how I saw it, but now it is what it's going to be. Seems how things work shaping with the foam. Anyway I got a bit on the top so that should work to insulate a bit, and I have some flow through ventilation that I spose I did from making my model aircraft and stressing the battreys, they really need it. Here's a pic of the back coming together and my last foam battery project, I enjoyed making it much more, Mabee cause I had a plan of sorts. Still a great deal of improv.
 

Attachments

  • image.jpg
    image.jpg
    34.9 KB · Views: 2,088
pendragon8000 said:
You'll be right.. the pos neg mix up is fixable . You'll be loving it when its finished :)
Can't wait! still goes btw, I can't feel in the way it's working that its been damaged, so that's a blow out,or not :D
I have tested it so I know what I'm in for with the golden controller, just gets along nice. I did get a 12 fet from cell man witch looks much more substantial ,still fairly small but won't go straight in, so I put it back in the box for now, had enough head bending already. I've had a pretty good session on it and I'm finally glassing. I took the thing off and it actually looks wrong without it, the bit of final shaping went well so all in all I recon its going to be all right :)
Glass will be on tonight then back day shift for a week so that should give it a chance to harden up and start preparing for paint at last.
 

Attachments

  • image.jpg
    image.jpg
    40.9 KB · Views: 2,063
yeah nice one. its funny how our brains adjuist to how something looks. i had the same thing with my bike. something different takes time to adjust to then you can see if its good or bad or whatever...

did you vacume bag the glass? someone told me thats a good way to get a tight finish.
 
pendragon8000 said:
yeah nice one. its funny how our brains adjuist to how something looks. i had the same thing with my bike. something different takes time to adjust to then you can see if its good or bad or whatever...

did you vacume bag the glass? someone told me thats a good way to get a tight finish.
Na, just as you see it. I'm guaranteed to be filling pinholes for a while but it will do what I want it to do, if I have any bits that won't conform I will place glad wrap over it and put a shopping bag full of sand on it. But just coating the part with resin draping the cloth over then dabbing it on to wet the glass through seems to work fine and it will go where you want it too mostly.I think the cloth is only 2 ounce so it folds up good. it will help some for strenth but mostly just to get a nice thing to paint. do intend vaccume bagging at some stage but it will be wings, I'm building a 1/4 scale mustang, I recon I will bag the wings on that, the wings on that are 2.7 metres 600 mm at the root. Better shape to bag. this is all over the place, with five separate pieces.
Thanks for showing some interest man, I appreciate it.
What is that right angle stuff you used on your machine used for,that looks like handy stuff, it's like plaster angles . Some of my corners are thin to the point if I hold it up I can see through in spots, but I have reinforced with carbon fibre here and there on the inside, so hopefully it will hold up ok. I just have to remember it limitations.
If I get amped and I want to go "missing trees" I will drag my 300 2stroke dirt bike out an do it at 90mph :twisted: though that's had a bit of a rest the last few years after nailing a roo (or should say it nailed me) .
5am, time for bed.
 

Attachments

  • image.jpg
    image.jpg
    27.9 KB · Views: 2,058
Finally some paint!
Started after sanding the resin down by using a water based aerosol grey primer, it dried really quickly showed up all my pinholes good , couldn't help but rub them all full of wet paint with my finger so hopefully there all gone and it will knock down fairly quick and start to get close to being able to top coat. Thanks to the really long dude at bunnings for a bit of help . The west systems epoxy resin can be coated with anything really but rubbing edges and the pinholes especially filling them with auto type fillers ect melts the foam , so I recon this water based primer is good stuff, drying So quickly it worked well for getting rid of the pinholes. I hate pinholes.
 

Attachments

  • image.jpg
    image.jpg
    33.3 KB · Views: 2,172
pendragon8000 said:
Sounds like u should get a nice finish.
its starting to come up
colour in a couple days, in between 12 hour shifts
and a bit during :wink:
 
Back
Top